# Payment Gateways
# PeGePay Ambank Duitnow
# PeGePay Setup Guide
## Login
1. Open URL PeGePay: [https://pegepay.com/](https://pegepay.com/) Click **LOGIN** Button[](https://docs.antlysis.com/uploads/images/gallery/2025-02/b2bh7IIWl0S22KOc-login.png)
2. Enter email address and click **CONTINUE** button [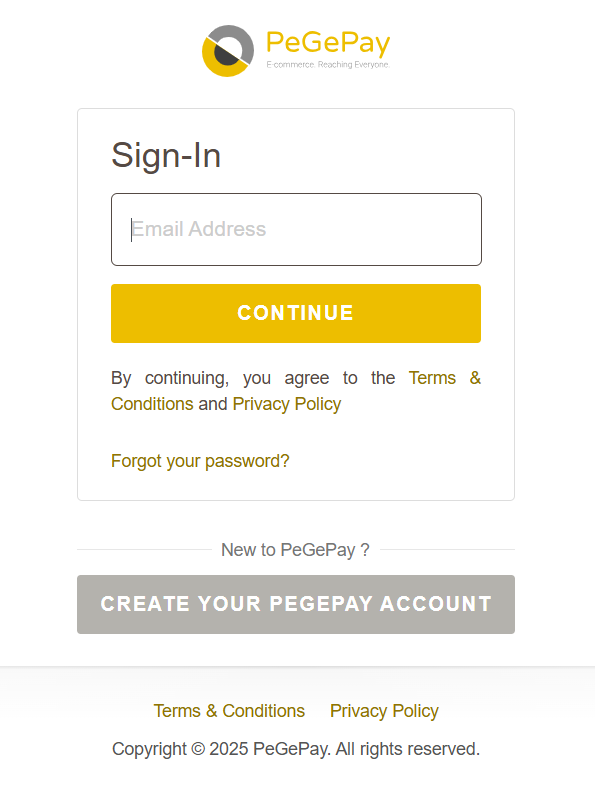](https://docs.antlysis.com/uploads/images/gallery/2025-02/YdBlmDMqUDWoTFAO-image.png)
3. Enter password and click **CONTINUE** button [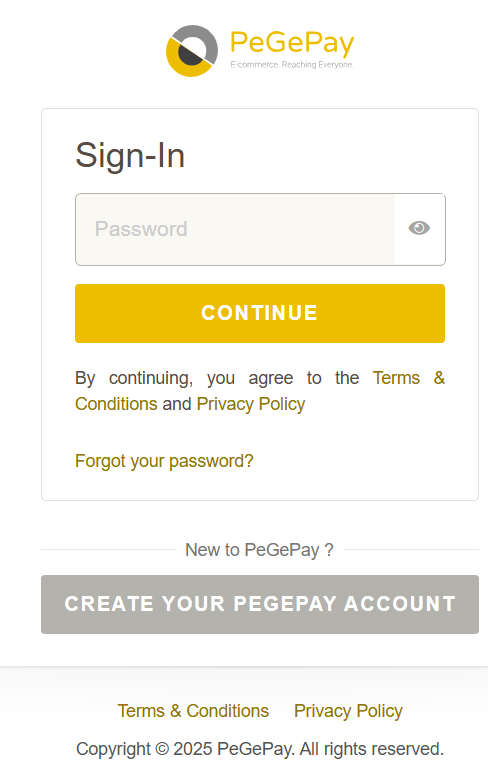](https://docs.antlysis.com/uploads/images/gallery/2025-02/76zH124CA7yf15Gj-image.png)
4. Enter verification code and click **ADD DEVICE** button, if verification code expired, click **RESEND CODE** button ## [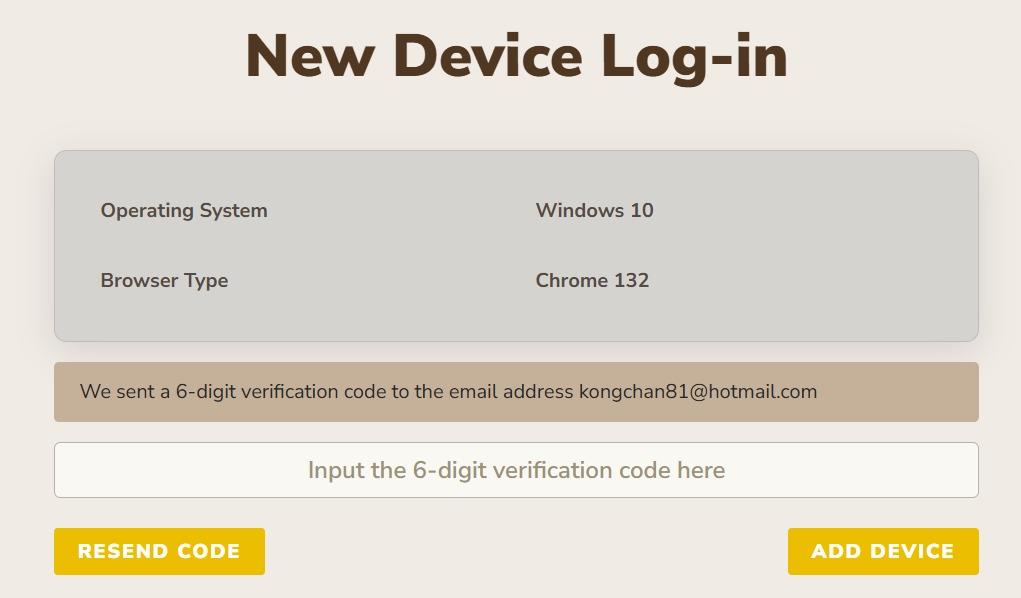](https://docs.antlysis.com/uploads/images/gallery/2025-02/VgA1oXz3qypSITHv-whatsapp-image-2025-02-19-at-11-06-25.jpeg)
## New Account Setup
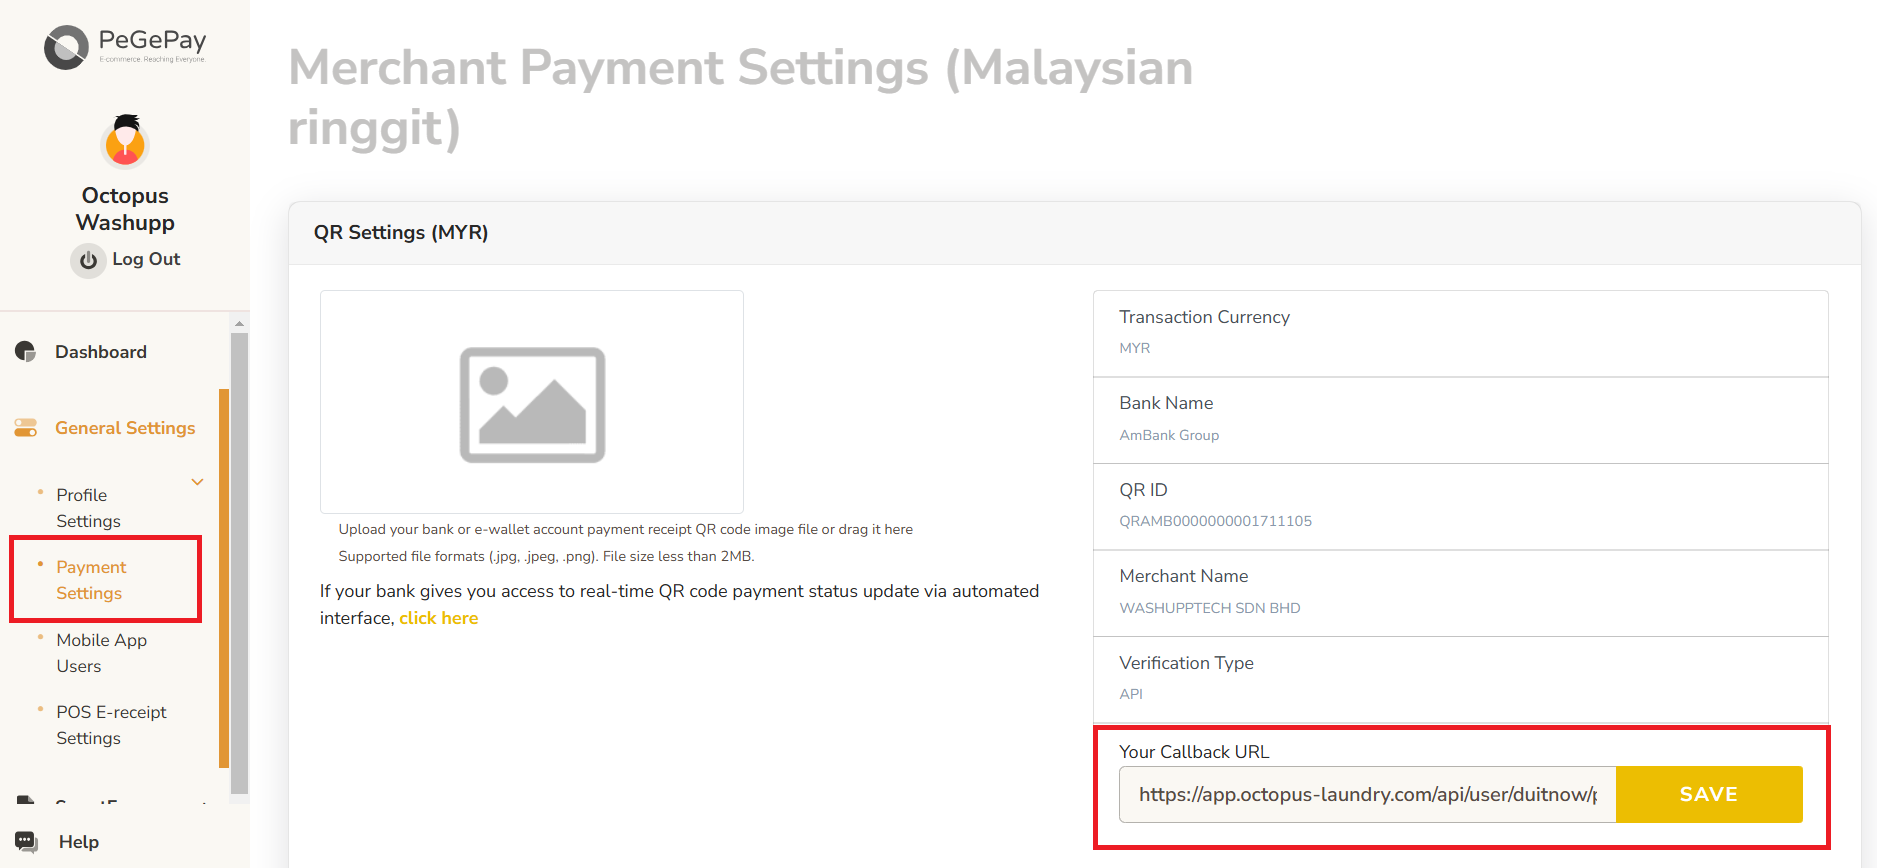
5. If it is a new account, have to set callback URL. From sidebar, click **General Settings**, click **Payment Settings**, enter callback URL and click **SAVE** button.
Callback URL:
## [](https://docs.antlysis.com/uploads/images/gallery/2025-02/JuaxUII9IyMlGavb-callback-url.png)
## Generate QR Code
### Dynamic QR Code
NOTE: if already setup dynamic QR code, when click **REGENERATE KEY**, all the old key will be expired and need to update to the latest key
6. From Sidebar, click **General Settings**, click **Payment Settings**, under **No PeGeFlash Display/Interactive Online/WhatsApp QR**, click **ADD DEVICE** button, then copy the Onboarding Key and paste into Laundro Portal [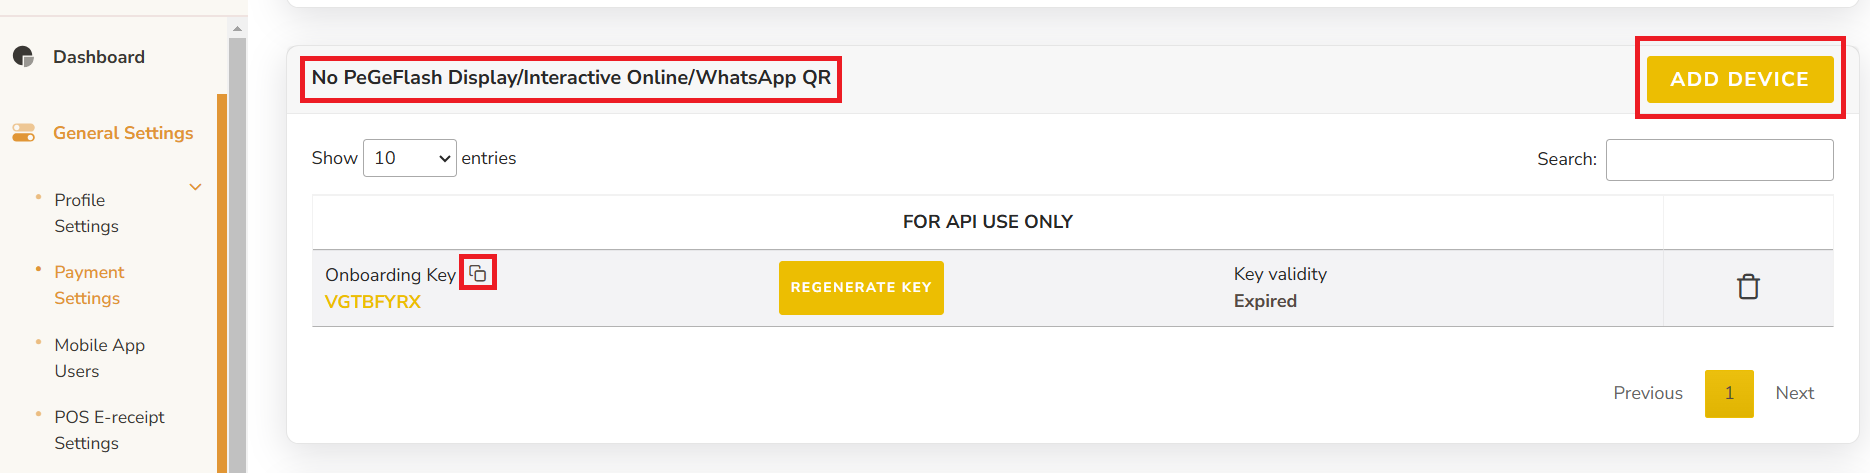](https://docs.antlysis.com/uploads/images/gallery/2025-02/8hIKYifMUYEyC9JC-dynamic.png)
7. In Laundro Portal, go to Settings Page, under Payment Gateway Config, select **Add DuitNow Config**[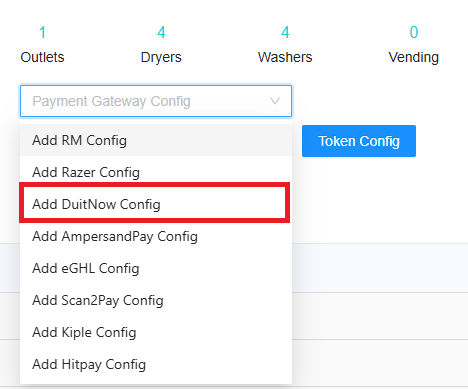](https://docs.antlysis.com/uploads/images/gallery/2025-02/FrlzYHG7EcBl66be-laundro.png)
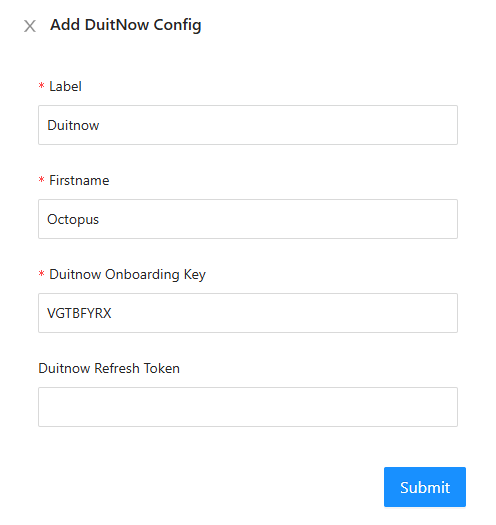
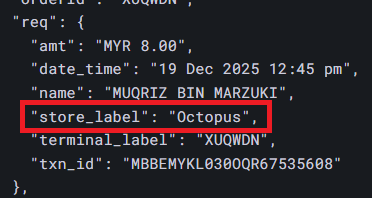
8. Input Label, firstname and paste the Onboarding Key from PeGePay into Duitnow Onboarding Key input, then click **Submit** button. The Firstname have to same with the store\_label in static Duitnow callback URL. If you want to use back the old Duitnow Refresh Token, you can just copy and paste in Duitnow Refresh Token input.
[](https://docs.antlysis.com/uploads/images/gallery/2025-12/VjhLFtrNNtXVFOhg-image.png)
[](https://docs.antlysis.com/uploads/images/gallery/2025-12/WdCJENXElEHkSRsH-untitled.png)
9. To enable DuitNow in machine payment page in loyalty, in outlet settings page, under **Duitnow Config**, select the config and save [](https://docs.antlysis.com/uploads/images/gallery/2025-02/Hjv0S3O1Yl7lghF9-laundro-duitnow.png)
10. To enable Duitnow for eToken reload in loyalty, click **Token Config** button [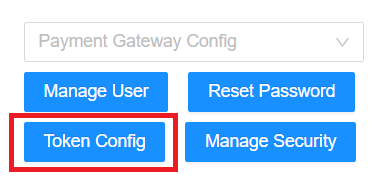](https://docs.antlysis.com/uploads/images/gallery/2025-02/MtPQA5OToAACx1Wa-laundro-token-config.png)
11. Payment Gateway select Duitnow, and select the duitnow Config, then **Submit** button [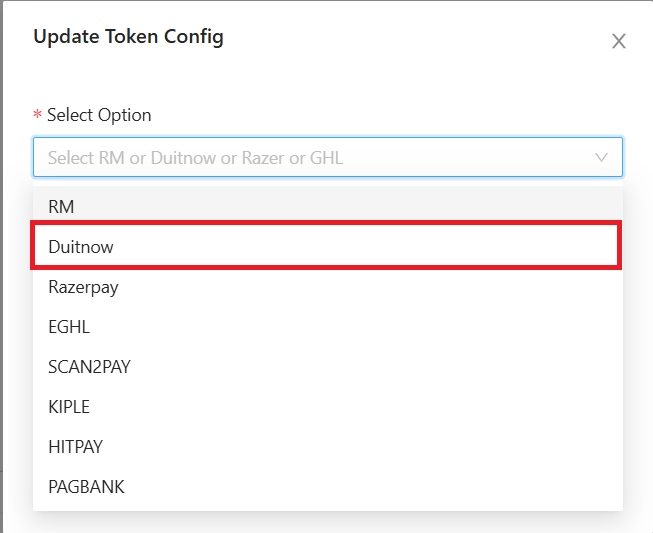](https://docs.antlysis.com/uploads/images/gallery/2025-02/P52TdSkF5bX9qOAw-token-duitnow.png)
### Static QR Code
12. You can get the static QR code from https://pegepay.com/iframe.php?merchant\_id=<merchantID>, replace <merchantID> with PeGePay merchant ID [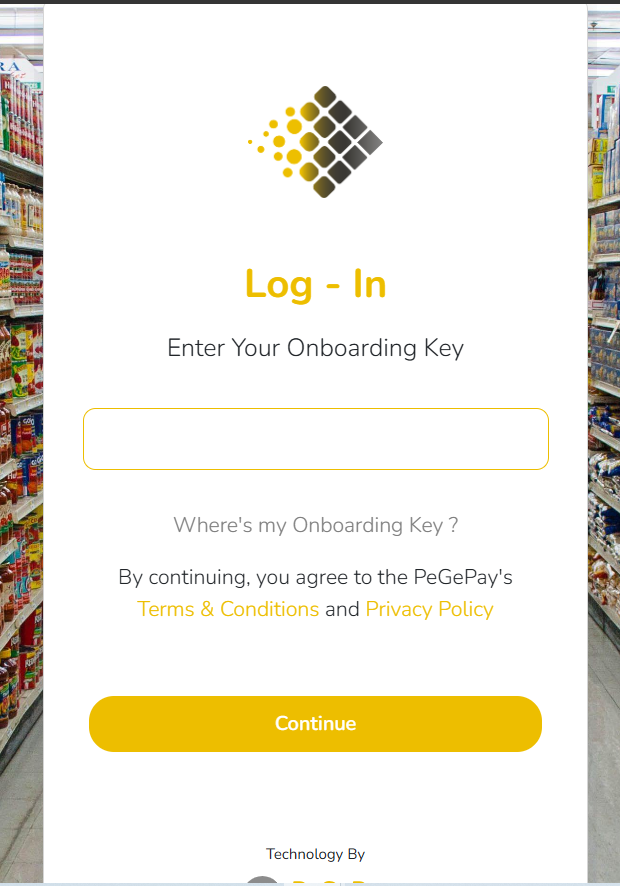](https://docs.antlysis.com/uploads/images/gallery/2025-02/r2qotBX9i8t67opx-image.png)
13. To get the PeGePay Merchant ID, you can get from **Payment Settings** Page, for example, M100000245 is the merchant ID and you can open the url: https://pegepay.com/iframe.php?merchant\_id=M100000245 [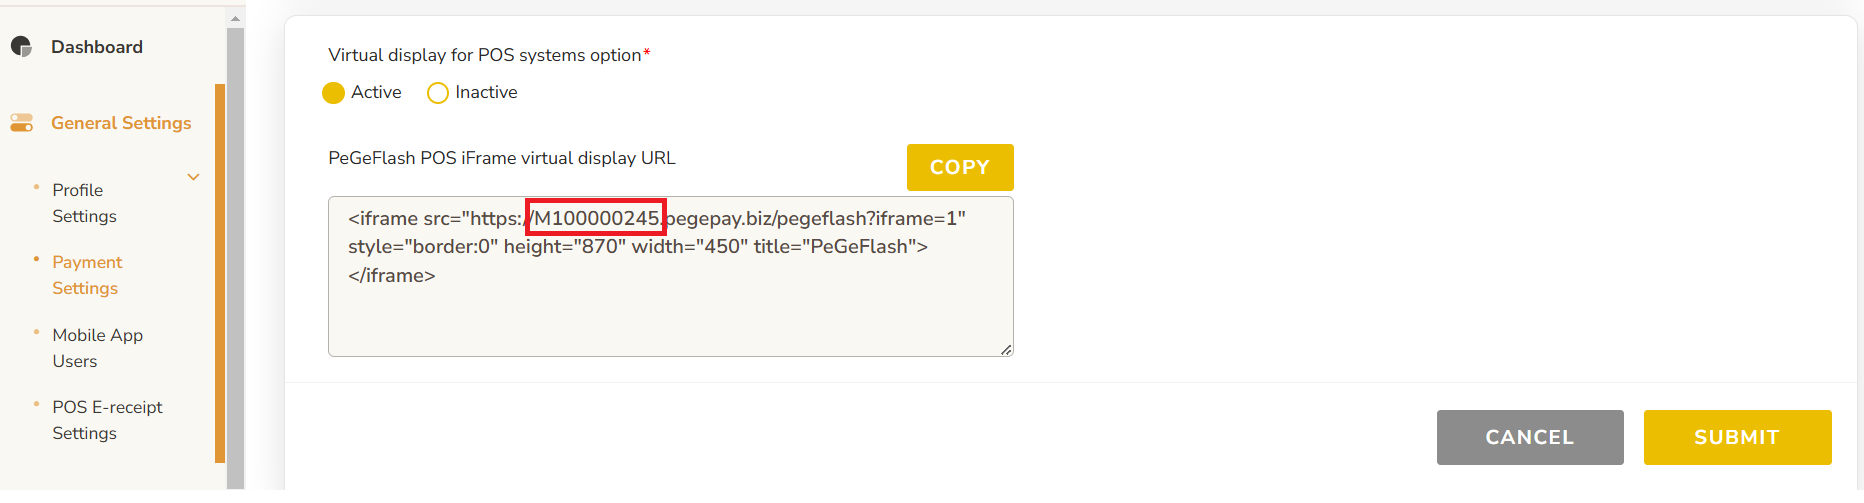](https://docs.antlysis.com/uploads/images/gallery/2025-02/QjgwWO7BvJZAVfRs-merchant-id.png)
14. From **Payment Settings** page, under **Static QR Buddy**, Click **ADD DEVICE** button
[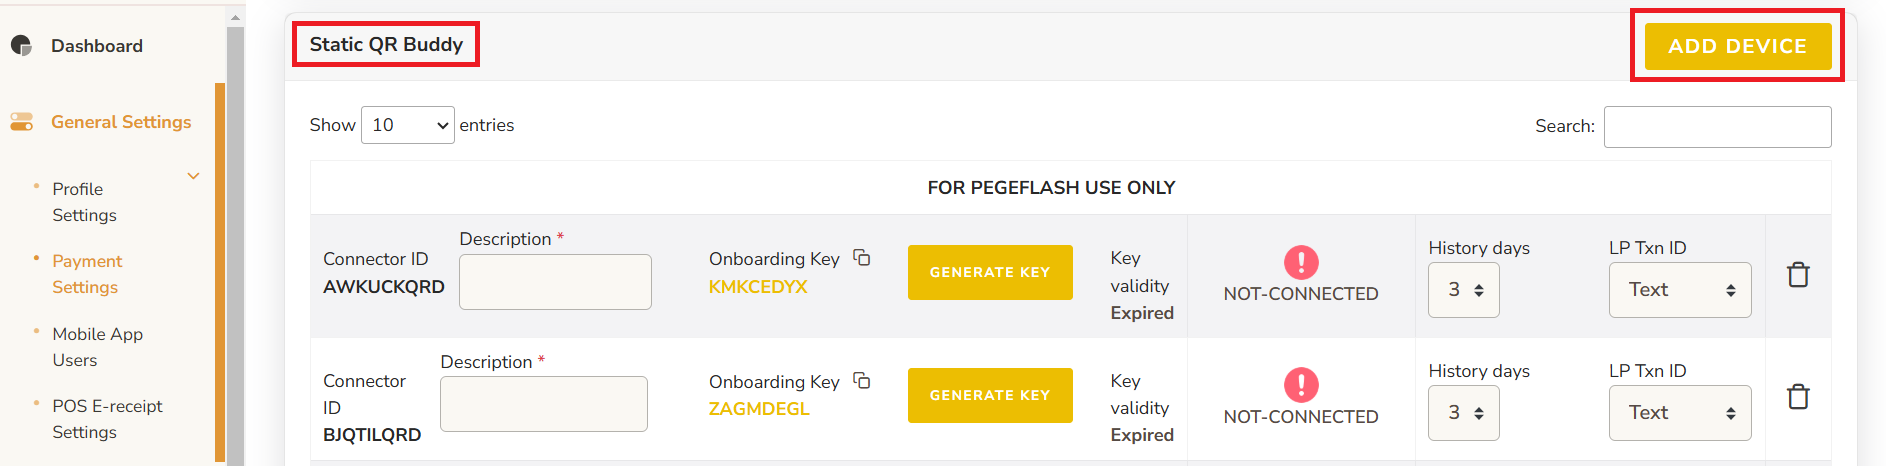](https://docs.antlysis.com/uploads/images/gallery/2025-02/XJeAAjlK5R3N3kHa-add-static.png)
15. Enter the description and click **GENERATE KEY** button \* The new connector ID will be empty Onboarding key and key validity, if already have onboarding key and key validity that is old connector ID[](https://docs.antlysis.com/uploads/images/gallery/2025-02/t6xU1B7tPyxwpMZz-image.png)
16. Copy the Onboarding Key, the key expired time is showing on Key validity [](https://docs.antlysis.com/uploads/images/gallery/2025-02/nlbnjieAe7twNHgn-generated-key.png)
17. Paste the Onboarding Key to static QR code page and click **Continue** button [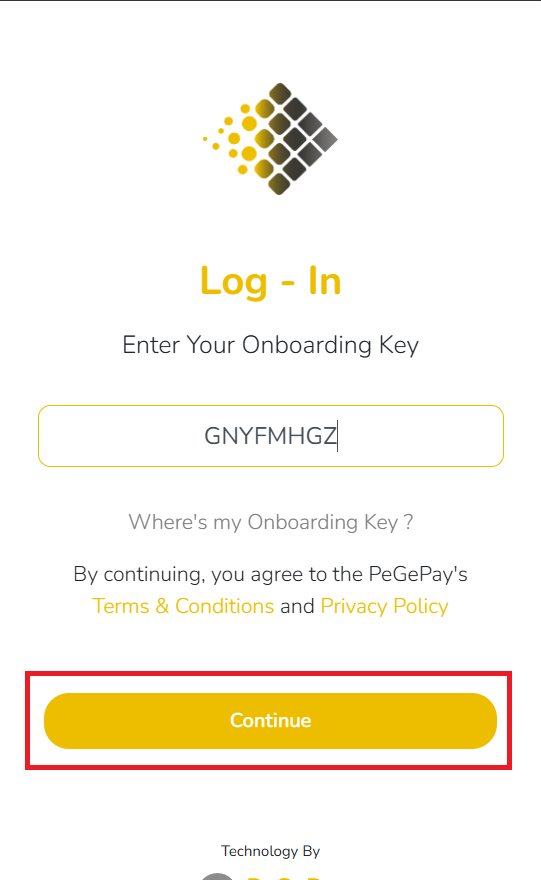](https://docs.antlysis.com/uploads/images/gallery/2025-02/cXElWA1yGDzbe32k-enter-onboarding-key.png)
18. The Static QR Code is showing, you can screenshot the QR code with the company name [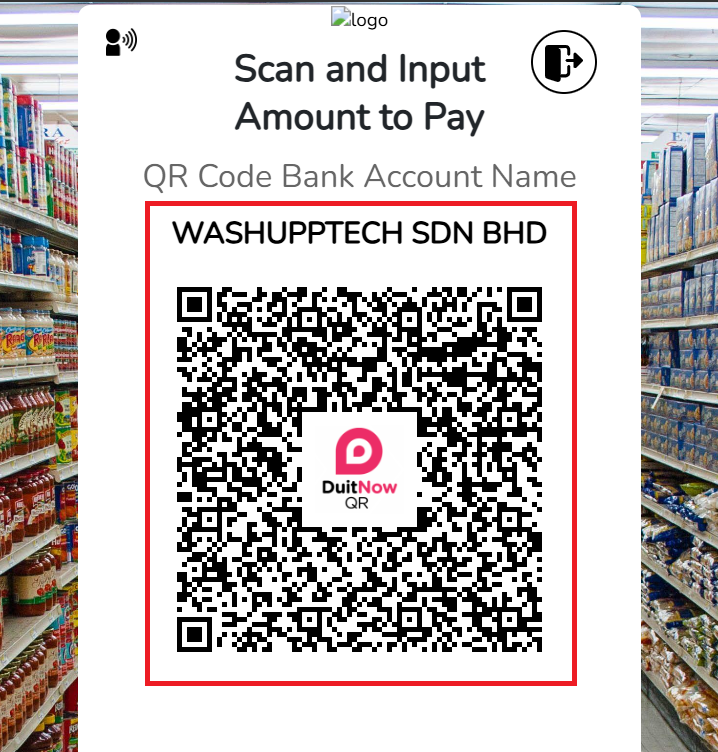](https://docs.antlysis.com/uploads/images/gallery/2025-02/dlZ6IcDBnPXHdqc0-qr-page.png)
19. When the static QR code is showing, it will show CONNECTED, copy the first 6 character of Connector ID and paste into Laundro Portal, no need to copy the last three character (QRD), QRD is stand for QR Display [](https://docs.antlysis.com/uploads/images/gallery/2025-02/UWDyraKNeQt5Otd1-connected.png)
20. In Laundro Portal, in machine settings page, paste the Connector ID into the input and click save [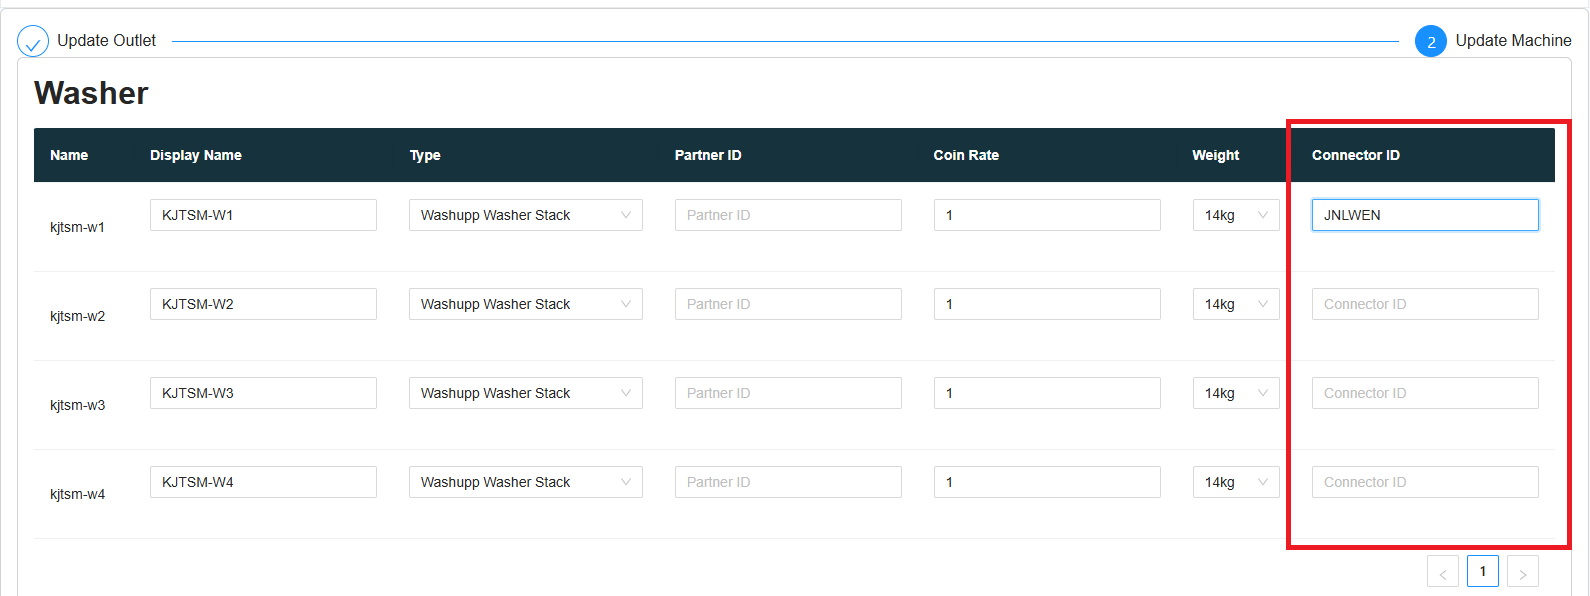](https://docs.antlysis.com/uploads/images/gallery/2025-02/7Gx5sHkHronfzwZy-laundro-connector-id.png)
21. To generate the second machine static QR code, you can click the icon at the bottom of the page [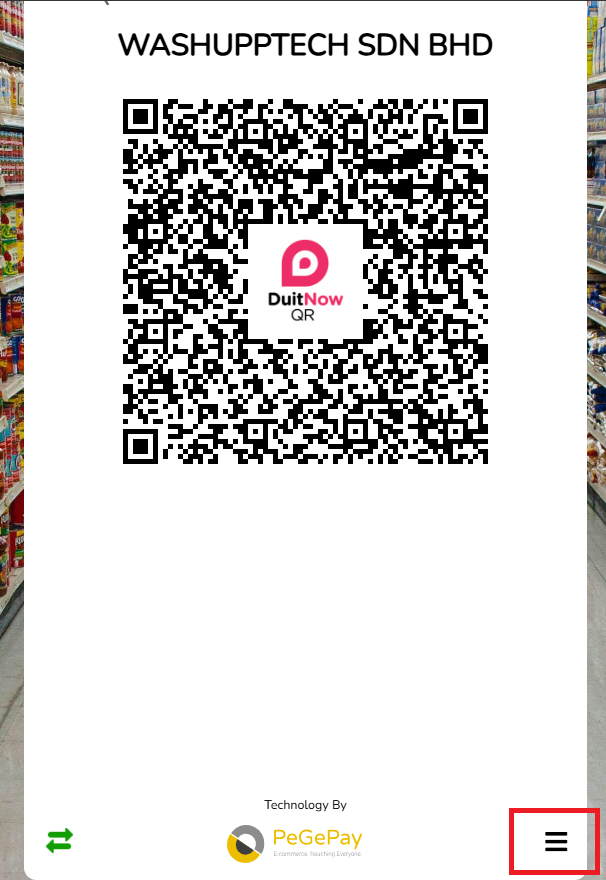](https://docs.antlysis.com/uploads/images/gallery/2025-02/G0B2y8ENptMrnlyr-logout.png)
22. Click the Change Log-In button to logout [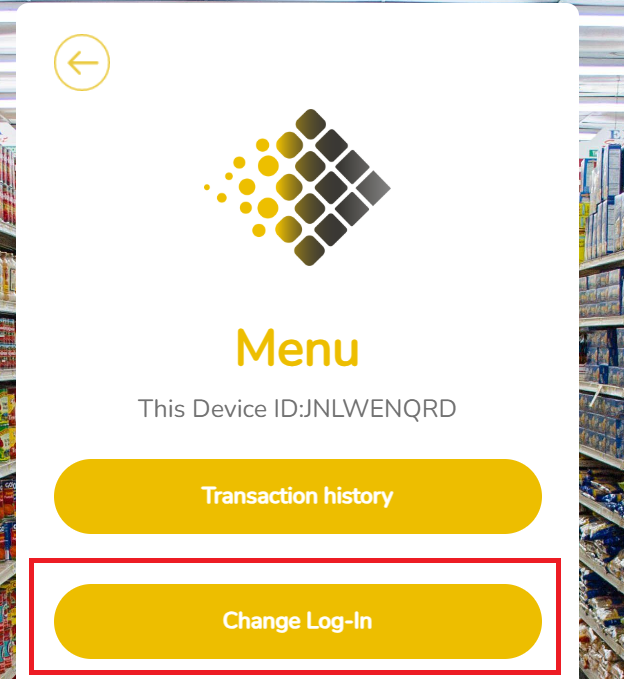](https://docs.antlysis.com/uploads/images/gallery/2025-02/wLVpc75hzBErmpxd-change-login.png)
23. Click CONFIRM button to confirm logout [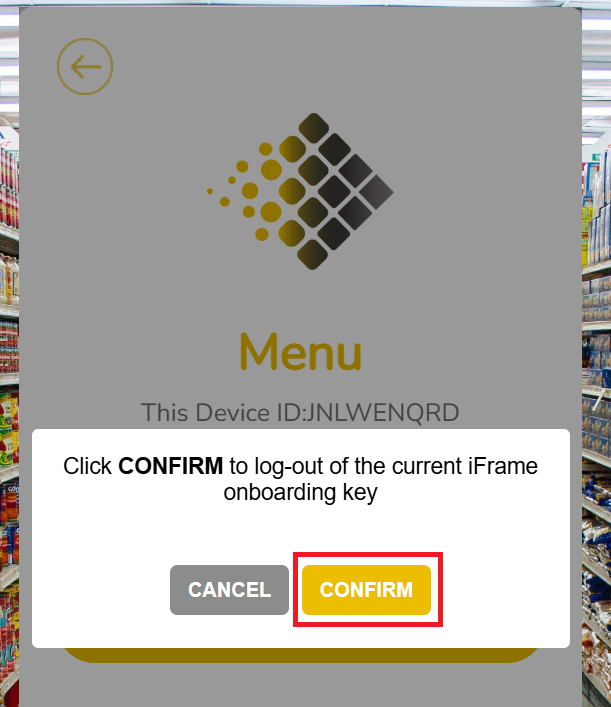](https://docs.antlysis.com/uploads/images/gallery/2025-02/2kvq1z3u1ArYF7iW-confirm-logout.png)
24. You can repeat the step to generate the static QR code for all the machine
## Transaction Checking
### Static QR Transaction
To check the static QR code transaction status, from sidebar, click **Transaction Log**, click **Static QR Buddy Transactions**
[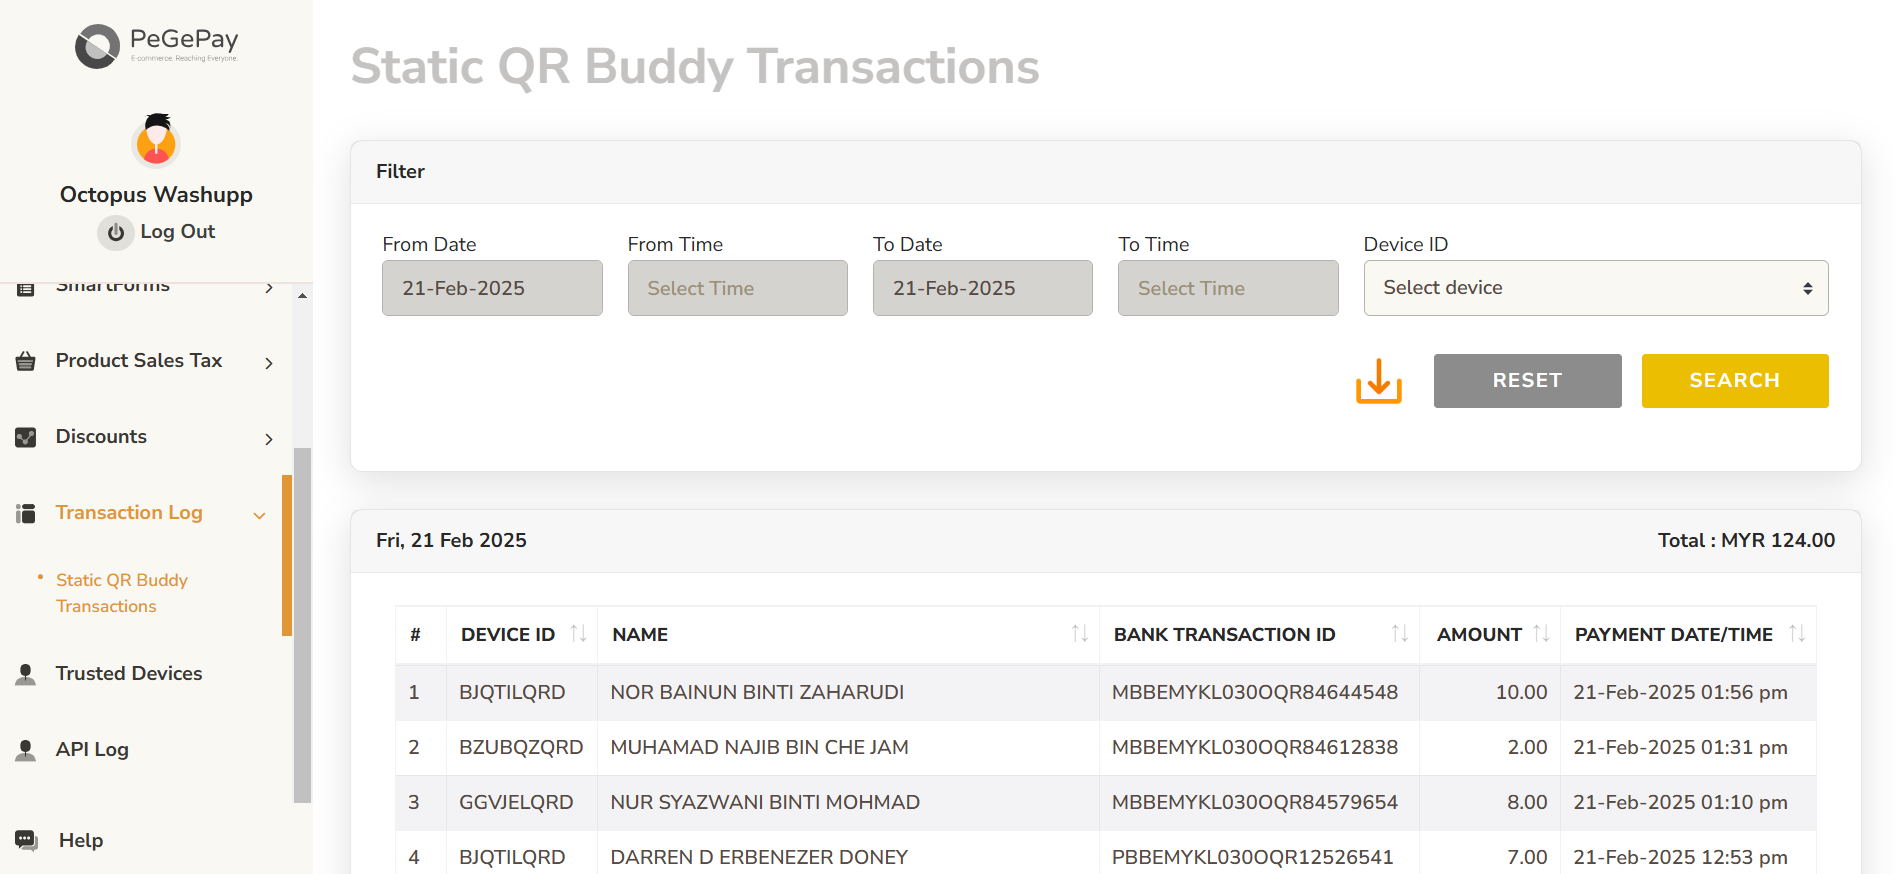](https://docs.antlysis.com/uploads/images/gallery/2025-02/if5jqQ2yZnoJXr0l-image.png)
### Dynamic QR Transaction
To check the dynamic QR code transaction, from sidebar, click **API Log**, you can click the icon to check for each transaction
[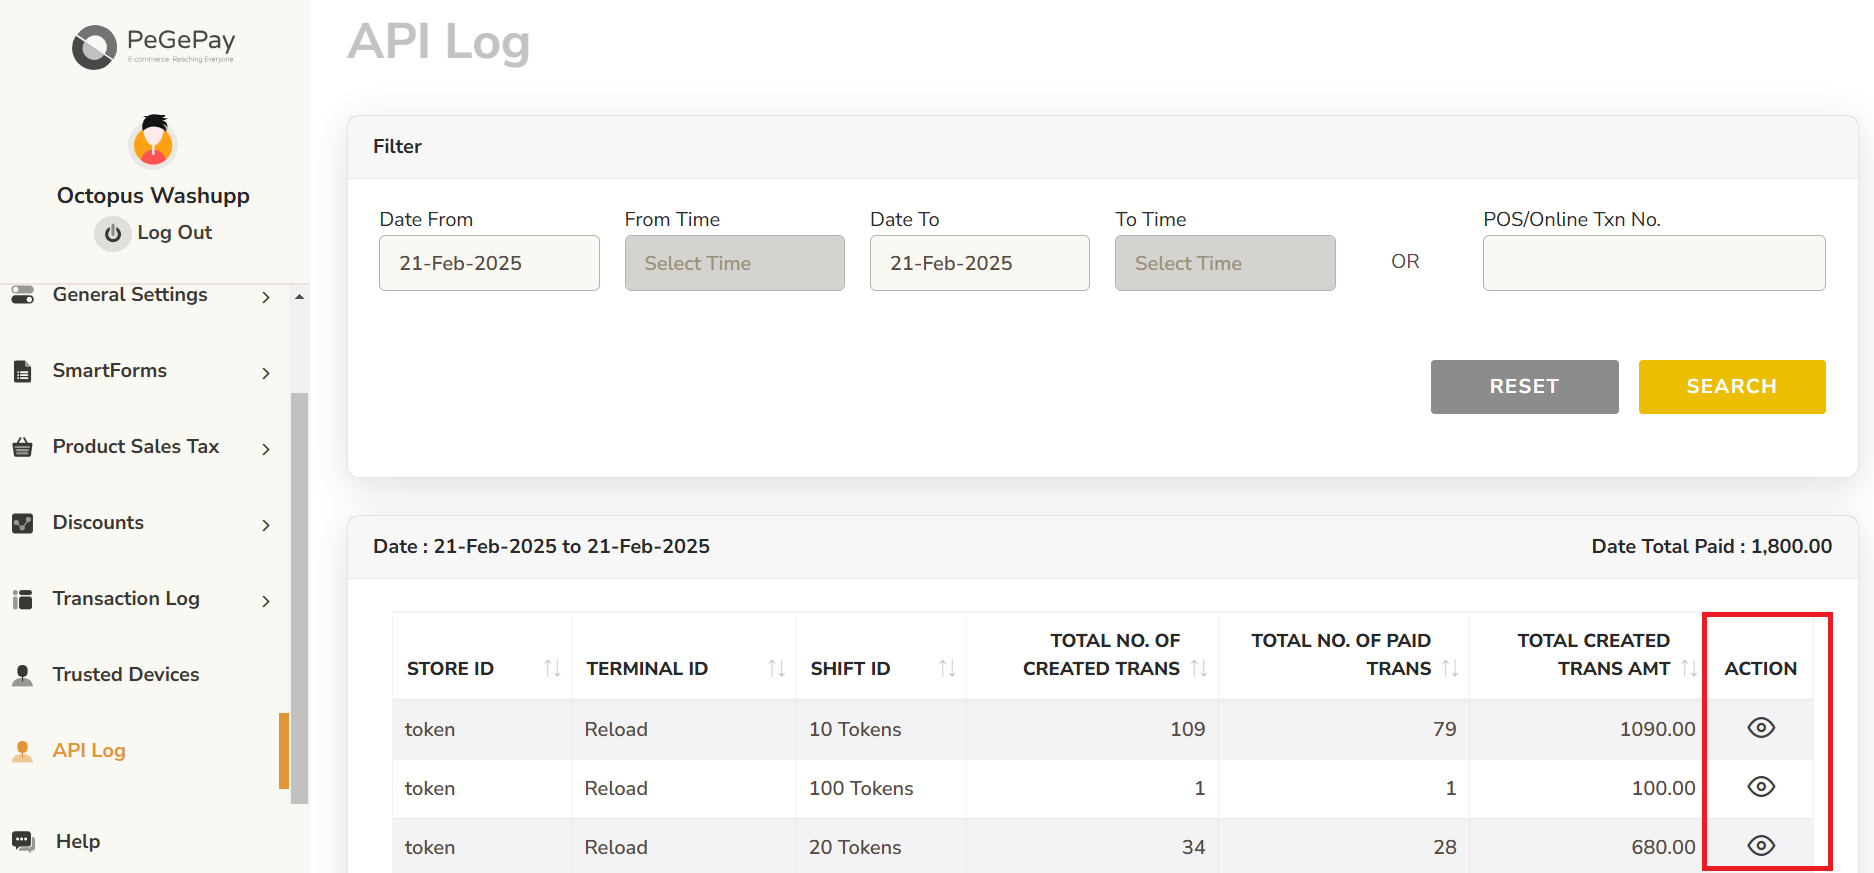](https://docs.antlysis.com/uploads/images/gallery/2025-02/rZnpmvhw1I33dRzS-dynamic-trans.png)
There will be 3 status
**UNPROCESSED**: the QR code is generated but the user didn't make the payment
**SUCCESSFUL** (yellow): payment the successful
**SUCCESSFUL** (red): payment duplicated, the user using the same QR code to pay 2 times
[](https://docs.antlysis.com/uploads/images/gallery/2025-02/DIImpi7ppzwS2Xeo-image.png)
If the Pay Mode is FR and the Amount is negative, this transaction is refunded
[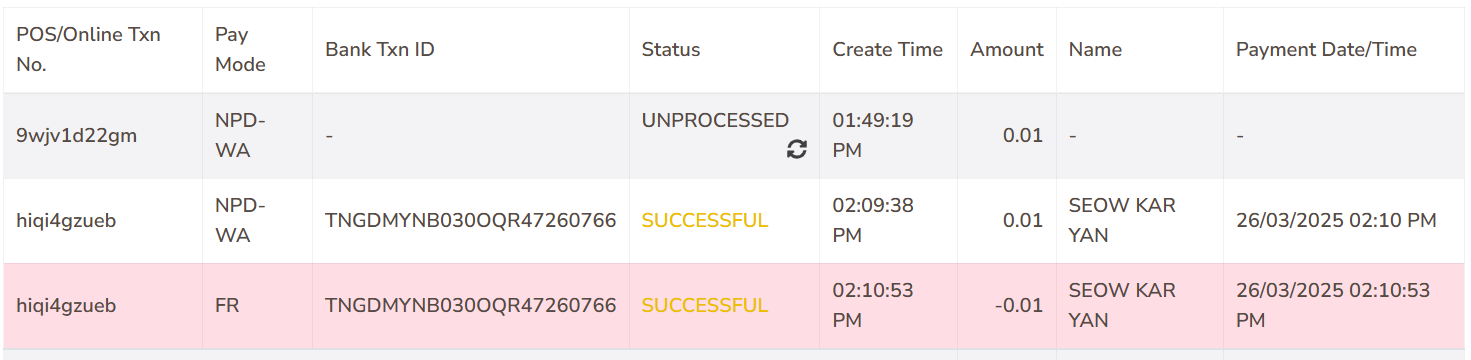](https://docs.antlysis.com/uploads/images/gallery/2025-03/MQya4aeRzC2VPSRq-image.png)
# HitPay
# HitPay Setup Guide
## Login
Open HitPay Portal URL: [https://dashboard.hit-pay.com/login](https://dashboard.hit-pay.com/login) . Enter the email and password to login [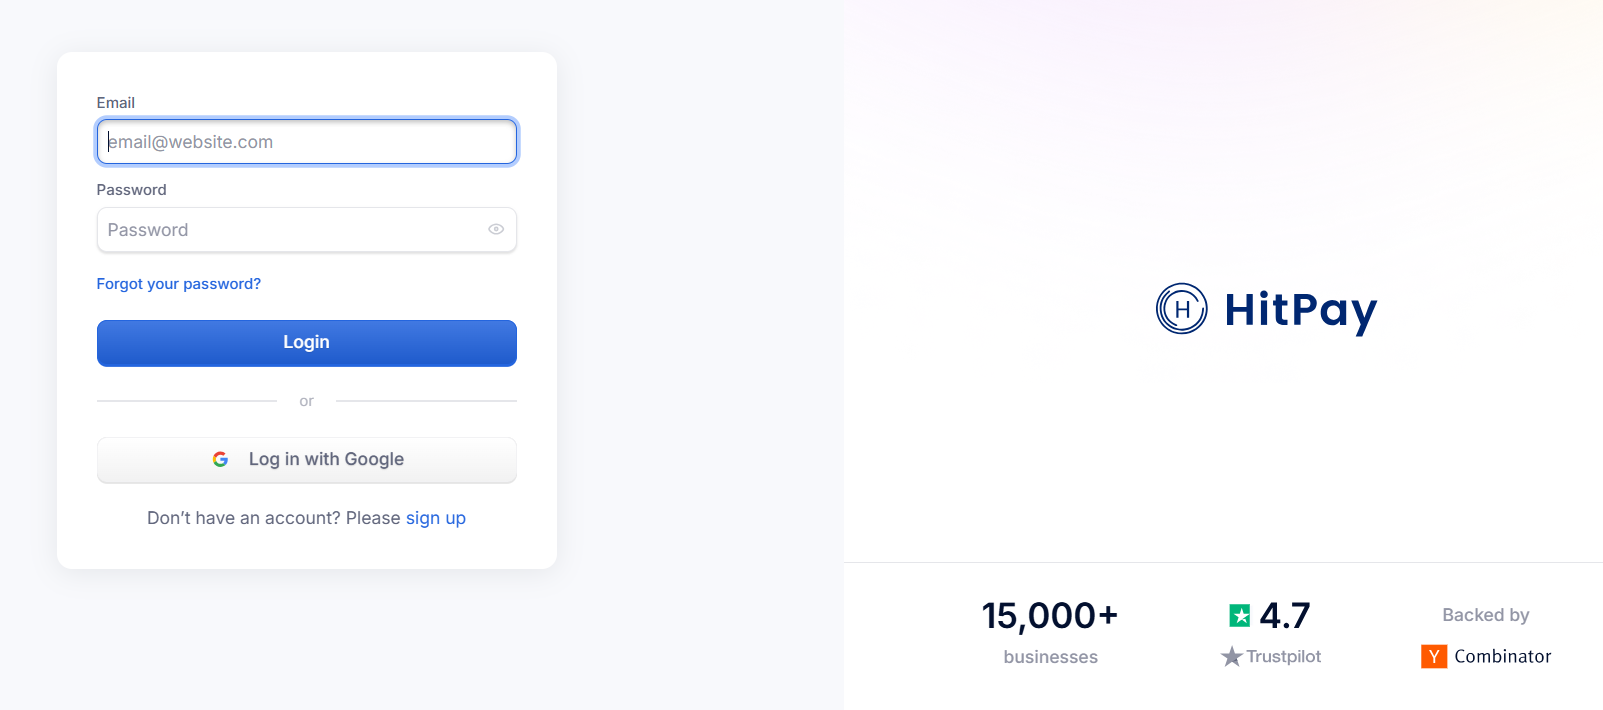](https://docs.antlysis.com/uploads/images/gallery/2025-03/KMnChjv3cmBJNJAq-login-page.png)
## Config Setup
From Sidebar, Select **API Keys**, copy the **API Keys** and **Salt**, then paste into Laundro Portal
[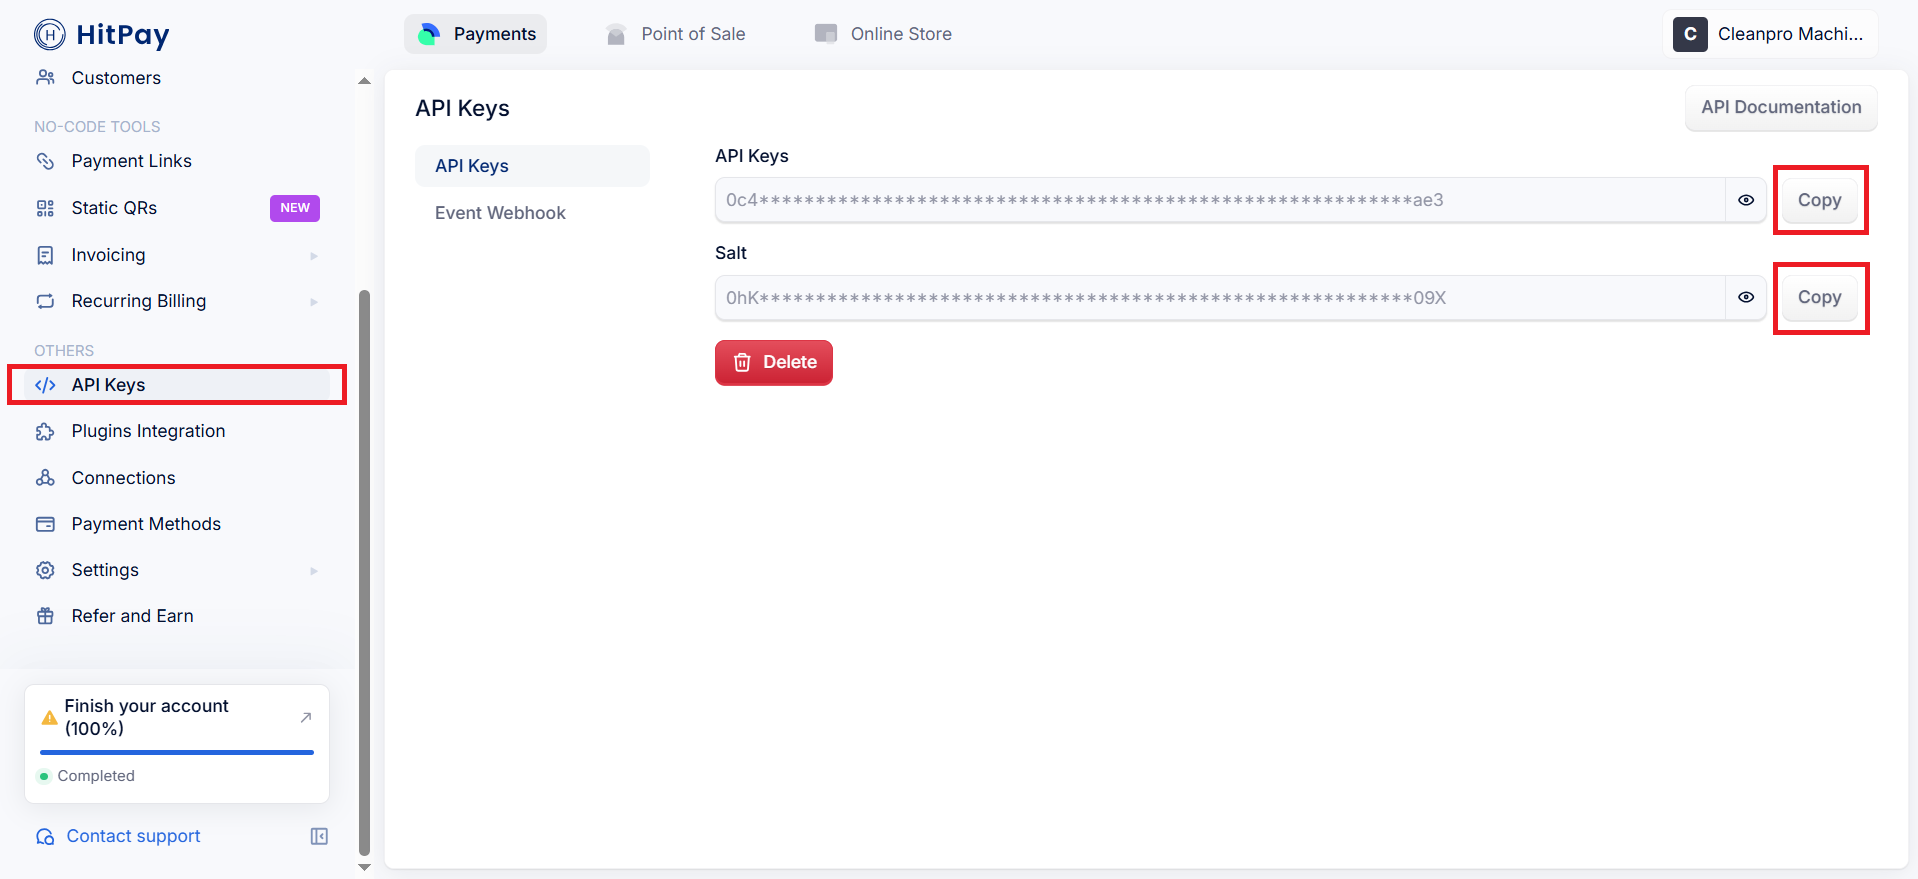](https://docs.antlysis.com/uploads/images/gallery/2025-03/hxvGBEeTHzvFoIEE-copy-credential.png)
In Laundro Portal, go to Settings Page, under Payment Gateway Config, select **Add Hitpay Config**
[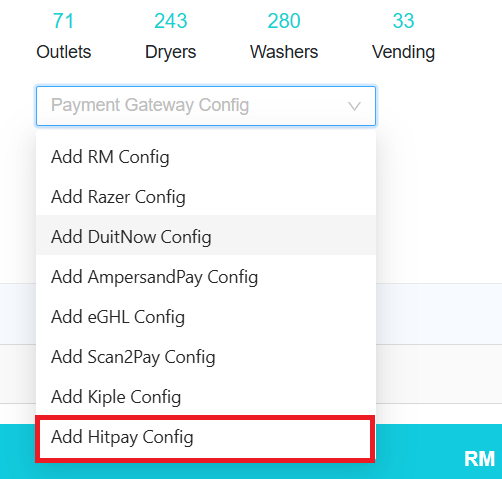](https://docs.antlysis.com/uploads/images/gallery/2025-03/MqoBgZFlgNr91Vy4-laundro-add-hitpay.png)
Enter the label, paste the API Key and salt from the HitPay Portal, then click **Submit** button
[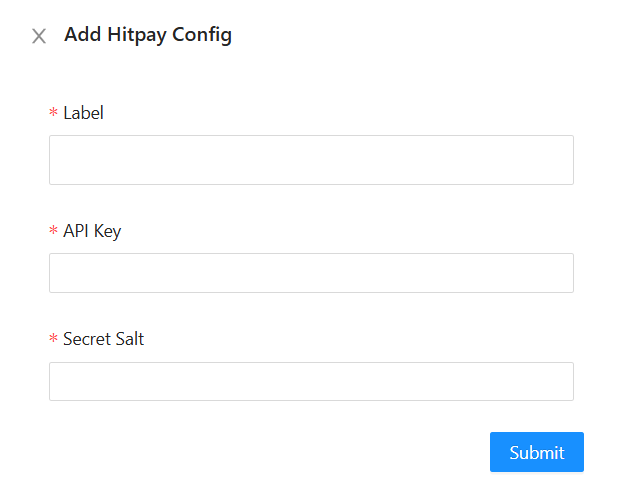](https://docs.antlysis.com/uploads/images/gallery/2025-03/sLruQ20HUrhSGdJA-laundro-add-hitpay-form.png)
To enable HitPay in machine payment page in loyalty, in outlet settings page, under **Payment Gateway Config**, select the config and save
[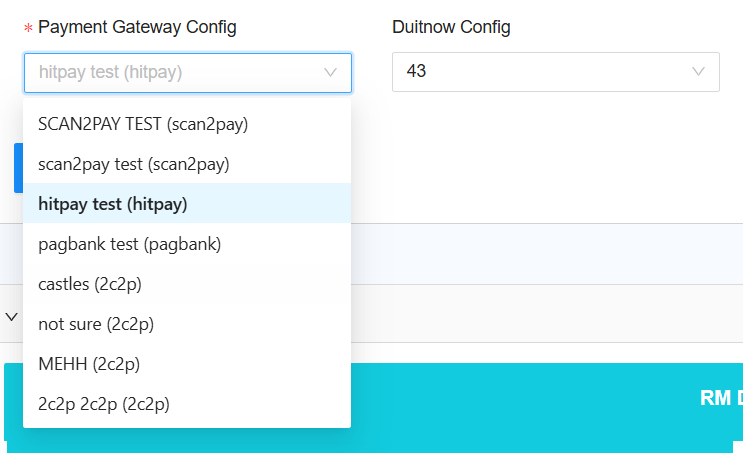](https://docs.antlysis.com/uploads/images/gallery/2025-03/cMAGeNKpHE0sg7xX-select-outlet-config.png)
To enable HitPay for eToken reload in loyalty, click **Token Config** button
[](https://docs.antlysis.com/uploads/images/gallery/2025-02/MtPQA5OToAACx1Wa-laundro-token-config.png)
Payment Gateway select HitPay, and select the HitPay Config, then **Submit** button
[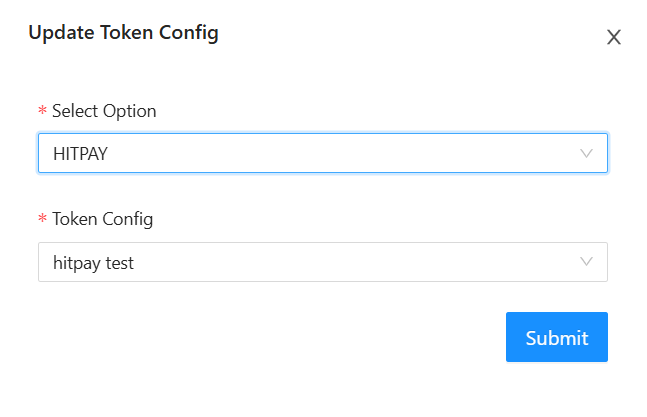](https://docs.antlysis.com/uploads/images/gallery/2025-03/RhnSfYuIRbg6soKB-token-config.png)
# Razer (Fiuu)
# Fiuu Setup Guide
## Login
**1)** Open Fiuu Portal URL: [https://portal.fiuu.com/index.php?mod=authentication&opt=login](https://portal.fiuu.com/index.php?mod=authentication&opt=login) . Enter **Merchant ID, email** and **password** to Login
[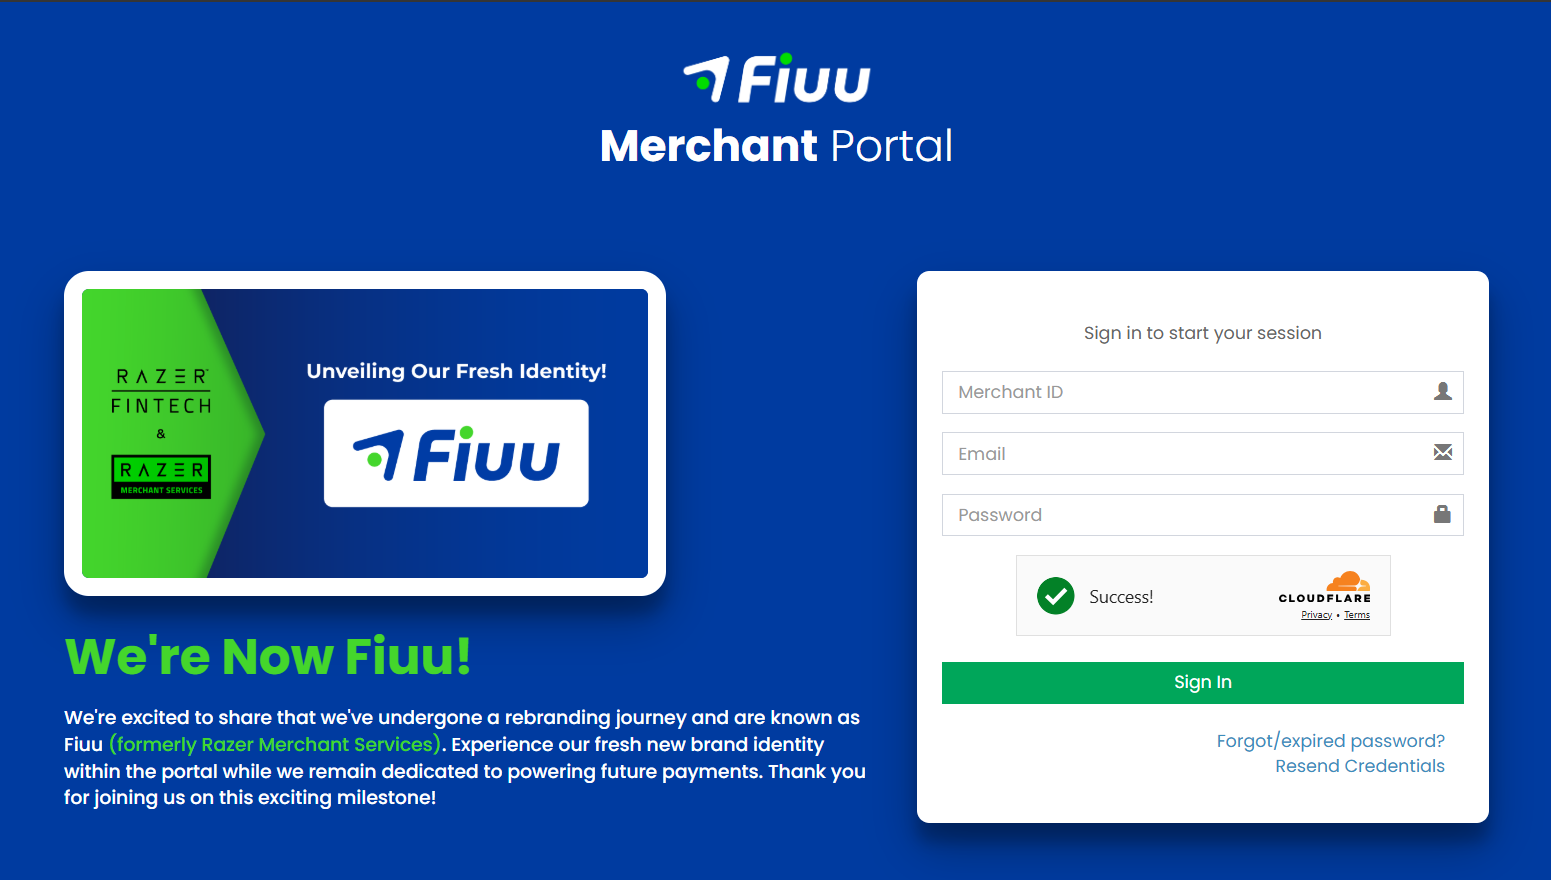](https://docs.antlysis.com/uploads/images/gallery/2025-03/sdguKdJsdy2sXDrF-login.png)
**2)** Select **Yes, I want to login!**
[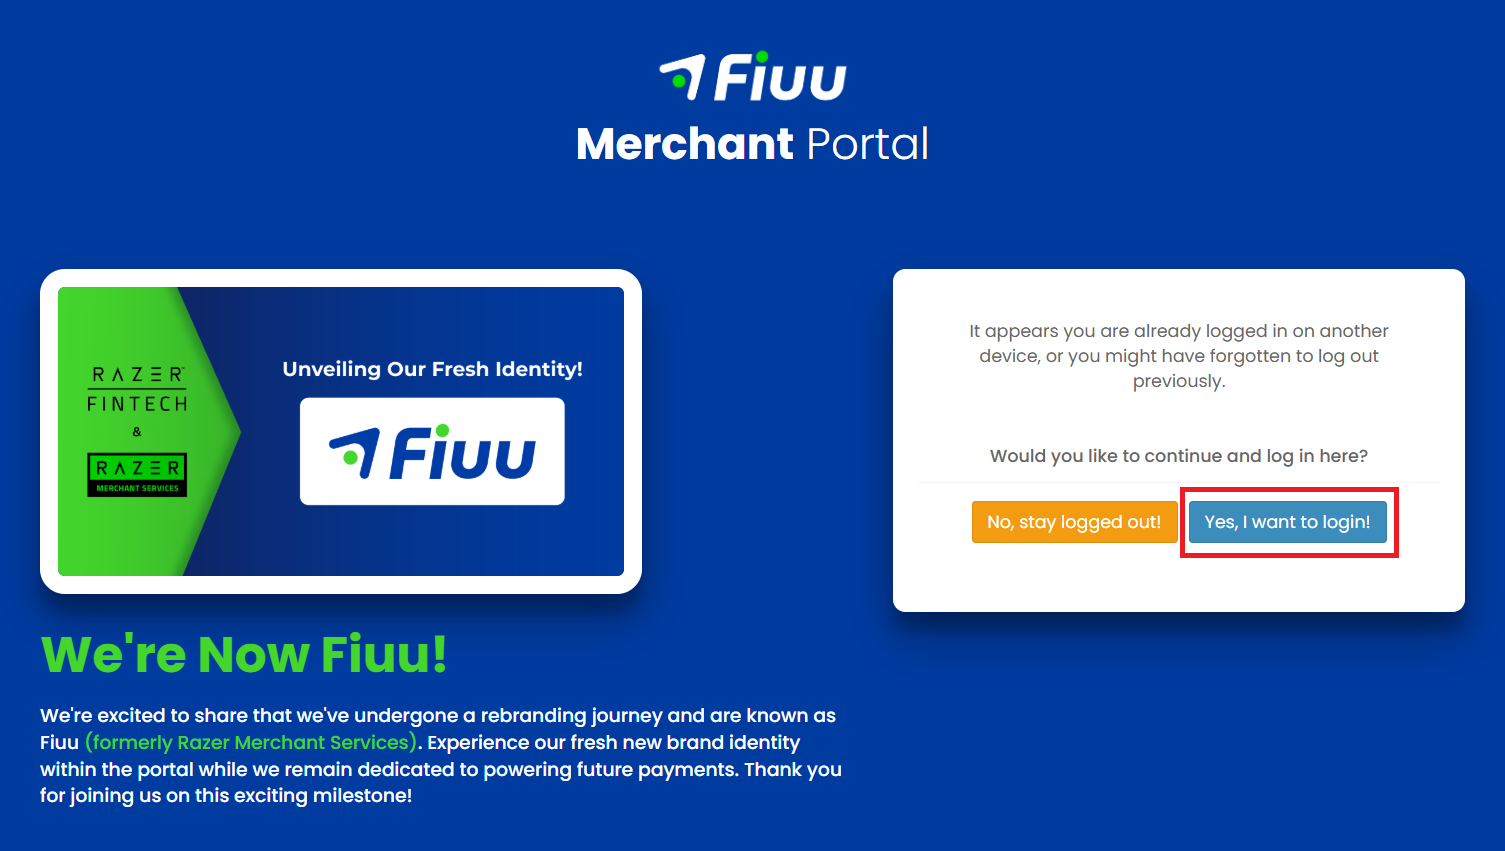](https://docs.antlysis.com/uploads/images/gallery/2025-03/twBIRYsFAC3A91pX-login2.png)
## ─────────────────────────────
## New Account Setup
**1)** If it is a new account, have to set **Return URL**, **Notification URL**, and **Callback URL**. From Sidebar, under **Transactions**, select **Settings,** enter the URL
[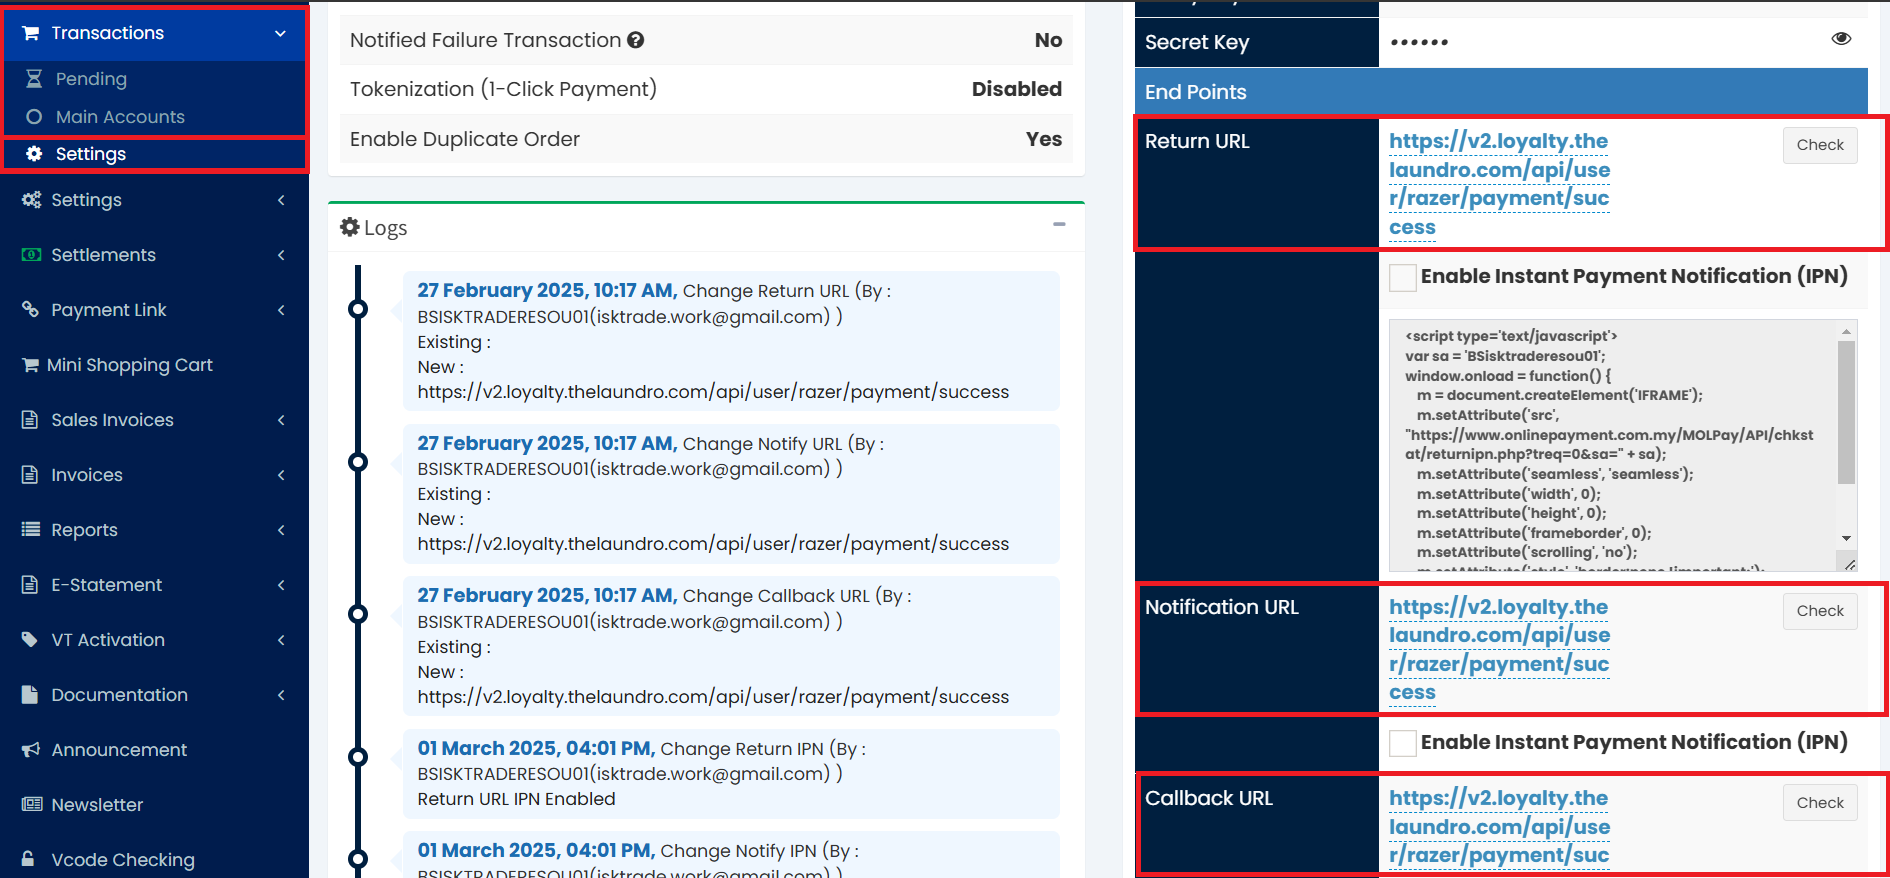](https://docs.antlysis.com/uploads/images/gallery/2025-03/sMZlMpibGNcxJLbs-callback-url.png)
Return URL, Notification URL and Callback URL:
**2)** You also can set the Return URL, Notification URL and Callback URL in this page. From Sidebar, Under **Settings**, select **Transaction Settings.** Click the pencil icon to edit the URL
[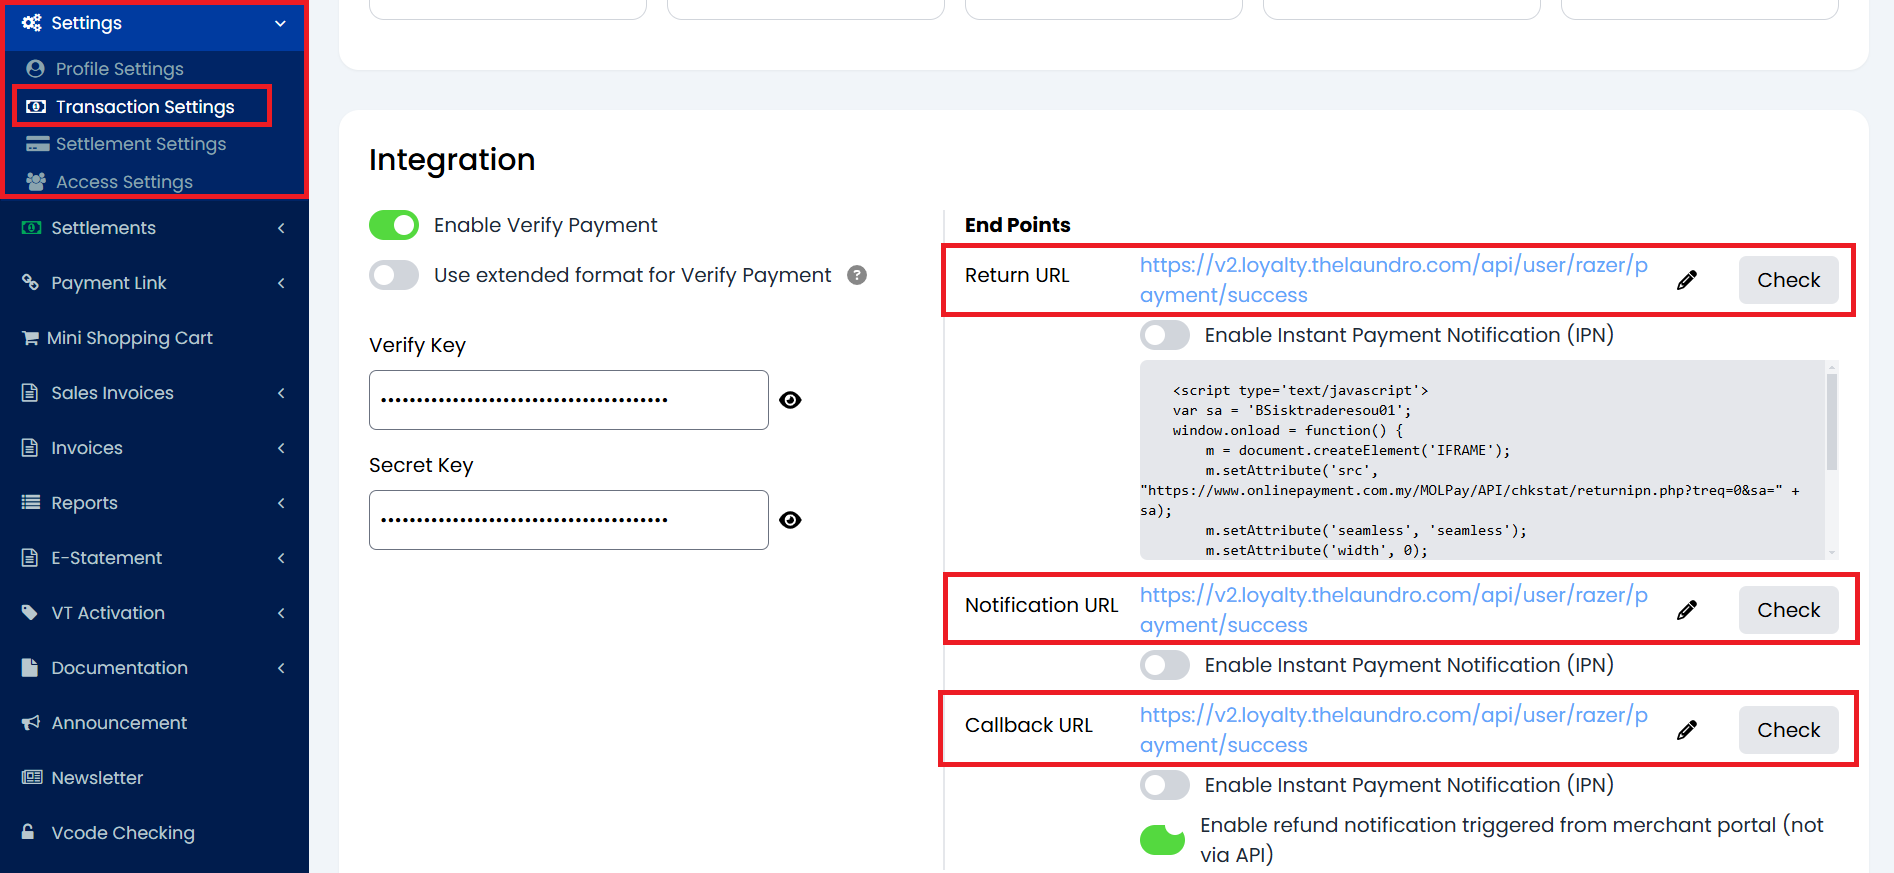](https://docs.antlysis.com/uploads/images/gallery/2025-03/Ibc7aK73cgrsmqlW-transaction-settings.png)
**3)** To register the domain, from sidebar, under **Settings** select **Profile Settings**
[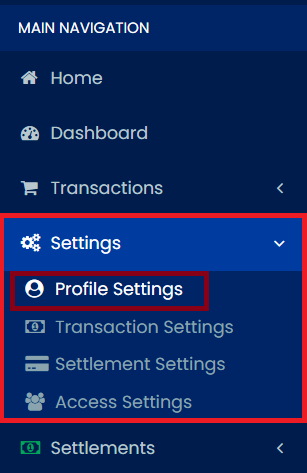](https://docs.antlysis.com/uploads/images/gallery/2025-03/Hu6S3DdxhSDTDKg0-profile-settings.png)
**4)** Enter the domain name (**payment-engine.antlysis.com**) and click **Register** button
[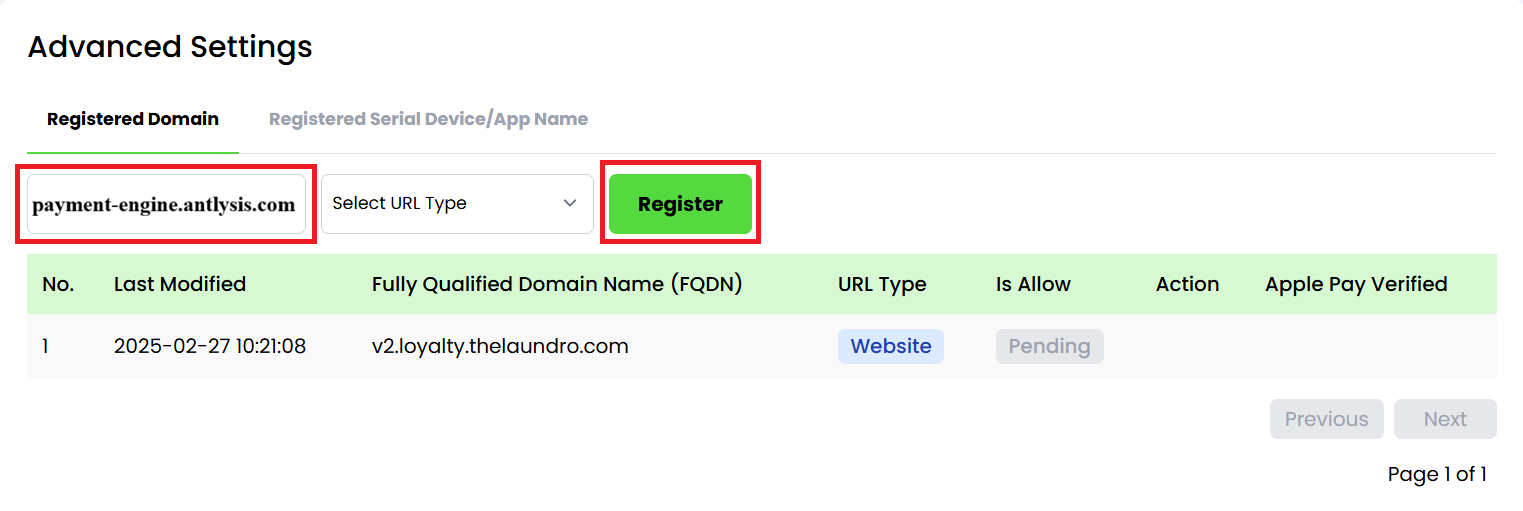](https://docs.antlysis.com/uploads/images/gallery/2026-05/D8gtfSjmi2vm7knY-crafdmdwnewv1fcc-register-domain.png)
## ─────────────────────────────
## Config Setup
**1)** From Sidebar under **Home**, you can copy the **Merchant ID**, **Verify Key** and **Secret Key**, then paste into Laundro Portal
[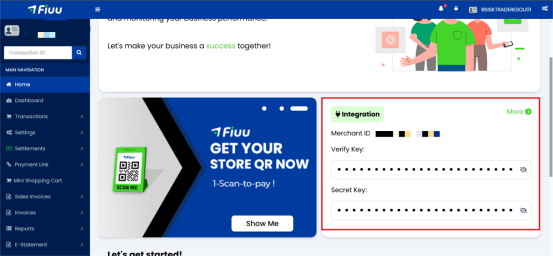](https://docs.antlysis.com/uploads/images/gallery/2026-03/CCKN9veB47jSTb4W-image.png)
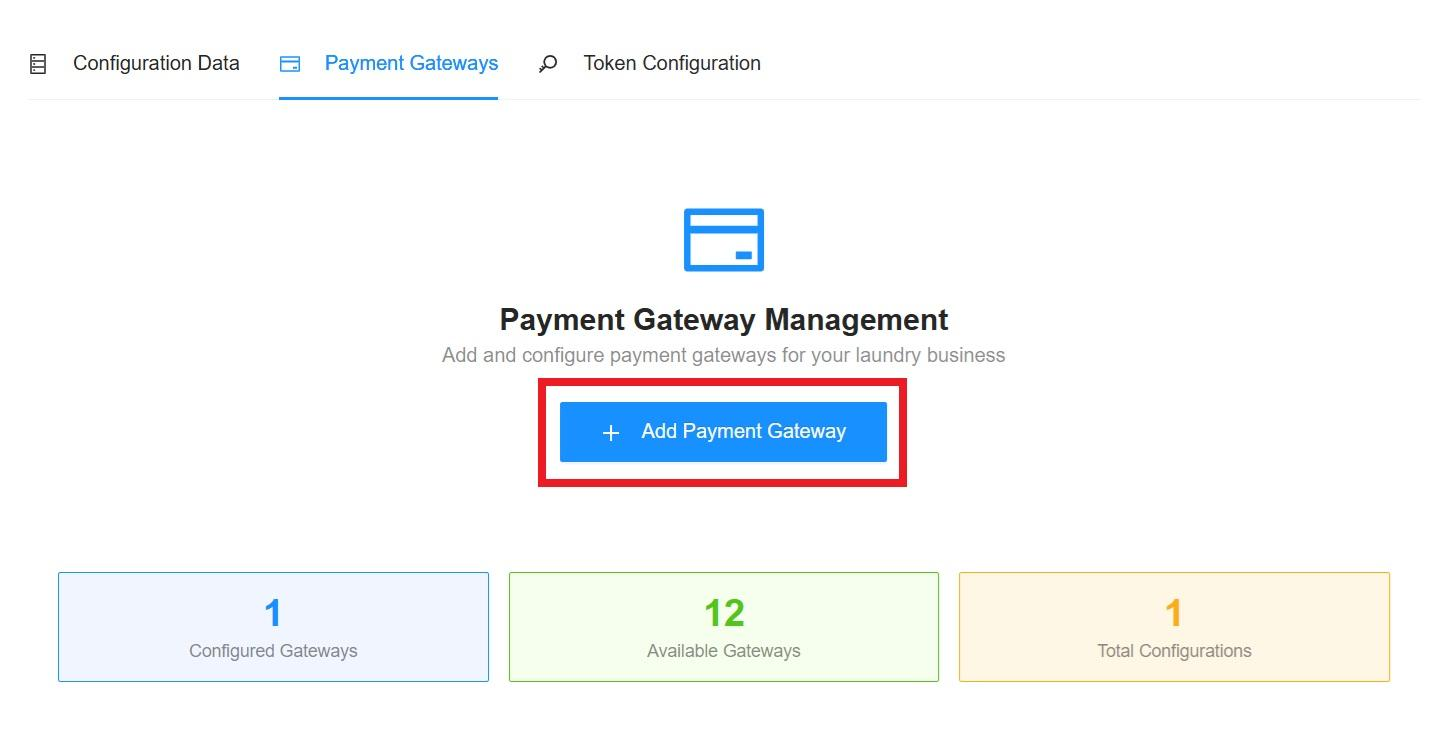
**2)** In Laundro Portal, go to Settings Page, under Payment Gateway Config, select **Add Razer Config**
[](https://docs.antlysis.com/uploads/images/gallery/2026-04/UgUXnLv6ap8tJ8m2-image.png)
**3)** Enter the Label, paste the Merchant ID, Verify Key and Secret Key, then click **Submit** button
[](https://docs.antlysis.com/uploads/images/gallery/2026-04/rFh8cr3vR9MvLl9Y-image.png)
[](https://docs.antlysis.com/uploads/images/gallery/2026-04/0ooAq8tw5ZV77t9b-image.png)
**4)** Enter the Label, paste the Merchant ID, Verify Key and Secret Key, then click **Submit** button.
[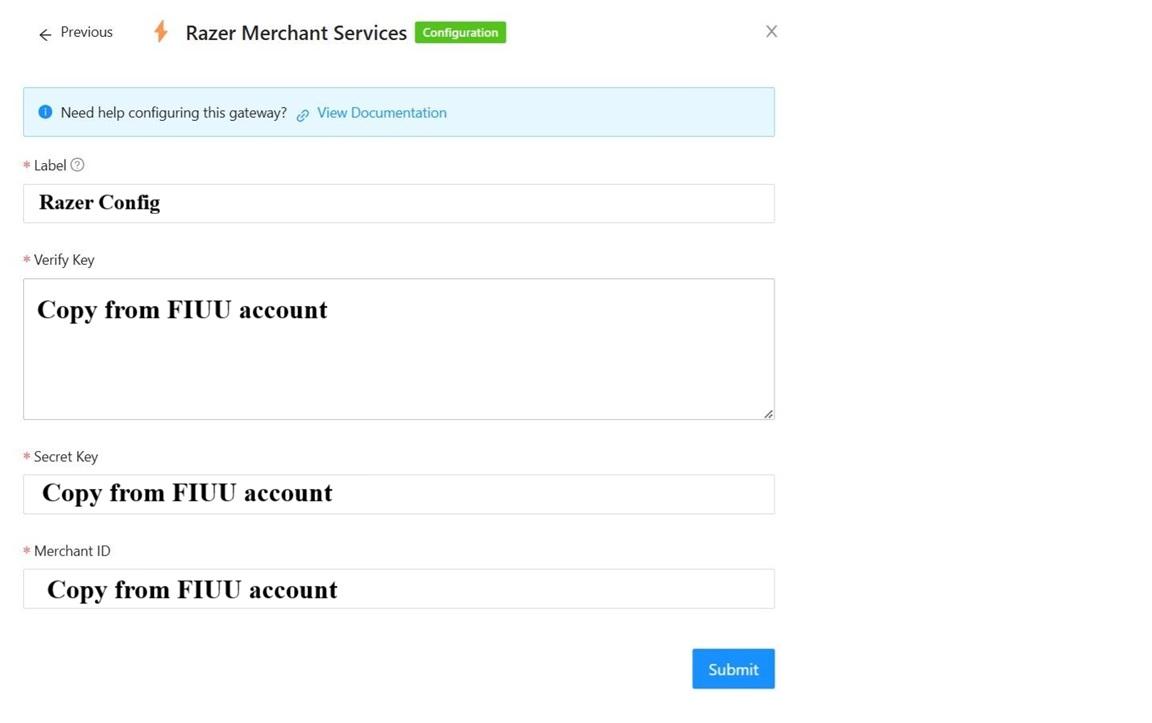](https://docs.antlysis.com/uploads/images/gallery/2026-04/V7mVe7R6Vi82WXYJ-merchant-service1.jpg)
**5)** To enable Fiuu in machine payment (static DuitNow and ewallet), in outlet settings page, under **Payment Gateway Config**, select the token config.
[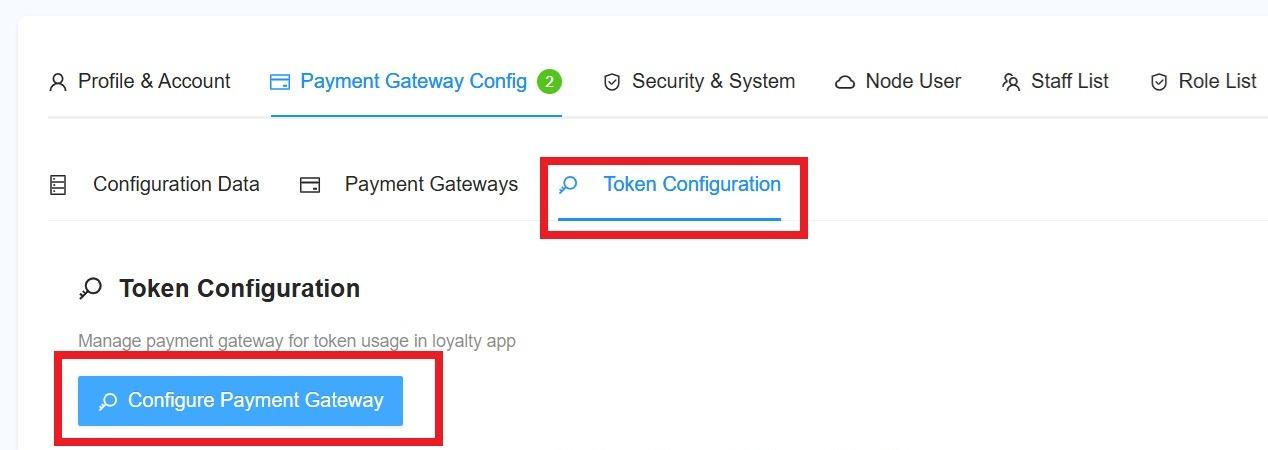](https://docs.antlysis.com/uploads/images/gallery/2026-04/nCjtsLQWDy4rQ8XX-token-config.jpg)
**6)** Payment Gateway select **Razerpay**, and select the **Razer Config**, then click **Submit** button.
[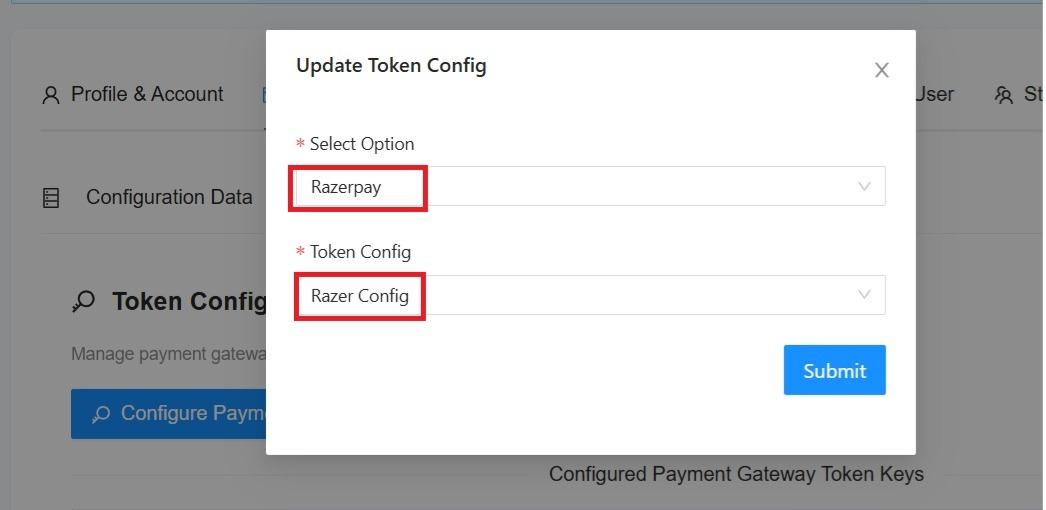](https://docs.antlysis.com/uploads/images/gallery/2026-04/8Vjapli0pWNc72yC-token-config-select.jpg)
**7)** To complete this process, the outlet details need to be updated in the payment configuration.
**8)** Go to ''**My Outlet**''
[](https://docs.antlysis.com/uploads/images/gallery/2026-05/Qq6moAWGw9CTRaz7-image.png)
**9)** Select the outlet for which you want to update the payment configuration.
[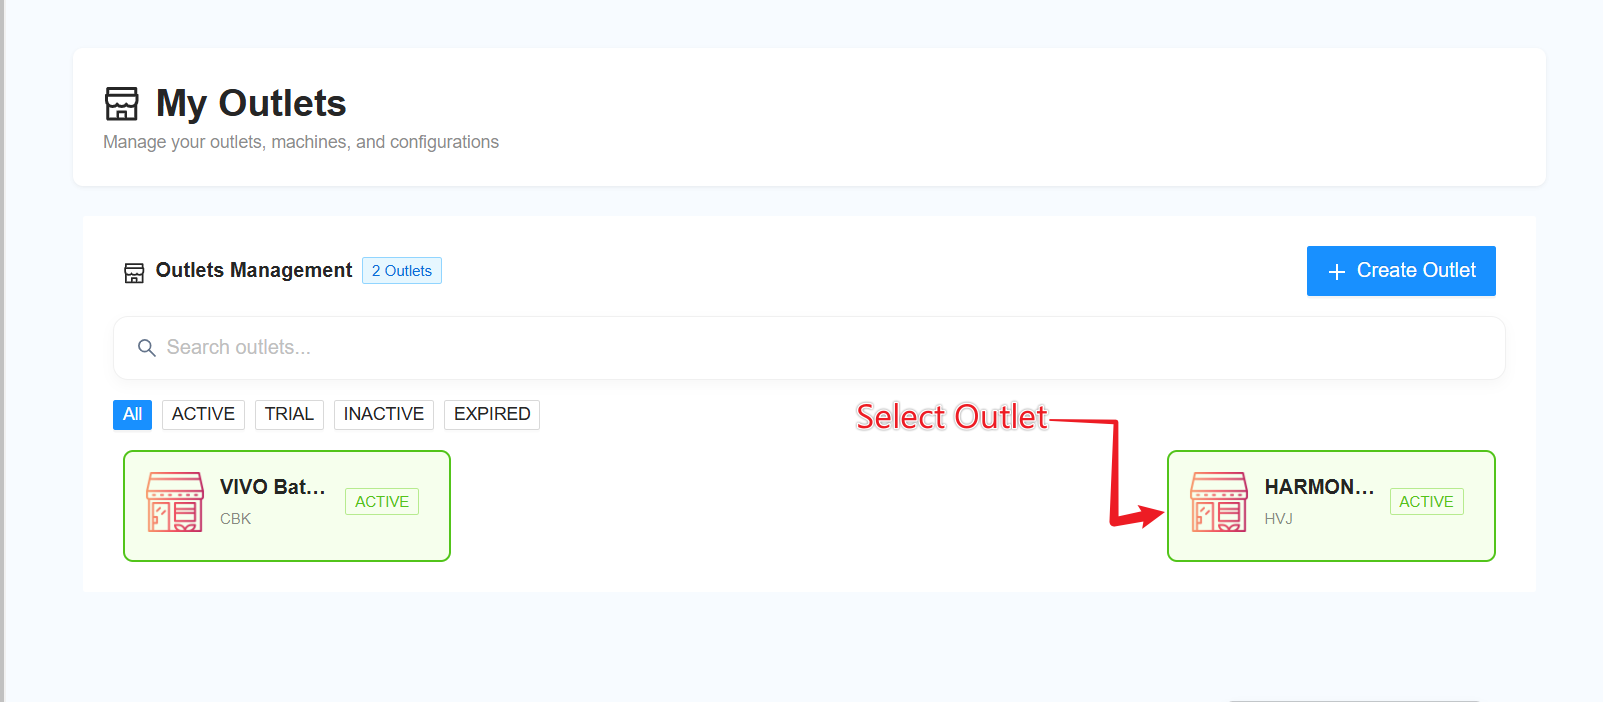](https://docs.antlysis.com/uploads/images/gallery/2026-05/abGtczQCy6VriMsv-image.png)
**10)** Click on “Edit Outlet”.
[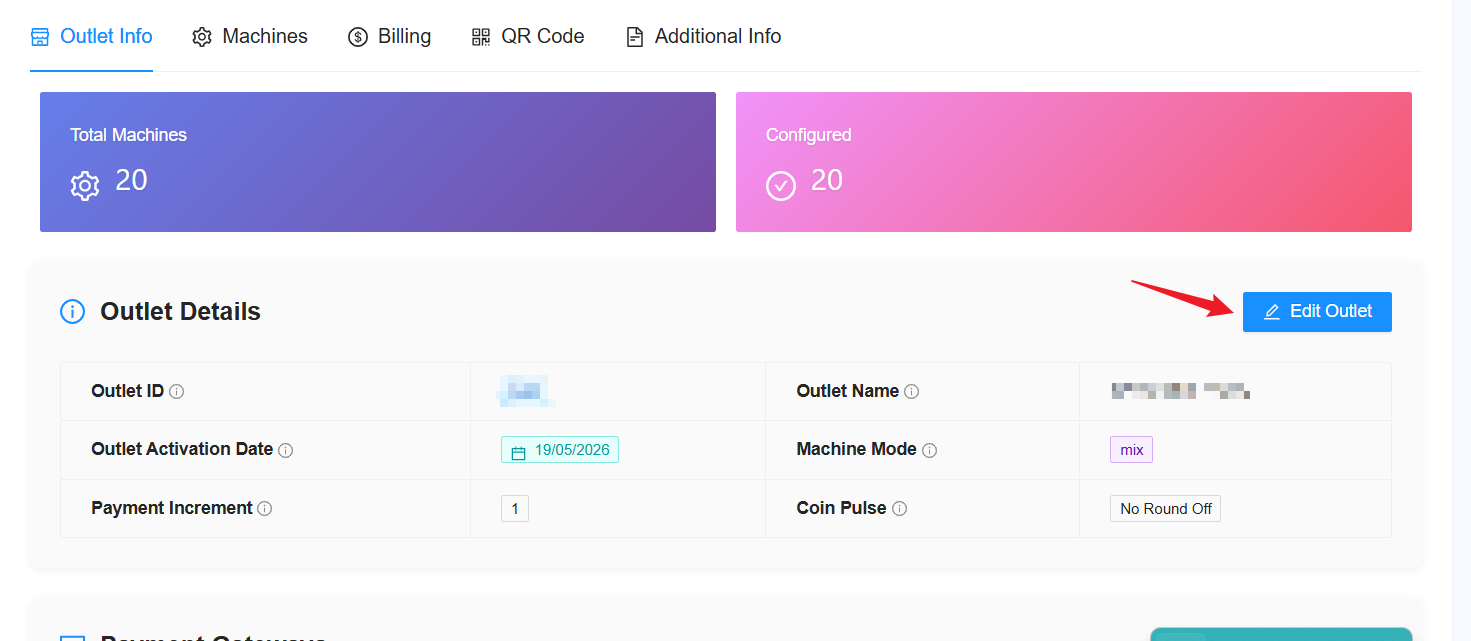](https://docs.antlysis.com/uploads/images/gallery/2026-05/AAVQm5XZNpAPCLAg-image.png)
**11)** Click “Next” until you reach the Payment Configuration section.
[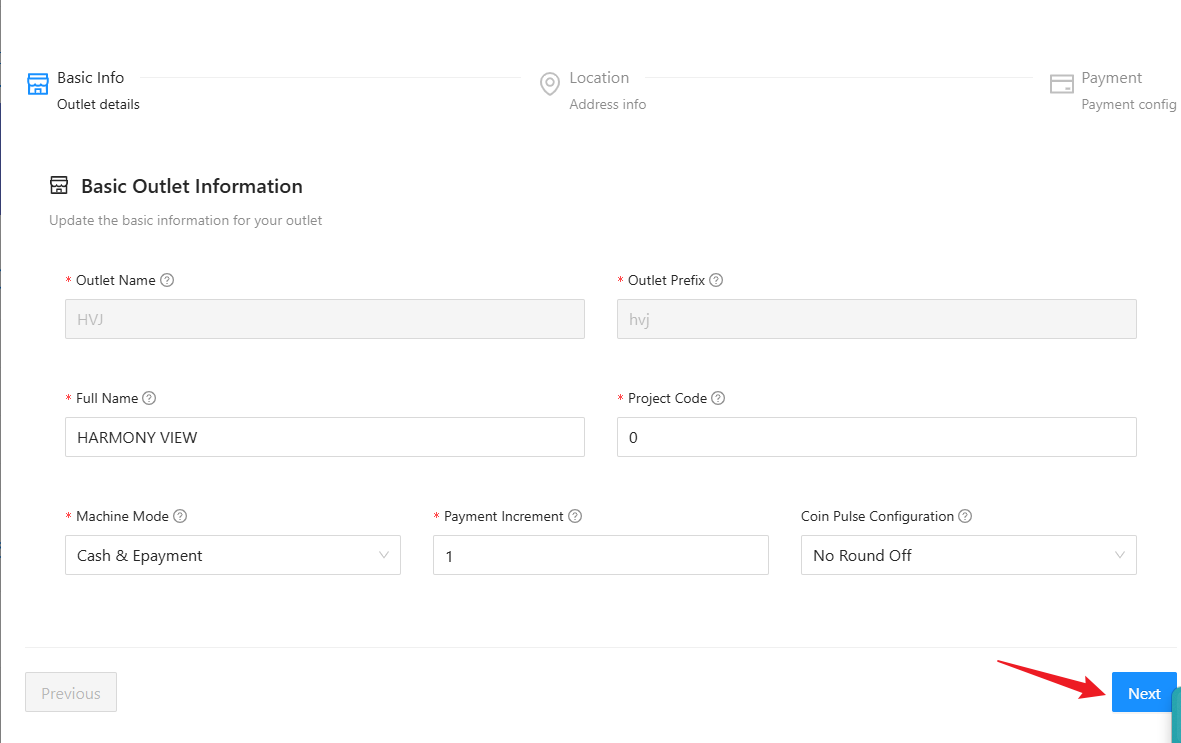](https://docs.antlysis.com/uploads/images/gallery/2026-05/VPGlvTSXBh8krQLd-image.png)
**12) In the Payment Configuration section, click on “Payment Gateway Config” and select “Razer Config (Razer)”.**
[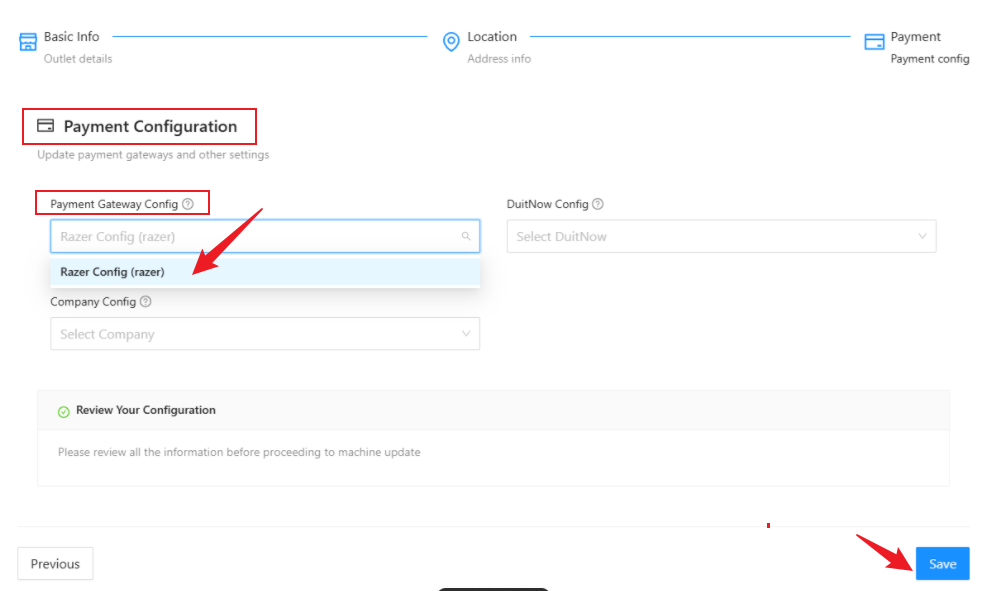](https://docs.antlysis.com/uploads/images/gallery/2026-05/EmbzfUOkZo6NpjH2-image.png)
**13)** Click ''**Save**'' and its done.
# FIUU Static QR Download
## Login
**1)** Open Fiuu Portal URL: [https://portal.fiuu.com/index.php?mod=authentication&opt=login](https://portal.fiuu.com/index.php?mod=authentication&opt=login) . Enter **Merchant ID, email** and **password** to Login
[](https://docs.antlysis.com/uploads/images/gallery/2025-03/sdguKdJsdy2sXDrF-login.png)
**2)** Select **Yes, I want to login!**
[](https://docs.antlysis.com/uploads/images/gallery/2025-03/twBIRYsFAC3A91pX-login2.png)
## ─────────────────────────────
## Static DuitNow QR Code
**1)** In Fiuu Portal, from sidebar, under **Payment Link**, select **Generate Static QR-Code.**
[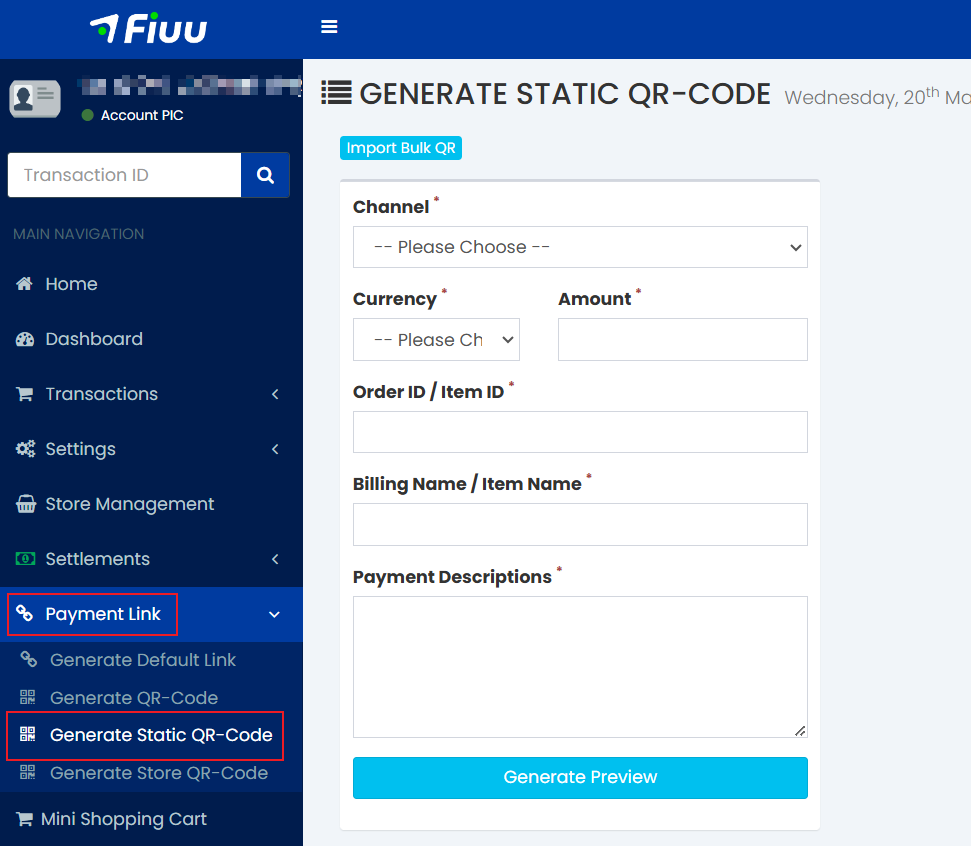](https://docs.antlysis.com/uploads/images/gallery/2026-05/YqEnzQ6X9uvd80hI-image.png)
**2)** Click on “Channel” and select “DuitNow QR Offline”. After selecting it, the configuration will change to “Type2”.
[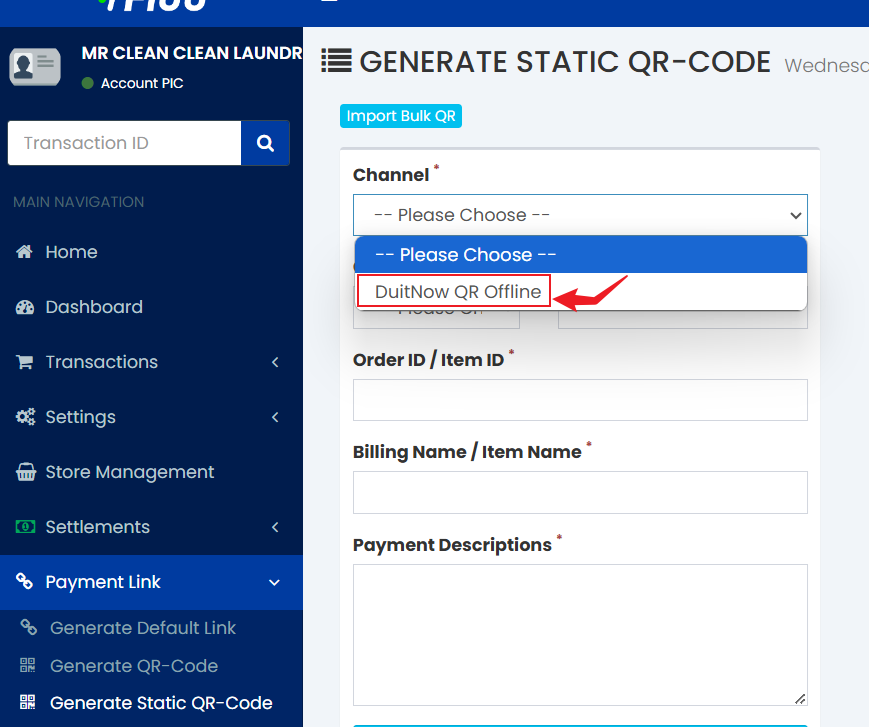 ](https://docs.antlysis.com/uploads/images/gallery/2026-05/rVxSNLEGsGUUEEu3-image.png)[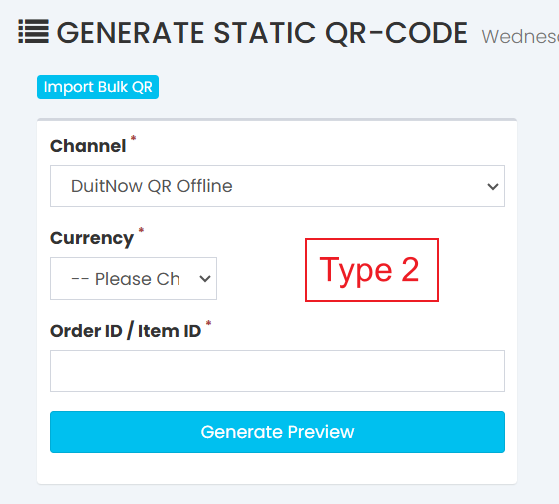](https://docs.antlysis.com/uploads/images/gallery/2026-05/CMu7dhSN3pLg63VX-image.png)
**3)** Select the currency and enter the Machine ID in the “Order ID / Item ID” column, then click on “Generate Preview”.
[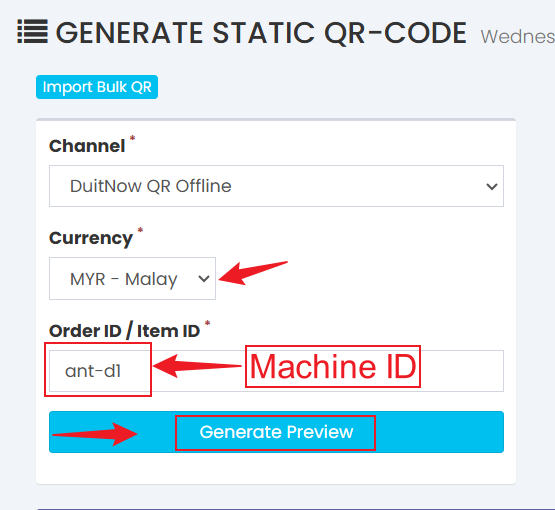](https://docs.antlysis.com/uploads/images/gallery/2026-05/Iy3cy5CB3VfqpYst-image.png)
**4)** After clicking “Generate Preview”, a QR code will be generated. Below the QR code, click “Save”.
[](https://docs.antlysis.com/uploads/images/gallery/2026-05/kXRMFjtkWr1blH9Q-image.png)
**5) After clicking “Save”, scroll down and you will see three icons on the right. Click on the middle icon to preview and download the QR code.**
[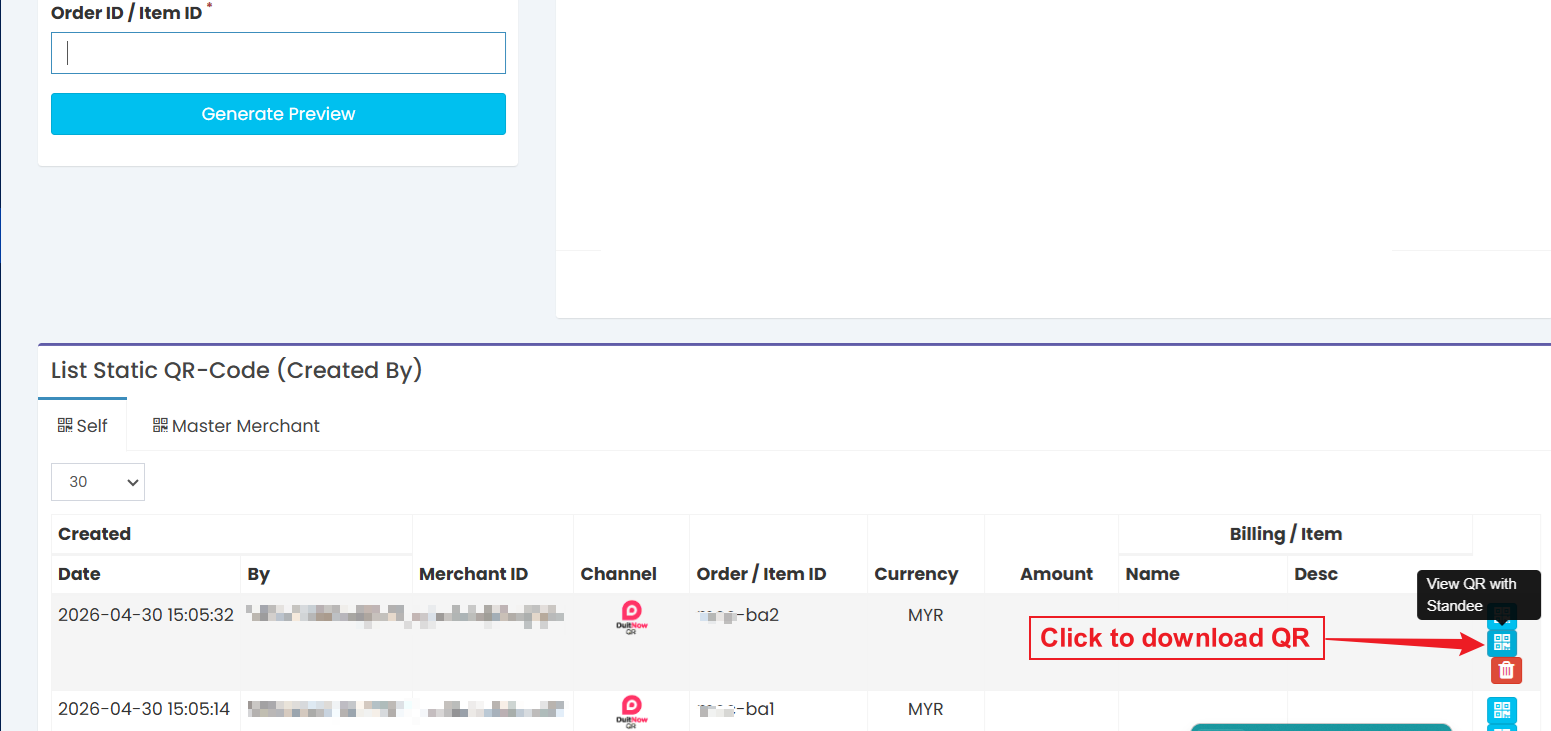](https://docs.antlysis.com/uploads/images/gallery/2026-05/Ds4P6P9oJfQD23RE-image.png)
**6)** Click the **Download QR Code** button to donwload the QR code
[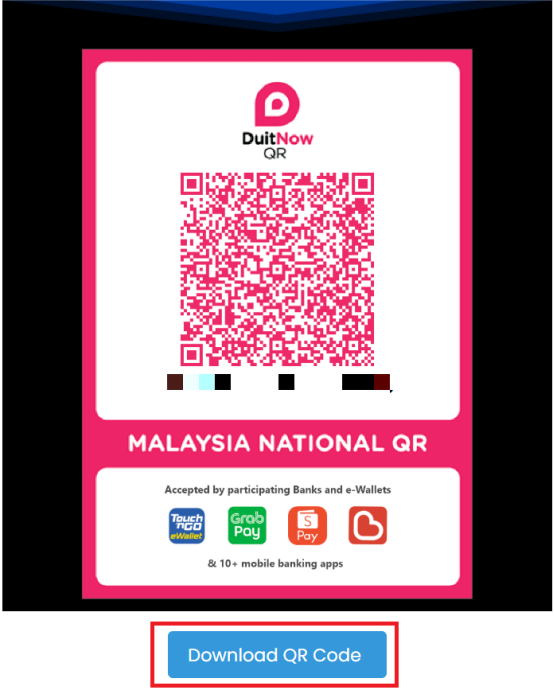](https://docs.antlysis.com/uploads/images/gallery/2026-03/sJhwtIFWkyf379QF-image.png)
## ─────────────────────────────
### **Machine ID**
**1)** You can get the ''**Machine ID**'' from Laundro Portal in the machine settings page.
**Step 1:** Go to **“My Outlets”.**
**Step 2:** Select the specific outlet.
[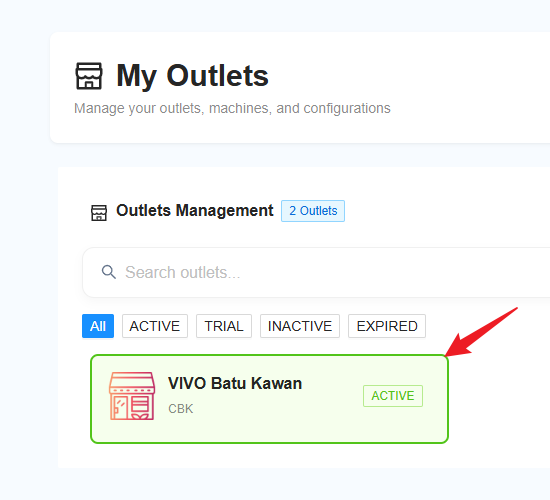](https://docs.antlysis.com/uploads/images/gallery/2026-05/6IYkStEqFk21oJwO-image.png)
**Step 3:** Click on “**Machine**” and copy the ID highlighted in the circle.
[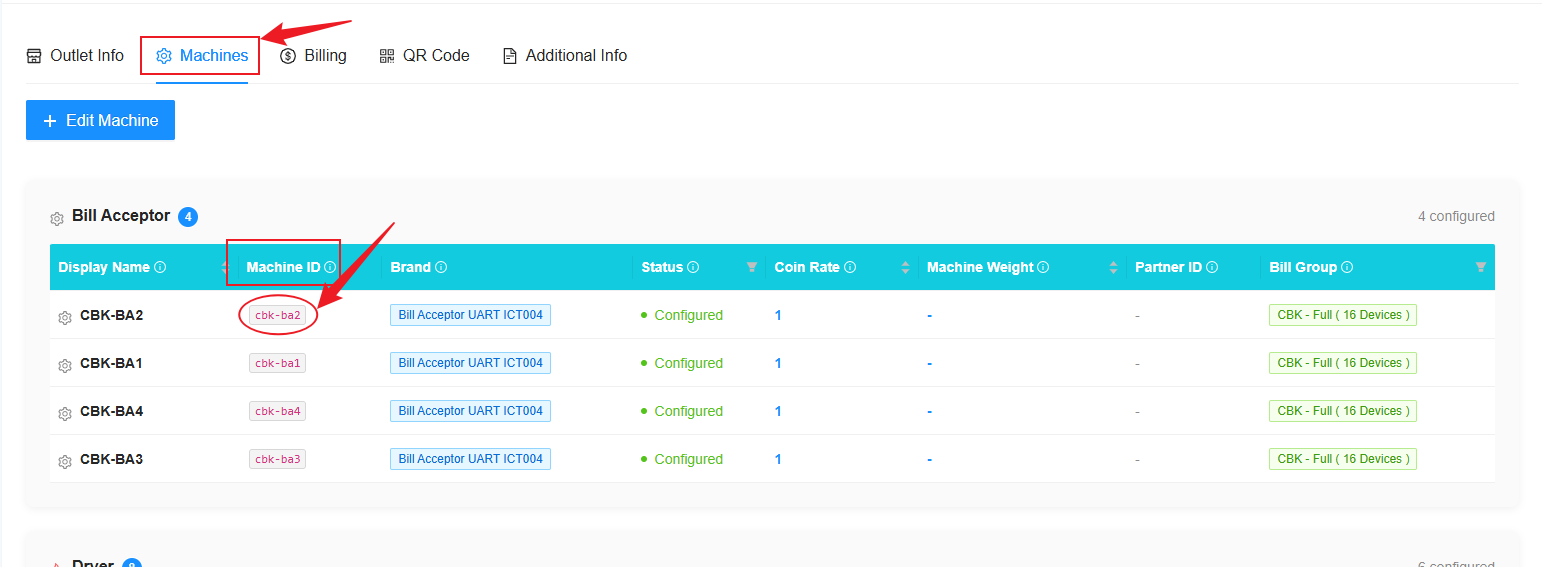](https://docs.antlysis.com/uploads/images/gallery/2026-05/6CnbWo6NMcbN9IYC-image.png)
---
# RHB Duitnow
# RHB Duitnow
## RHB Duitnow Setup Guide
## Login
##### 1. Open URL laundro v2 admin : [https://v2.thelaundro.com/admin\_login](https://v2.thelaundro.com/admin_login)
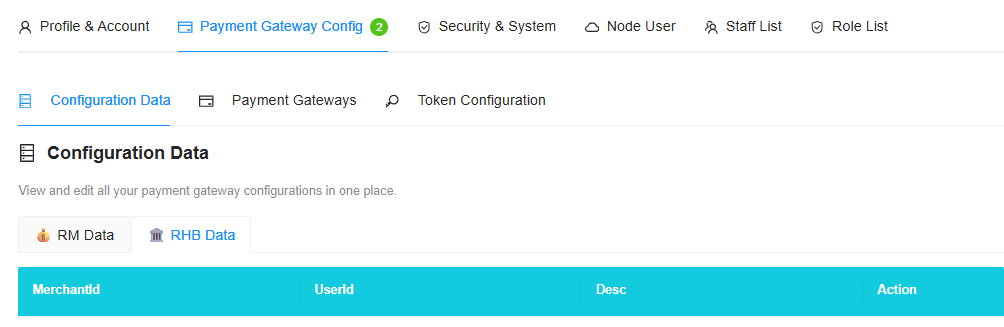
2\. Click to RHB Duitnow management & Click at Add **RHB DuitNow QR Code**
[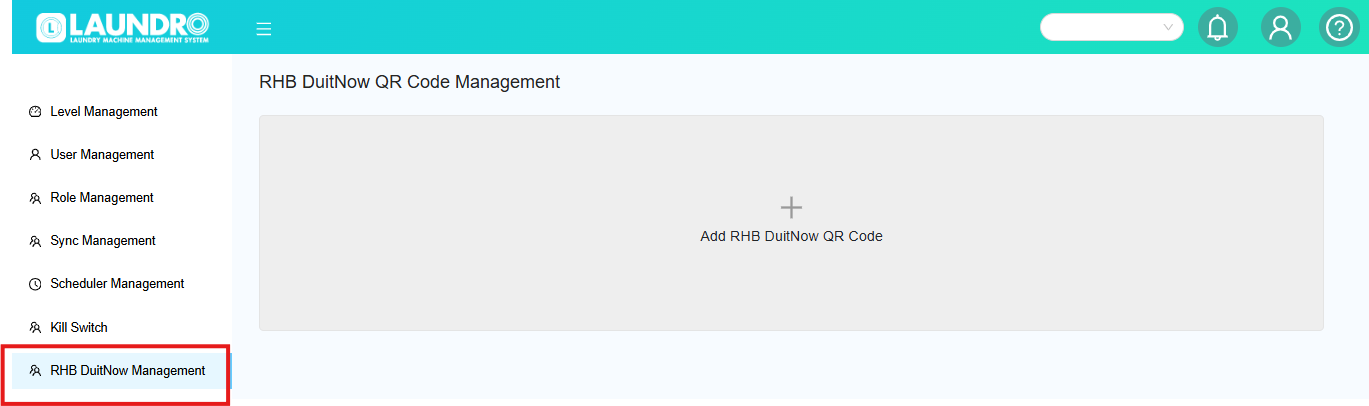](https://docs.antlysis.com/uploads/images/gallery/2026-04/rZWoqH5WTFhL7Hzc-image.png)
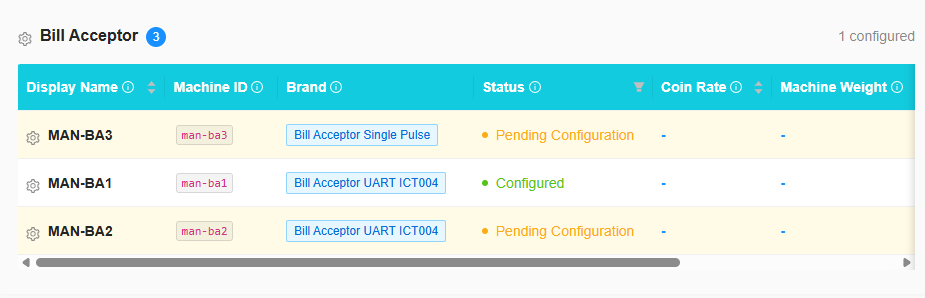
4\. Please select the required details paste into the box.
- Copy the **Machine ID** from the Laundro account (name) and paste it.
[](https://docs.antlysis.com/uploads/images/gallery/2026-04/yyN0AXDCnnLQd9QD-image.png)
- Update too the laundro **(RHB DATA)** [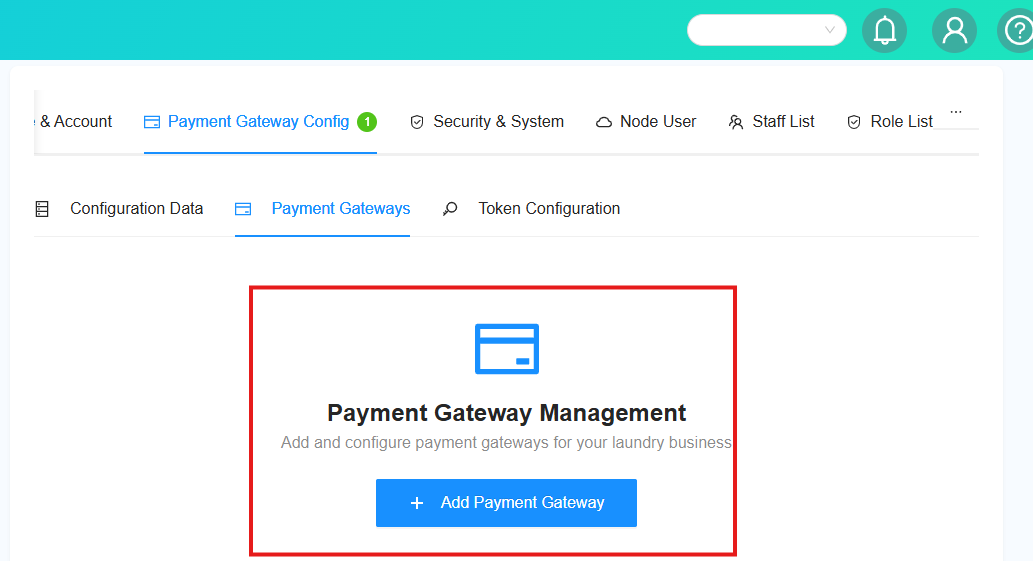](https://docs.antlysis.com/uploads/images/gallery/2026-05/sFAtVd90IcsJCzdx-image.png)
[](https://docs.antlysis.com/uploads/images/gallery/2026-05/ZSzfxEF3vQtoOgPD-image.png)
[](https://docs.antlysis.com/uploads/images/gallery/2026-04/99fo8kEXEAjUjHyw-image.png)
- **PLEASE** FILL UP 4 TEM'S MENTIONED
- **MERCHANT ID**
- **USER ID**
- DESC
- **RHBD ID**
ICA MODEL : RHBD214215GTBMAKER2RHBCIC08
- After complete fill **RHB DATA**
- **PLEASE ADD ON TOKEN CONFIG**
[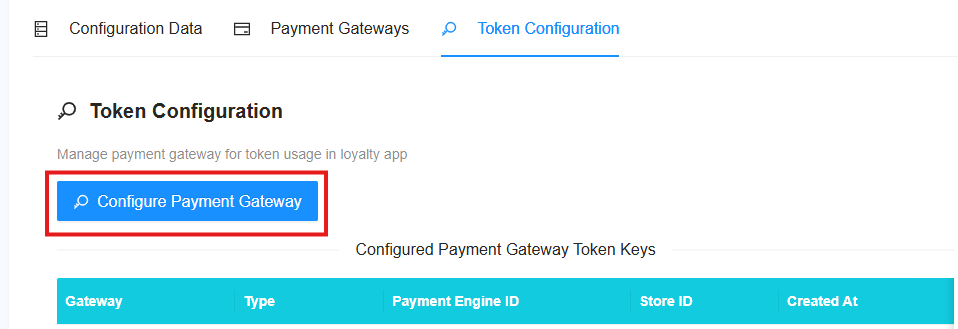](https://docs.antlysis.com/uploads/images/gallery/2026-05/dlREKwzhjZSzQWE5-image.png)
[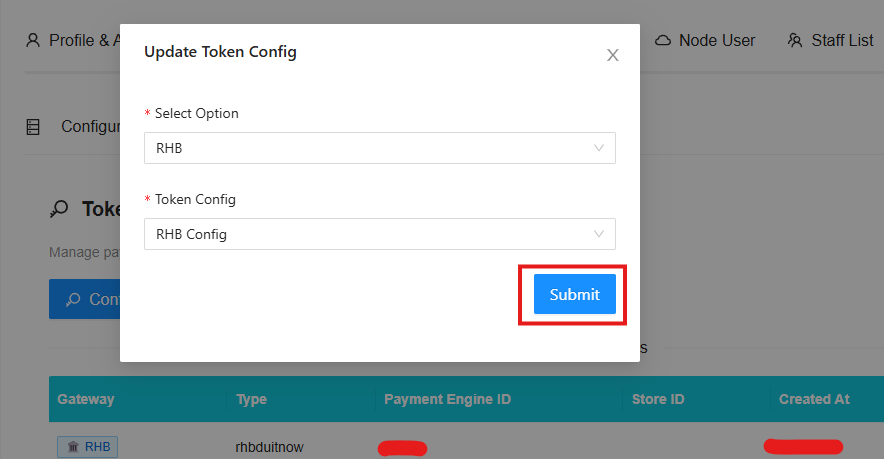](https://docs.antlysis.com/uploads/images/gallery/2026-05/8Jp44yzNP81xC0wp-image.png)
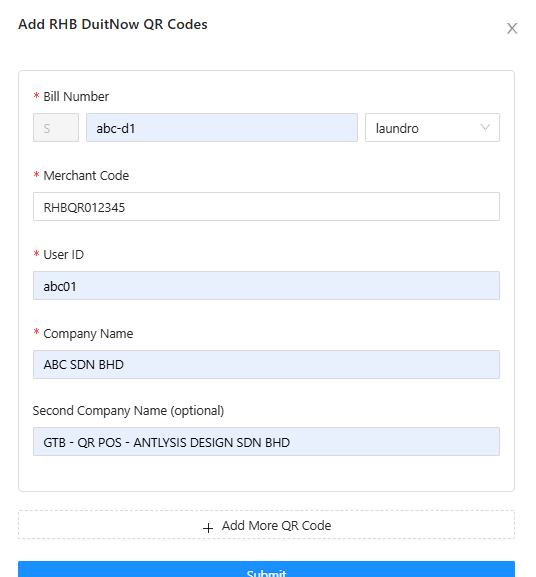
5. Please obtain the information listed below from the client/customer.
- Bill Number : copy & paste ID from laundro
- Merchant code : copy details from client
- User ID : copy details from client
- Company name : Please enter the outlet name to make it easier to locate.
- Second Company name : GTB - QR POS - ANTLYSIS DESIGN SDN BHD
- To add more QR codes, click the “Add More QR Code” button.
- Submit after done
- **IF** u need create new QR Please click**"REFRESH"**
[](https://docs.antlysis.com/uploads/images/gallery/2026-04/5JR5LsoKpUByB8Yf-image.png)
- **Please refresh** if needed, then proceed with generating the **next QR** code for the following outlet or machine (washer/dryer).
[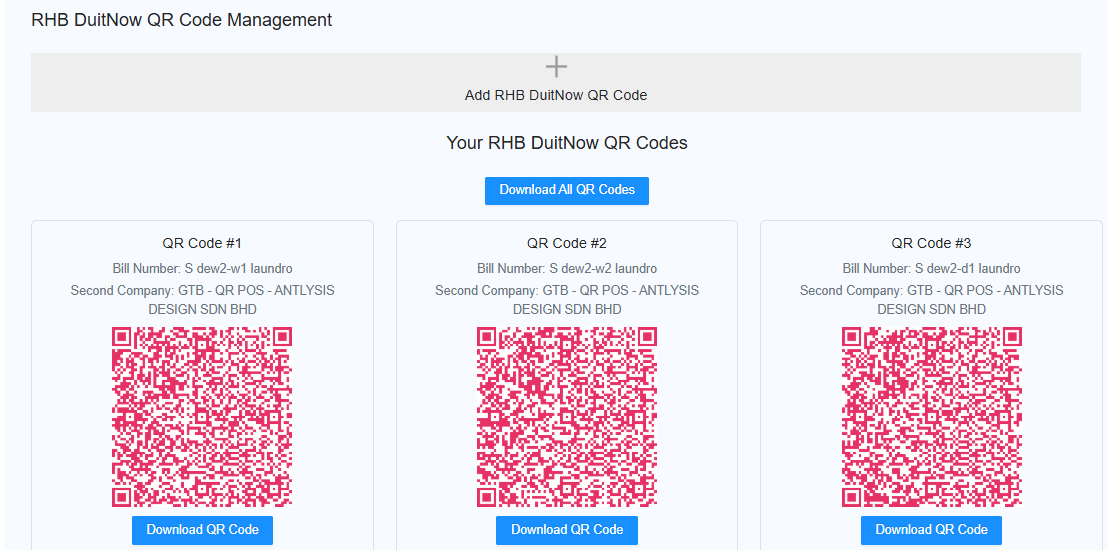](https://docs.antlysis.com/uploads/images/gallery/2026-02/6eTvCfWa45rDYB0Z-image.png)
# Static QR Code Generation
# Revenue Monster
# Revenue Monster Setup
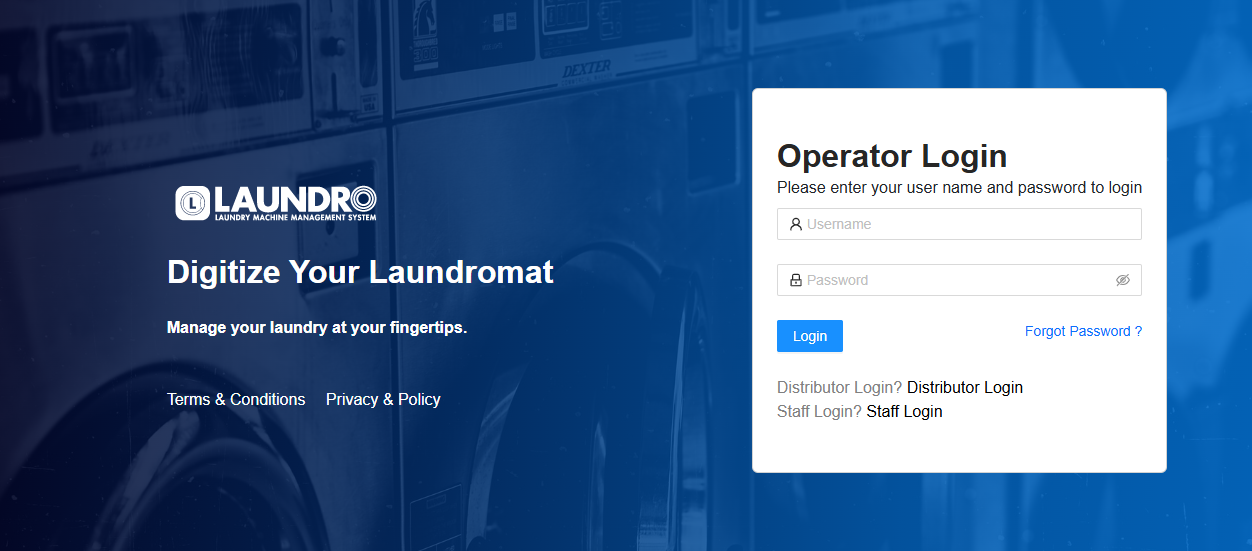
**“First, open the LAUNDRO Operator link page.”** - [https://v2.thelaundro.com/operator\_login](https://v2.thelaundro.com/operator_login)
---
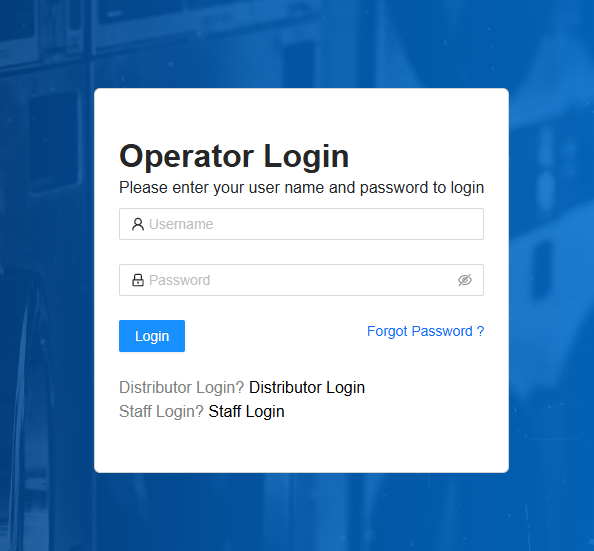
#### **Operator Login**
**“Next, open the Revenue Monster link page as well.” -** [https://merchant.revenuemonster.my/](https://merchant.revenuemonster.my/)
[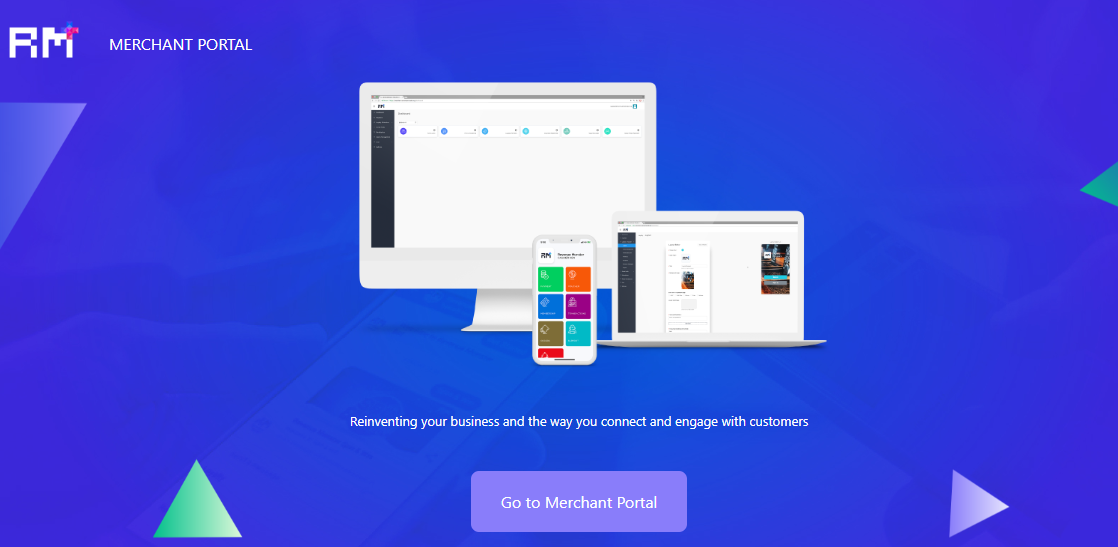](https://docs.antlysis.com/uploads/images/gallery/2026-01/scaled-1680-/oozELObKGqSrlNXm-step-1.PNG)
---
##### **Revenue Monster Portal**
## tes1
### test2
#### test4
##### tesrt5
**1)** Open both links, then log in to the **Revenue Monster** portal using the details provided.
[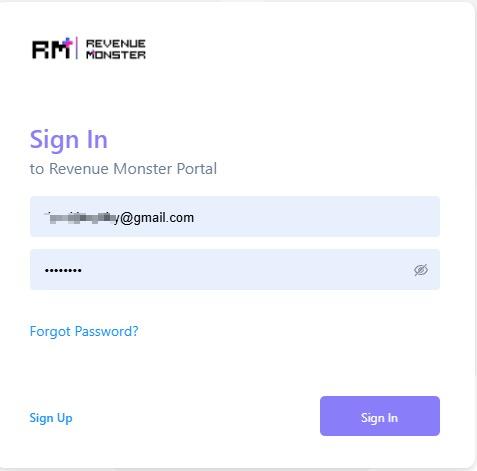](https://docs.antlysis.com/uploads/images/gallery/2026-05/4K464jSrG9FVGsyN-whatsapp-image-2026-05-12-at-10-24-33-am.jpeg)
---
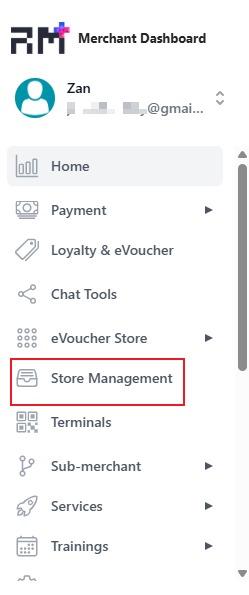
**2)** Click on **‘Store Management’** on the left sidebar.
[](https://docs.antlysis.com/uploads/images/gallery/2026-05/UjDTt0kfb7aEMyYj-whatsapp-image-2026-05-12-at-10-36-25-am.jpeg)
---
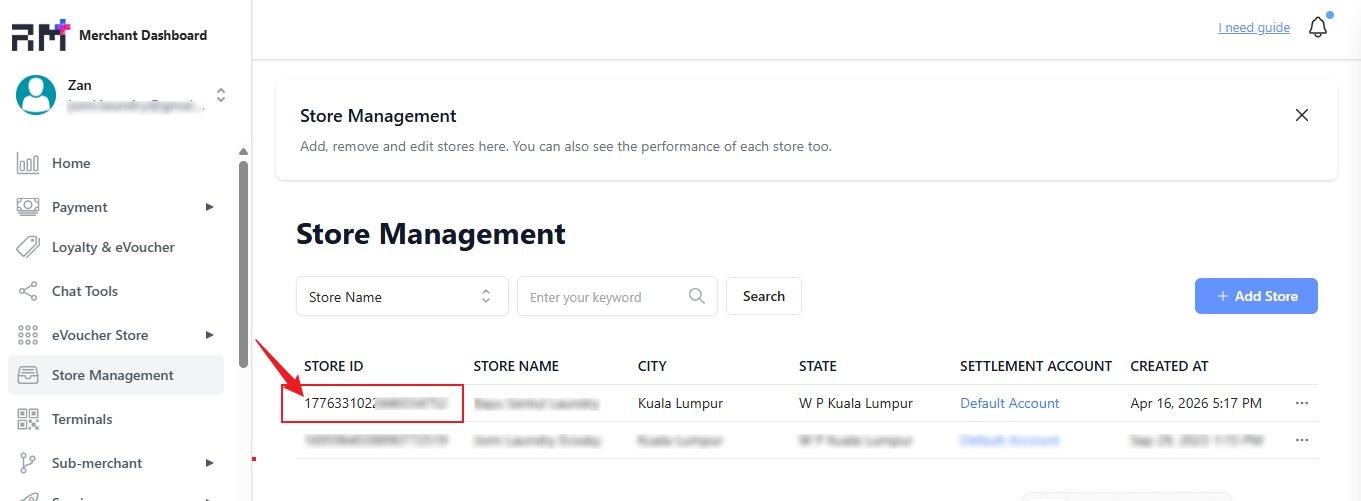
**3)** Below the **Store ID**, you will see a number. Click on it.
[](https://docs.antlysis.com/uploads/images/gallery/2026-05/3zcOSBHqZiyRV2fz-whatsapp-image-2026-05-12-at-11-11-51-am.jpeg)
---
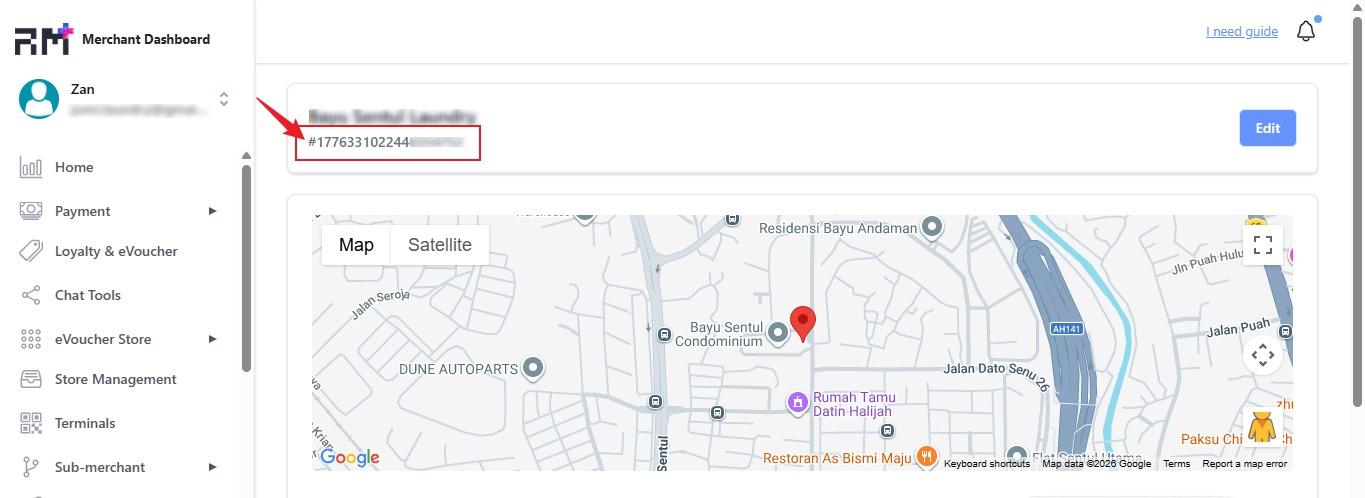
**4)** Copy the Store ID number without the ‘#’ symbol—numbers only.
[](https://docs.antlysis.com/uploads/images/gallery/2026-05/xe6koBAY4G0IqIOA-whatsapp-image-2026-05-12-at-11-15-13-am.jpeg)
---
**5)** Before copying the Store ID number, go to the **LAUNDRO ''operator login''** page and log in to the portal using the provided **ID** and **PASSWORD**.
[](https://docs.antlysis.com/uploads/images/gallery/2026-01/scaled-1680-/pCCbXxaK7zZcUbeL-laundro-step1-copy.PNG)
---
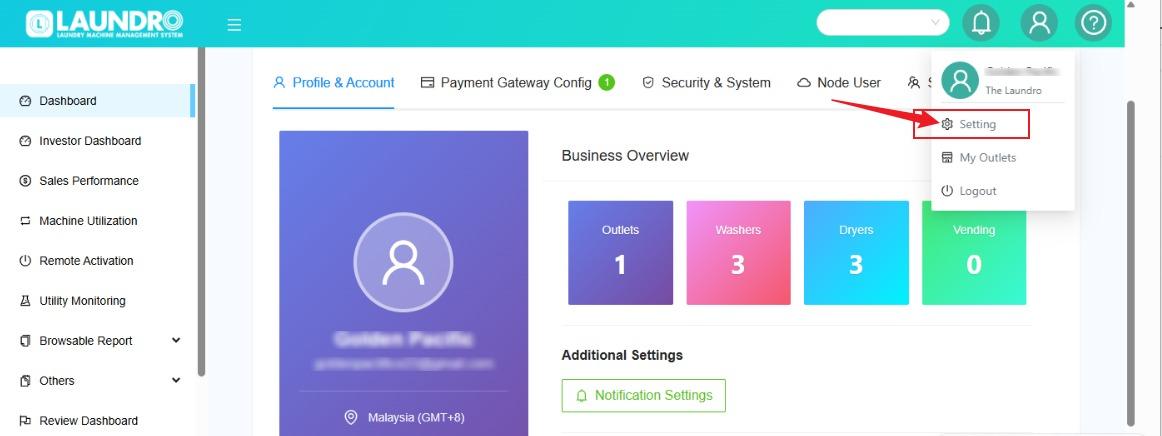
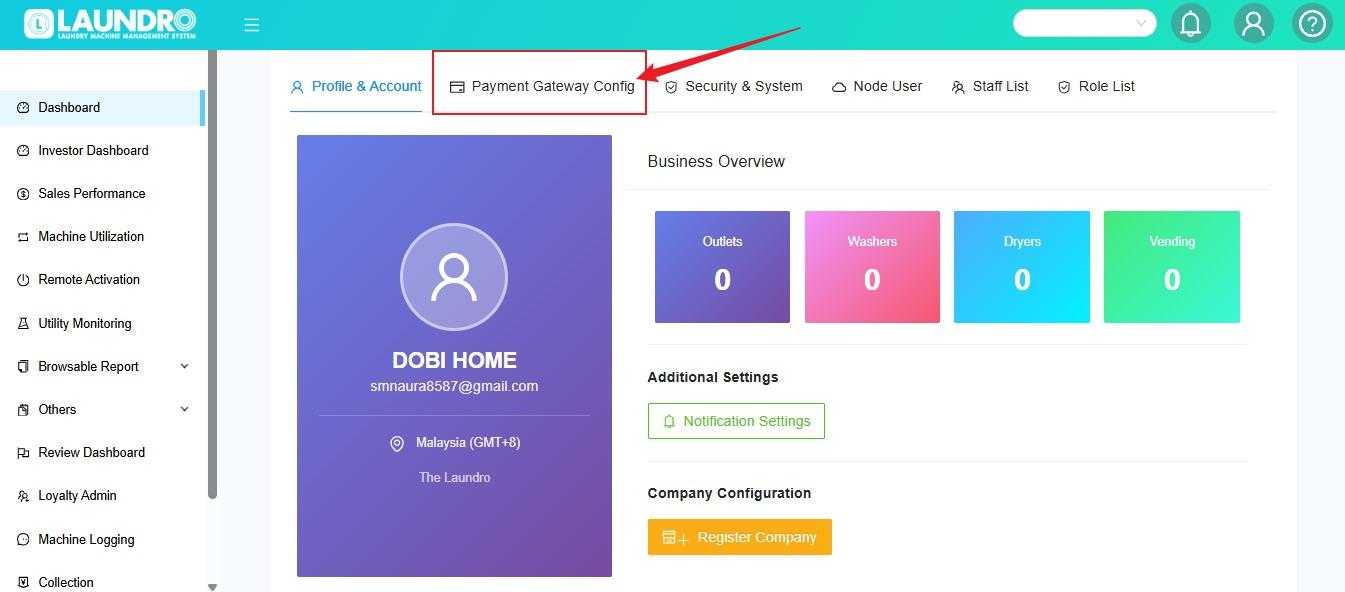
**6)** On the top right, click on the user bar, then select ‘**Setting.**
[](https://docs.antlysis.com/uploads/images/gallery/2026-05/5EbUrYL2E4ZHcLTI-whatsapp-image-2026-05-12-at-11-23-14-am.jpeg)
---
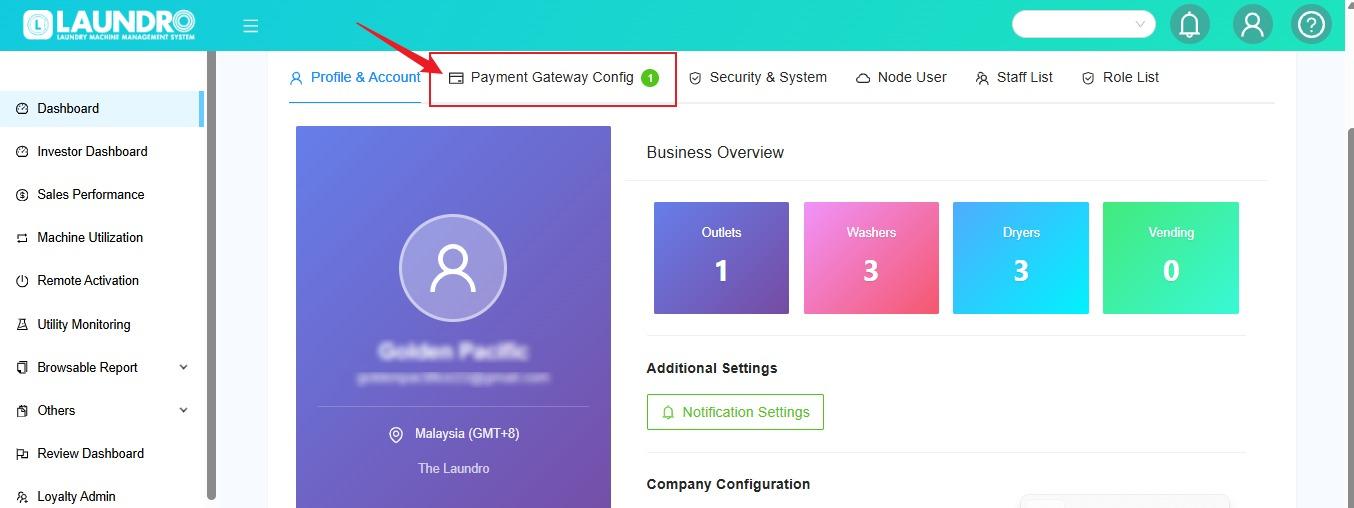
**7)** Now, you are on the **Settings page**. **'Select Payment Gateway Config**.
[](https://docs.antlysis.com/uploads/images/gallery/2026-05/UhHm69s7VnPuONMF-whatsapp-image-2026-05-12-at-11-43-41-am.jpeg)
---
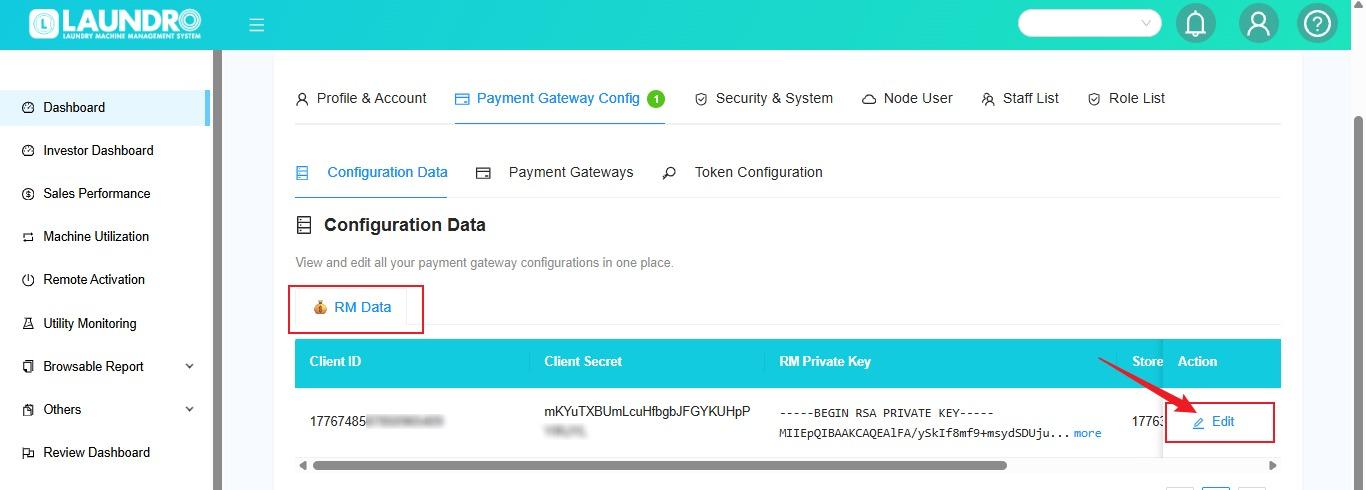
**8)** Scroll down until you see **‘RM DATA.’** Under **‘Action,’** click the pencil icon **( Edit ).**
[](https://docs.antlysis.com/uploads/images/gallery/2026-05/j5lPvDJmMQZoY3yU-whatsapp-image-2026-05-12-at-11-30-57-am.jpeg)
---
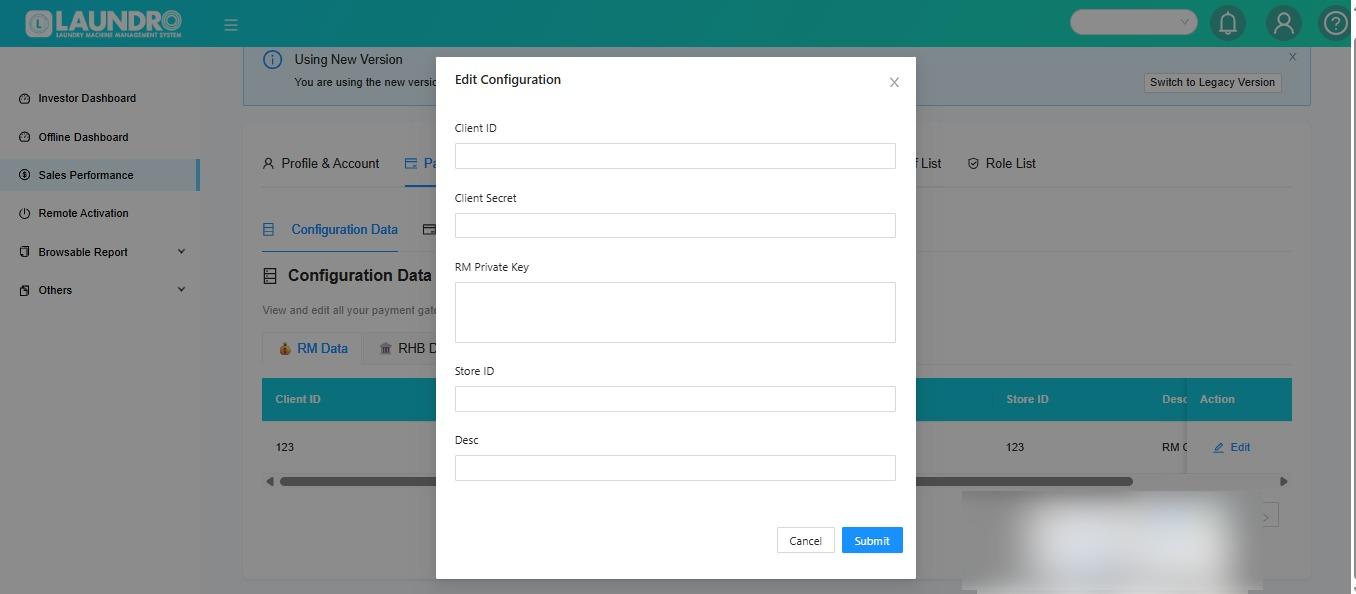
**9)** The **Edit Configuration** page will pop up.
[](https://docs.antlysis.com/uploads/images/gallery/2026-05/fjXbUdB4mXtQRRV9-whatsapp-image-2026-05-20-at-11-34-12-am.jpeg)
---
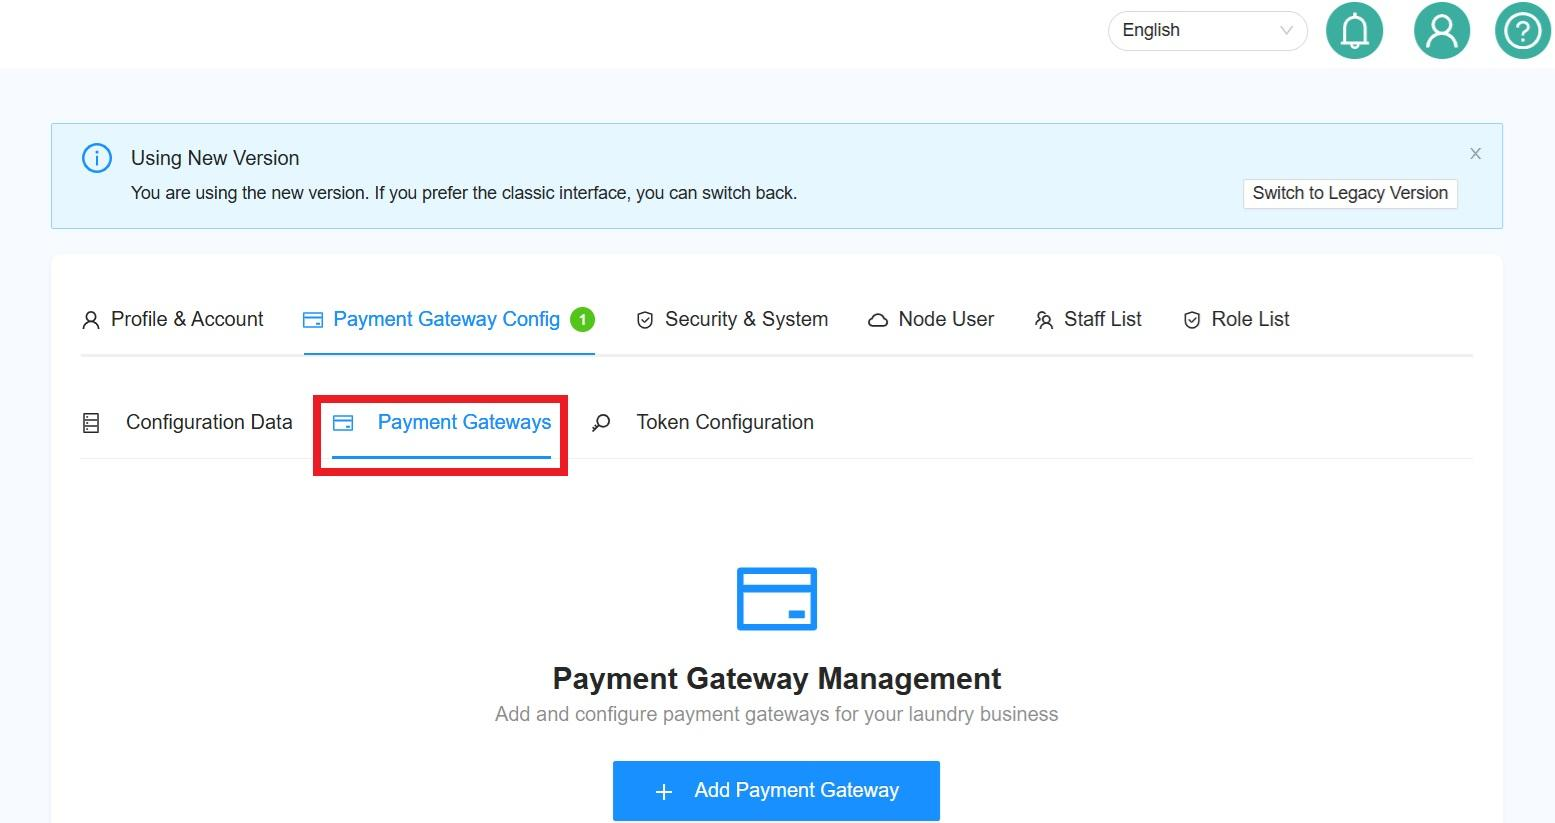
**10)** For **New / 1st time Set-up Payment Gateway**. **Click** Payment Gateway Config Tab.
[](https://docs.antlysis.com/uploads/images/gallery/2026-05/LH92LNjnikSQ5yjf-whatsapp-image-2026-05-22-at-11-22-16-am.jpeg)
**11)** Click into **+ Add Payment Gateway.**
[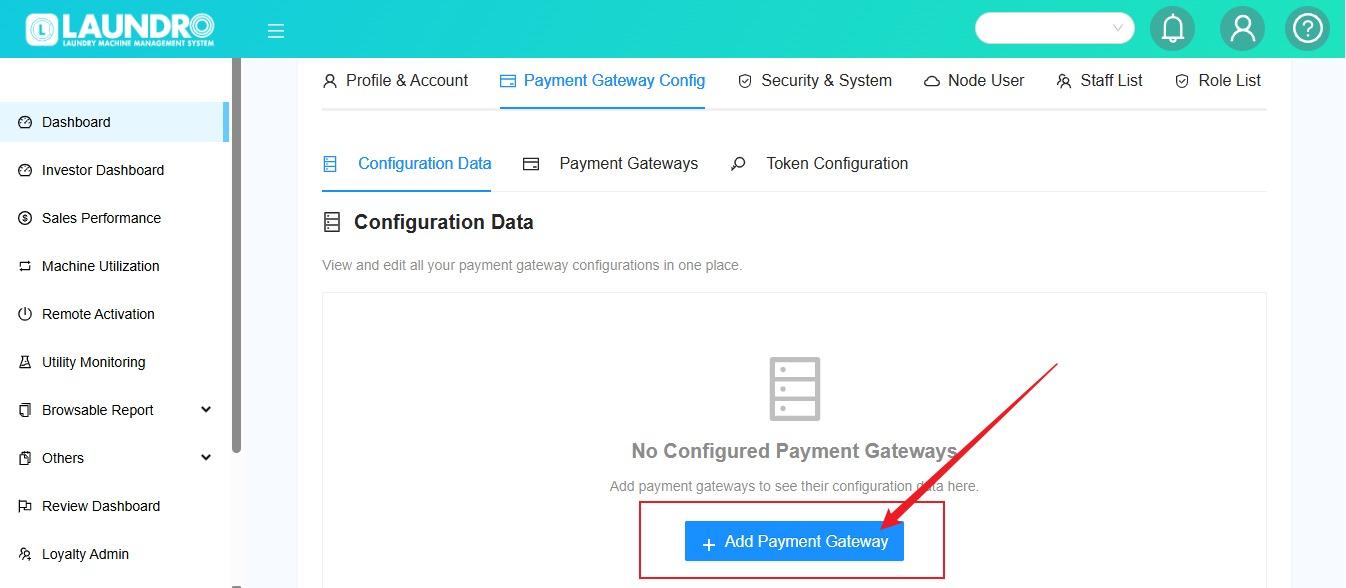](https://docs.antlysis.com/uploads/images/gallery/2026-05/PMzET24hKjgr9mJ5-whatsapp-image-2026-05-22-at-11-26-32-am.jpeg)
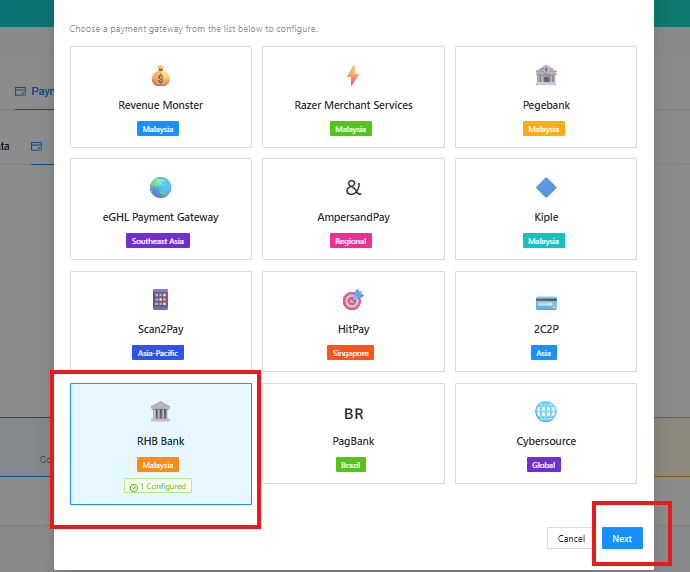
**12)**
1. **Click** Into **Revenue Monster** Tab.
2. **Click Next.**
[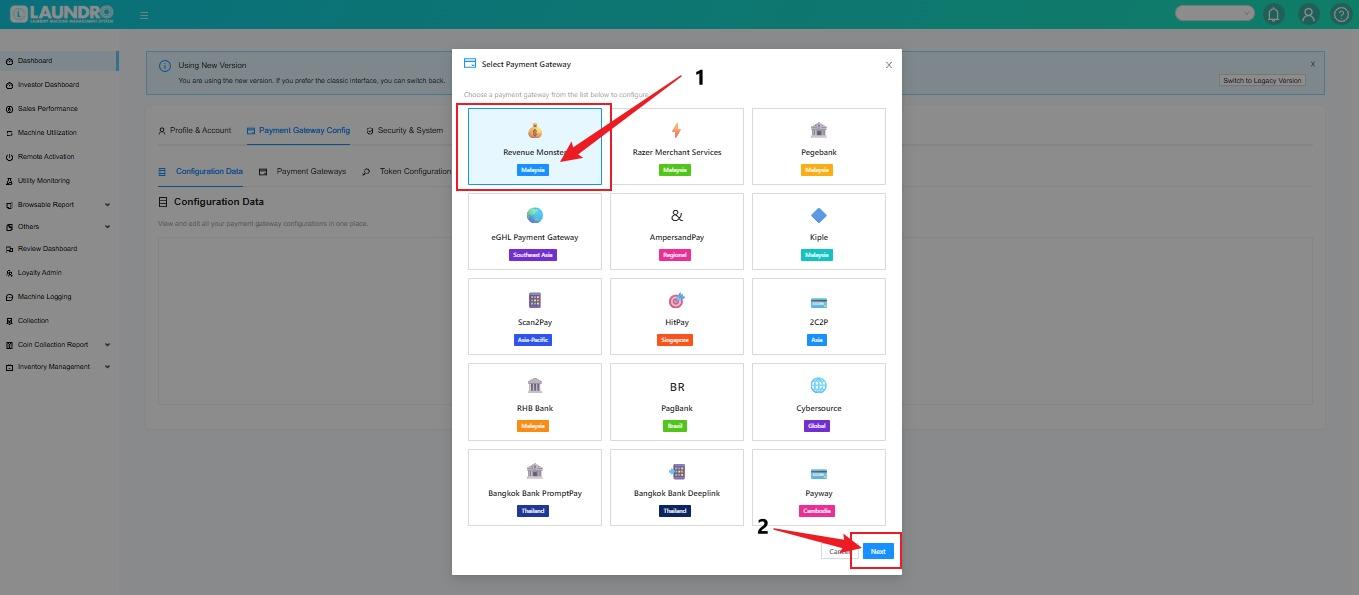](https://docs.antlysis.com/uploads/images/gallery/2026-05/lyWQ5fZjypewy2Yv-whatsapp-image-2026-05-22-at-11-29-26-am.jpeg)
**13)** Continue fill-up from section **1 - 5** then click **"Submit".**
[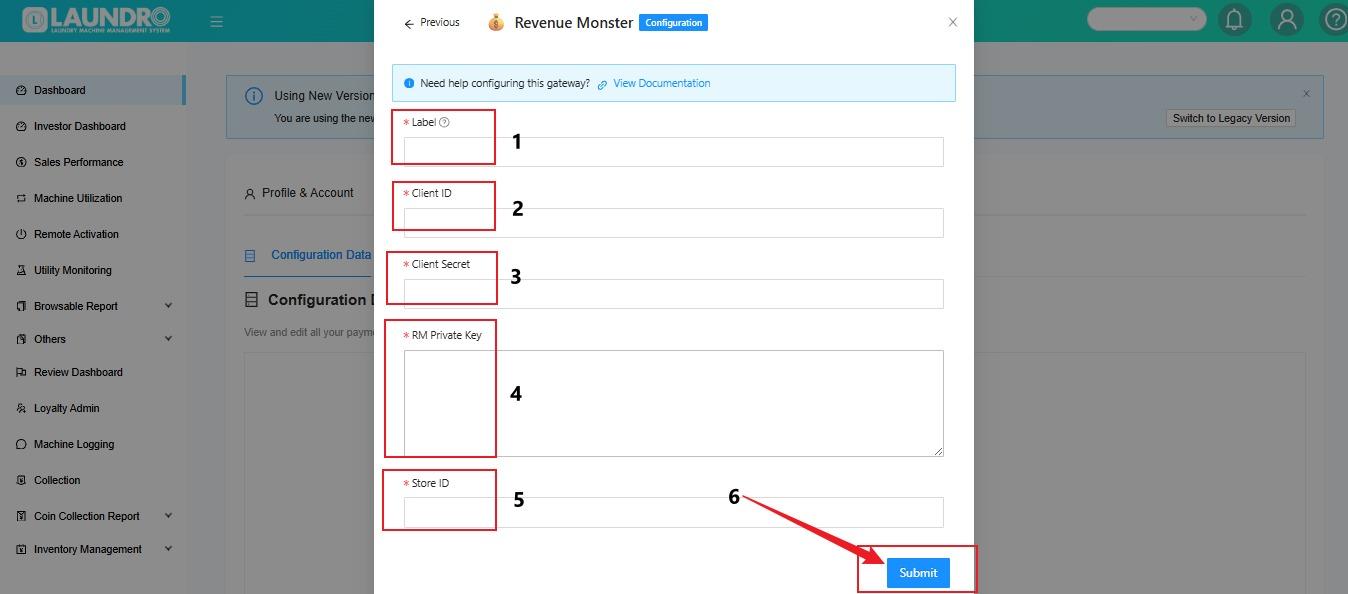](https://docs.antlysis.com/uploads/images/gallery/2026-05/sjYyz2kfKt7cY8TC-whatsapp-image-2026-05-22-at-11-37-44-am.jpeg)
**14)** From step (4), copy the Store ID and paste it into the Laundro ‘Store ID’ field.**15)** Update the description (DESC) to **‘RM Config'**.
[](https://docs.antlysis.com/uploads/images/gallery/2026-05/KNDKiFkiPyJ0qJzu-whatsapp-image-2026-05-20-at-11-35-40-am-1.jpeg)
---
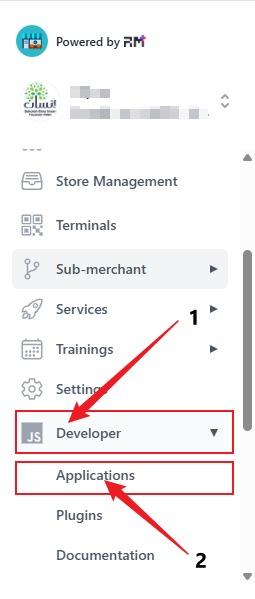
**16)** Leave it on the Laundro page. Now go back to the Revenue Monster page, click on **‘Developer,’** and select **‘Application.**
[](https://docs.antlysis.com/uploads/images/gallery/2026-05/VEDQSeHT7U9BRrNQ-whatsapp-image-2026-05-21-at-1-30-39-pm.jpeg)
---
**17)** On the Application page, below the **Client ID**, click on the number.
[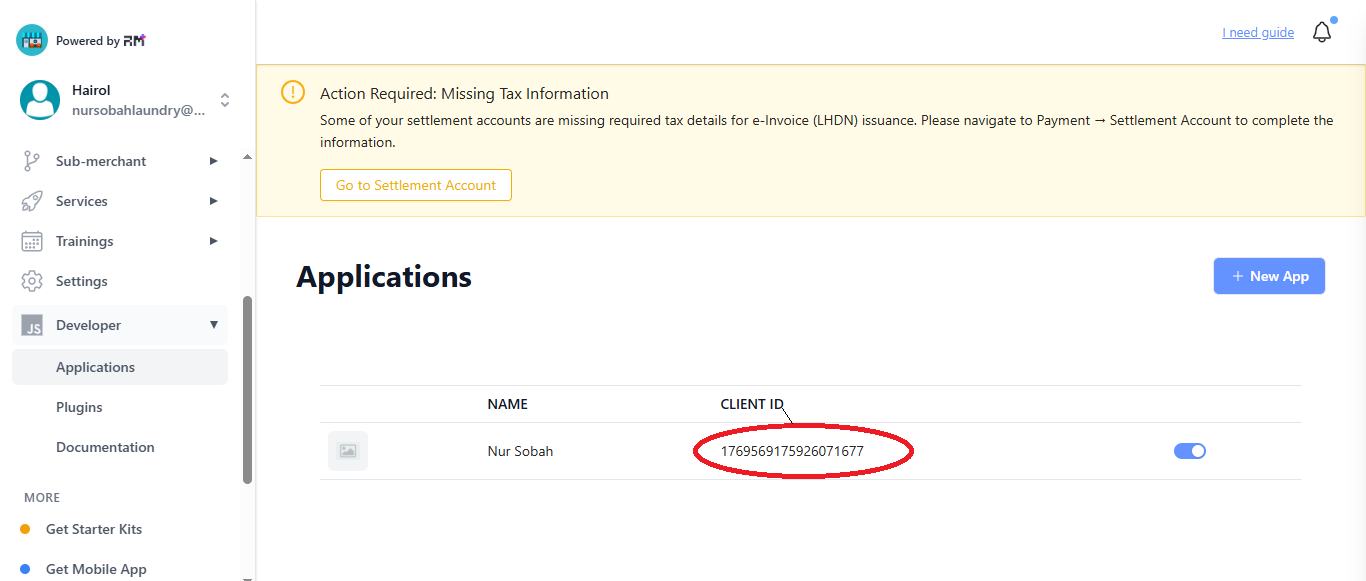](https://docs.antlysis.com/uploads/images/gallery/2026-01/lFMM397J4U3iAPZt-step-11.PNG)
---
#### For New Application
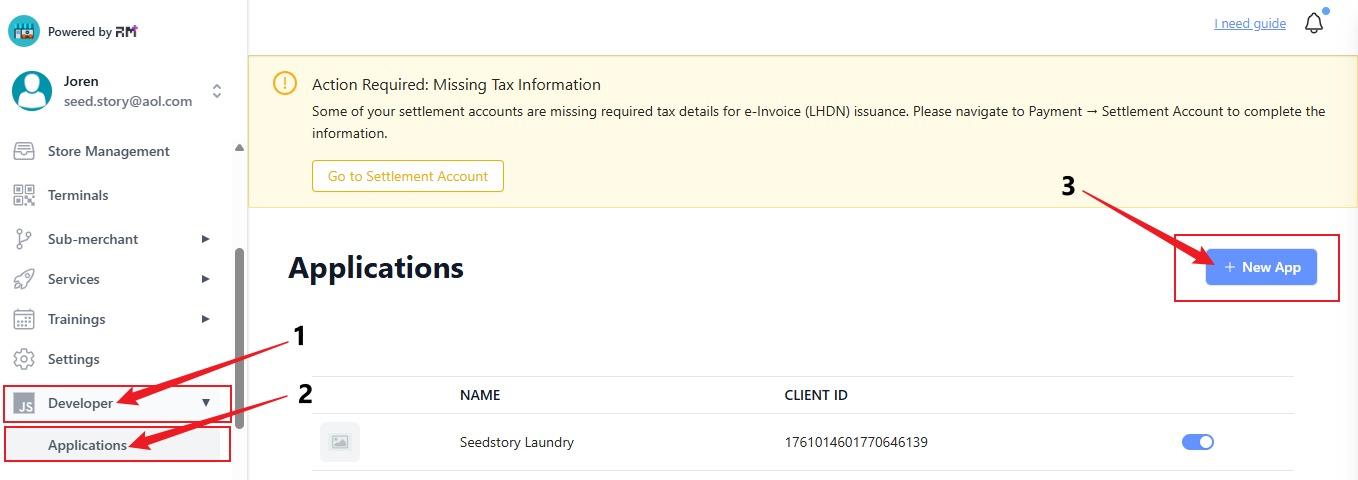
**18)** For **New Application** -
1. Click **Developer** on the left menu.
2. Select **Applications**.
3. Click the **+ New App** button on the top right.
4. **After New App Success. Follow Page #17.**
[](https://docs.antlysis.com/uploads/images/gallery/2026-05/ixXSU7oFJKvqiyfG-whatsapp-image-2026-05-13-at-11-33-32-am.jpeg)
---
**19)** The page will appear like this.
[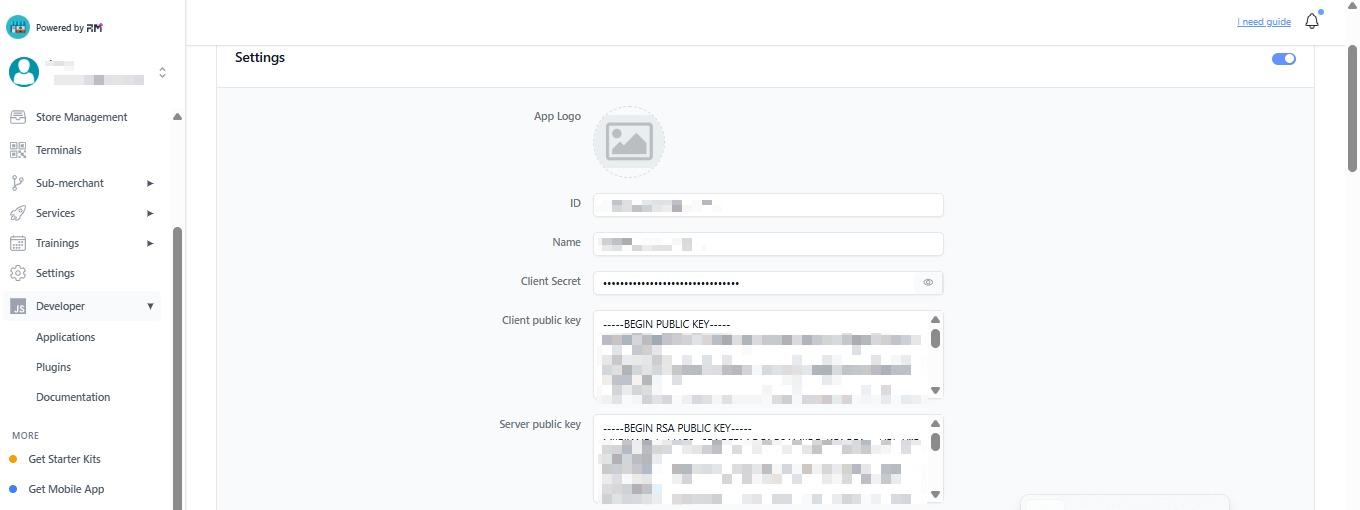](https://docs.antlysis.com/uploads/images/gallery/2026-05/zMBthUSwuQ6k1SHL-whatsapp-image-2026-05-13-at-11-52-39-am.jpeg)
---
**20)** Scroll down until find **'Generate'**. Click on Generate. Then will appear key word at **Private key & Public key**. Copy the Public key & Paste into Client Public Key **@Page 21 #4.** Copy Private Key & Paste into RM Private Key **@Page 13 #4.**
[](https://docs.antlysis.com/uploads/images/gallery/2026-05/4zquSZ4yZKiBrO5r-whatsapp-image-2026-05-13-at-11-47-11-am.jpeg)
---
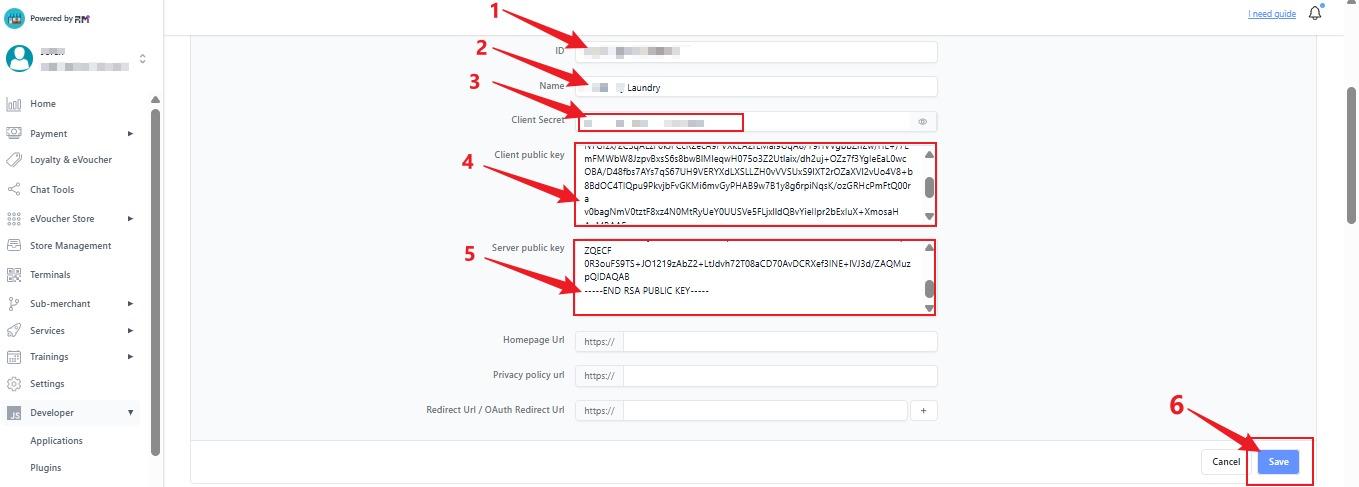
**21)**
1. Enter the **ID**.
2. Enter the **Outlet Name**.
3. Fill in the **Client Secret**.
4. Paste the **Client Public Key**.
5. Paste the **Server Public Key**.
6. After completing all fields, click **Save**.
[](https://docs.antlysis.com/uploads/images/gallery/2026-05/q2IhbXh5duGZUIAR-whatsapp-image-2026-05-12-at-12-20-24-pm.jpeg)
---
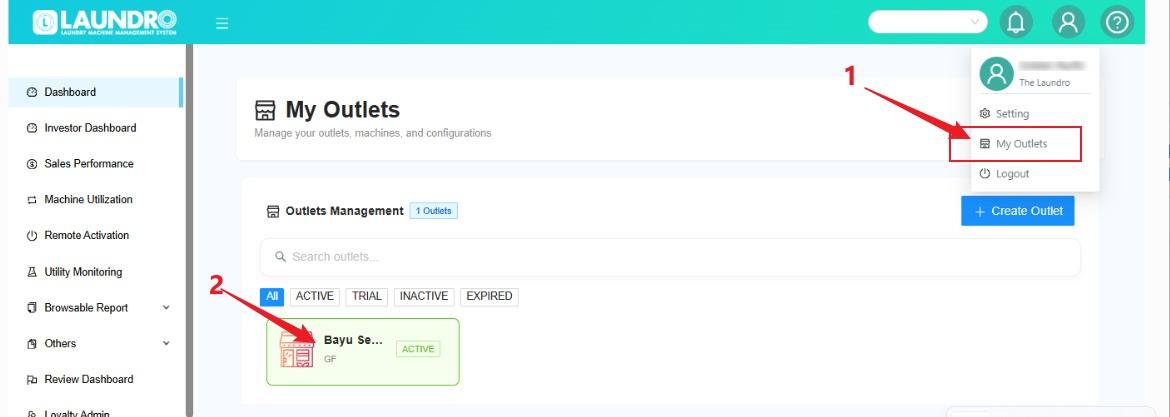
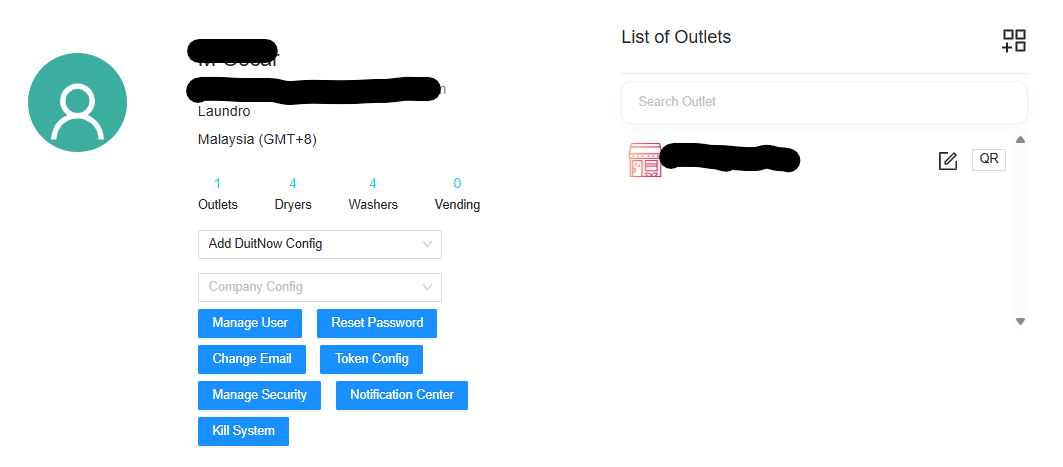
**22)** Update payment gateways and other settings
1. Click the profile icon and select **“My Outlets.”**
2. Click the **outlet box** to open the outlet details.
[](https://docs.antlysis.com/uploads/images/gallery/2026-05/gHz3UdxLdDM6J6gA-whatsapp-image-2026-05-12-at-11-55-10-am.jpeg)
---
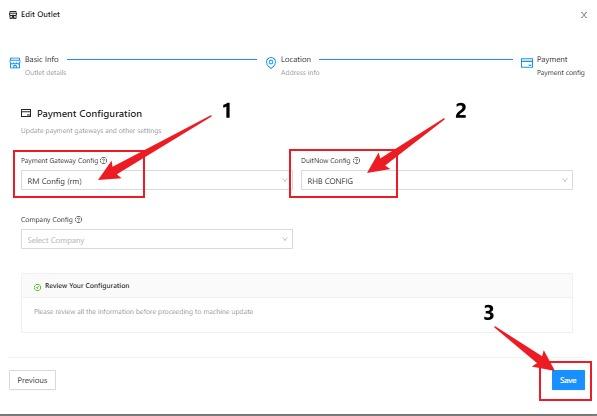
**23)**
1. **Click into Payment Gateway Config** - Choose Payment Gateway.
2. **Click into Duitnow Config** - Choose Duitnow Config
3. After complete **Click Save**
[](https://docs.antlysis.com/uploads/images/gallery/2026-05/0bIj0t8g9Sb6w9QX-whatsapp-image-2026-05-20-at-10-43-33-am.jpeg)
---
---
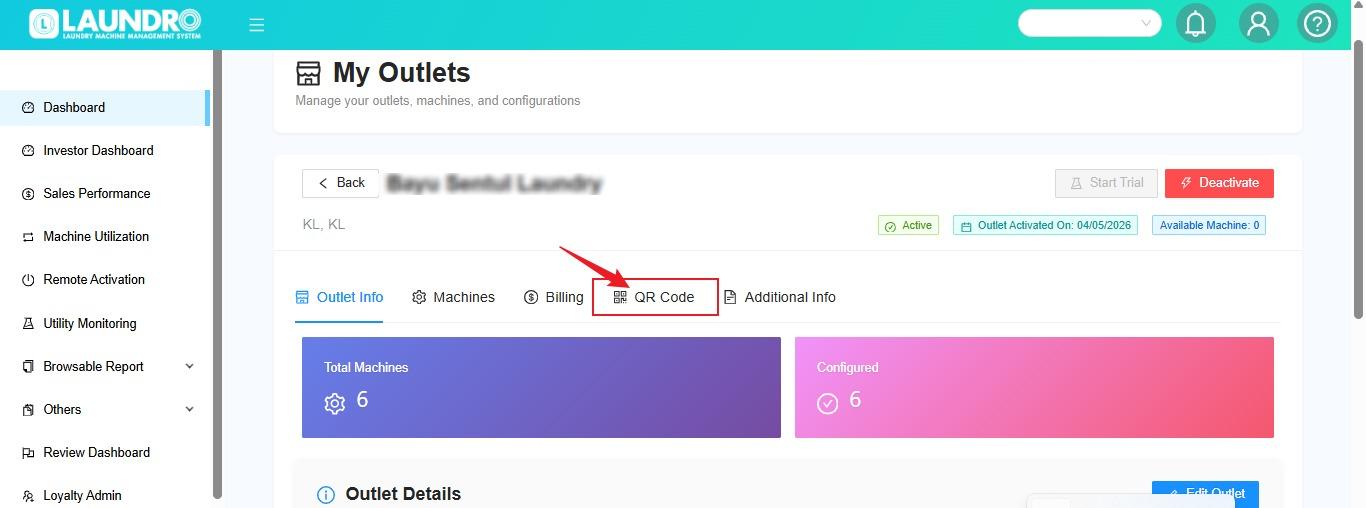
**24)** To load **QR Code**.
1. Click the profile icon and select **“My Outlets.”**
2. Click the **outlet box** to open the outlet details.
[](https://docs.antlysis.com/uploads/images/gallery/2026-05/gHz3UdxLdDM6J6gA-whatsapp-image-2026-05-12-at-11-55-10-am.jpeg)
---
**25)** Click **QR Codes.**
[](https://docs.antlysis.com/uploads/images/gallery/2026-05/m4T51RwwczpzCr1R-whatsapp-image-2026-05-12-at-11-47-15-am.jpeg)
---
**26)** Click **Download All.**
[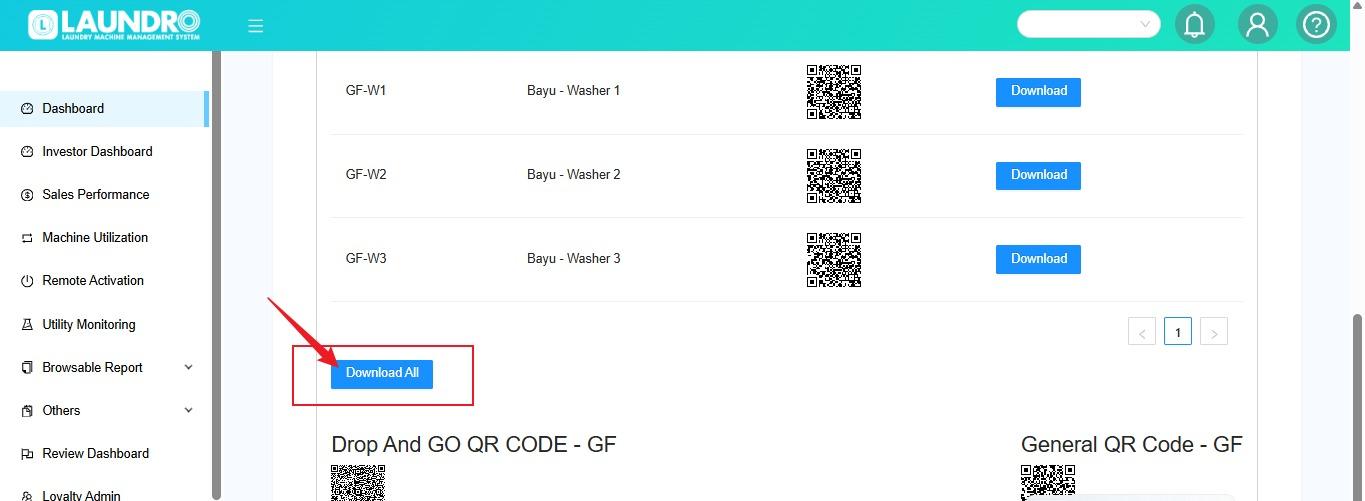](https://docs.antlysis.com/uploads/images/gallery/2026-05/du99aK1RbWURrk6Q-whatsapp-image-2026-05-12-at-11-49-42-am.jpeg)
# Duitnow Setup
Login operator -> click paymnent gateway -> click add duitnow
[](https://docs.antlysis.com/uploads/images/gallery/2026-03/fFInmEjwtm0mafJT-image-1773124963270.png)
Add credentials
ONBOARDING KEY Just click (space)
[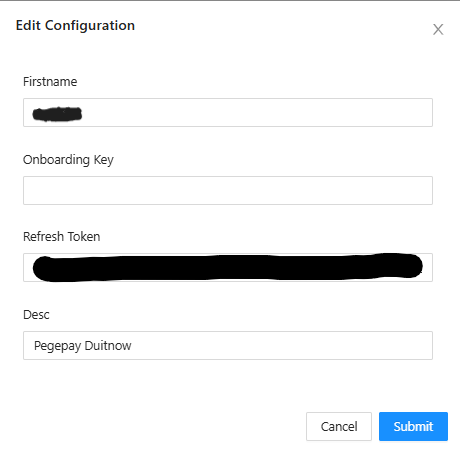](https://docs.antlysis.com/uploads/images/gallery/2026-03/ZQcDd8B17N2VoNAR-image-1773125321450.png)
After submit please click token config Select option - Duitnow
Duitnow Config - Pegepay Duitnow
[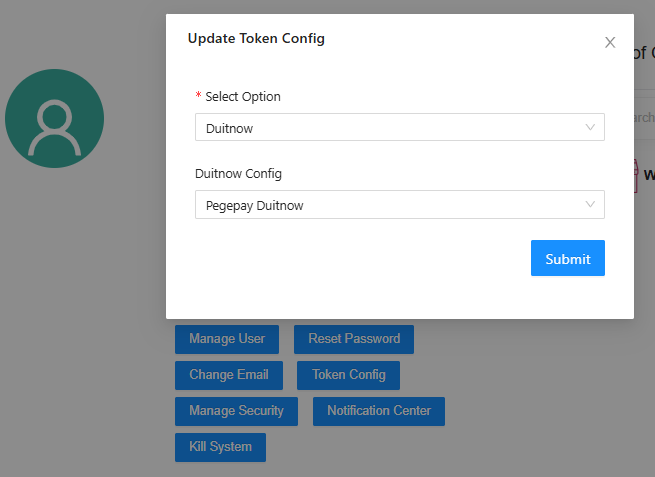](https://docs.antlysis.com/uploads/images/gallery/2026-03/pzw1b3l8U5ukqOvH-image-1773125305219.png)
# EGHL
# Eghl Setup Guide
Document will be updated soon!
# Ampersand
# Ampersand Setup Guide
Document will be updated soon!!!
# Kiple
# Kiple Setup Guide
Document will be updated soon!!!
# Scan2pay
# Scan2pay Setup Guide
Document will be updated soon!!!
# 2C2P
# 2C2P Setup Guide
Document will be updated soon!!!
# Pagbank
# Pagbank Setup Guide
Document will be updated soon!!!
# Cybersource
# Cybersource Setup Guide
Document will be updated soon!!!