Laundro FAQ
All frequently asked questions
- 📩 How to Check SMS Credit
- 💳 How to Top Up SMS Credit
- Check Fiuu Payment Records
- 🏪 How to Activate an Outlet
- Add Outlet In Operator
- Change connected WiFi
- 🔄 How to Reset Alpha-1 for a New Outlet
- How To Get Kiosk URL
- How to Cancel Voucher / Remove Credit or Stamp
- 🔳 How to Get QR Codes
- Top-up But Not Get Token
- 📩 How to Change E-mail
- 👥 How to Create a Staff User
- 🏪 How to Deactivate an Outlet
- Epayment Transaction Record: Filter & Download Guide
- How To View Individual / All Machine Sales Transactions
- 📊 Costing & Sales Report
- Chemical Report v2
- Terminal Record v2
- Einvoice Report v2
- 📦 Inventory Management v2
- Coin Collection by outlet v2
- Bill Collection v2
- Coin Collection V2
- Outlet Group
- Offline Dashboard
- Machine Utilization v2
- Sales / Bill Performance v2
- Summary Dashboard v2
- ➕ Add Machines to an Existing Operator
- ✏️ How to Edit Machine Details
- 💰 How to Set Pricing
- ⚡ How to Do Remote Activation
- Billing Page
- Unresolved Data
- Notification Settings
- 🔔 How To Enable Daily Email Update
- ✏️ How to Edit Pricing
- 🧾 How to Get an Invoice
- How to Pay an Invoice
- How to change outlet visibility for a staff user
📩 How to Check SMS Credit
In this guide, you check how much SMS credit your operator has. SMS means Short Message Service. It is a text message that Laundro sends to a phone. It is used for member's authetication or commununication.
🎯 Purpose
Use the SMS Report to:
- 📩 Monitor SMS requests, including temporary-password requests.
- 💳 Check the remaining SMS credit balance.
- ⚠️ Identify when a top-up may be needed.
🧭 Quick Navigation
- 🔐 Log in to Laundro Portal
- ⚙️ Open Settings
- 🏪 Select Your Operator
- 📩 Open Notification Settings
- 🔍 Check Your SMS Credits
- 💳 Top Up if Needed
Before you start
- Use a user role that can open the Billing page. Only approved roles can open it. If you cannot open it, contact the Laundro administrator at admin@antlysis.com.
🔐 Step 1: Log in to Laundro Portal
Log in using your username and password.
💡 Tip: Make sure your account has the necessary permissions to access the required settings.
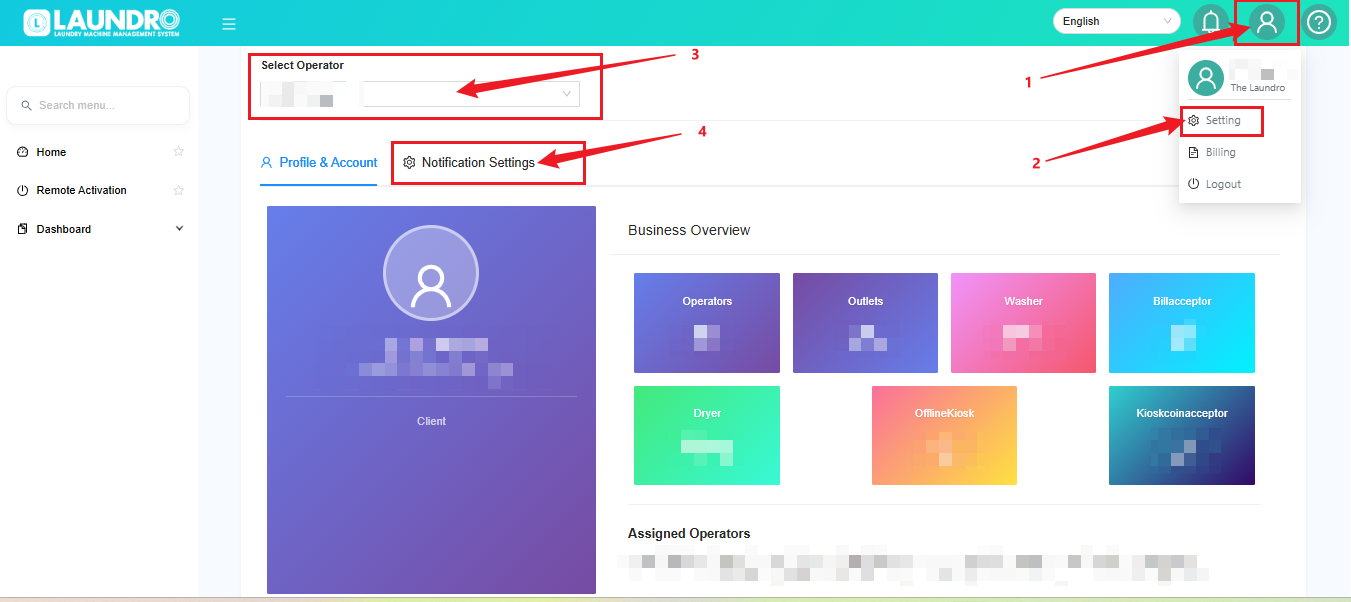
⚙️ Step 2: Open Settings
- Click the Profile icon at the top-right corner.
- Select Setting.
🏪 Step 3: Select Your Operator
3. Find the Select Operator dropdown list. Choose the operator you want to check.
4. Click the Notification Settings tab. The page opens on Profile & Account first.
💡 Tip: Make sure you select the correct operator before checking the credit balance.
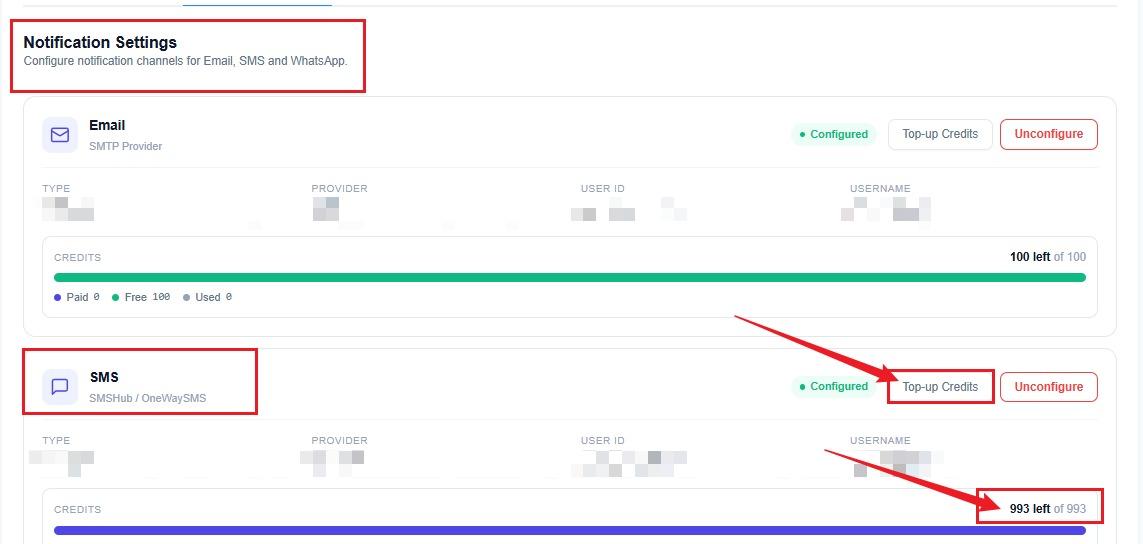
📩 Step 4: Open Notification Settings
- Scroll down to locate the SMS section.
- Find the SMS section. Scroll down if you do not see it.
- Look at the CREDITS box in the SMS section.
- Read the text at the top right of the CREDITS box.
🔍 Step 5: Check Your SMS Credits
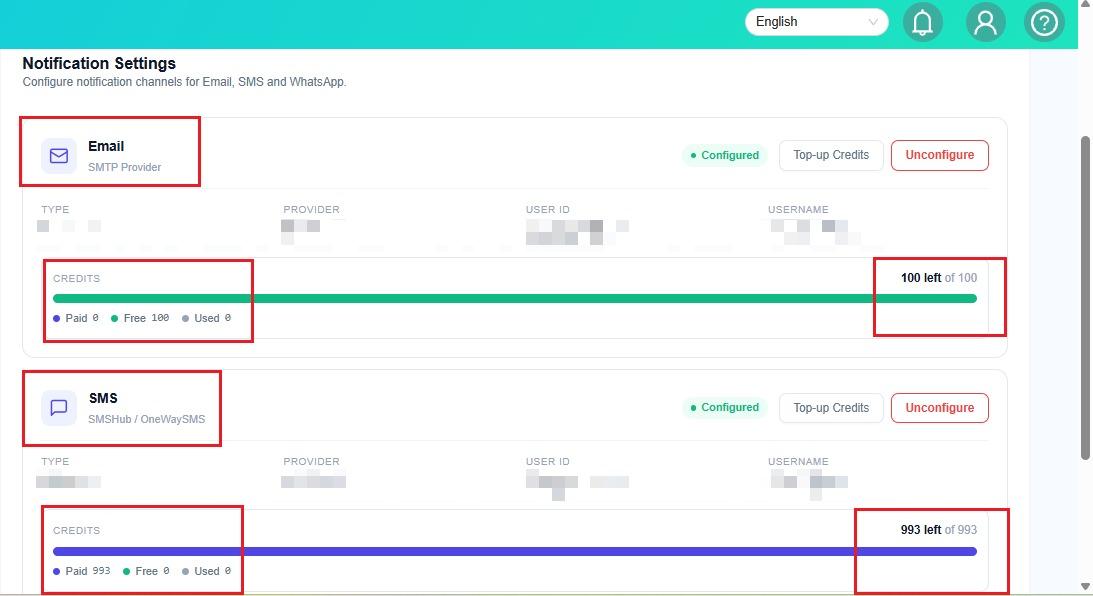
- Locate the CREDITS box under the SMS section.
- Look at the credit balance displayed at the top-right corner of the box.
- Check the balance to see how many credits remain.
💡 How to Understand Your SMS Credit Balance
Example: 589 left of 638
- ✅ 589 left — You have 589 SMS credits remaining.
- 📊 638 total — Your total credit allocation is 638.
- 📉 Used — Credits that have already been used.
- 💳 Paid — Credits purchased.
- 🎁 Free — Credits provided free of charge.
📌 Remember: One SMS uses one credit.
⚠️ Out of credits: If this message appears in red, your SMS credit balance is empty and you may need to top up.
💳 Step 6: Top Up Your SMS Credits
If you have run out of SMS credits:
- Go to the SMS section.
- Click Top-up Credits.
- Follow the instructions on the top-up page to complete the process.
➡️ Next Step: Refer to the How To Top-up SMS Credit guide for detailed instructions.
✅ Quick Checklist
Before leaving the page, make sure you have:
- ☐ Selected the correct operator.
- ☐ Located the SMS section.
- ☐ Checked the remaining credit balance.
- ☐ Confirmed whether a top-up is needed.
🎉 You're all set! You now know how to check your SMS credit balance and identify when a top-up may be required.
💳 How to Top Up SMS Credit
In this guide, you will top up the SMS credit for your Laundro notifications. SMS means Short Message Service. It is a text message that Laundro sends to a phone.
Before you start
- Sign in to Laundro.
- Use a user role that can open the Billing page. Only approved roles can open it. If you cannot open it, contact the Laundro administrator at admin@antlysis.com.
- Choose a way to pay. After you click Pay Now, Laundro opens a payment gateway. A payment gateway is a separate website that accepts your payment. It shows many payment options.
Why you need SMS credit
Laundro uses SMS credit to send text messages. When the SMS credit is finished, you cannot send SMS messages. Top up the SMS credit before it is finished.
Steps
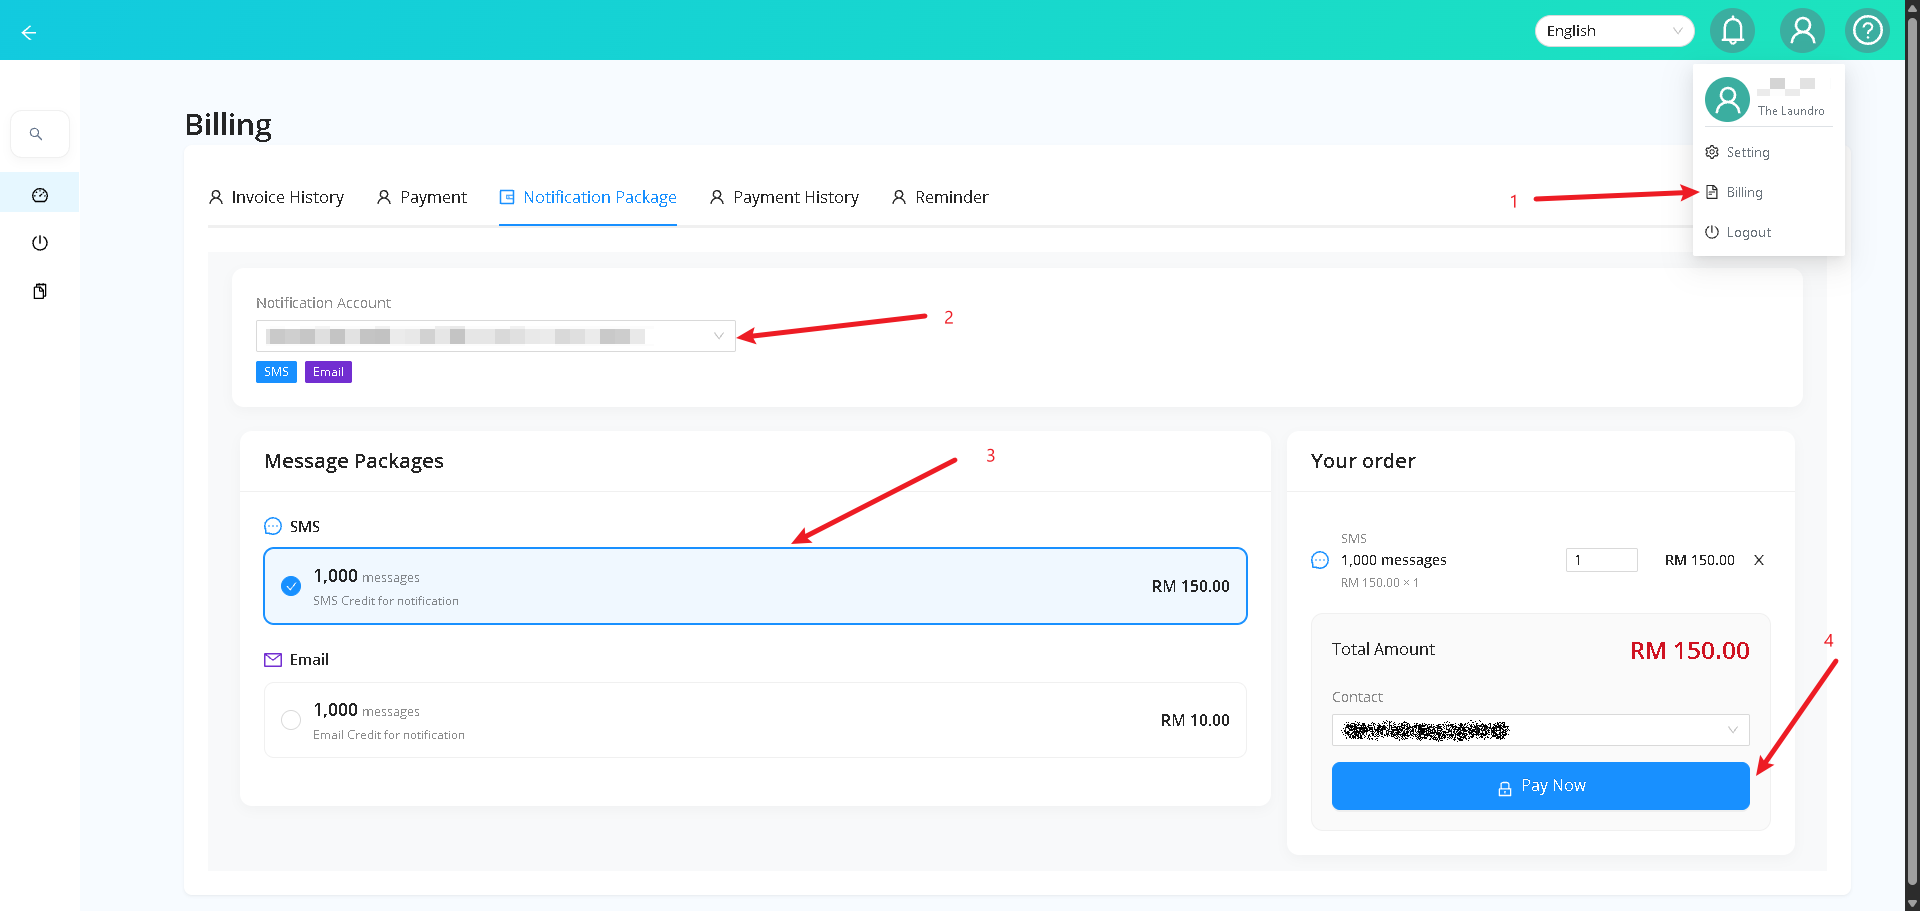
- Click the profile icon at the top right of the screen.
- Click Billing.
- Click the Notification Package tab.
- In Notification Account, choose the account that you want to top up.
- Under Message Packages, find SMS.
- Click the package with 1,000 messages.
In this example, the price is RM 150.00. RM means Malaysian ringgit.
- In Your order, check the package and the Total Amount.
- If you need more than one package, change the number in the quantity box.
- In Contact, choose the billing company. The billing company is the company name for this payment.
Laundro does not give a refund after you pay. Check the Total Amount before you click Pay Now. If you need help after you pay, contact the Laundro administrator at admin@antlysis.com.
- Click Pay Now.
- On the payment page, choose a payment option.
- Follow the instructions on the payment page to finish your payment.
What you should see
After you pay, the payment page shows a success message. Then Laundro opens the Payment History page. The new SMS credit is added immediately to the account that you chose.
Open the top-up page from Notification Settings
You can also open the top-up page from the Notification Settings tab. Use these steps instead of steps 1 to 3 above.
- Click the profile icon at the top right of the screen.
- Click Setting.
- Click the Notification Settings tab.
- In the SMS section, click Top-up Credits.
- Continue from step 4 in the Steps section above.
Terms used in this page
- Top up: add SMS credit
- SMS credit: the balance that you use to send SMS messages
- Package: a set number of messages that you buy
- Notification Account: the account that receives the credit
- Billing company: the company name for the payment
- payment gateway: a separate website that accepts your payment
- Laundro administrator: the Laundro team, who own the product and help with user roles and refunds
Check Fiuu Payment Records
(ENG)
👉Step 1: Log in to the FIUU portal using your existing ID and password.
👉Step 2: Click on "Transactions".
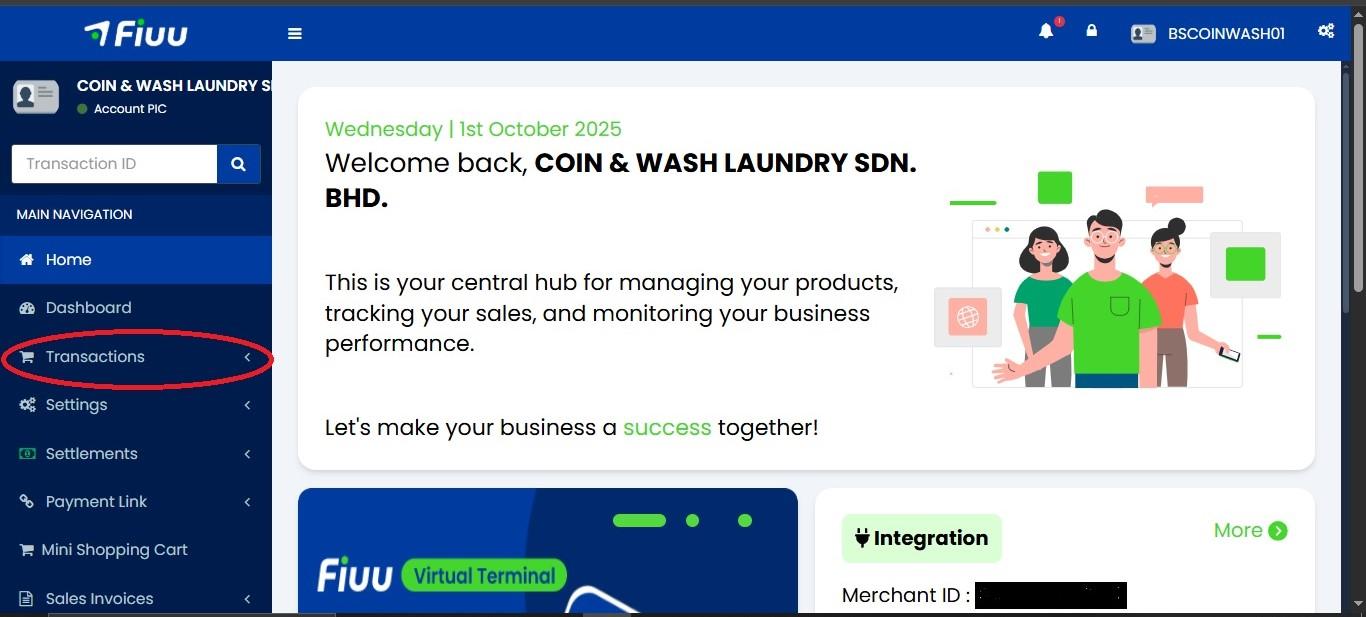
👉Step 3: Click on "Main Accounts".
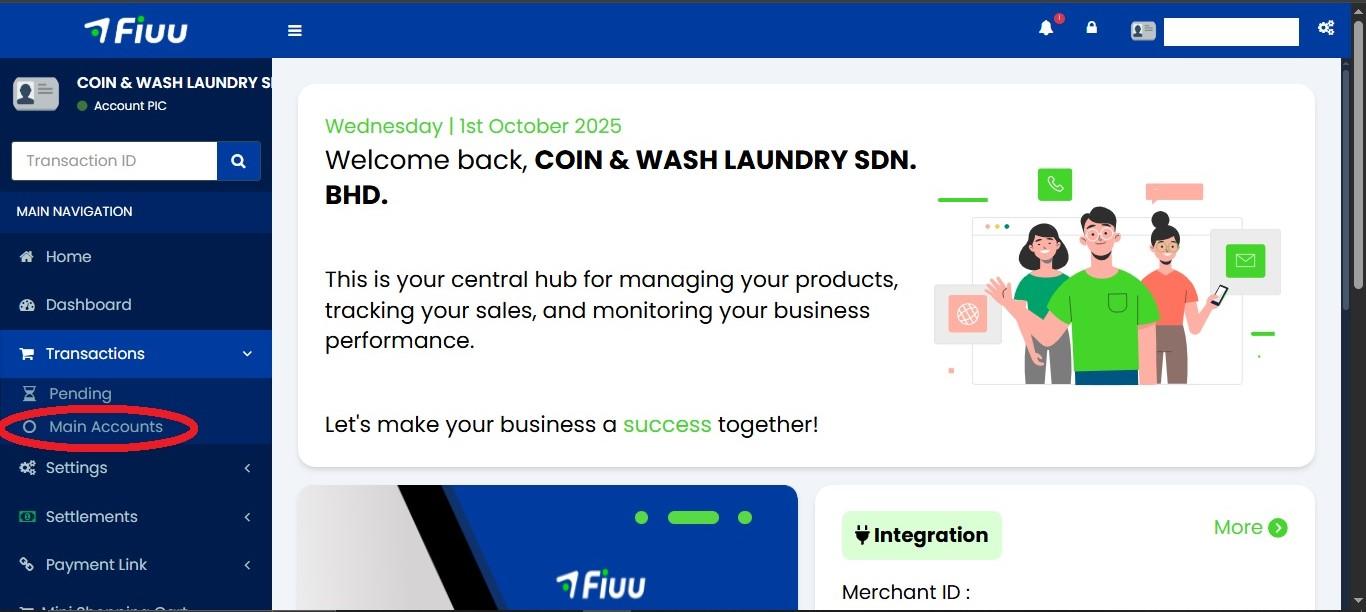
👉Step 4: Now you can view the transaction date and time.
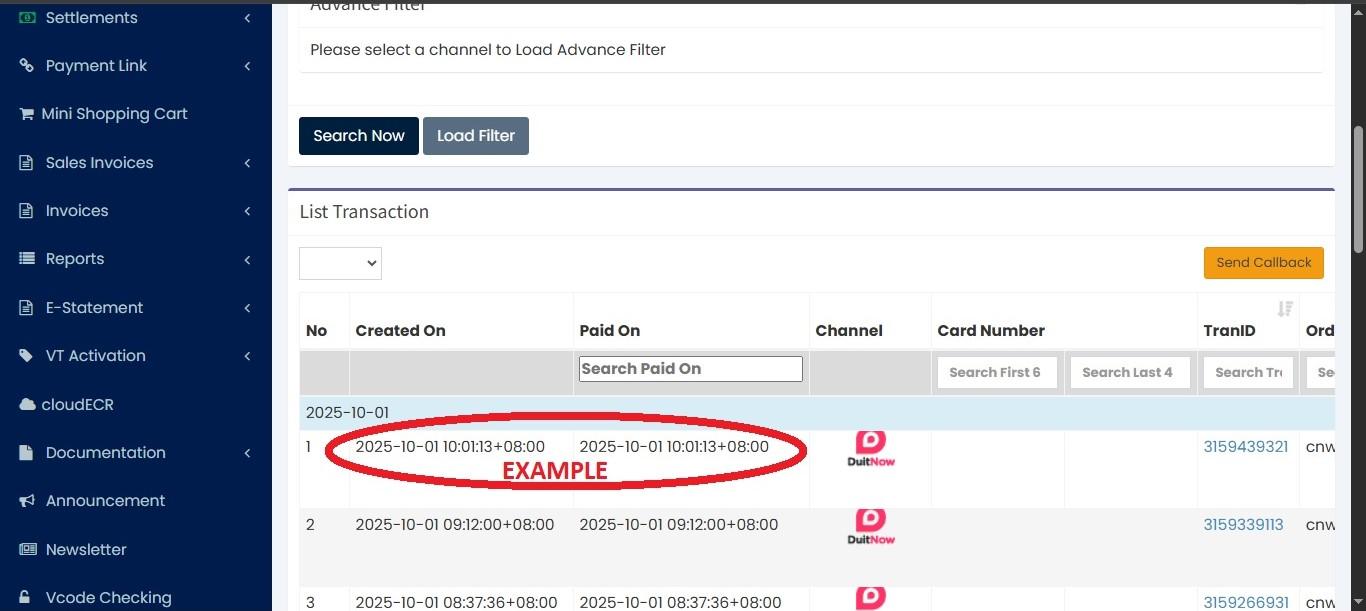
👉Step 5: Scroll to the right to view the machine details and the transaction amount.
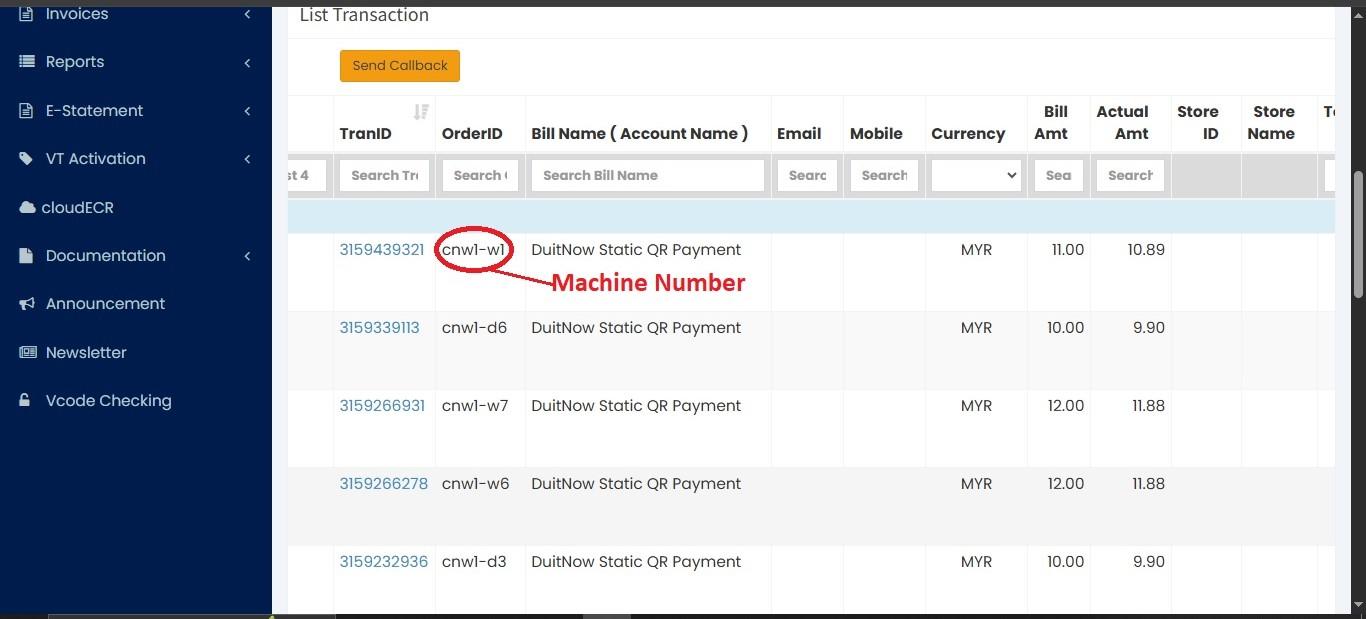
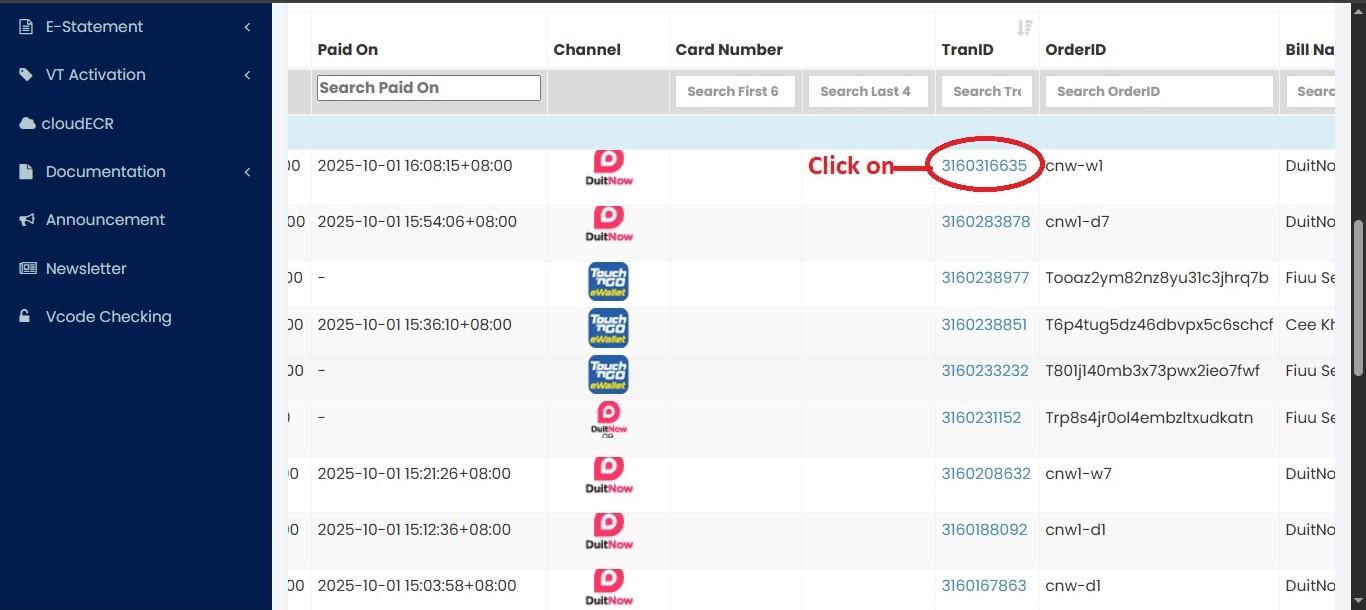
👉Step 6: Click on the "Transaction ID" to view the transaction details.
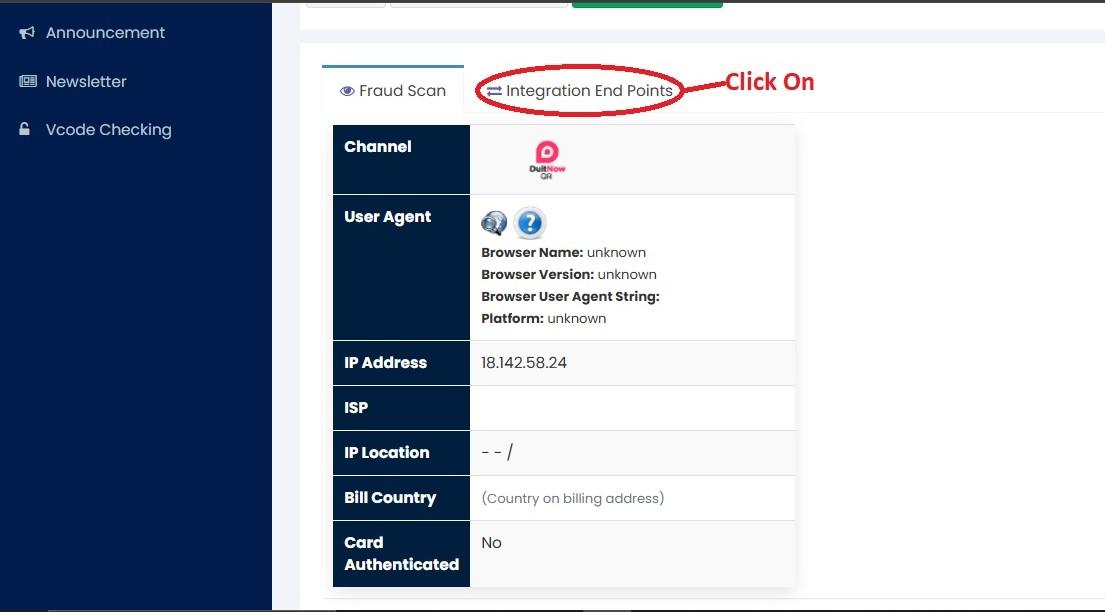
👉Step 7: Click on "Integration End Points".
Step 8: You’ll see the transaction details, which fall into three types: payment successful, payment failed, and payment delayed. Examples of each transaction type are shown below.
Transaction Details
- You can refer to the date and time details for reference.
Payment Successful
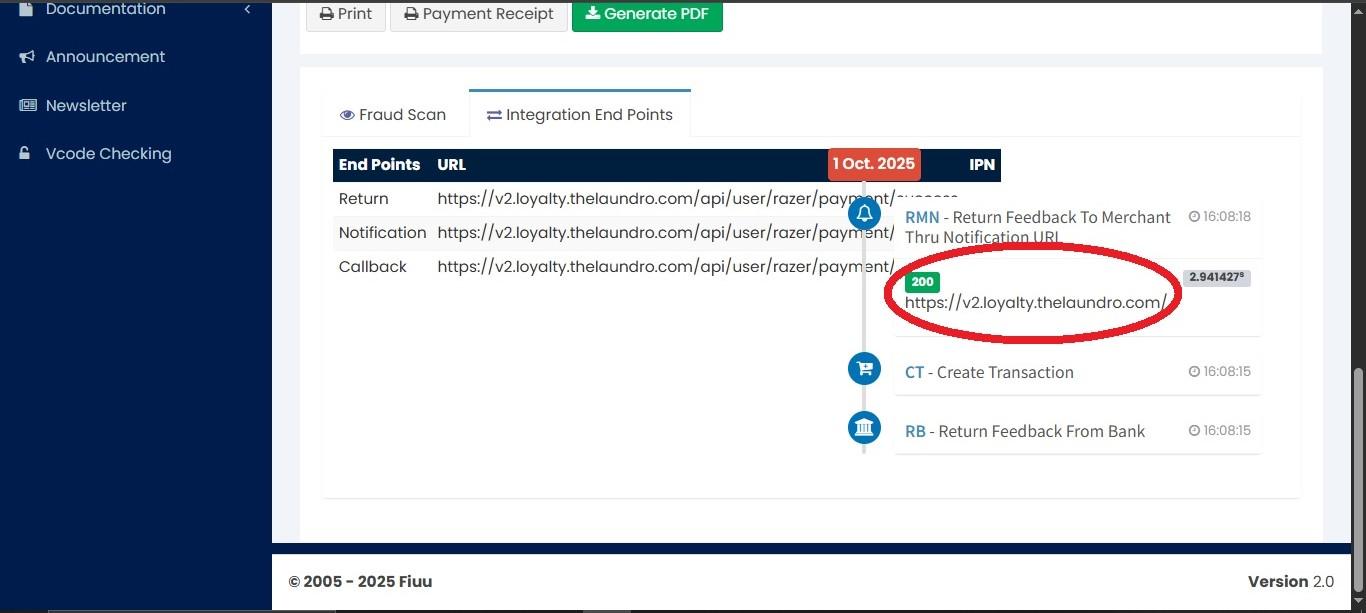
- You will see the transaction details. From there, look for the green icon with https://v2.loyalty.thelaundro.com/ — this indicates that LAUNDRO has received the transaction.
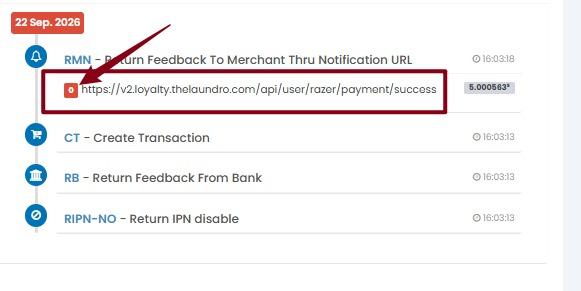
Payment Error
- If you find that the value shows “0”, it indicates an error in the FIUU system. Please email FIUU to request further clarification and a solution for the error.
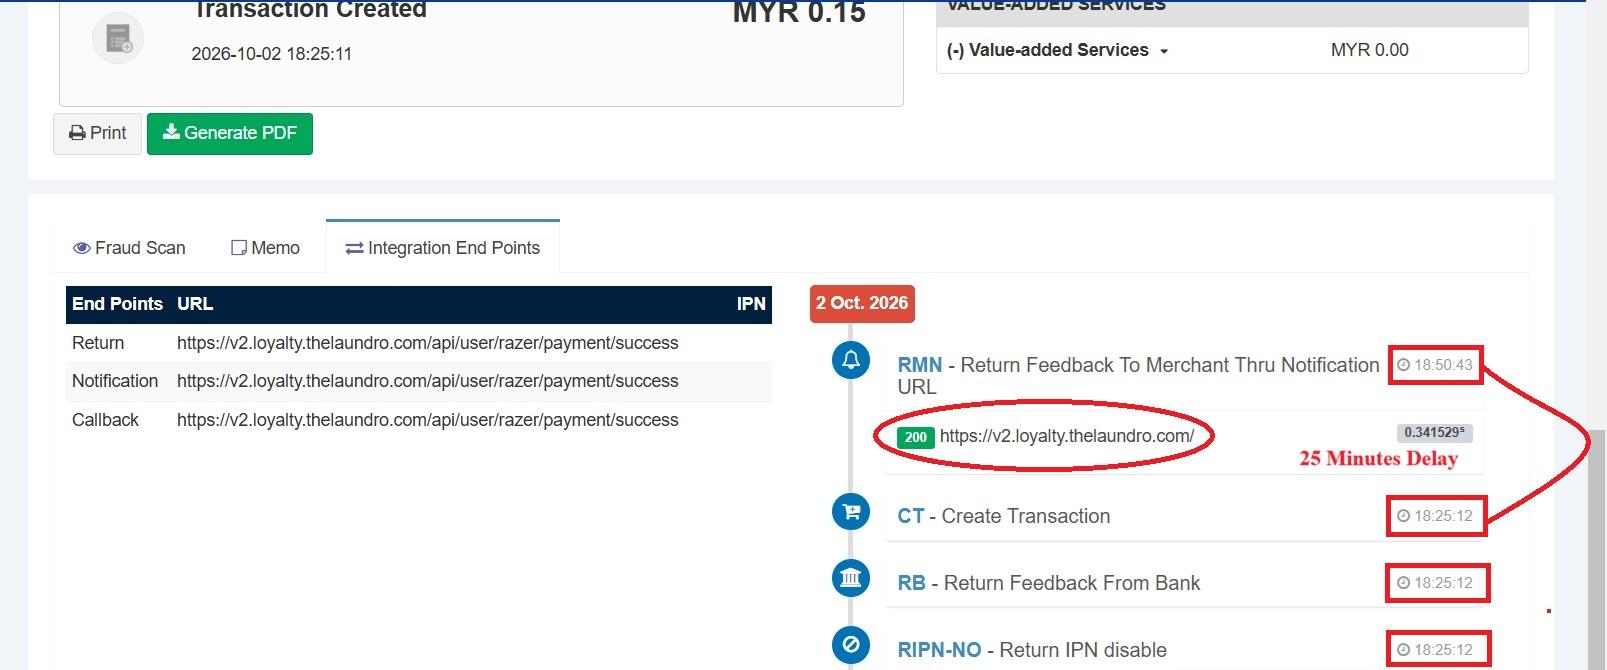
Payment Delay
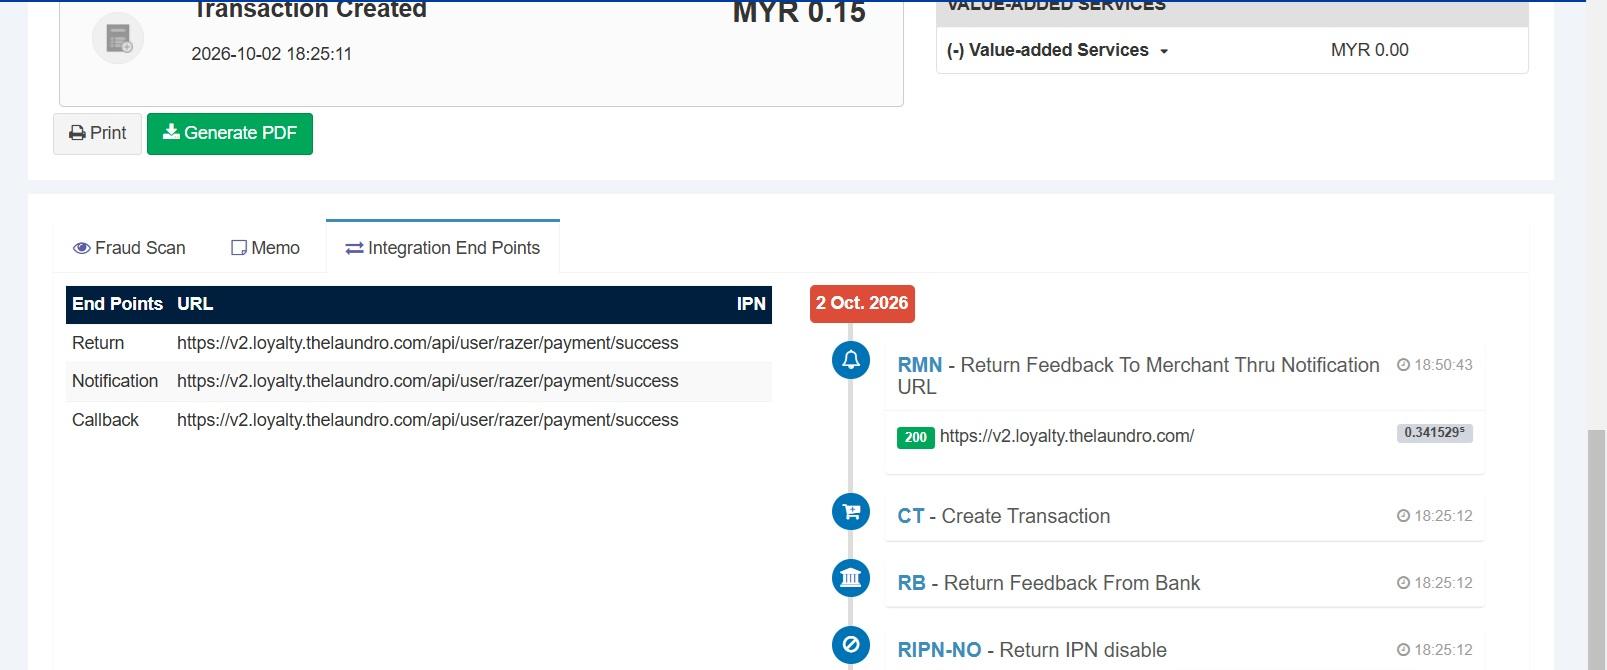
- As shown in the picture, the transaction was created at 18:25 and the feedback was returned at 18:50, indicating a delay in the payment feedback.
(BM)
👉 Langkah 1: Log masuk ke portal FIUU menggunakan ID dan kata laluan sedia ada anda.
👉 Langkah 2: Klik pada "Transactions".
👉 Langkah 3: Klik pada "Main Accounts".
👉 Sekarang anda boleh melihat tarikh dan masa transaksi.
👉 Tatal ke kanan untuk melihat butiran mesin dan jumlah transaksi.

👉Langkah 6: Klik pada "Transaction ID".
👉Langkah 7: Klik pada "Integration End Points".
Langkah 8: Anda akan melihat butiran transaksi yang terbahagi kepada tiga jenis: pembayaran berjaya, pembayaran gagal dan pembayaran tertangguh. Contoh bagi setiap jenis transaksi ditunjukkan di bawah.
Butiran Transaksi
- Anda boleh merujuk butiran tarikh dan masa.
Pembayaran Berjaya
- Anda akan melihat butiran transaksi. Cari ikon hijau bersama-sama dengan https://v2.loyalty.thelaundro.com/ — ini menunjukkan bahawa LAUNDRO telah menerima transaksi tersebut.
Ralat Pembayaran
- Jika nilai yang dipaparkan ialah “0”, ini menunjukkan terdapat ralat dalam sistem FIUU. Sila e-mel pihak FIUU untuk mendapatkan penjelasan lanjut dan penyelesaian bagi ralat tersebut.
Kelewatan Pembayaran
- Seperti yang ditunjukkan dalam gambar, transaksi dibuat pada pukul 18:25 dan maklum balas diterima pada pukul 18:50. Ini menunjukkan kelewatan maklum balas pembayaran.
🏪 How to Activate an Outlet
Welcome to the Laundro Portal Guide! 👋
Follow these steps to activate a new outlet or add billing for additional machines to an existing outlet.
💡 Before you start: Make sure all Washer and Dryer devices have been configured before activating the outlet. Pricing can be configured separately.
🔐 Step 1 — Access My Outlets
- Log in to the Laundro Portal.
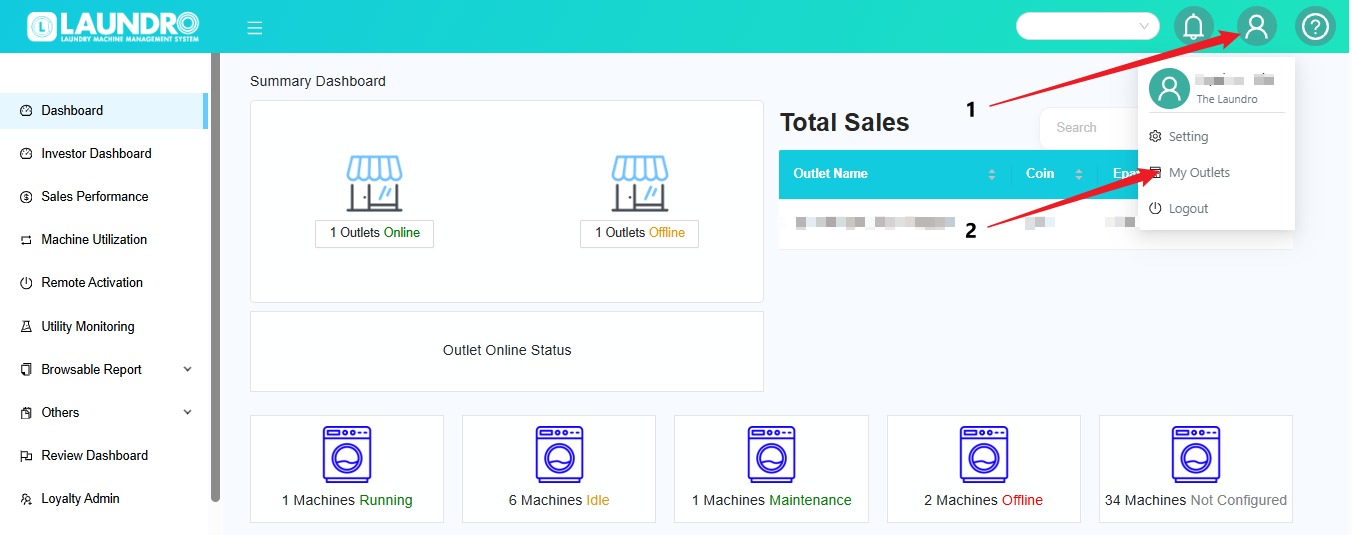
- Click the Profile icon at the top-right corner.
- Select My Outlets from the dropdown menu.
💡 Tip: Make sure you select the correct outlet before proceeding.
🧾 Step 2 — Check Your Outlet Status
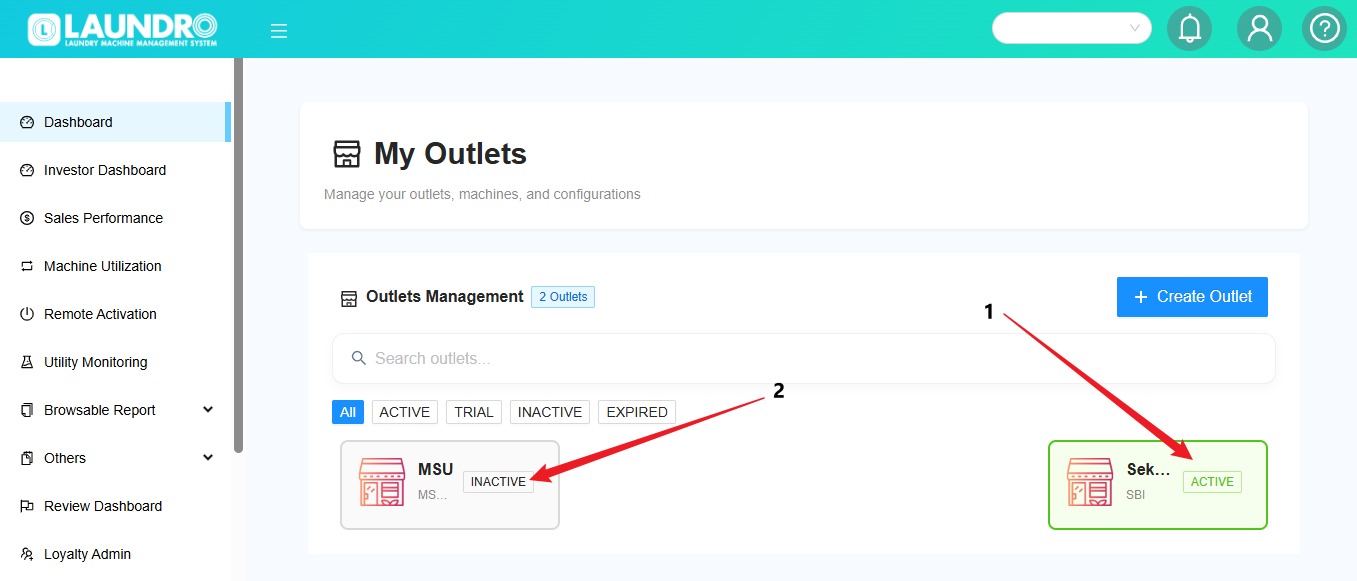
On the My Outlets page, check the status of your outlet.
- 🟢 Outlet Activated: The outlet has already been activated.
- 🟠 Outlet Inactive: Click the inactive outlet to continue with the activation process.
💳 Step 3 — Set Up Billing
To set up billing for an inactive outlet:
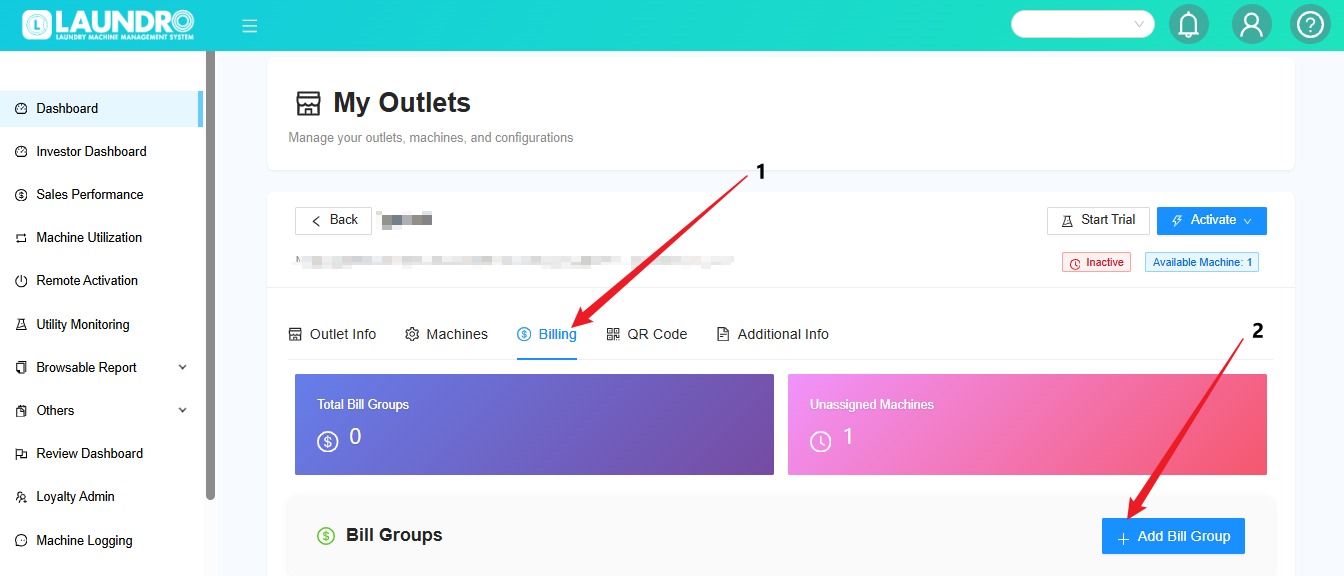
- Open the outlet you want to activate.
- Click the Billing tab.
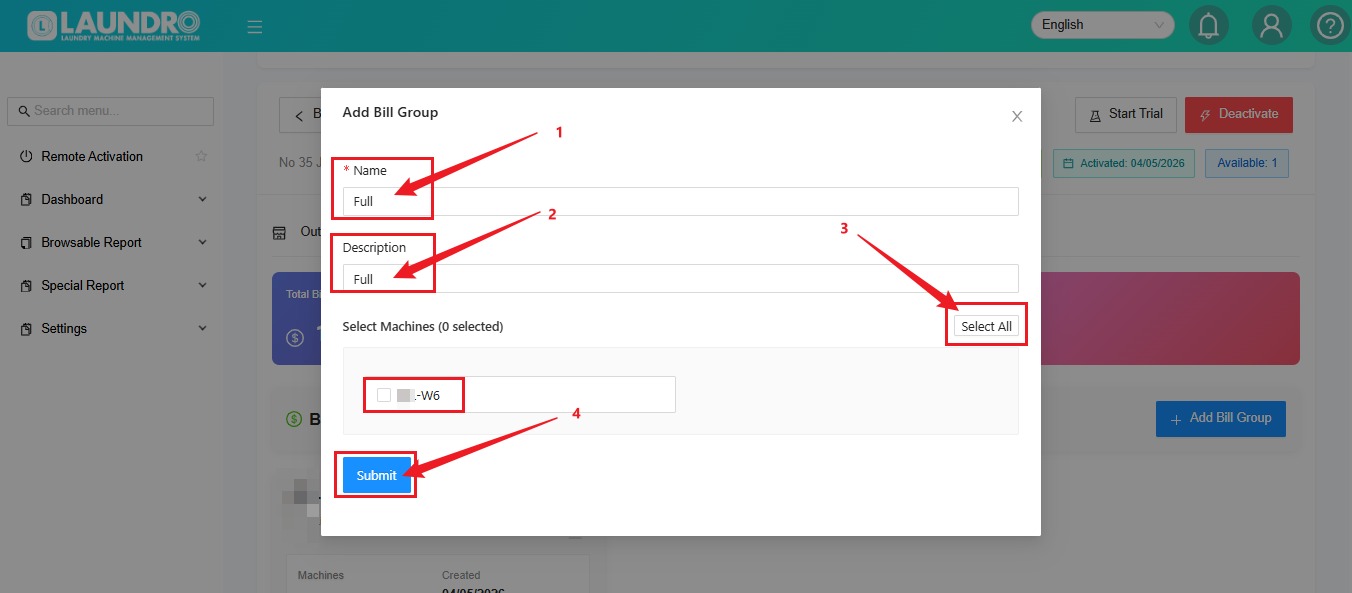
- Click + Add Bill Group.
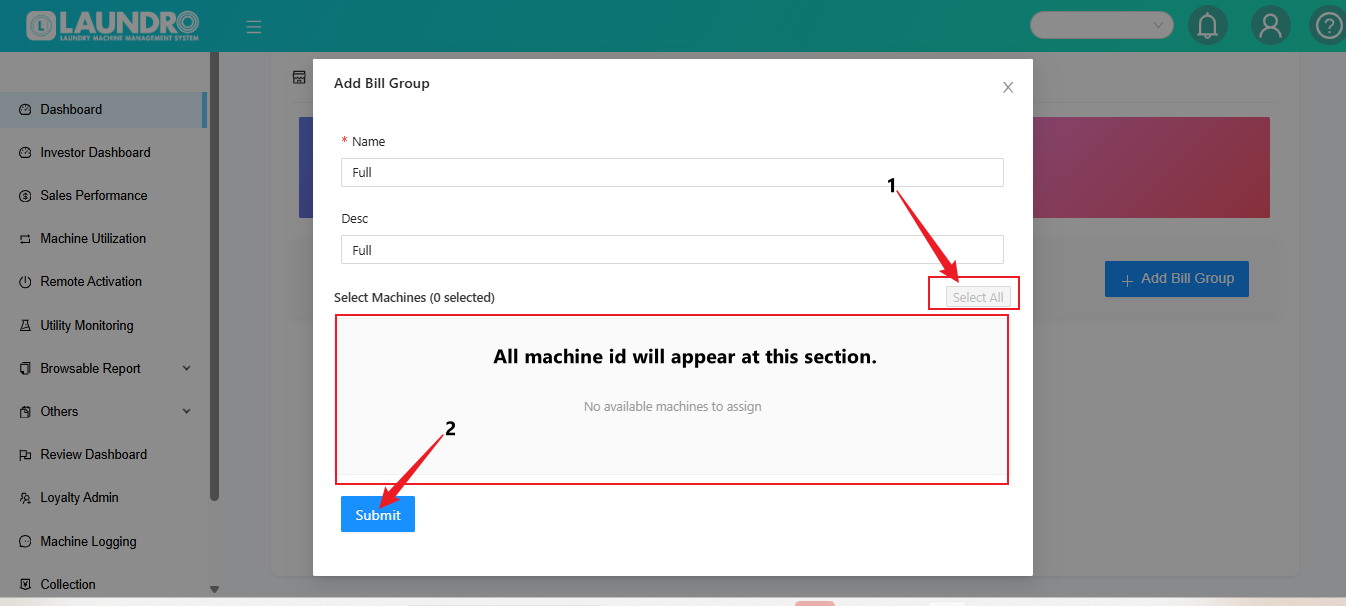
📝 Select the Machines
- Click Select All to select all the listed machines.
- Click Submit to confirm your selection.
💡 Quick Tip: Check that all the intended machines are selected before clicking Submit.
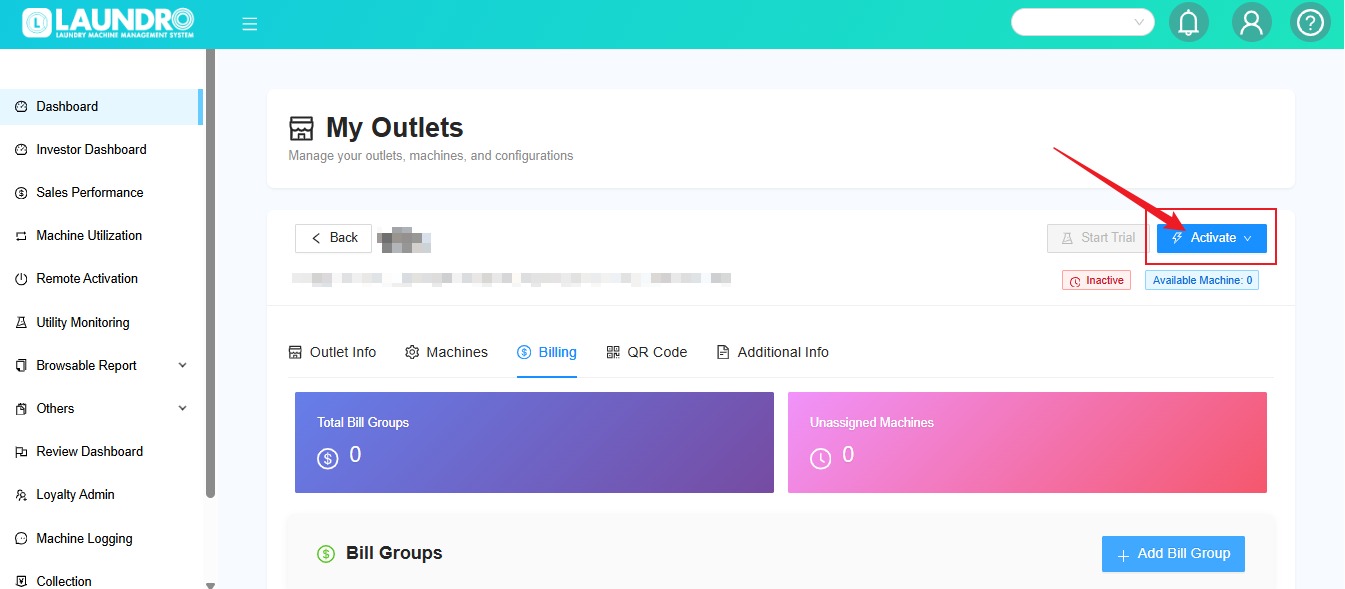
✅ Step 4 — Activate the Outlet
Once the billing setup is complete:
🎉 Your outlet activation process is complete once the system confirms the activation.
⚠️ Important Reminder :
- Please ensure that all Washer and Dryer devices are configured before activating the outlet.
- Each new outlet is given a one time free trial period of 5 days to test the full function of the system.
- Once outlet is activated, the billing cycle will start automatically on the activation date.
➕ Step 5 — Add Machines for an Existing Outlet
Already have an active outlet but want to add more machines? Follow these steps!
💡 Quick Tip: Make sure you select the newly added machines rather than billing the existing machines again.
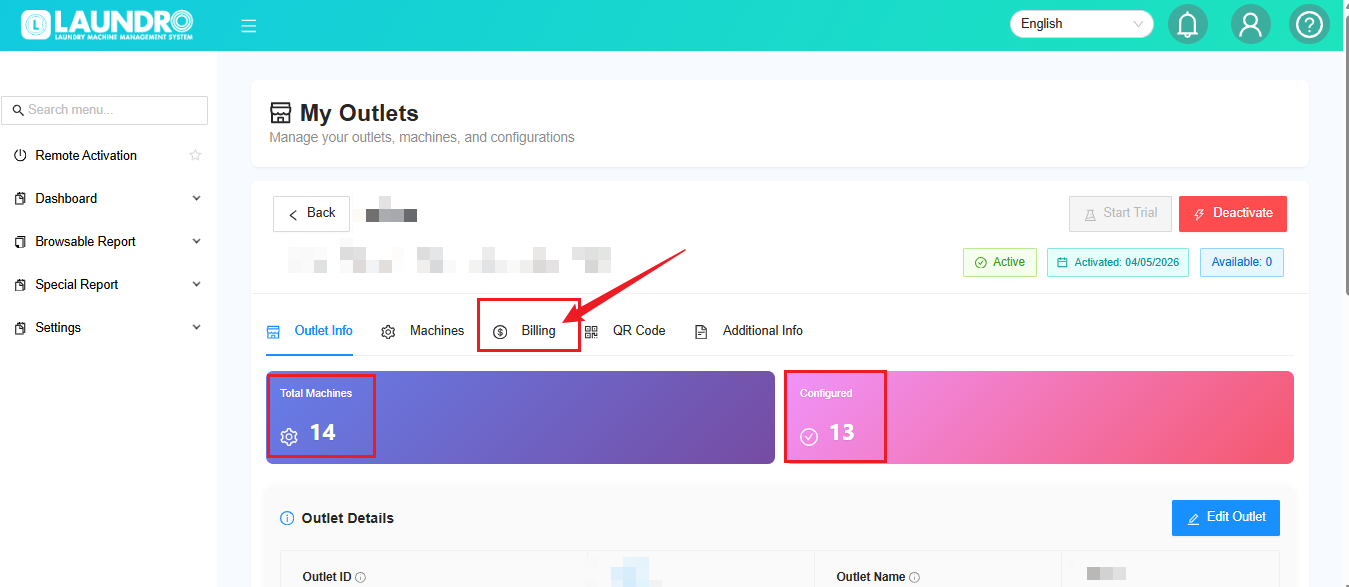
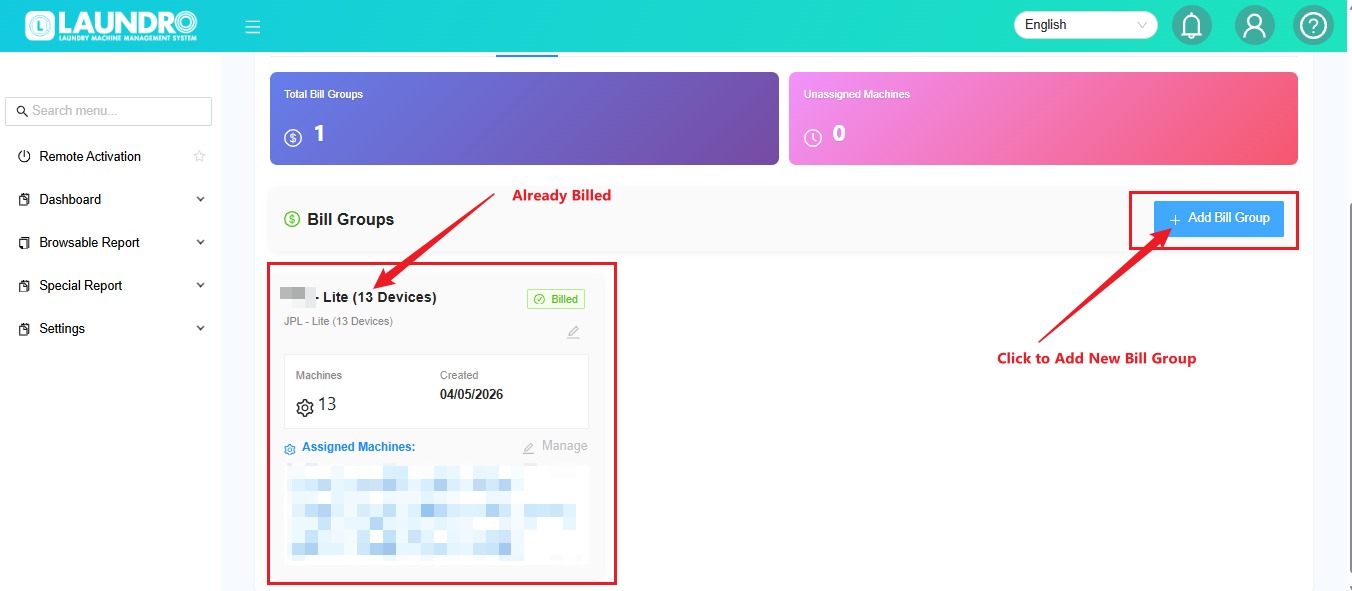
💡 Quick Tip: Make sure you select the newly added machines rather than billing the existing machines again.
🎉 You're All Set!
Before finishing, use this checklist:
- Correct outlet selected
- All Washer and Dryer devices configured
- Required machines selected for billing
- Billing setup completed
- Outlet activated, if applicable
Need help? Contact the Laundro support team if you encounter any issues during activation.
Add Outlet In Operator
Create New Outlet In Operator
Laundro login link: https://v2.thelaundro.com/operator_login
1) Please log in to this page using the provided ID and password.
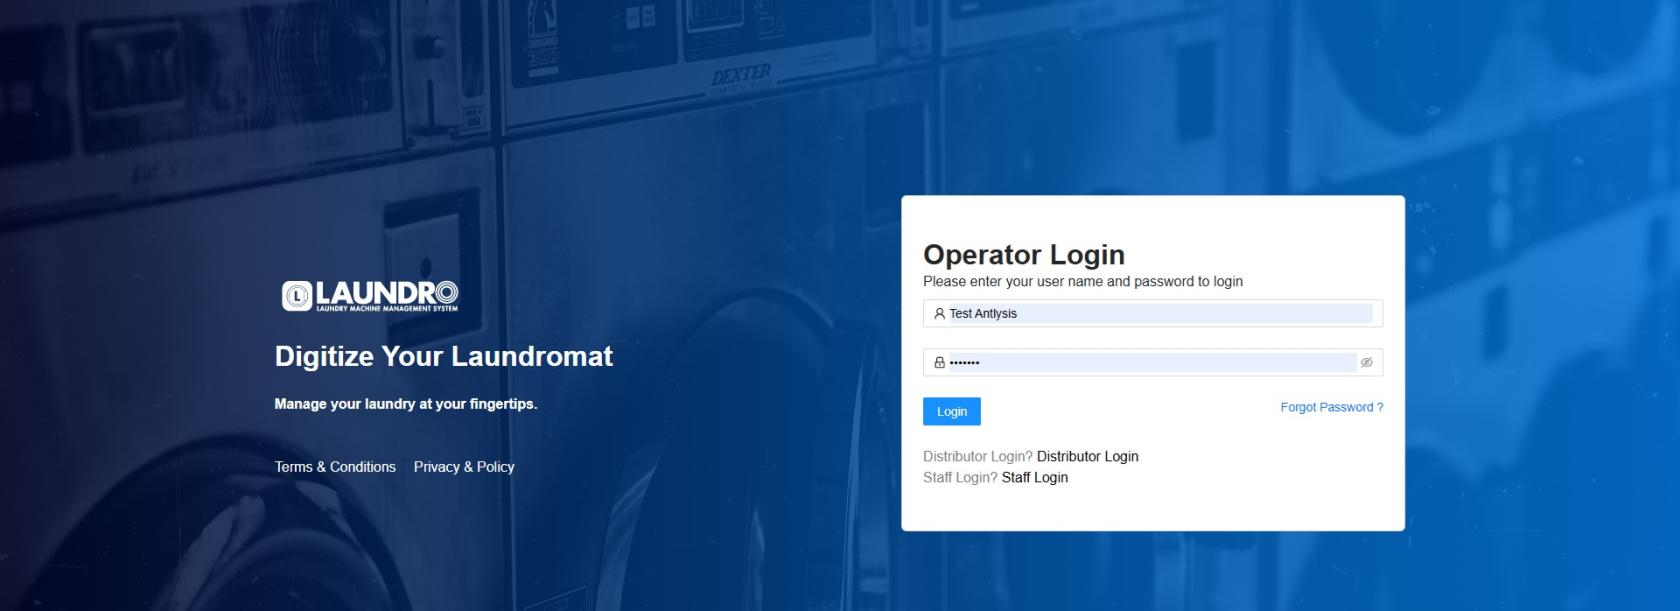
2) Please click on the Account icon and select “My Outlet.”
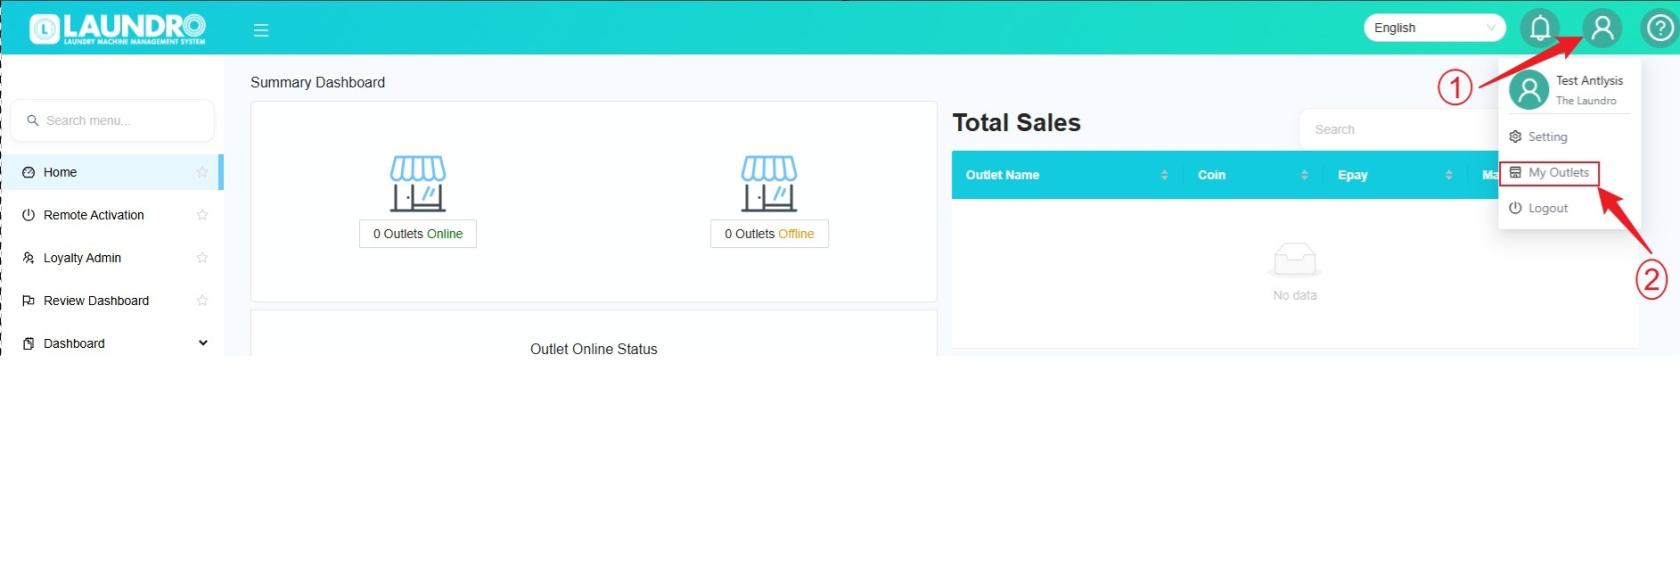
3) Please click on “Create Outlet.”
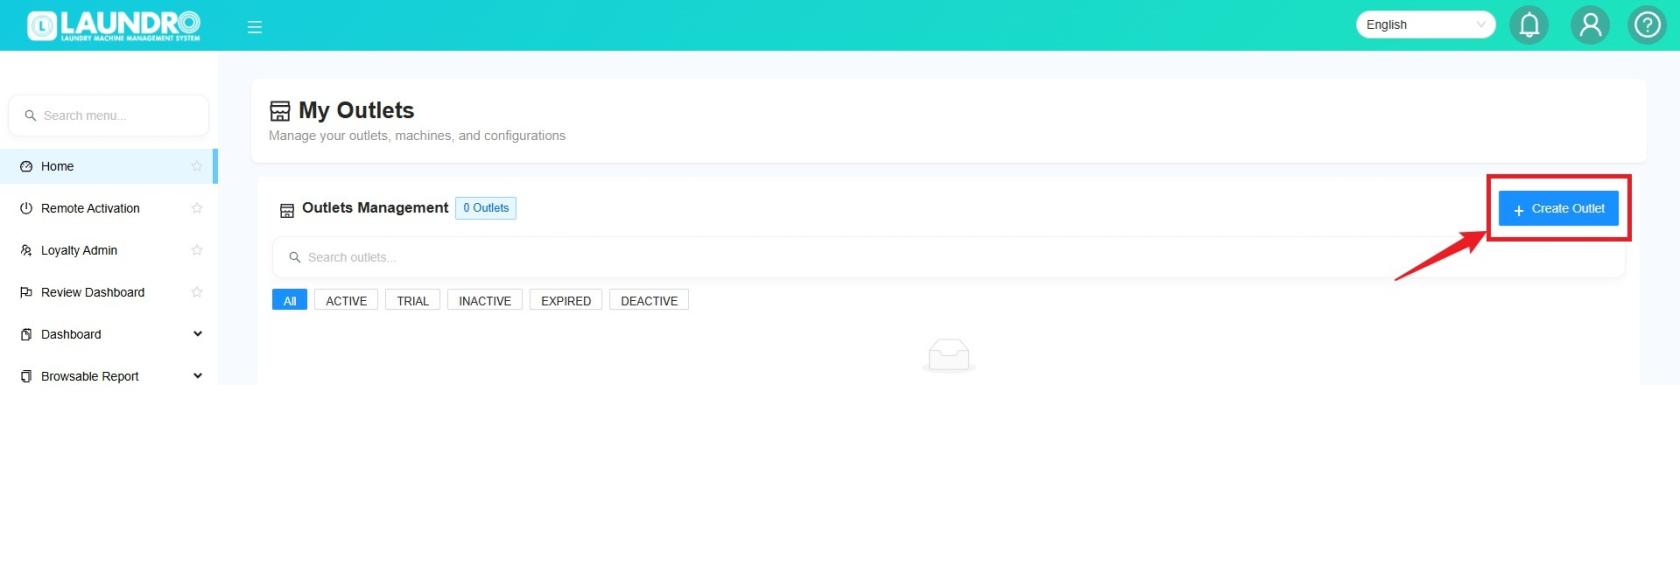
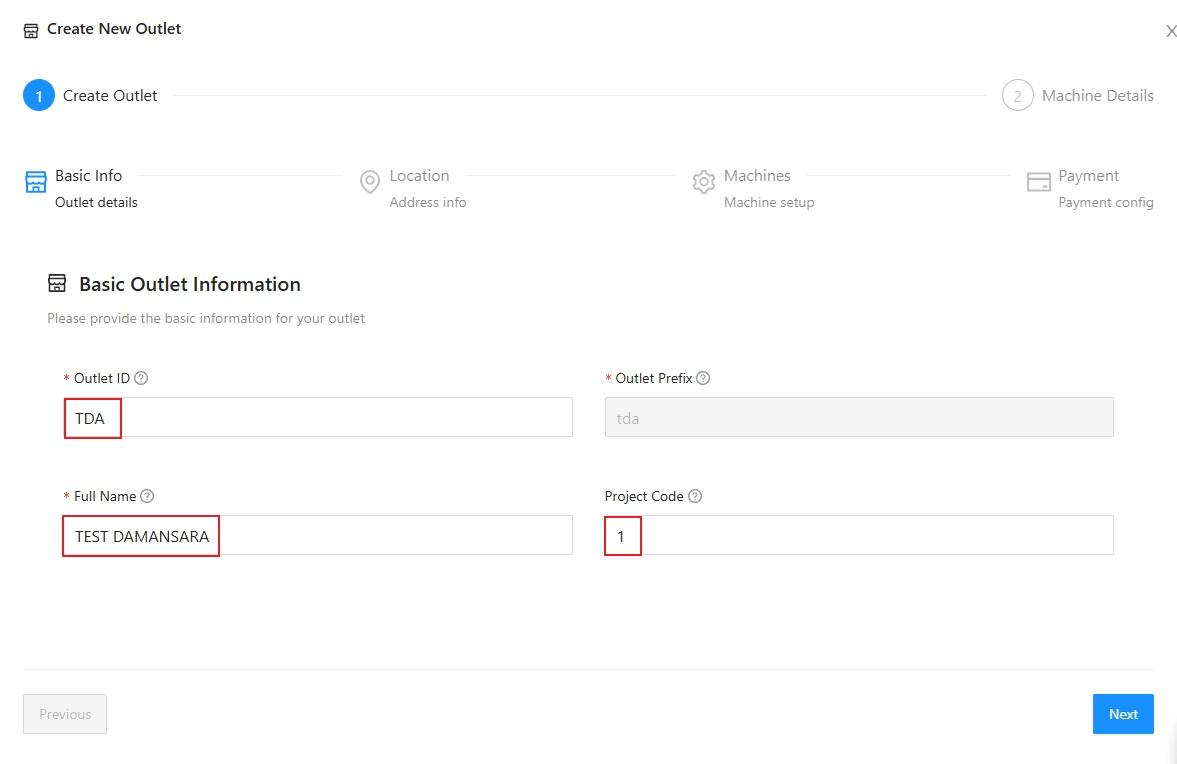
4) The “Create New Outlet” page will appear. Please proceed by filling in the required details.
Full Name: Enter the name you would like to use for the outlet.
Outlet ID: Enter a short ID for the outlet, as shown in the example picture below.
Project Code: Enter 1 for the first outlet, 2 for the second outlet, and continue numbering sequentially for each additional outlet.
Click ''Next''
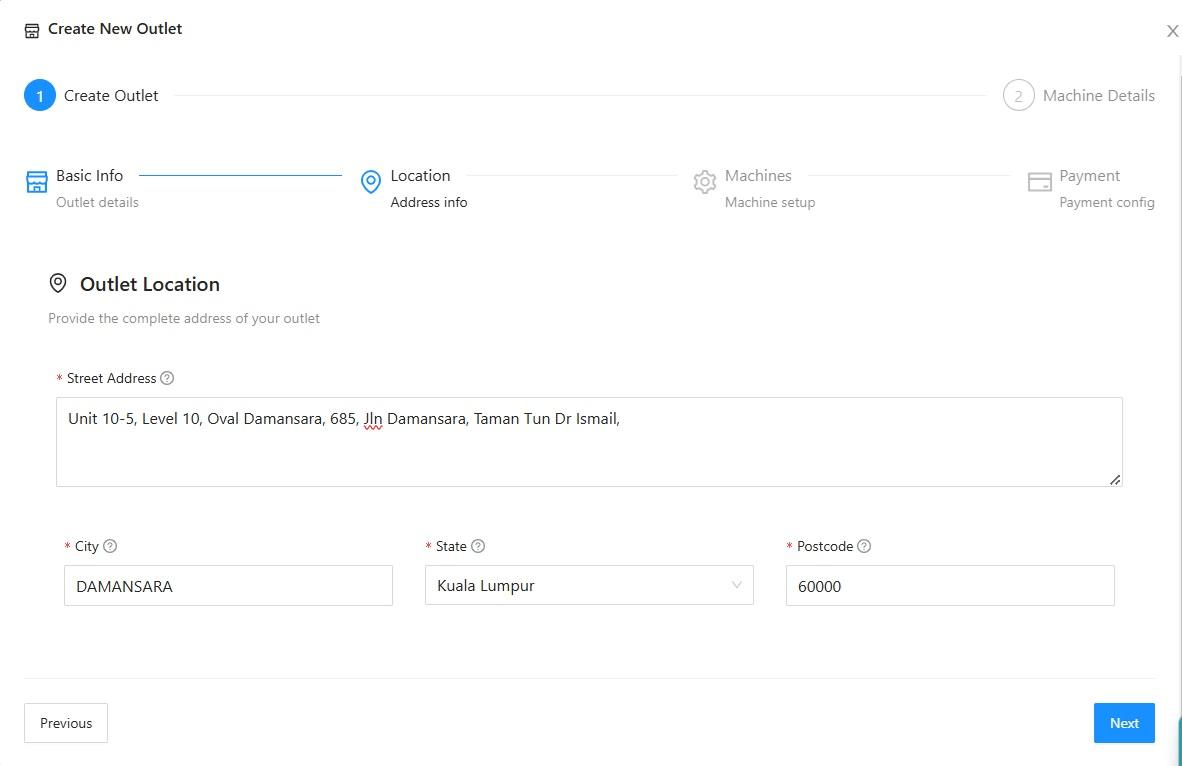
5) Enter the outlet location as shown in the picture below.
Click ''Next''
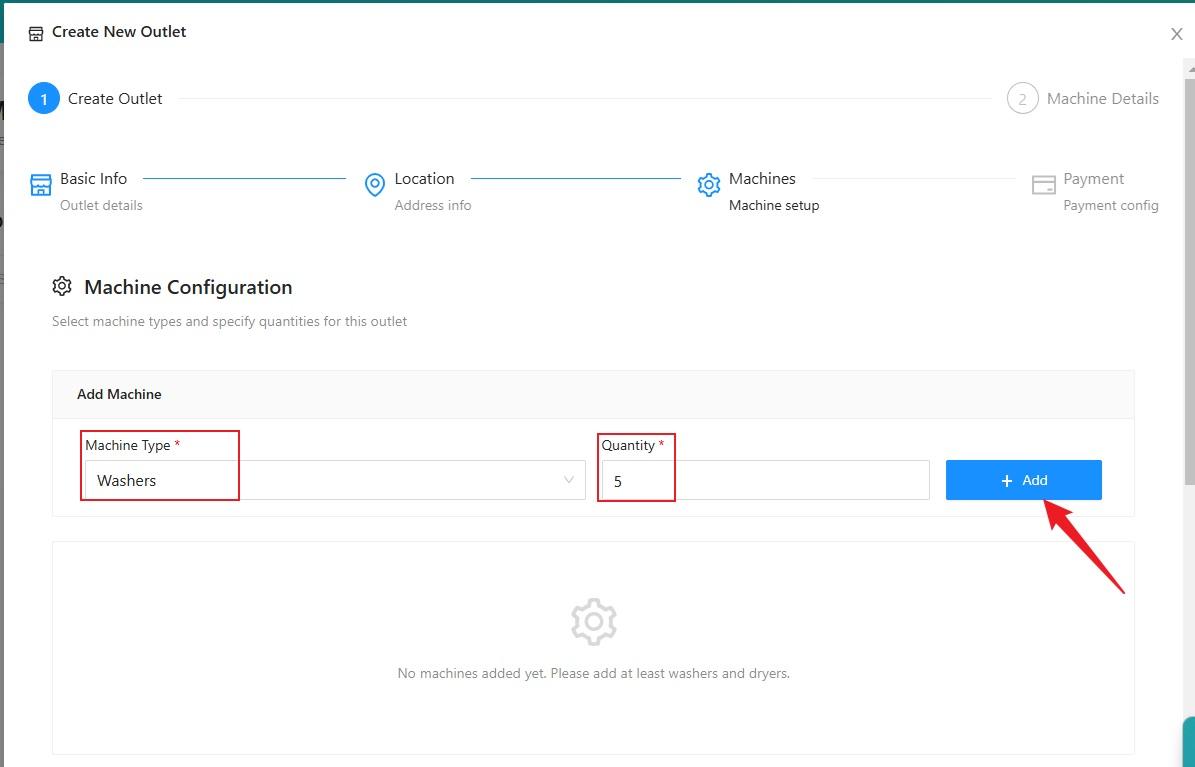
6) For machine configuration, select the machine type, enter the quantity of machines, then click “ADD.”
If you have other types of machines at the same outlet that you would like to add, repeat the same process.
7) Scroll down to view the details you have selected. If you entered the wrong quantity, you can adjust it under “Action.”
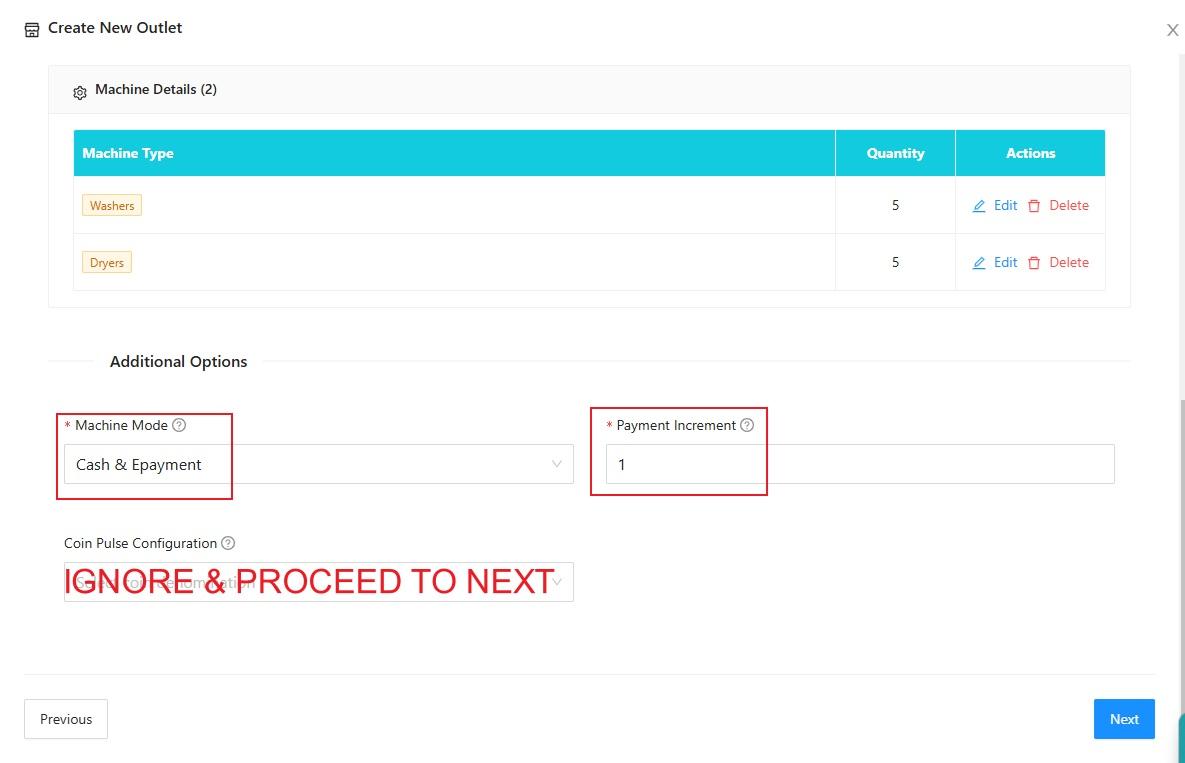
Under Additional Options, select “Cash & E-Payment” for Machine Mode and enter 1 for Payment Increment.
Click ''Next''
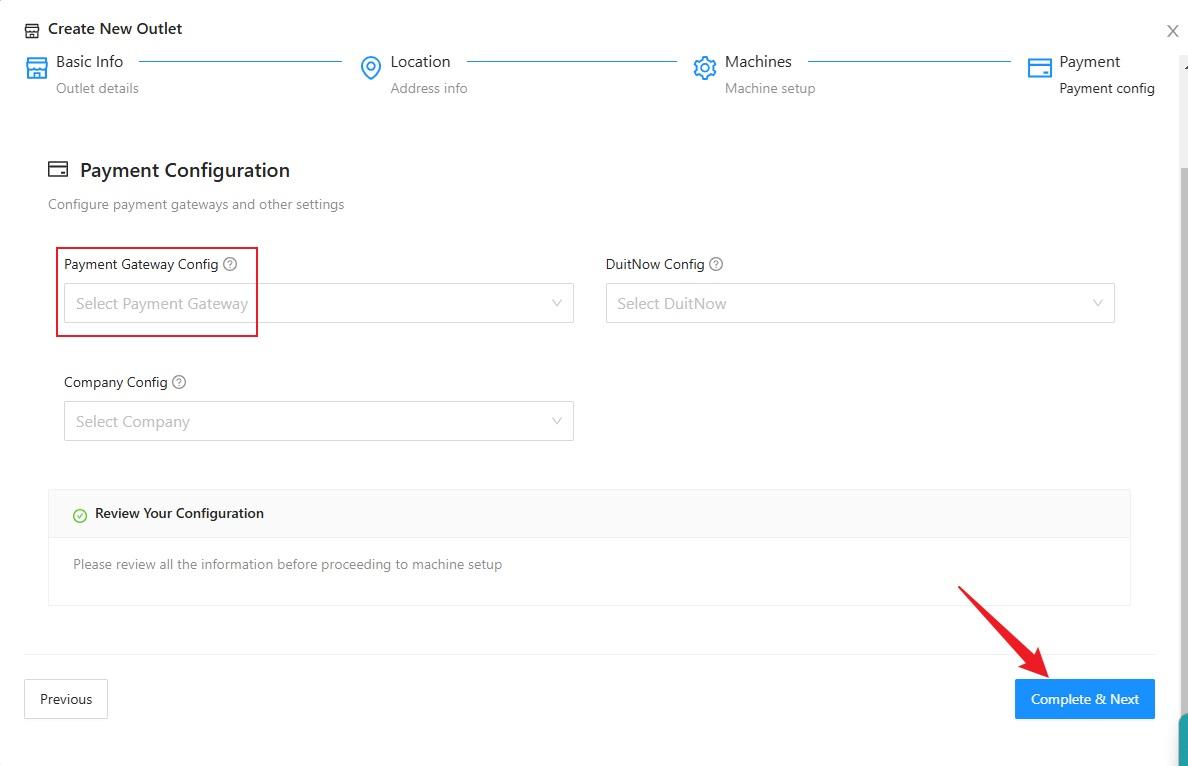
8) If a payment gateway is already available, you can select it. If the payment gateway is not ready or you are not using the current payment gateway, leave it blank for now and proceed to the next step.
For Payment gateway details kindly contact our person in charge.
Click ''Complete & Next''
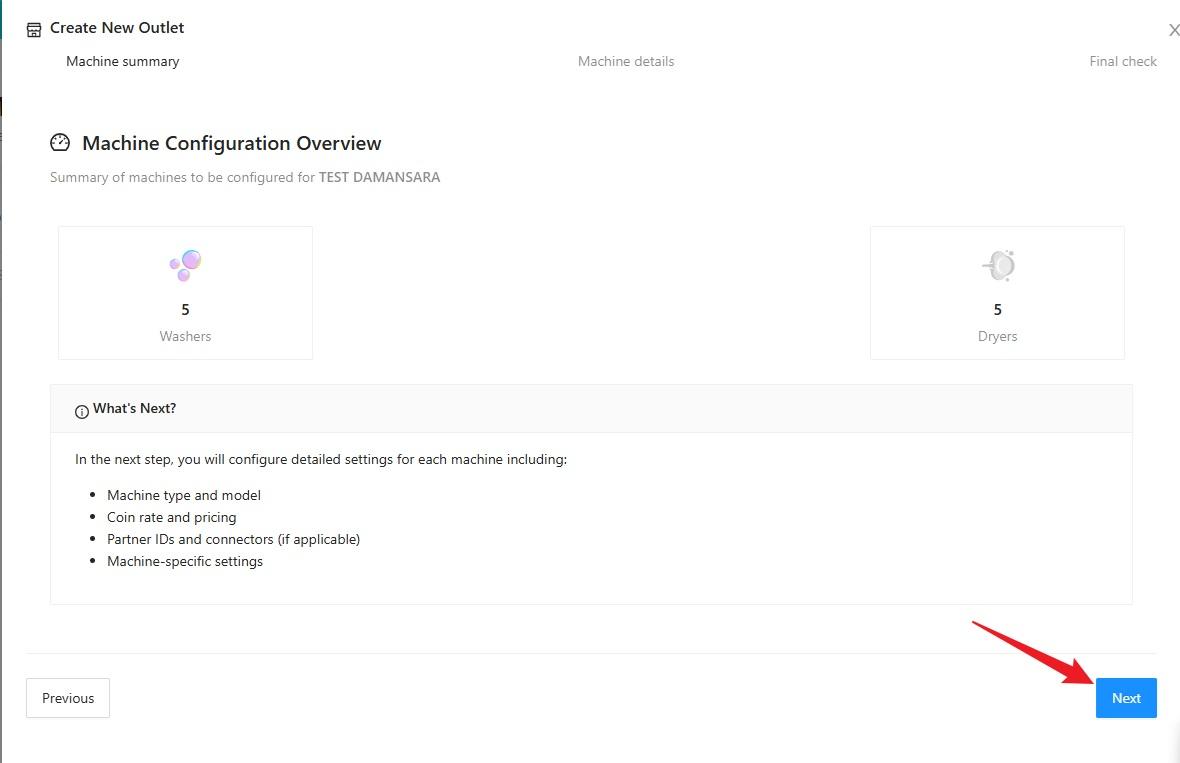
9) If the machine numbers are correct, proceed to the next step.
Click ''Next''
10) Click on the machine you selected.
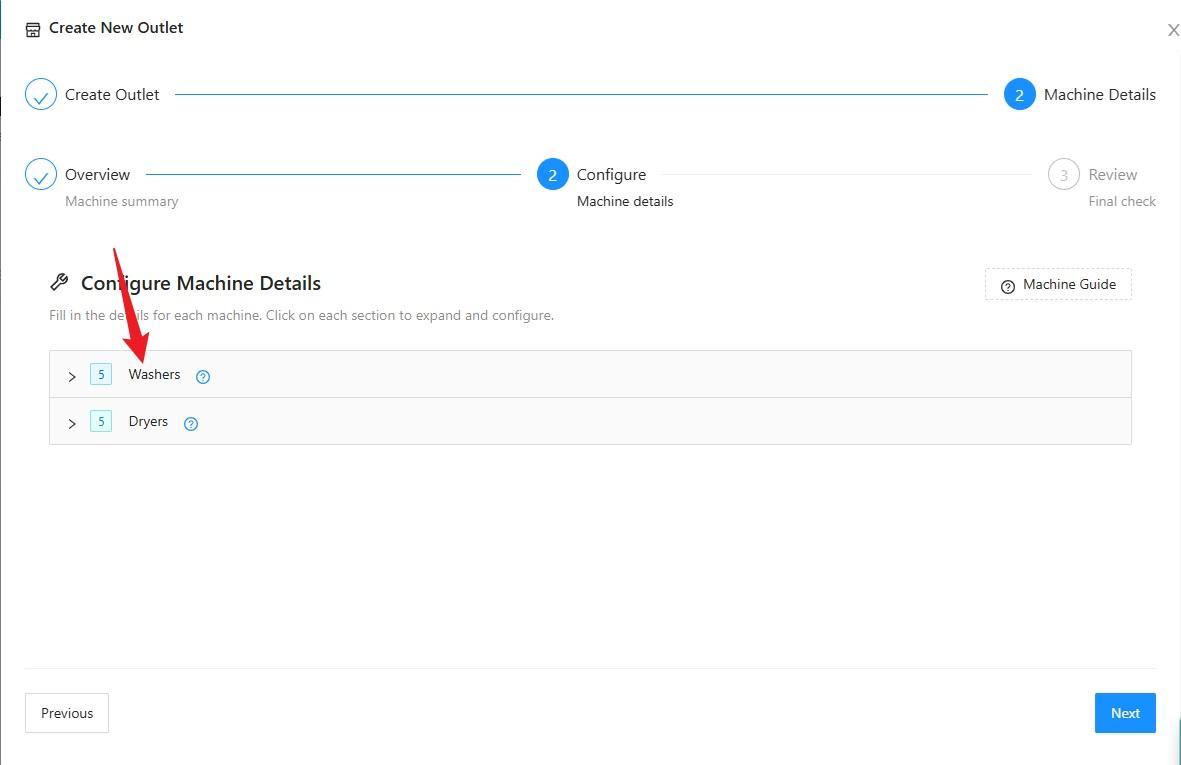
11) For Machine Details, select the machine brand and machine weight. For the Coin Rate, enter 1.
Click ''Next''

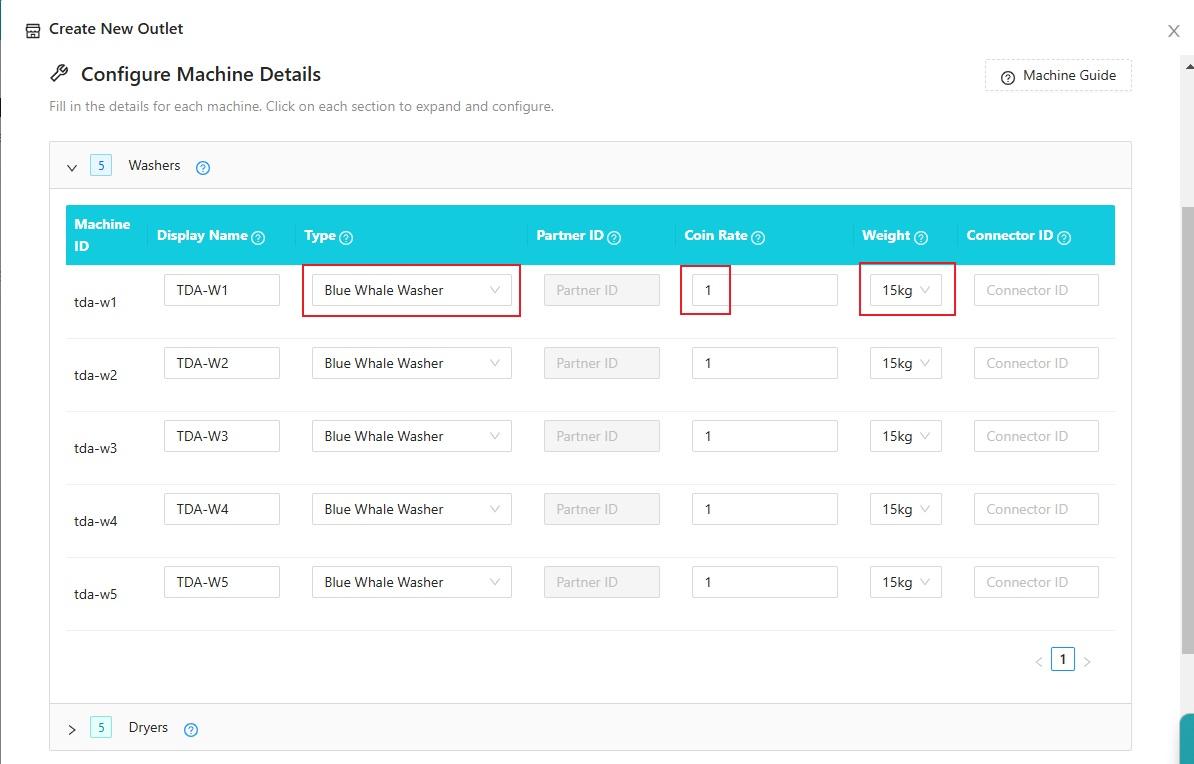
12) Before clicking “Complete,” check the machine details and outlet name to make sure all the information is correct. Then click “Complete.”
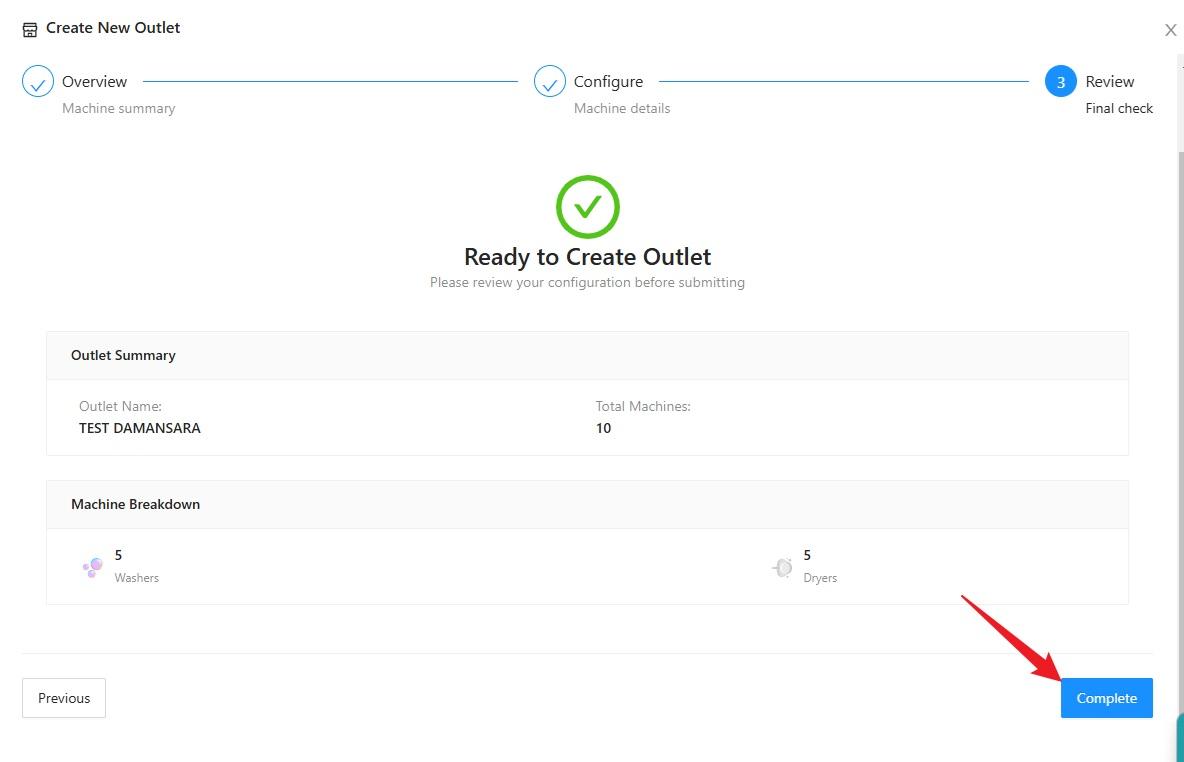
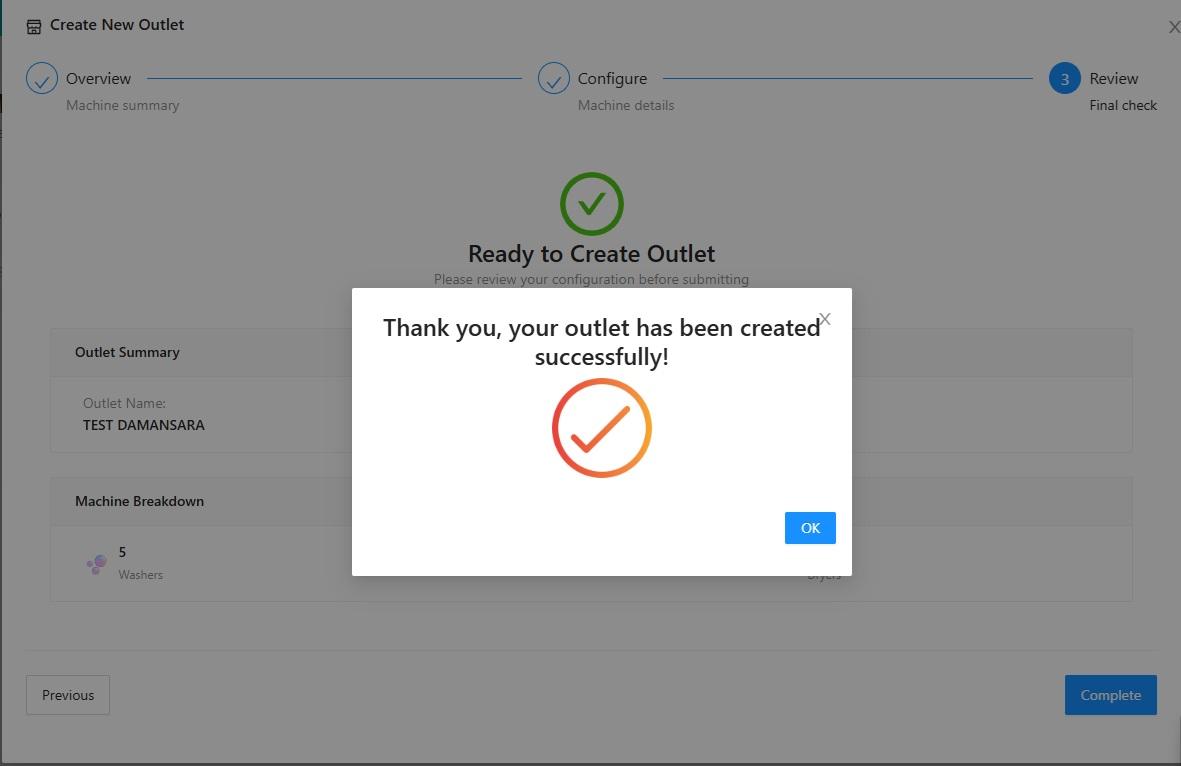
13) The new outlet account has been created successfully. Click “OK” to complete the process.
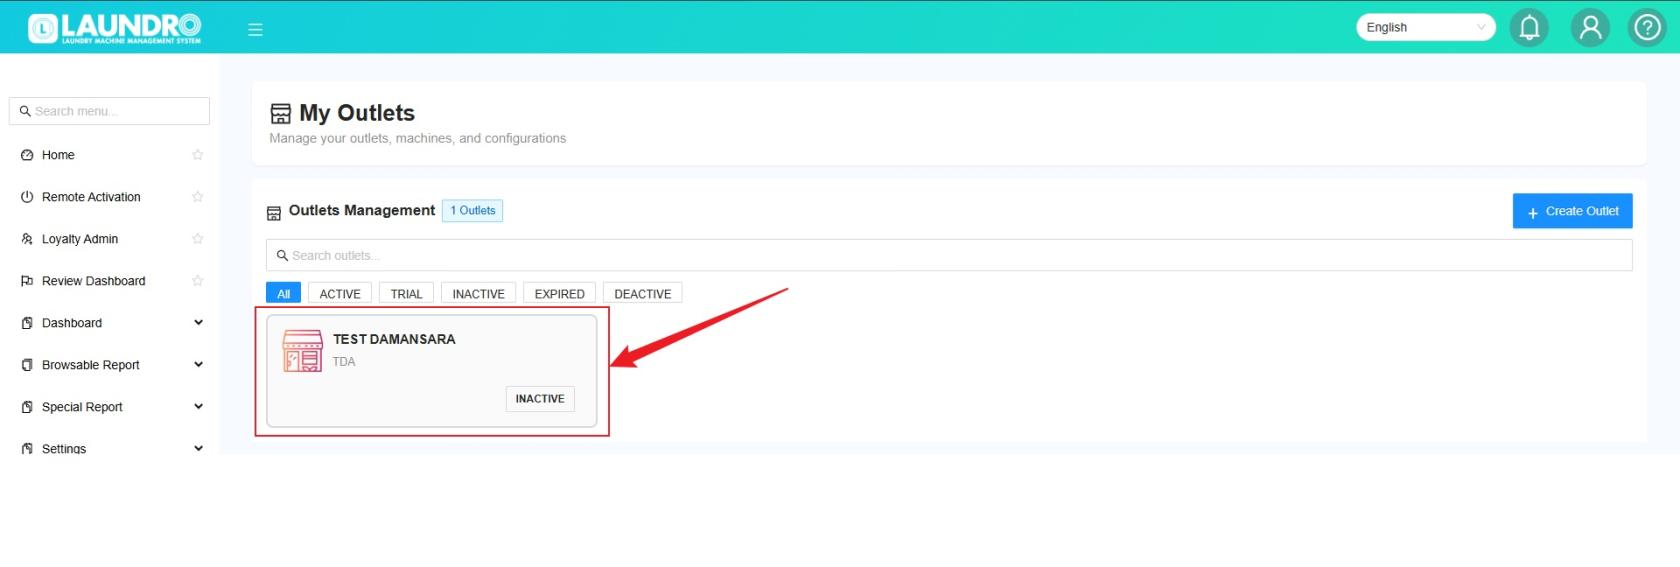
14) You will now see the newly created outlet on the “My Outlet” page.
⚠️ Attention: Please make sure all outlet and machine details are correct before completing the setup.
If you encounter any issues or have any questions, please don’t hesitate to contact us.
Change connected WiFi
1) Follow the steps below to connect the device to a Wi-Fi network. Ensure that the Wi-Fi network is available and that you have the correct Wi-Fi ID/Name and password before proceeding.
Device support only 2.4gh.
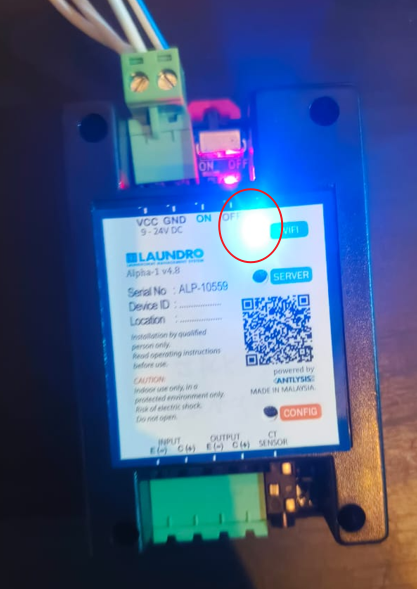
Step 1- To connect the device to a new Wi-Fi network, first ensure the device is in Configuration Mode. The blue LED indicator should be blinking.
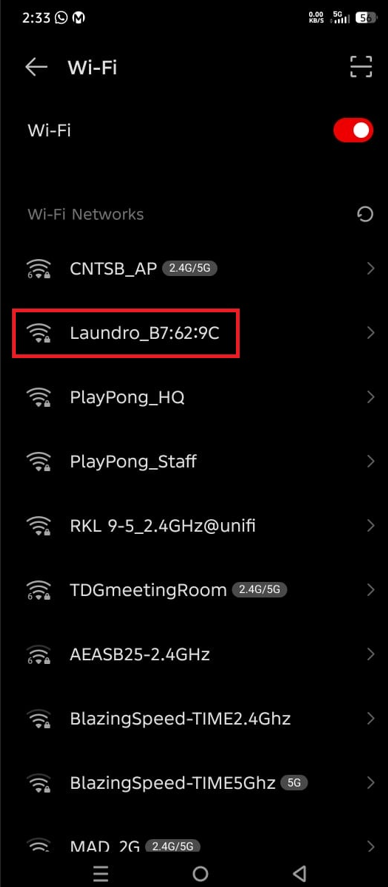
Step 2- Open the Wi-Fi Settings page on your mobile phone and search for available Wi-Fi name Example:'' Laundro_##:##:##''.
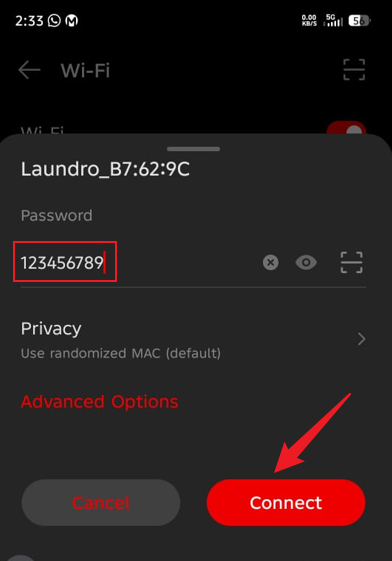
Step 3: Select the Laundro Wi-Fi network from the list of available networks. When prompted, enter the password:
Step4 - Once the correct password has been entered, tap Connect to proceed.
Password: 123456789
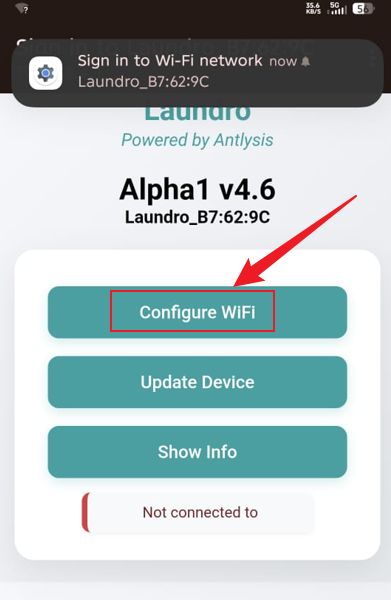
Step 5: After connecting to the Wi-Fi network, you will be redirected to the Configuration Page.
Step 6: Click Configure Wi-Fi to open the Wi-Fi Configuration page.
Step 7: From the list of available networks, choose the Wi-Fi network you want to connect to, then scroll down the page.
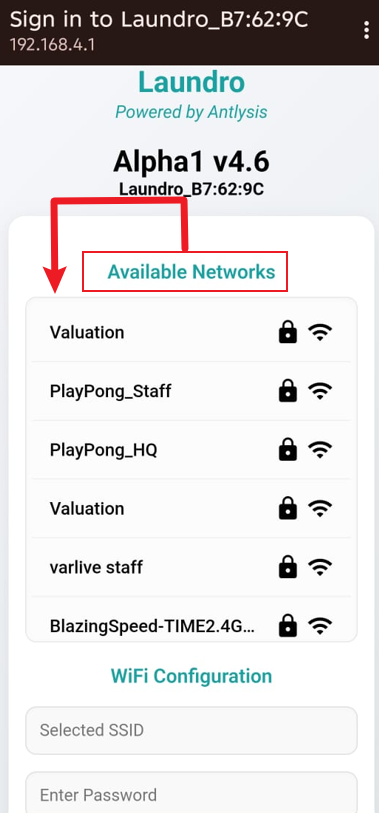
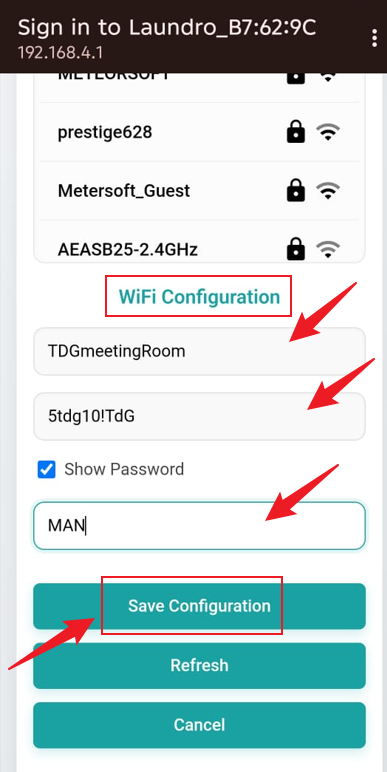
Step 8: Under Wi-Fi Configuration, confirm the selected SSID (Wi-Fi Name), enter the Wi-Fi password, and then enter the provided Outlet ID. Ensure all information is correct click on Save Configuration .
Before selecting Save Configuration, double-check the Wi-Fi password and Outlet ID. Ensure all information is correct and that no hidden spaces have been entered.
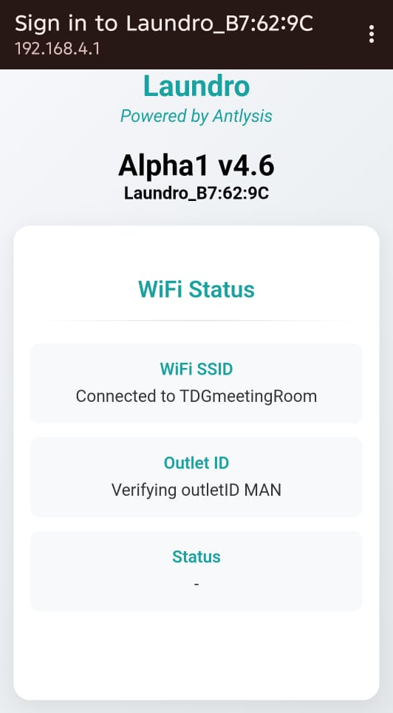
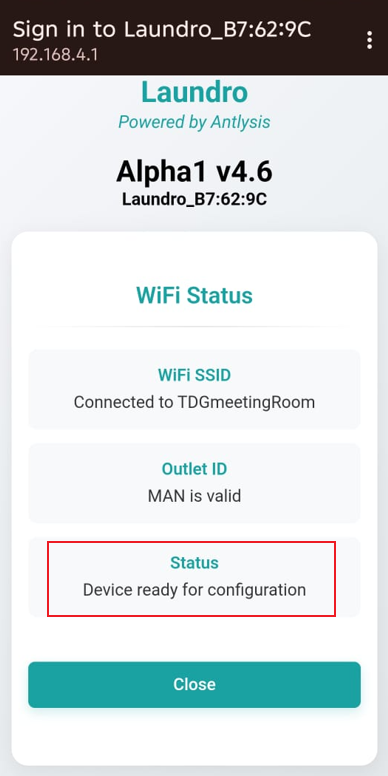
Step 9:The Wi-Fi Status page will be displayed, and the device will start configuring automatically. Please wait until the status message reads "Device Ready for Configuration".
Step10: Once the configuration process has been completed successfully, the Wi-Fi (Blue) and Internet (Green) indicator lights on the device will turn on.
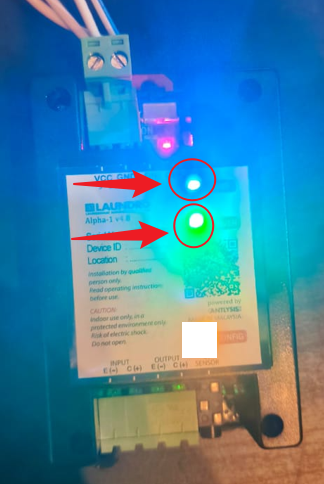
2) It is all done now. You can check the dashboard page to ensure the machine shows as Online. For confirmation, you can also try testing a remote activation on the machine.
🔄 How to Reset Alpha-1 for a New Outlet
🛠️ Preparing an Alpha-1 device for a new outlet? Follow this guide to perform a factory reset and prepare the device for its next setup.
🎯 Purpose
This guide explains how to:
- 🔧 Access the Alpha-1 device.
- 🔄 Perform a factory reset.
- 💡 Identify the reset status using the LED indicators.
- 📶 Confirm that the device enters AP mode.
🧭 Quick Navigation
- 🛑 Prepare the Device
- 🔧 Open the Alpha-1 Casing
- ⚡ Power On the Device
- 🔄 Perform a Factory Reset
- 💡 Check the LED Indicators
- 📶 Confirm AP Mod
🛑 Step 1: Prepare the Device
Before starting, make sure you have:
- 🪛 A Philips-head screwdriver (PH1).
- 🔌 Access to the Alpha-1 power supply.
- 📘 The correct factory-reset instructions for your Alpha-1 model.
⚠️ Safety Reminder: Disconnect the power before opening the casing. Do not touch exposed electrical connections while the device is powered. Only restore power when it is safe to do so and according to the approved procedure.
🔧 Step 2: Open the Alpha-1 Casing
- Make sure the power supply is disconnected.
- Use a Philips-head screwdriver (PH1) to unscrew the four screws.
- Carefully open the casing to access the internal components.
💡 Tip: Keep the screws in a safe place so they can be reinstalled later.
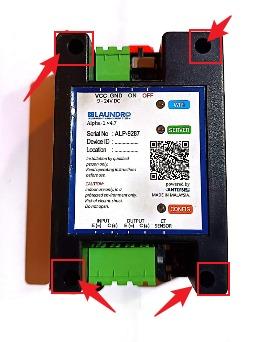

⚡ Step 3: Power On the Alpha-1
Once the casing has been opened safely, restore the power supply according to the approved reset procedure.
⚠️ Important: Avoid touching exposed electrical components while power is connected.
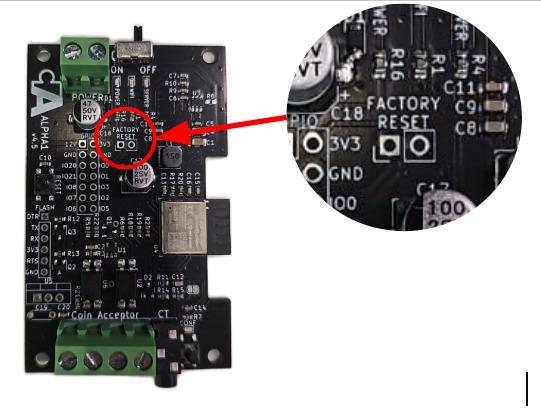
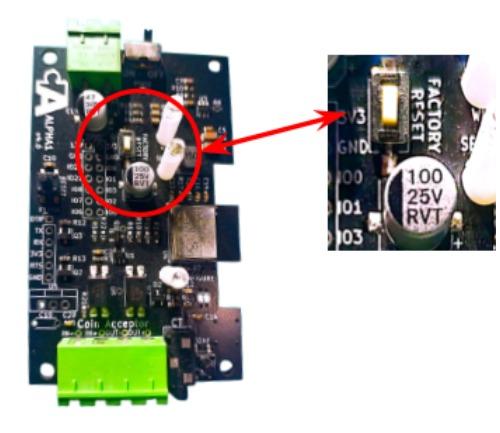
🔄 Step 4: Perform a Factory Reset
- Locate the designated Factory Reset button or reset points.
- Follow the approved reset method for your Alpha-1 model.
- Complete the reset action as instructed.
⚠️ Important: The original guide mentions both shorting two points and long-pressing Factory Reset. Confirm the correct method for your device before proceeding. Do not short unidentified pins.
💡 Step 5: Check the LED Indicators
After performing the reset, observe the Alpha-1 LED indicators.
✅ Expected result: All LEDs blink once to indicate that the device has been reset.
💡 Troubleshooting Tip: If the LEDs do not blink as expected, check the reset procedure and power connection before trying again.
📶 Step 6: Confirm AP Mode
After the factory reset, the Alpha-1 should enter AP mode.
AP mode allows the device to be accessed for the next setup process.
✅ Expected result: The Alpha-1 enters AP mode and is ready for the next configuration step.
✅ Final Checklist
Before closing the casing or proceeding with the new outlet setup, confirm:
- ☐ The factory reset was completed.
- ☐ All LEDs blinked once as expected.
- ☐ The Alpha-1 entered AP mode.
- ☐ The device is ready for the next configuration step.
- ☐ The casing is securely closed when it is safe to do so.
🎉 Reset Completed!
The Alpha-1 is ready for the next setup stage once the factory reset is successful and AP mode has been confirmed.
➡️ Next Step: Continue with the approved Alpha-1 setup procedure for the new outlet.
How To Get Kiosk URL
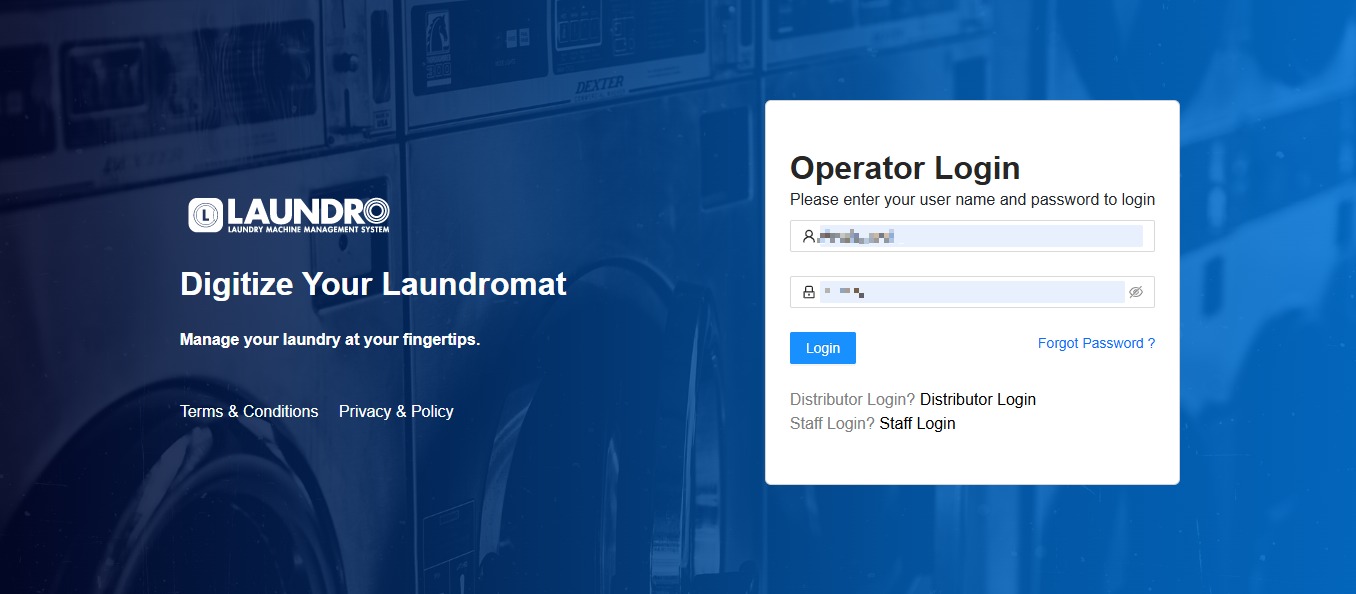
- Login into Laundro Portal & put-in Username / Password : https://v2.thelaundro.com/operator_login
2.
-
Click the Profile icon at the top-right corner of the screen.
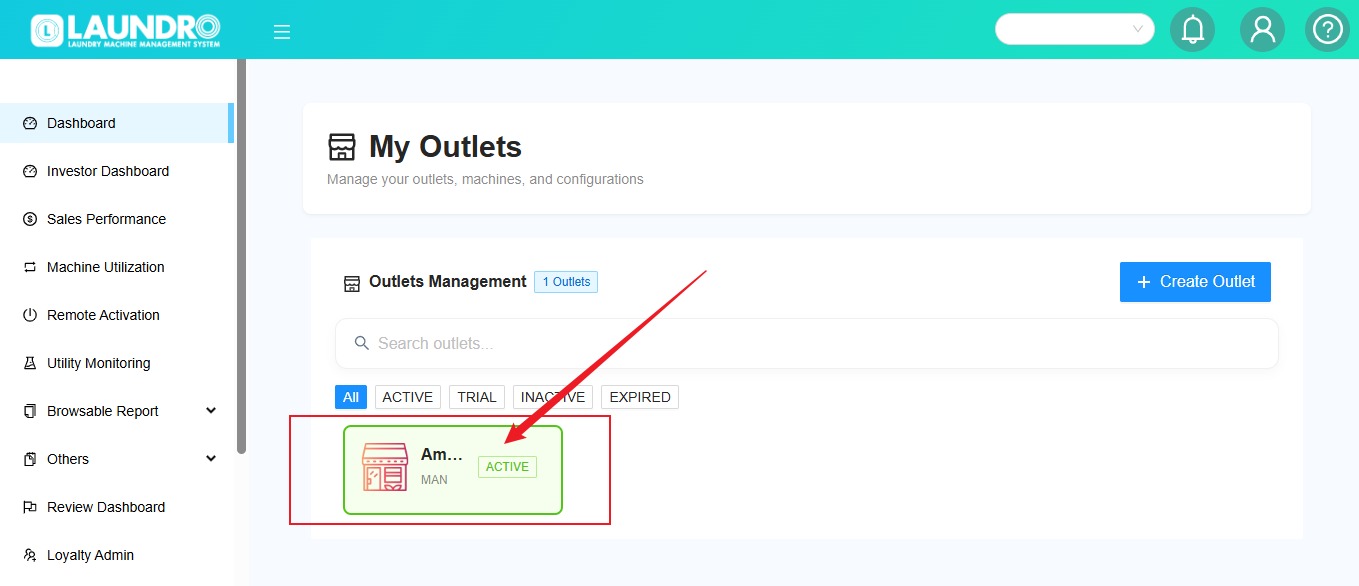
-
Select My Outlets from the dropdown menu.
-
The system will open the My Outlets page where you can view your outlets.
3. Click Outlet.
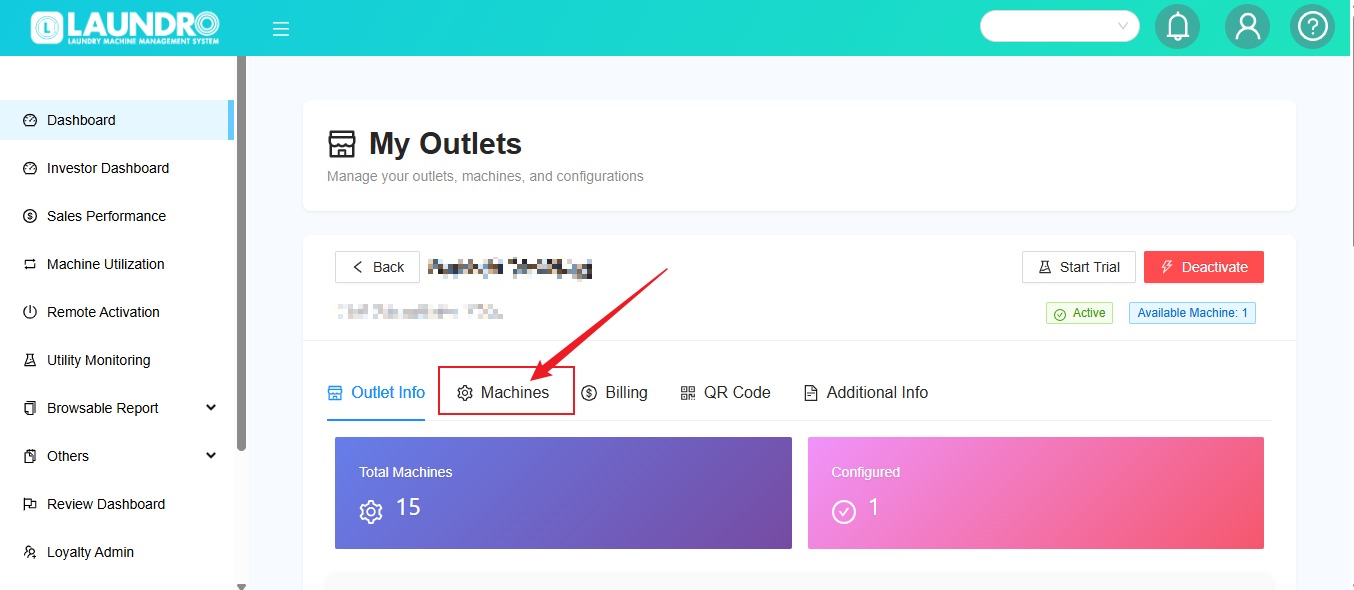
4. Click Machines
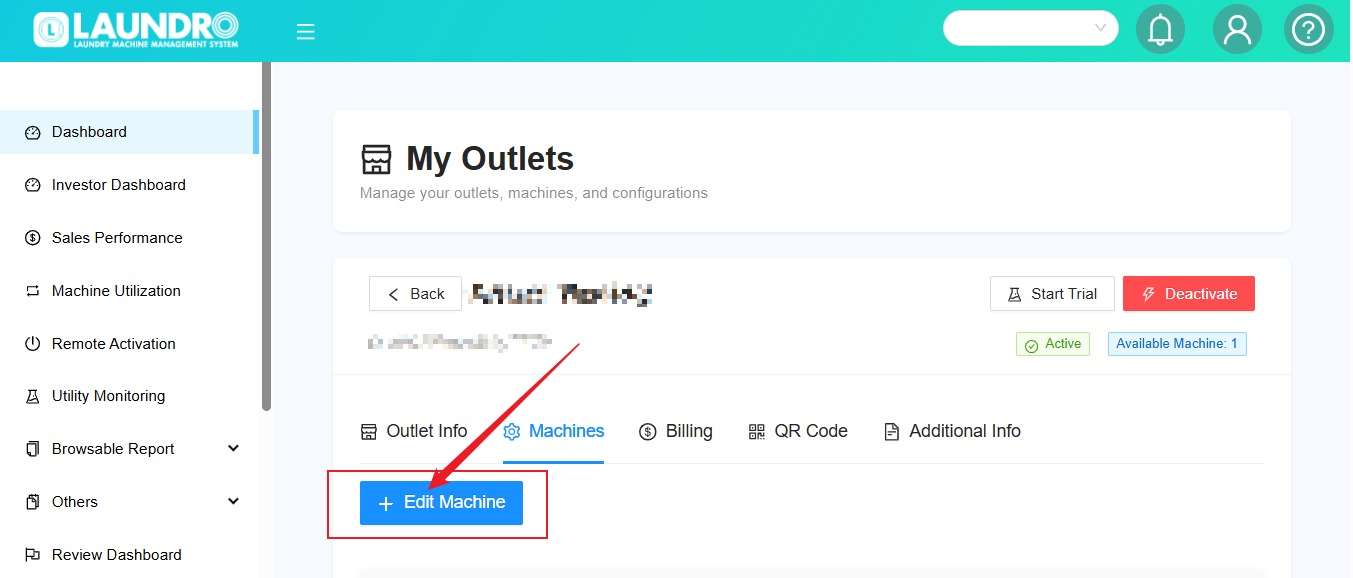
5. Click +Edit Machine.
6.
- Click "Select machine type to add."
- Click Kiosk.
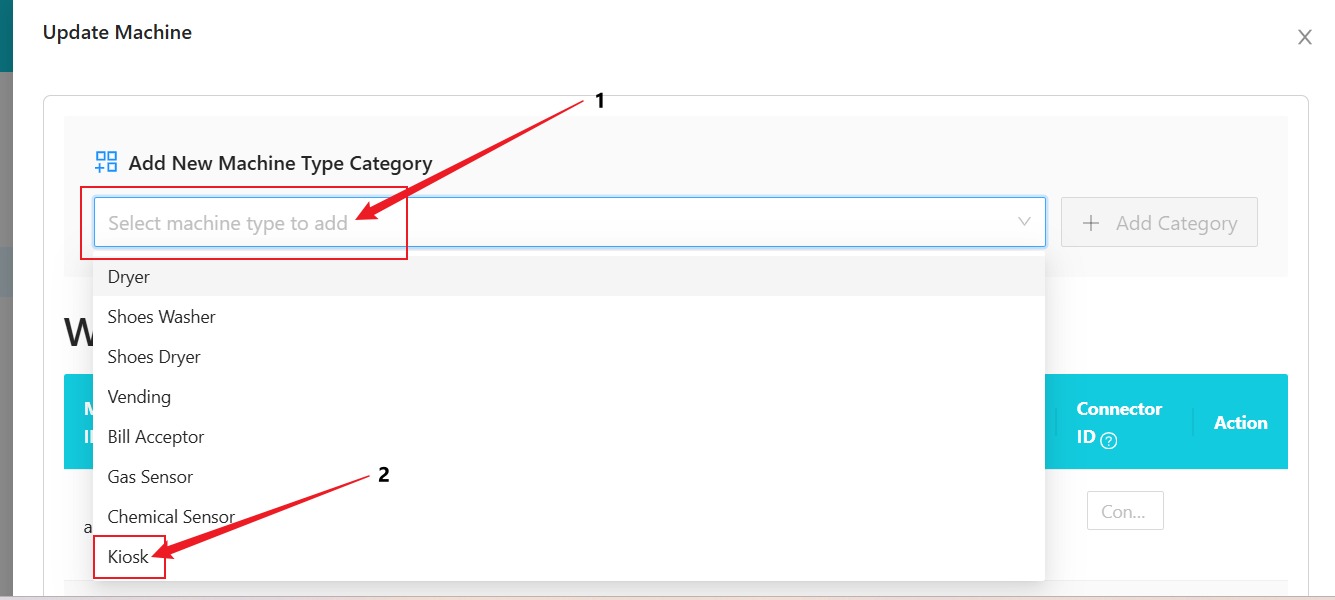
7.
- Kiosk will appear on that column.
- Click + Add Category.
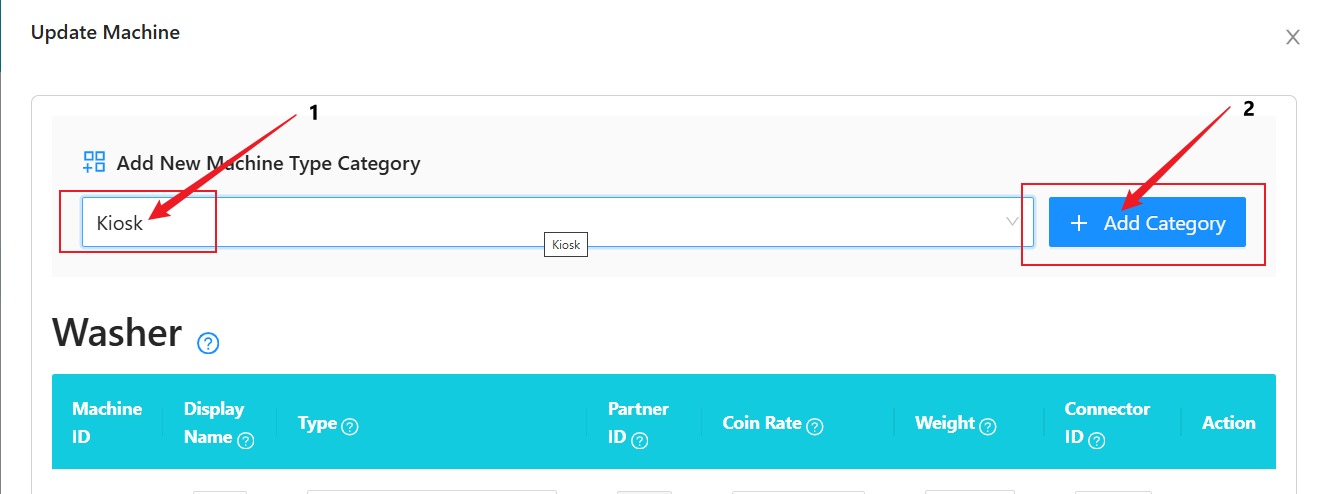
8.
- Kiosk Added.
- Click QR Code.
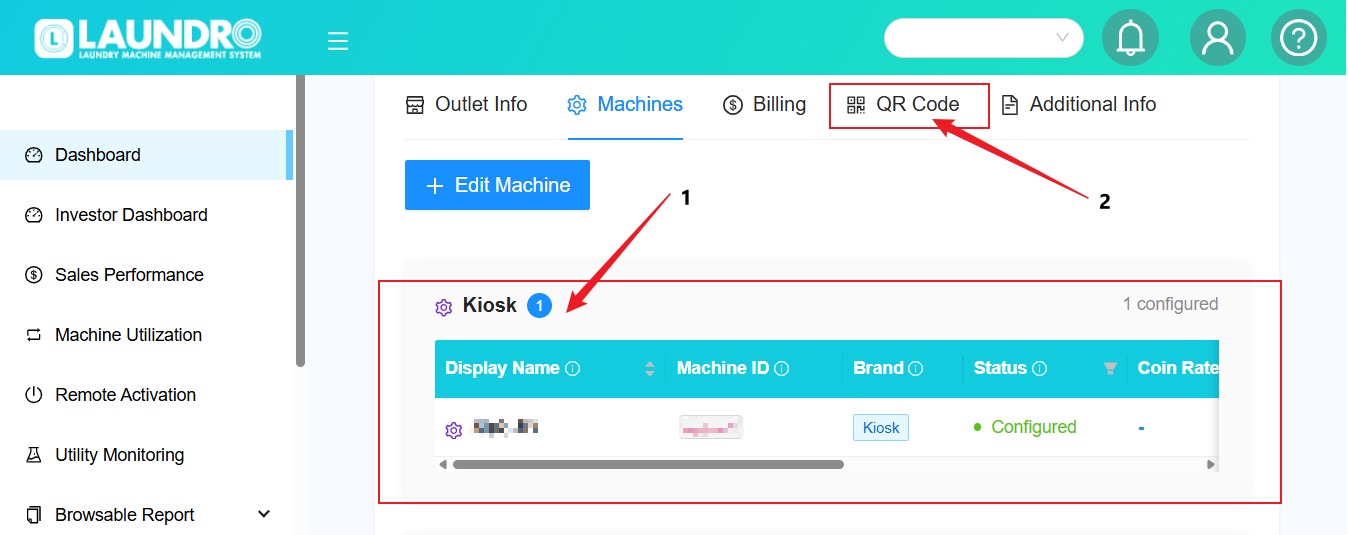
9.
- Click Kiosk QR Code.
- Kiosk QR Code will appear. Scan QR Code & Kiosk Link appear. Click URL Link.
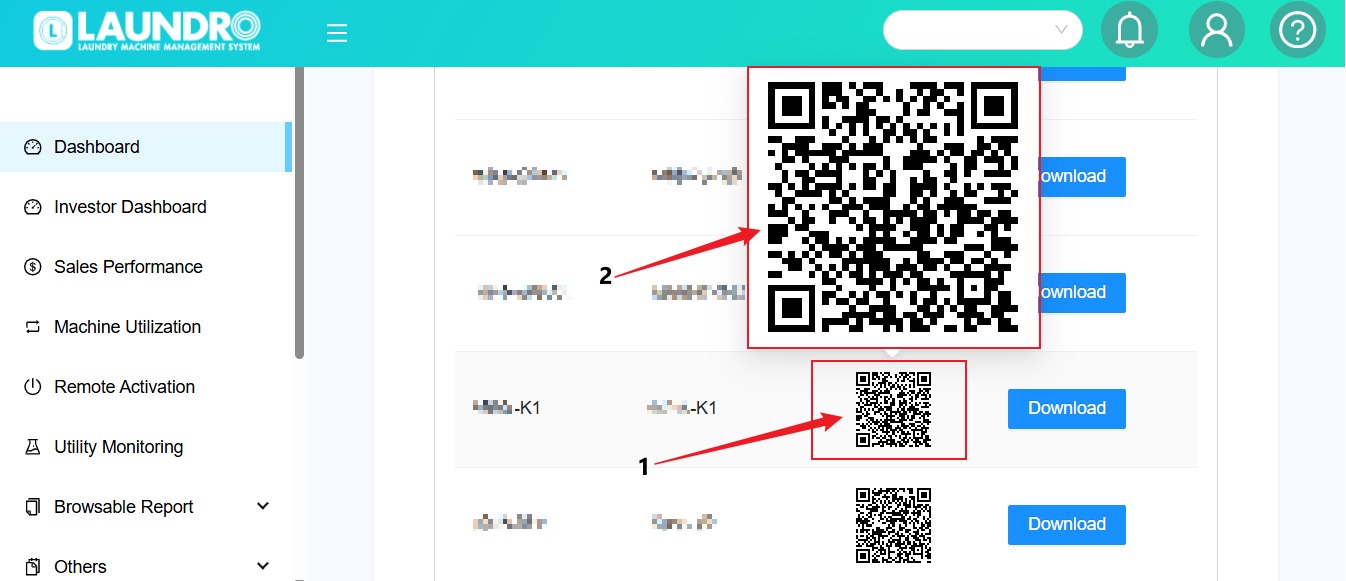
10.
- Fill-in Username
- Password
- Click Login.

11. Ready to use.

How to Cancel Voucher / Remove Credit or Stamp
A) How To Chancel Voucher
1) Log in to your Laundro Operator account.
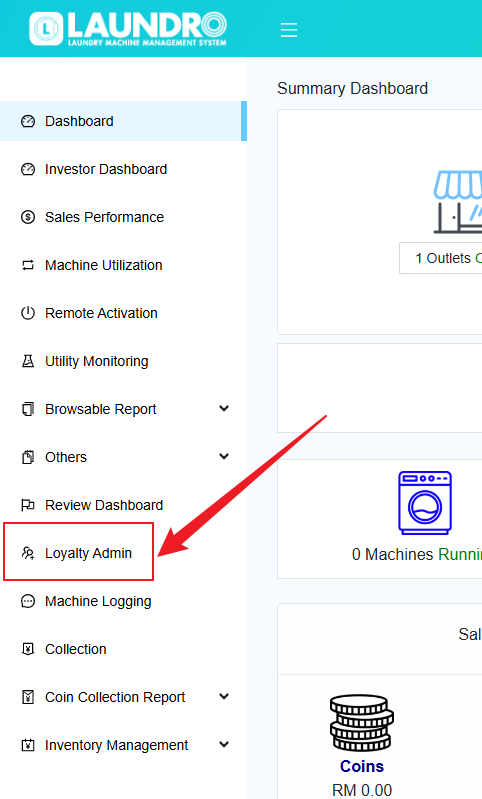
2) On the page, click on "Loyalty Admin" in the left-hand column.
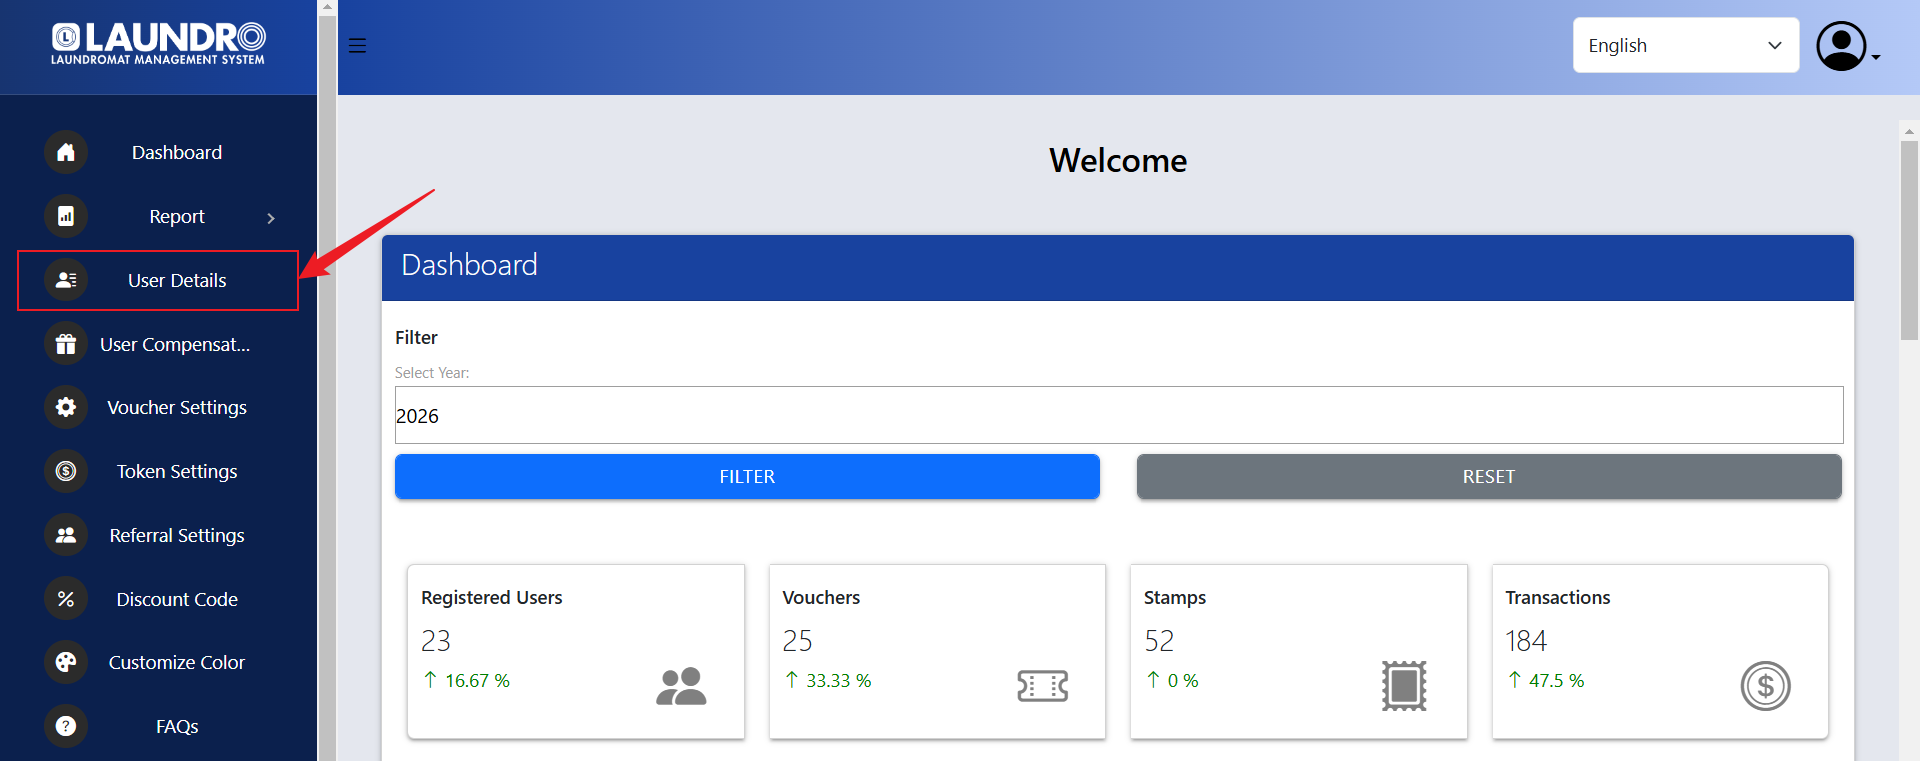
3) On the Loyalty Admin page, click on "User Details".
4) Under "User Details", you can search for a user using their Phone Number, Member ID, or Email Address.

5) Under "Member Details Report", click on "REPORT".

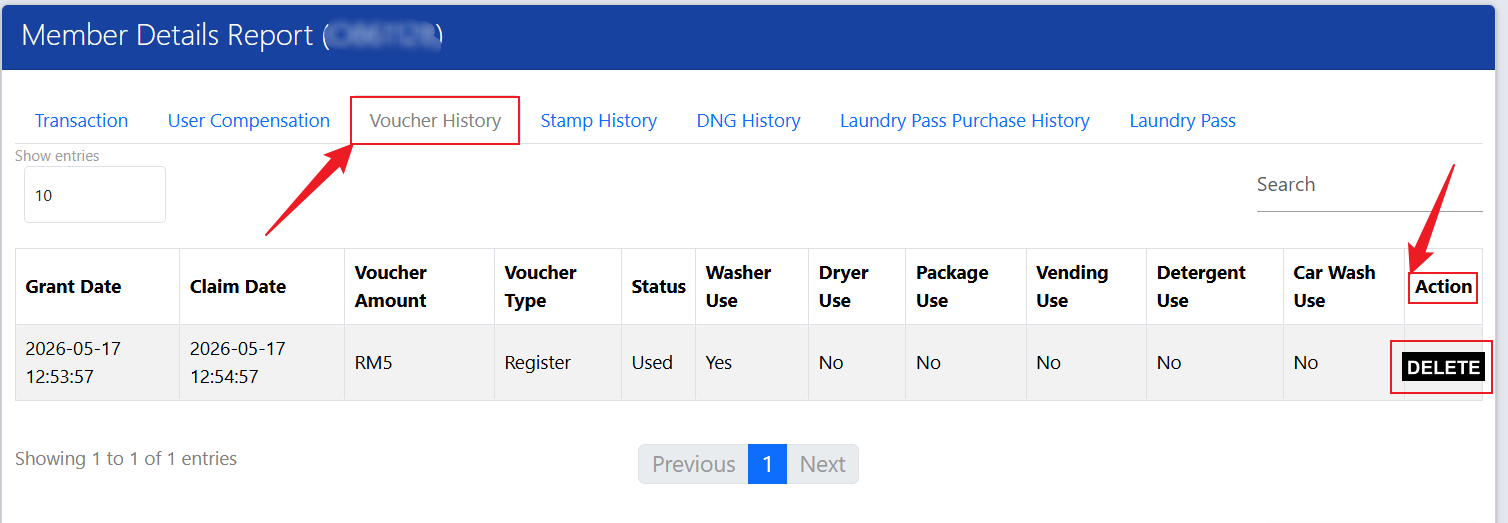
6) Click on "Voucher History". Under the "Action" column, click the Delete icon to remove the voucher.
B) Remove Credit Or Stamp
1) Log in to your Laundro Operator account.
2) On the page, click on "Loyalty Admin" in the left-hand column.
3) On the Loyalty Admin page, click on "User Details".
4) Under "User Details", you can search for a user using their Phone Number, Member ID, or Email Address.
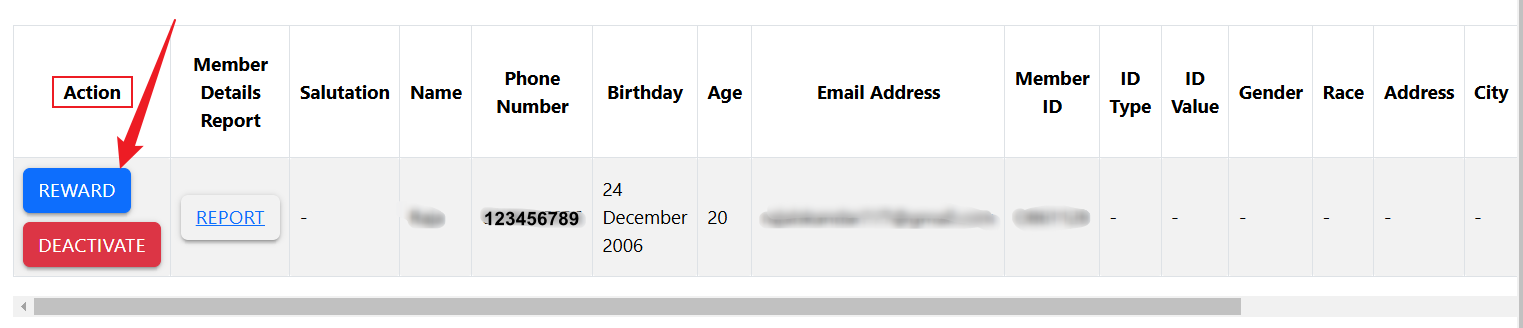
5) Under the "Action" column, click on "REWARD".
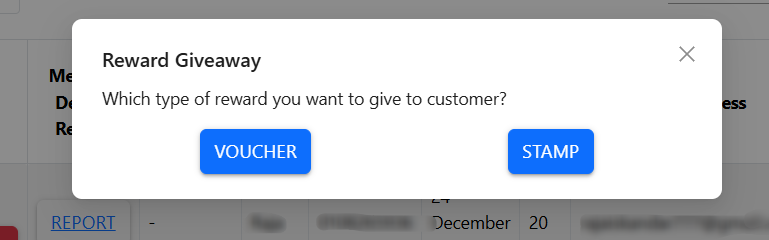
6) Click on prefer reward VOUCHER or STAMP.
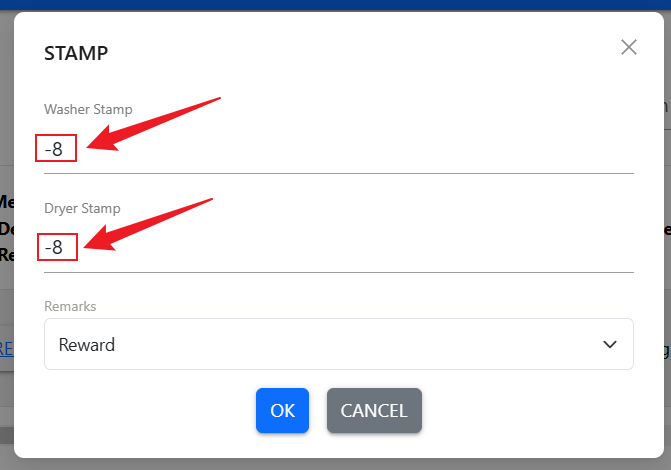
7) To remove credit, enter a negative (-) sign before the amount shown, then click "OK".
8) Once the process is completed, the credit will be removed.
🔳 How to Get QR Codes
Welcome to the Laundro Portal Guide! 👋
Need to download QR codes for your laundry outlet? No worries! Follow this simple guide to retrieve your machine QR codes and Drop n Go Service QR code.
🎯 Purpose
This guide shows you how to:
- 🏪 Find your outlet in the Laundro Portal.
- 🔳 Access the outlet's QR Codes page.
- ⬇️ Download all machine QR codes.
- 📦 Download the Drop n Go Service QR code.
🧭 Quick Navigation
- 🔐 Log in to Laundro Portal
- 🏪 Open My Outlets
- 🔳 Select QR Codes
- ⬇️ Download All or Other
- ✅ Verify Your Download
🔐 Step 1: Log In to Laundro Portal
- Open the Laundro Portal.
- Enter your registered Username and Password.
- Click Login.
🔗 Portal Login: https://v2.thelaundro.com/operator_login
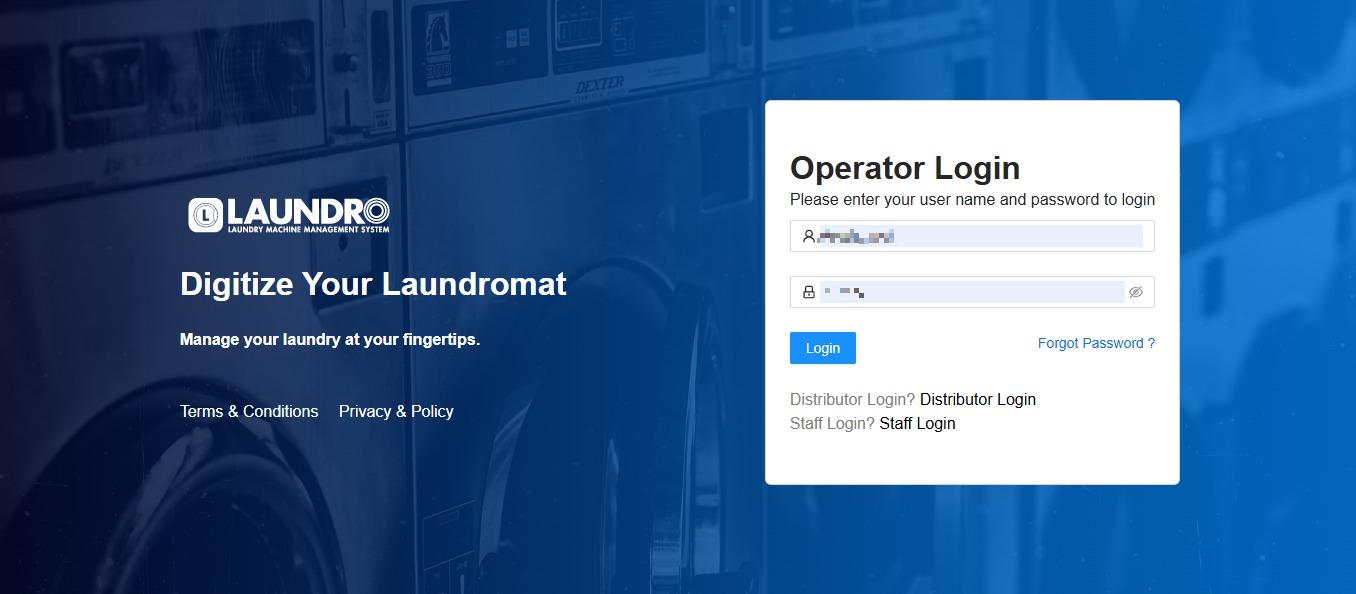
🏪 Step 2: Open My Outlets
- Click the Profile icon at the top-right corner of the screen.
- Select My Outlets from the dropdown menu.
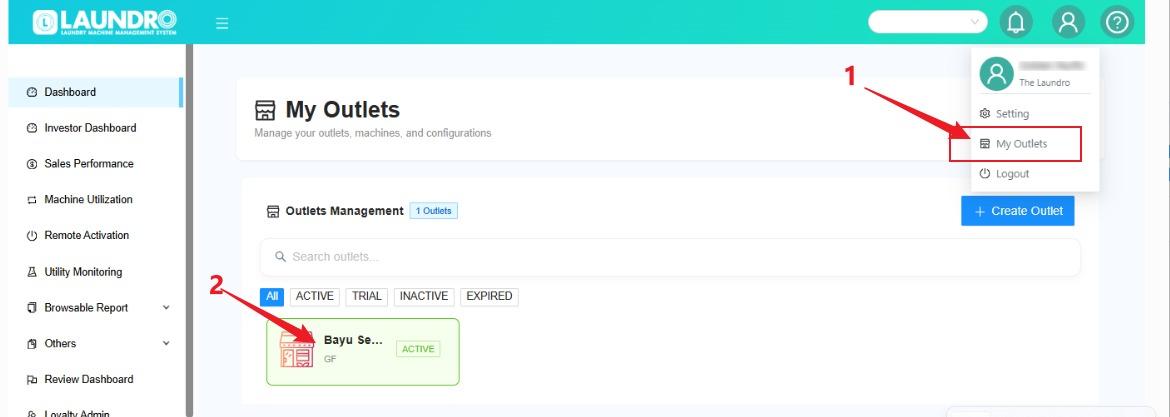
- Find the outlet you want to access.
- Click the outlet box to open its details.
💡 Tip: Make sure you select the correct outlet before proceeding.
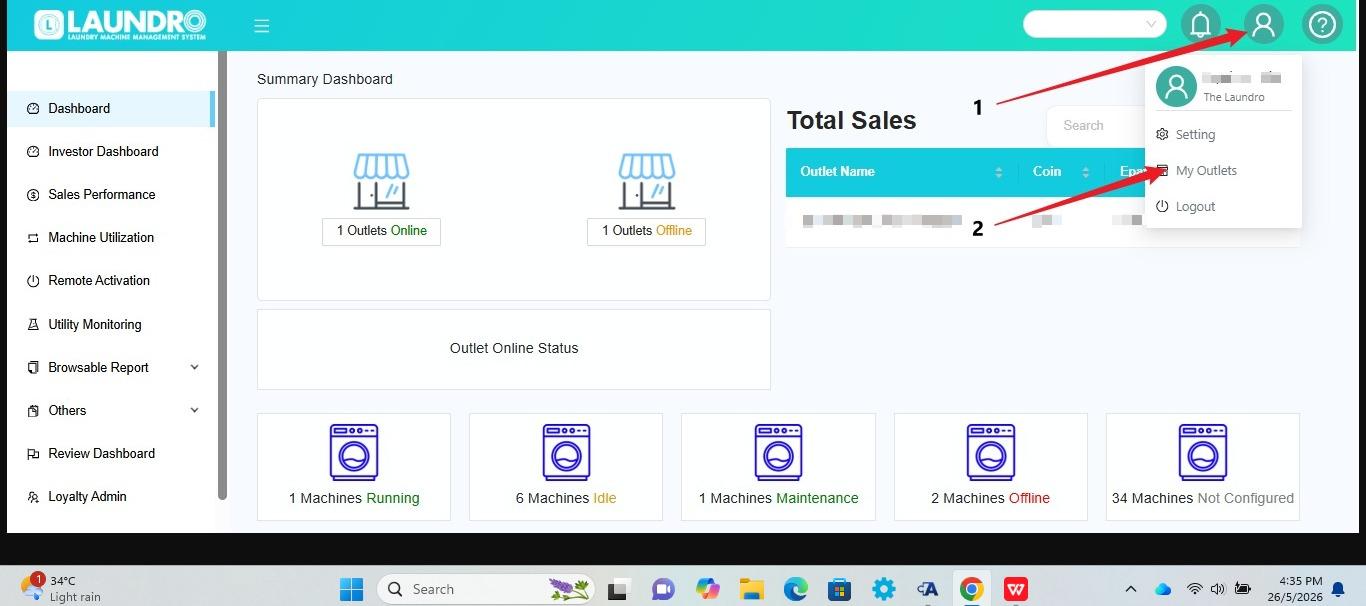
- Highlight the Profile icon and My Outlets option.
- Highlight an outlet box on the My Outlets page.
💡 Quick Tip: Make sure you select the correct outlet before proceeding.
🔳 Step 3: Open QR Codes
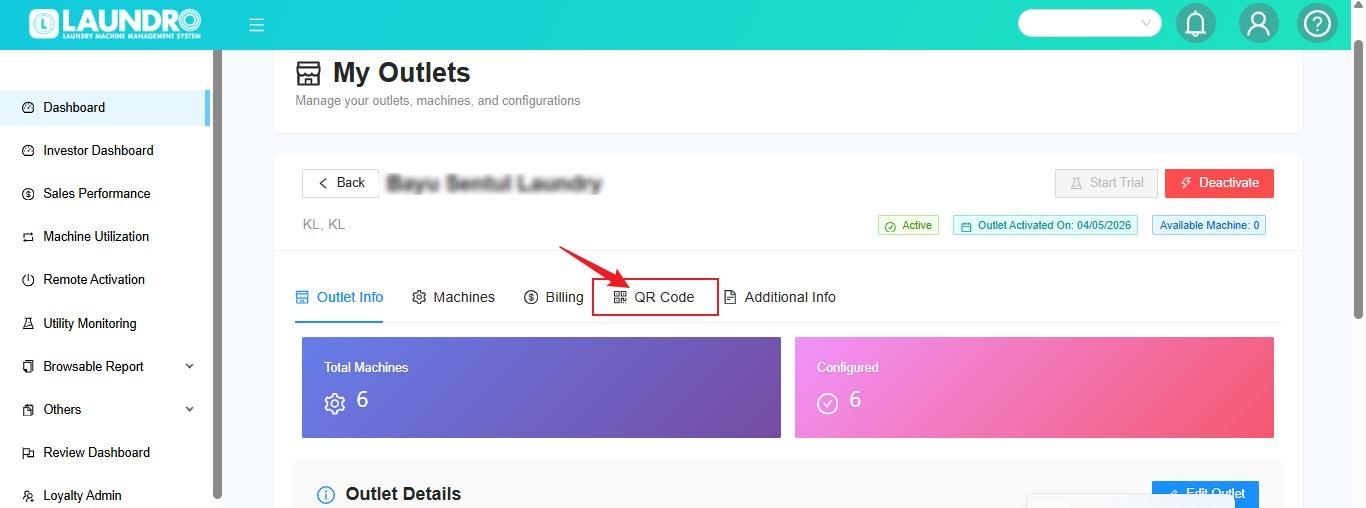
- Inside the selected outlet's details, locate QR Codes.
- Click QR Codes to open the QR Codes page.
- Review the available QR code options.
⬇️ Step 4: Download All QR Codes
There are two download options available:
Option A – Download All Machine QR Codes
- On the QR Codes page, click Download All.
- Allow the system to generate the QR codes.
- Check your browser's Downloads folder for the downloaded file.
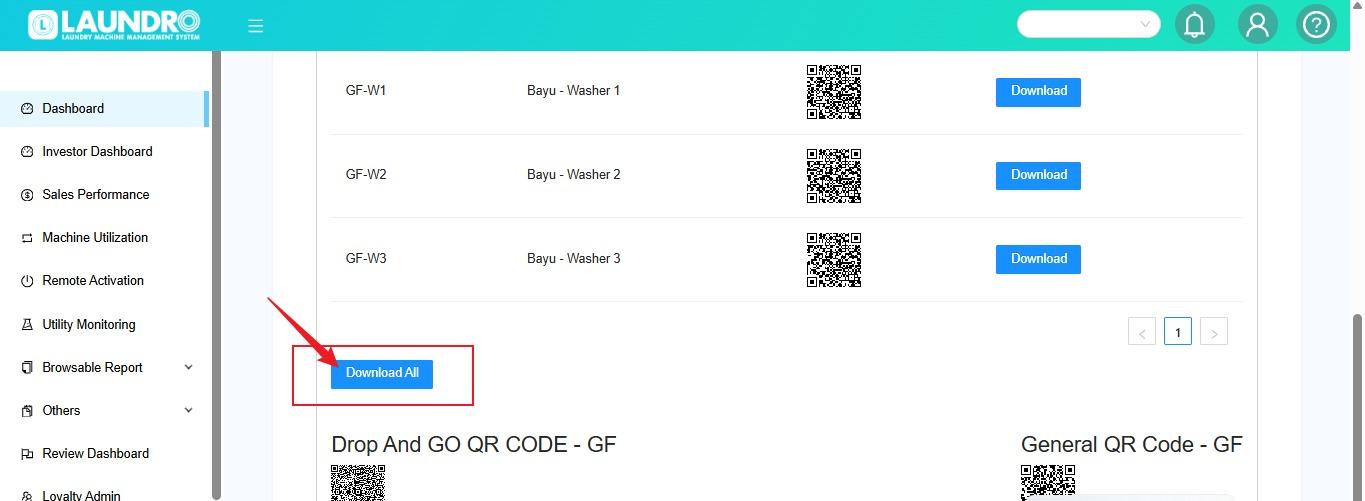
This is what our New Page looks like. You can click “Download All” to generate and download the QR codes.
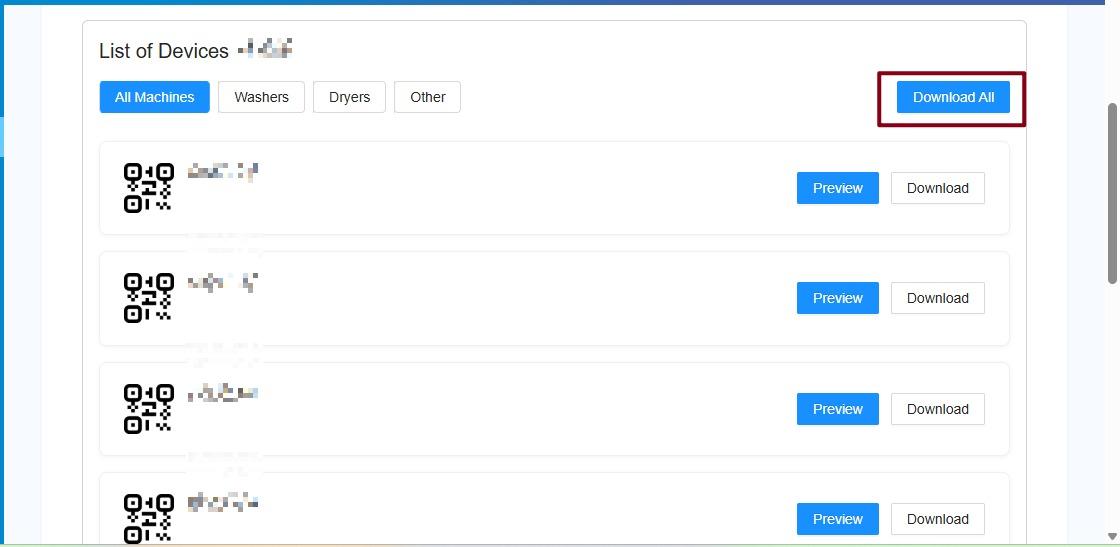
Option B – Download Drop n Go Service QR Code
- On the QR Codes page, locate the Other option.
- Click 'Other' to download the Drop n Go Service QR code.
- Check your browser's Downloads folder.
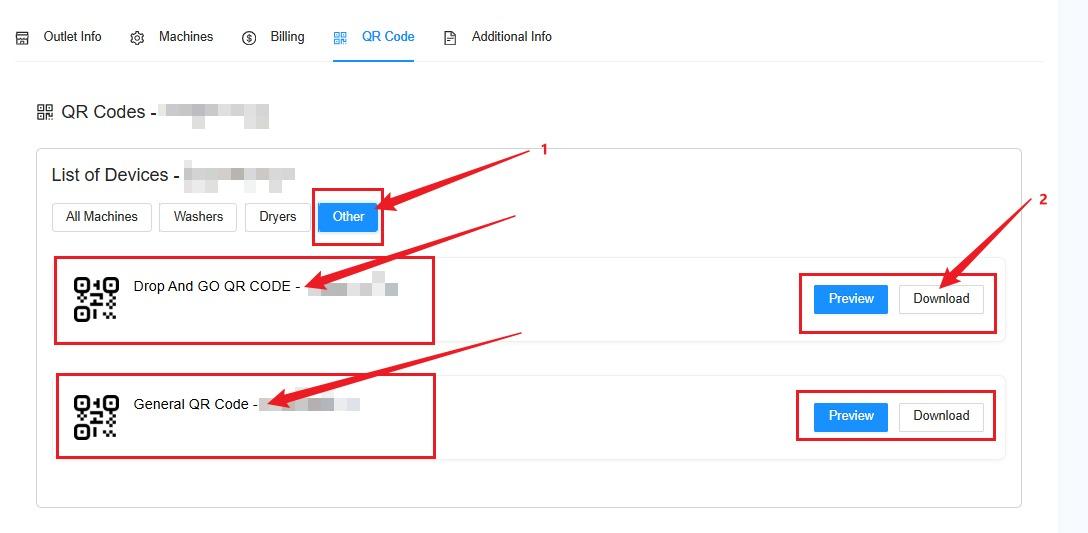
💡 Remember:
- Download All – For downloading the outlet's machine QR codes.
- Other – For downloading the Drop n Go Service QR code.
⚠️ Important Reminders
- Always select the correct outlet.
- Check that the downloaded QR codes belong to the intended outlet.
- Make sure the QR code is clear and readable before printing.
- Keep a copy of the downloaded QR codes for future use.
📋 Quick Reference
Option | Purpose |
|---|
Download All | Download machine QR codes |
Other | Download Drop n Go Service QR code |
- 🔐 Logged in successfully
- 🏪 Selected the correct outlet
- 🔳 Opened the QR Codes page
- ⬇️ Downloaded the required QR code
- 📁 Checked the downloaded file
- 🔍 Verified the QR code before printing
🎉 You're Done!
🎉 You're all set! You can now use your downloaded QR codes for your laundry outlet.
If the download does not work, try again and check your browser's download settings. If the issue persists, contact Laundro Support and provide the outlet name and a screenshot of the issue.
Top-up But Not Get Token
- Login into Laundro Portal & put-in Username / Password : https://v2.thelaundro.com/operator_login

2. Click Loyalty Admin.
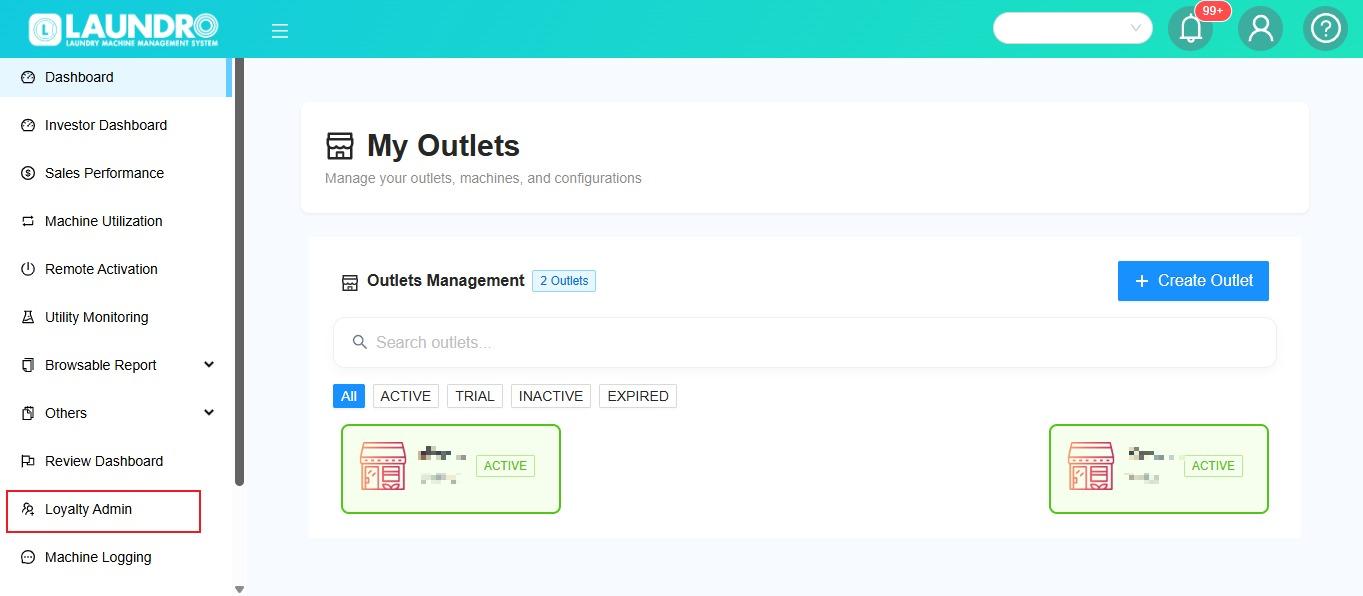
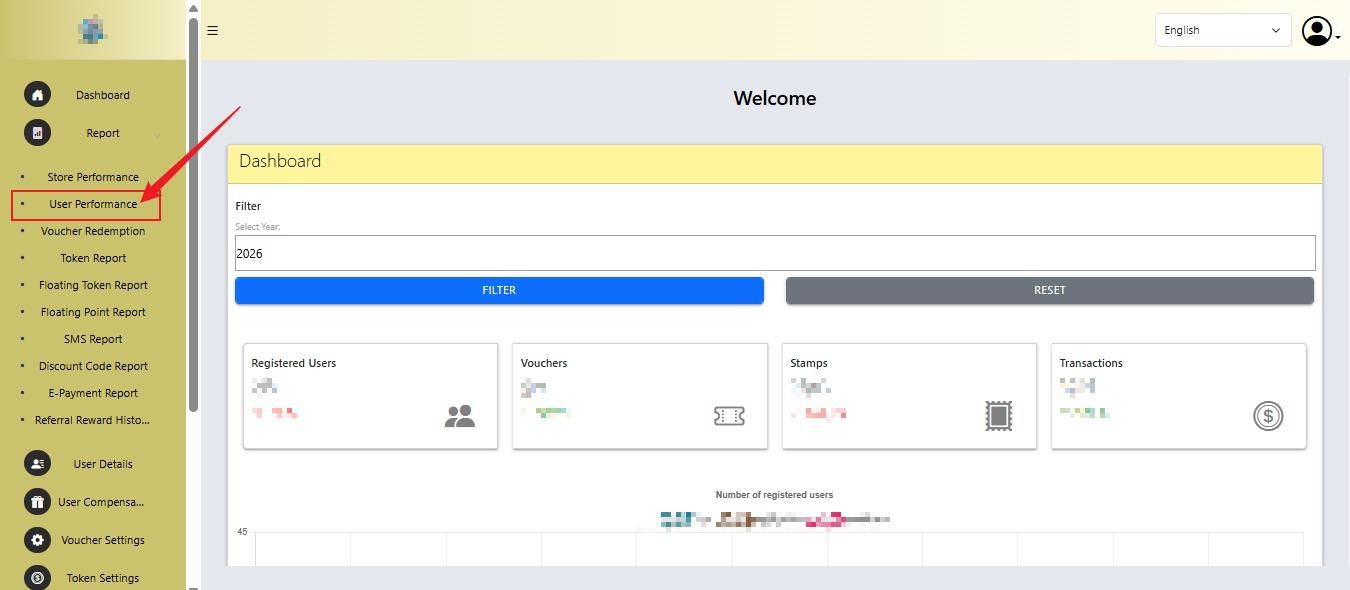
3. Click User Performance to find Member ID.
4.
- You can get the member ID through the phone number by entering the member’s phone number.
- Click User Details.
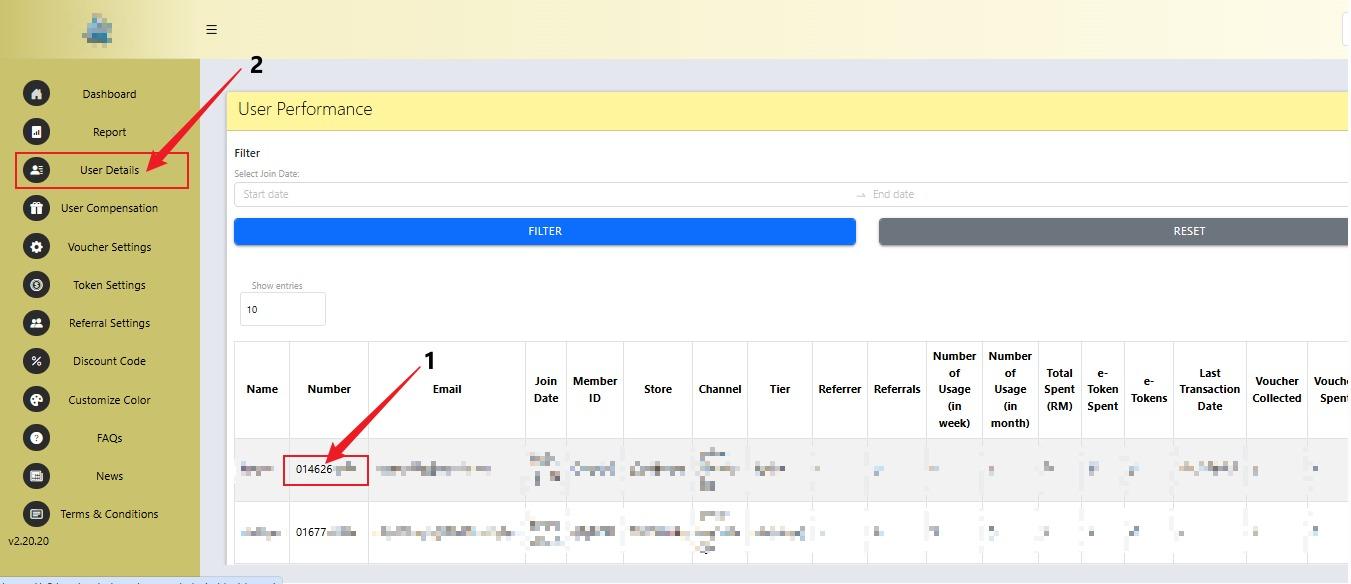
5.
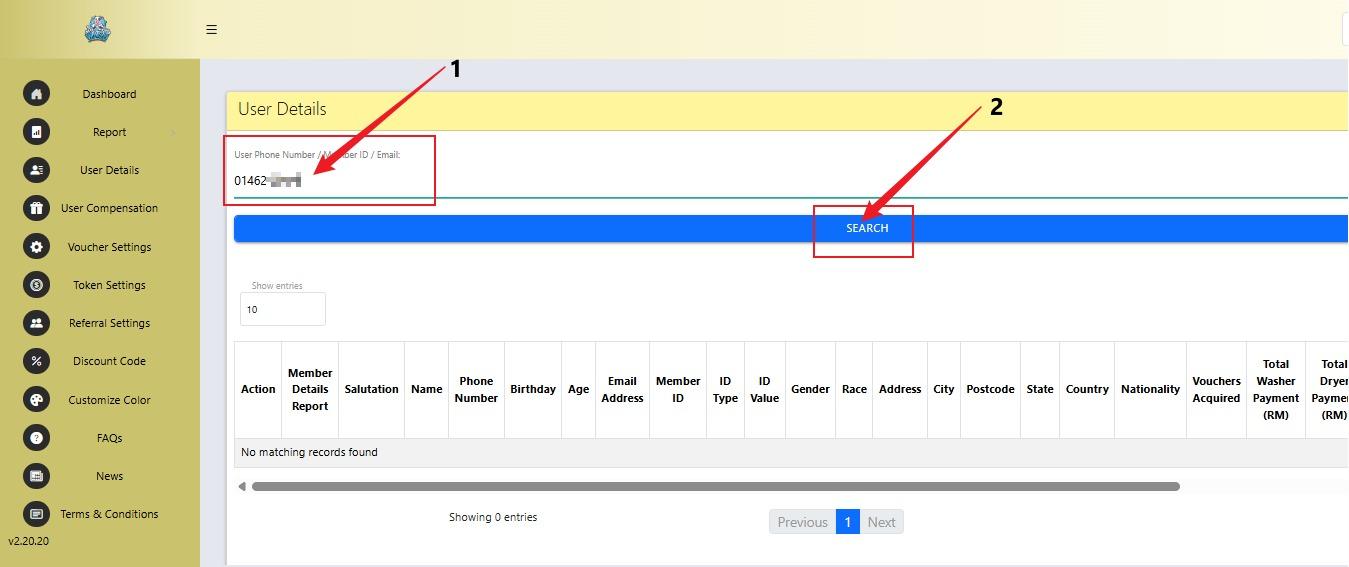
- Fill in User Phone Number.
- Click Search.
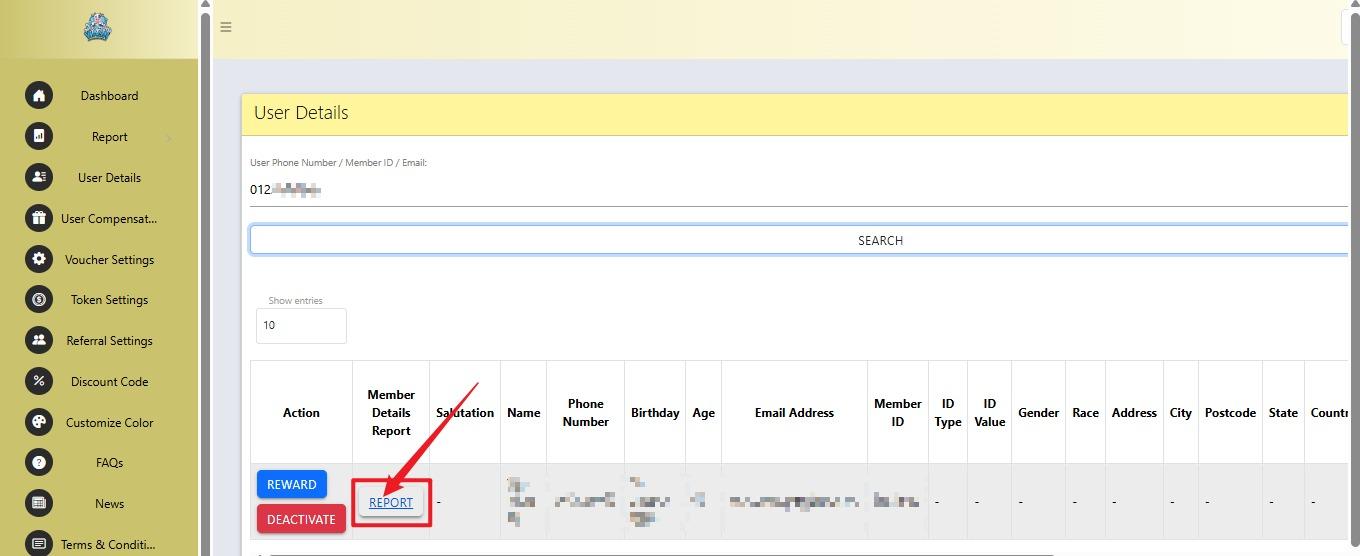
6. Click Report.
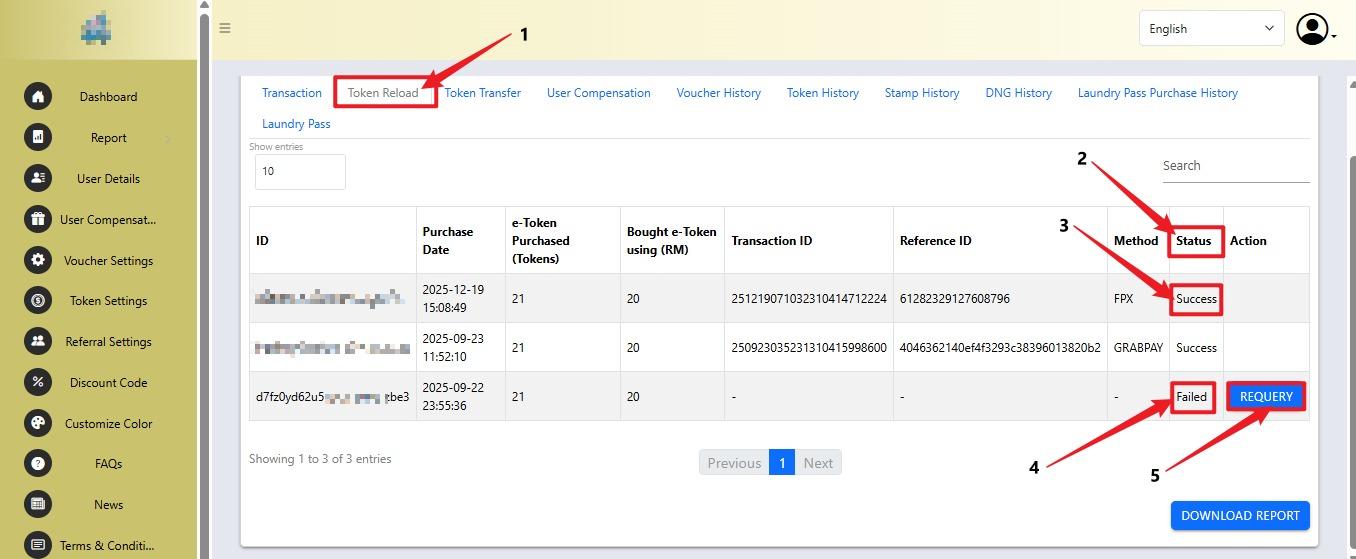
7.
- Click the Token Reload tab.
- Check the transaction Status.
- If the status shows Success, the reload is successful.
- If the status shows Failed, the reload was not successful.
- Click REQUERY to check the transaction again.
📩 How to Change E-mail
🎯 Purpose
Follow this guide to update your current email address to a new one in the Laundro Portal.
🧭 Quick Navigation
1. Log in to Laundro Portal
2. Open Settings
3. Go to Security & System
4. Change your email address
5. Verify your new email
🔐 Step 1: Log in to Laundro Portal
- Open the Laundro Portal Login. https://v2.thelaundro.com/operator_login
- Enter your username and password.
- Click Login.
⚙️ Step 2: Open Settings
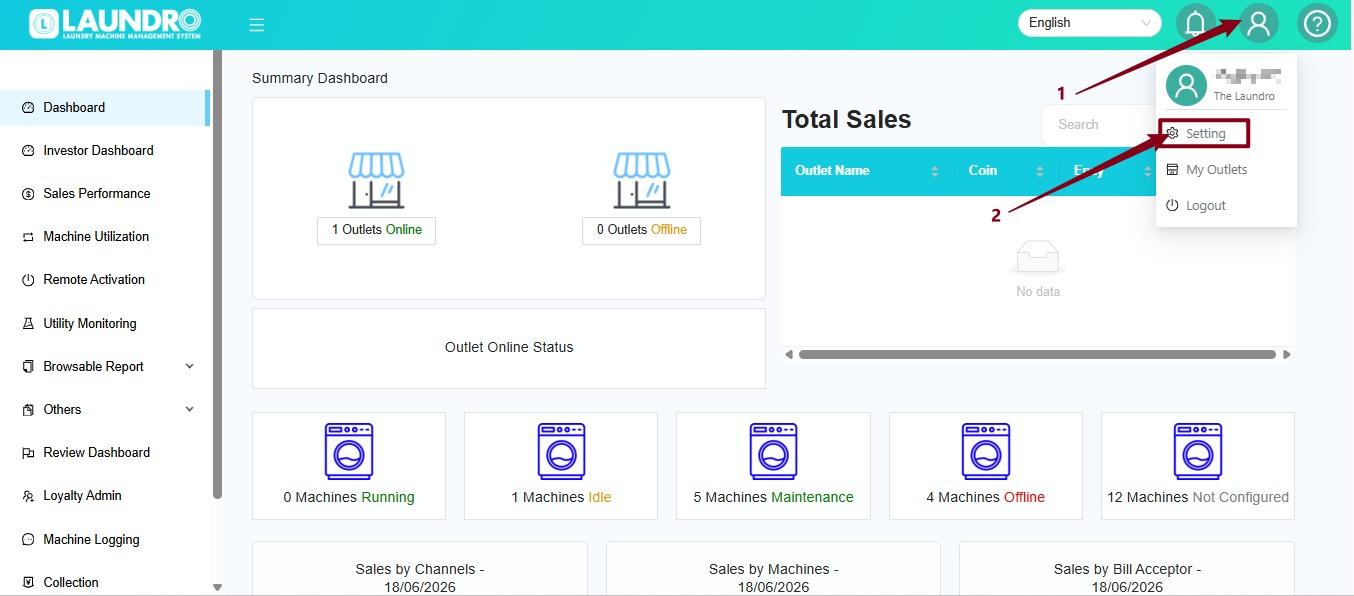
- Click the Profile icon at the top-right corner.
- Select Settings from the dropdown menu.
🛡️ Step 3: Open Security & System
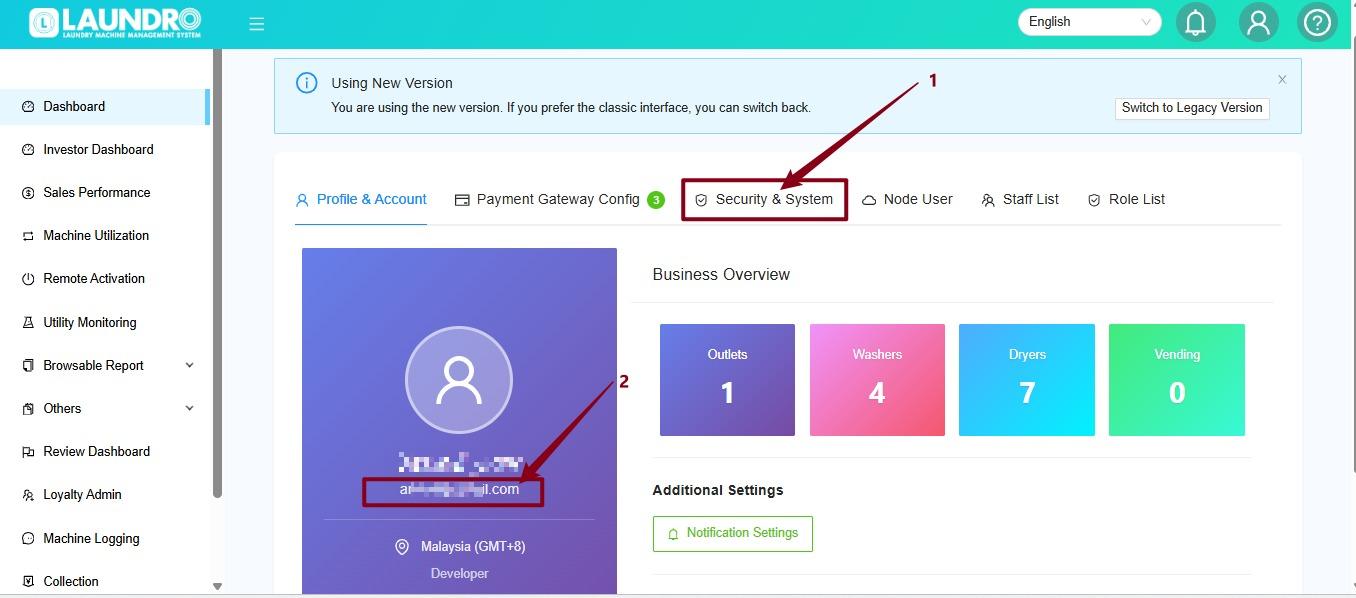
- On the Settings page, click Security & System.
- Locate your current email address.
📩 Step 4: Enter Your New Email
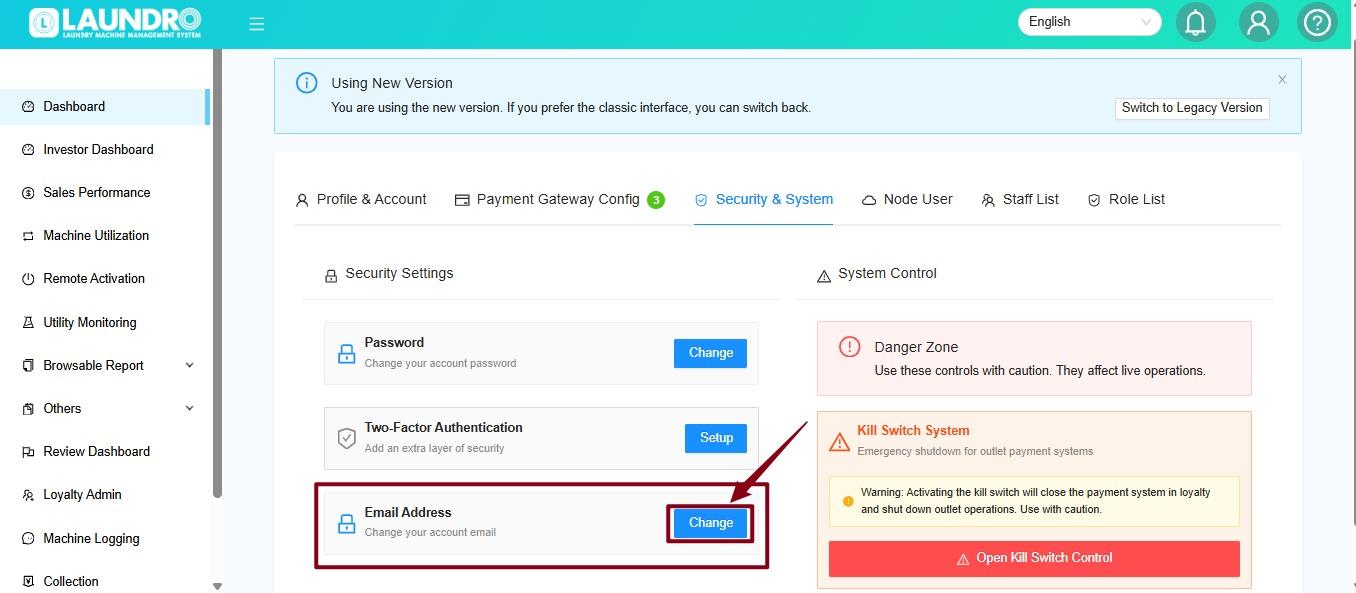
- Click Change beside the E-mail Address field.
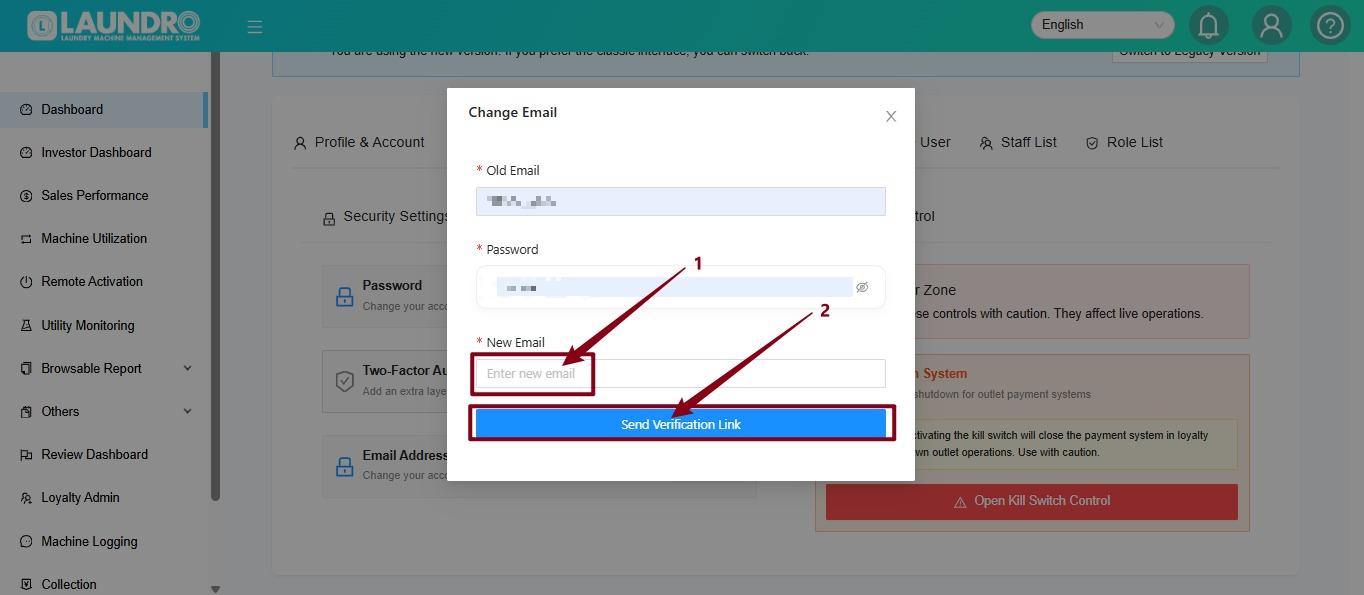
- Enter your new email address.
- Double-check that the email address is correct.
- Click Send Verification Link.
✅ Step 5: Verify Your New Email
- Open the inbox of your new email address.
- Look for the verification email from the system.
- Follow the instructions in the email to complete verification.
- Return to the portal and check whether the email address has been updated.
If you cannot find the verification email, check your Spam/Junk folder and confirm that you entered the correct email address.
🎉 All Done!
Your email change is complete once the verification process succeeds and the portal reflects the new address.
👥 How to Create a Staff User
Welcome to the Laundro Portal Guide! 👋
Want to give your staff access to the Laundro Portal? Follow this guide to create a staff role, set permissions, and create a staff account.
🛡️ Stage 1 — Create a Staff Role
A Staff Role determines which features and functions a staff member can access.
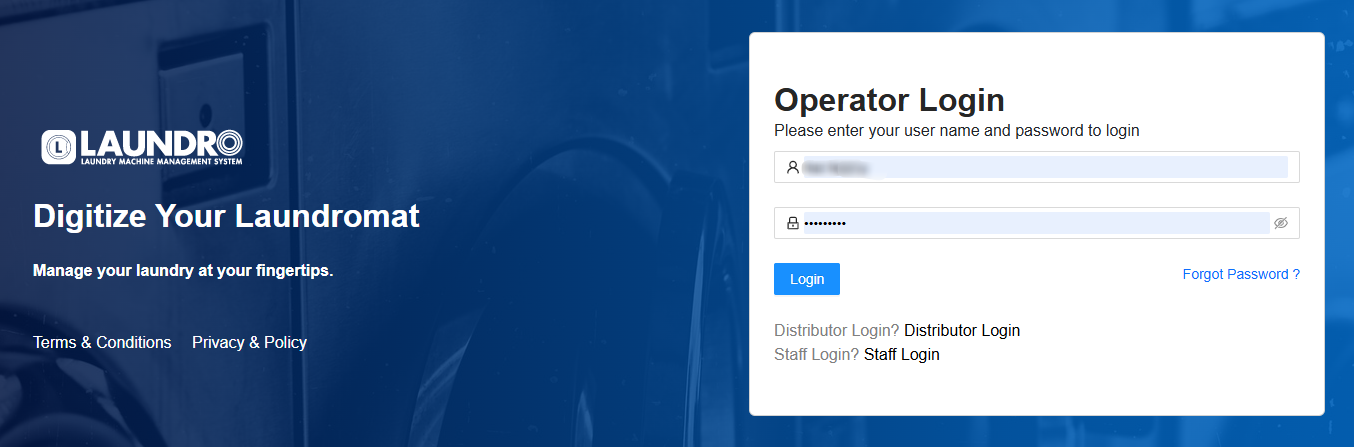
🔐 Step 1: Log In to Laundro Portal
Open the Laundro Portal and enter your operator username and password.
🔗 Portal Login: https://v2.thelaundro.com/operator_login
⚙️ Step 2: Open Settings
- Click the Profile icon at the top-right corner.
- Select Setting from the dropdown menu.
📋 Step 3: Open Role List
On the Setting page, click Role List.
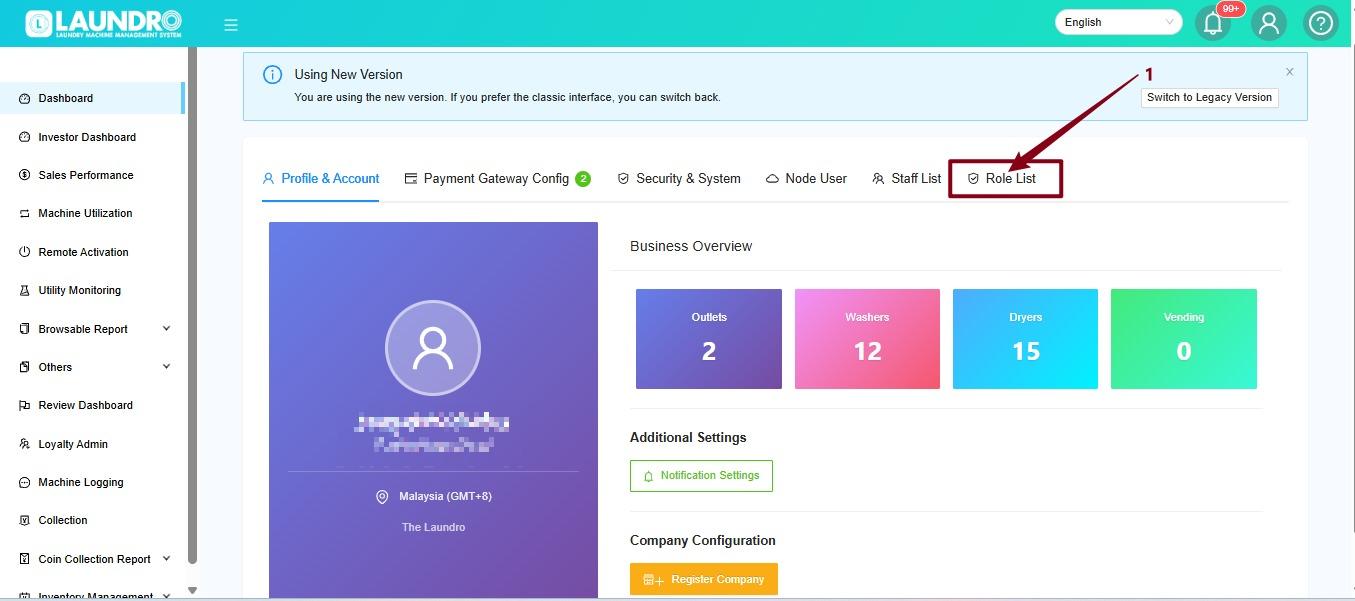
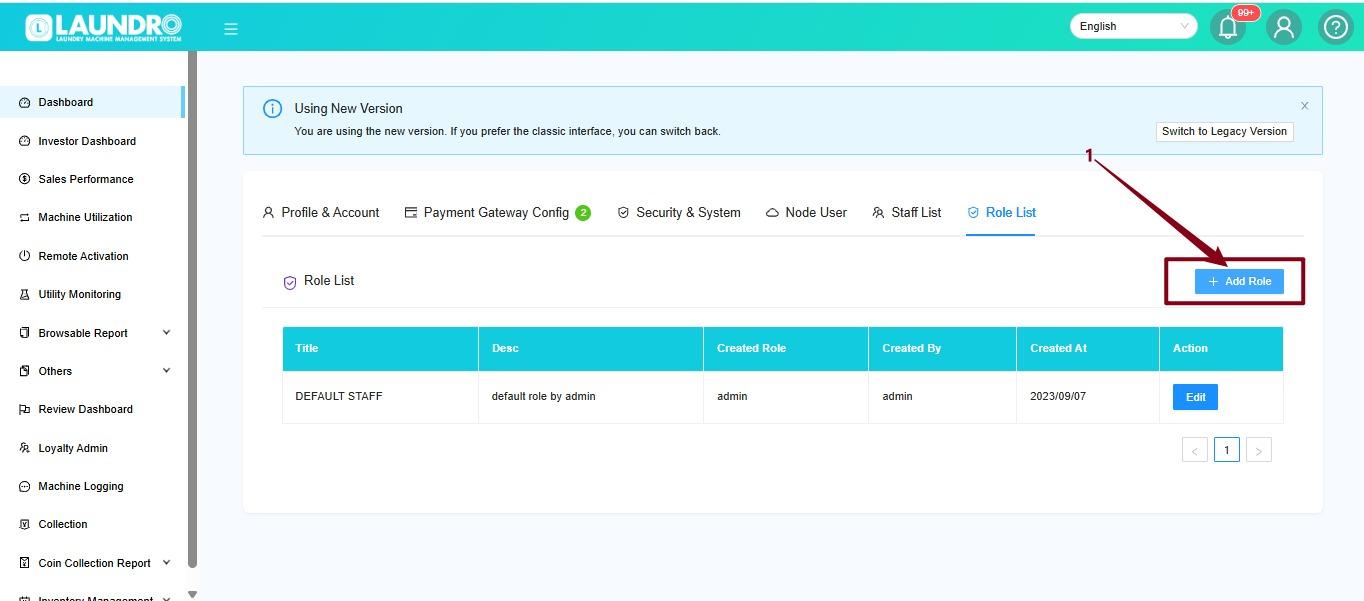
➕ Step 4: Add a New Role
Click Add Role to create a new staff role.
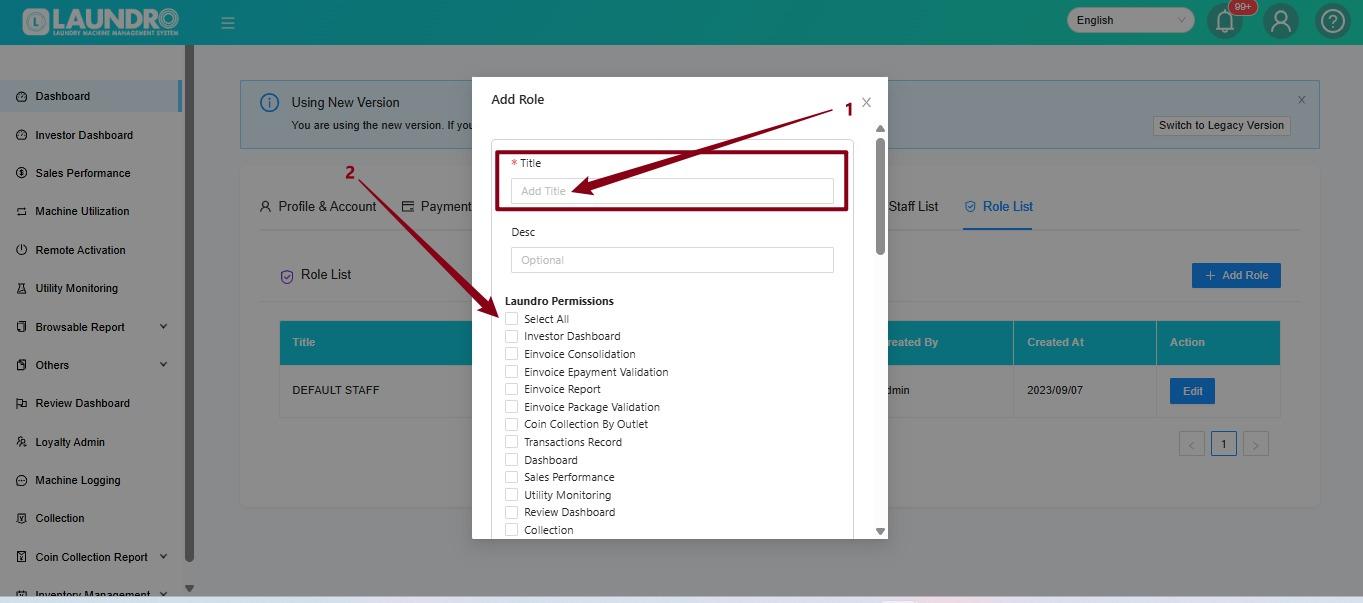
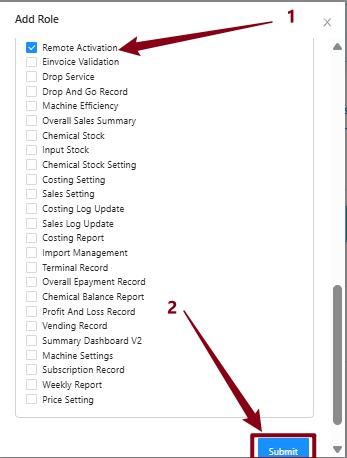
✏️ Step 5: Enter the Role Details
- Enter the role name in the Title field.
- Select the required permissions by checking the appropriate boxes.
Example: Staff - Remote Activation Only
If the staff member only handles remote activation, select the Remote Activation permission.
💾 Step 6: Submit the Role
Review the selected permissions, then click Submit to create the role.
💡 Quick Tip: Only enable the permissions required for the staff member's duties.
👤 Stage 2 — Create a Staff Account
Now that the role is ready, let's create the staff account!
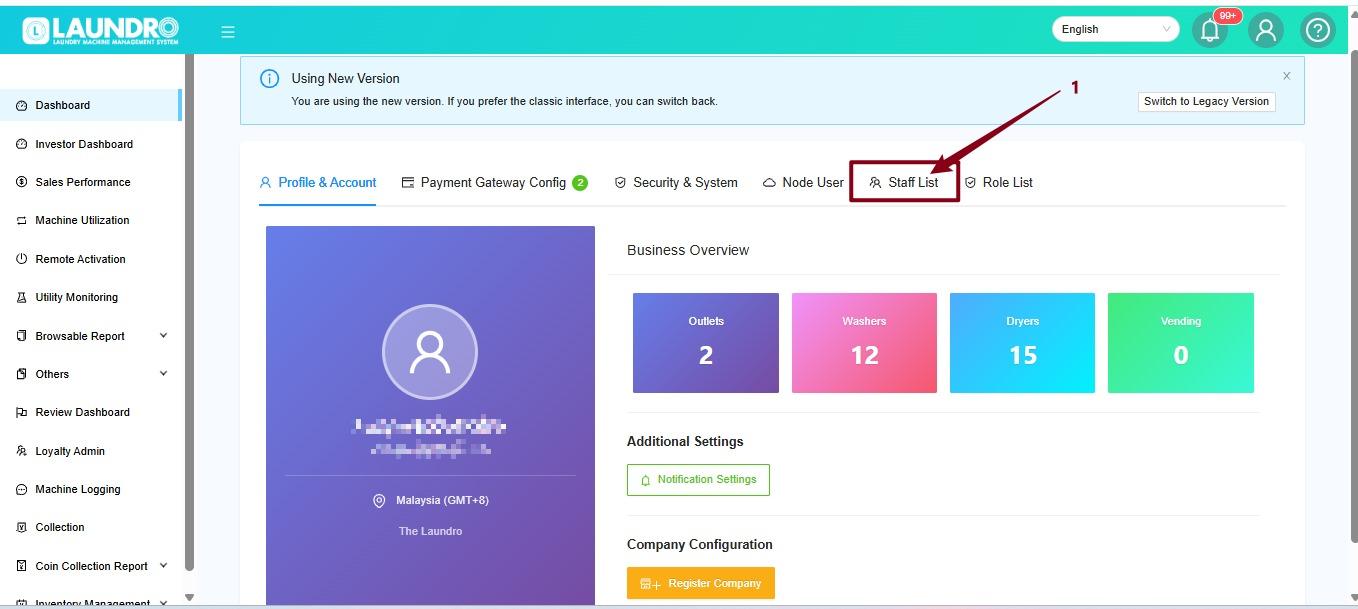
📋 Step 7: Open Staff List
Return to the Setting page and click Staff List.
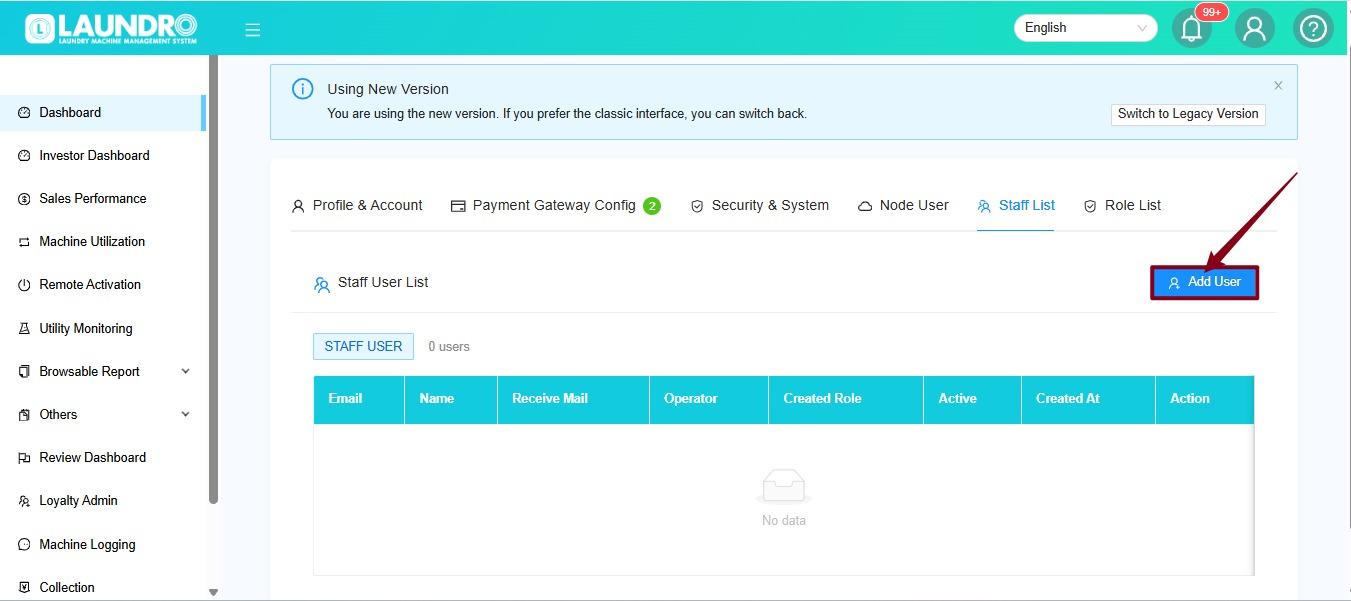
➕ Step 8: Add a User
Click Add User to open the new staff account form.
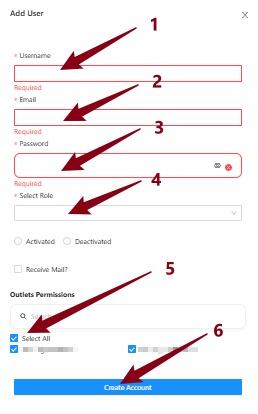
📝 Step 9: Fill In the Staff Details
Complete the required fields:
- Username — Enter the staff member's username.
- Email Address — Enter the staff member's email address.
- Password — Create a password for the account.
- Role — Select the role created earlier.
- Outlet Access — Select the outlet or outlets the staff member is allowed to access.
Once all details are complete, click Create Account.
⚠️ Important: Double-check the selected role and outlet access before creating the account.
🔐 Stage 3 — Log In as Staff
The staff account has been created. Now, let's log in!
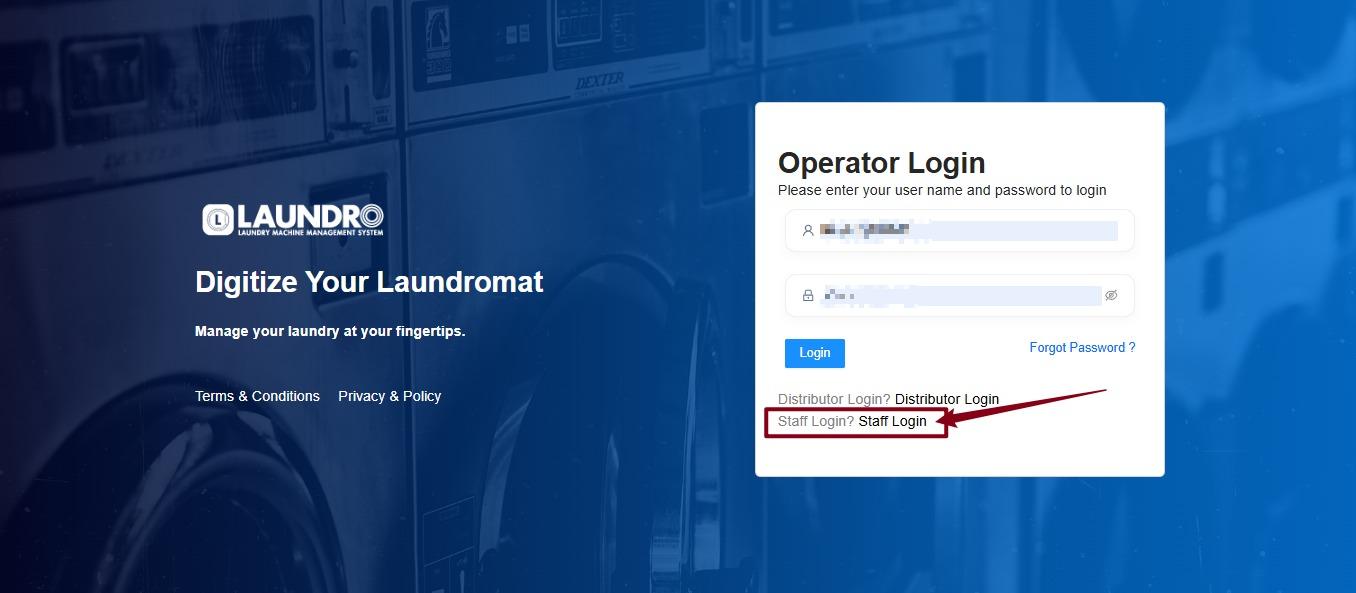
🚪 Step 10: Open the Login Page
Go to the Laundro Portal login page and select Staff Login.
🔗 https://v2.thelaundro.com/operator_login
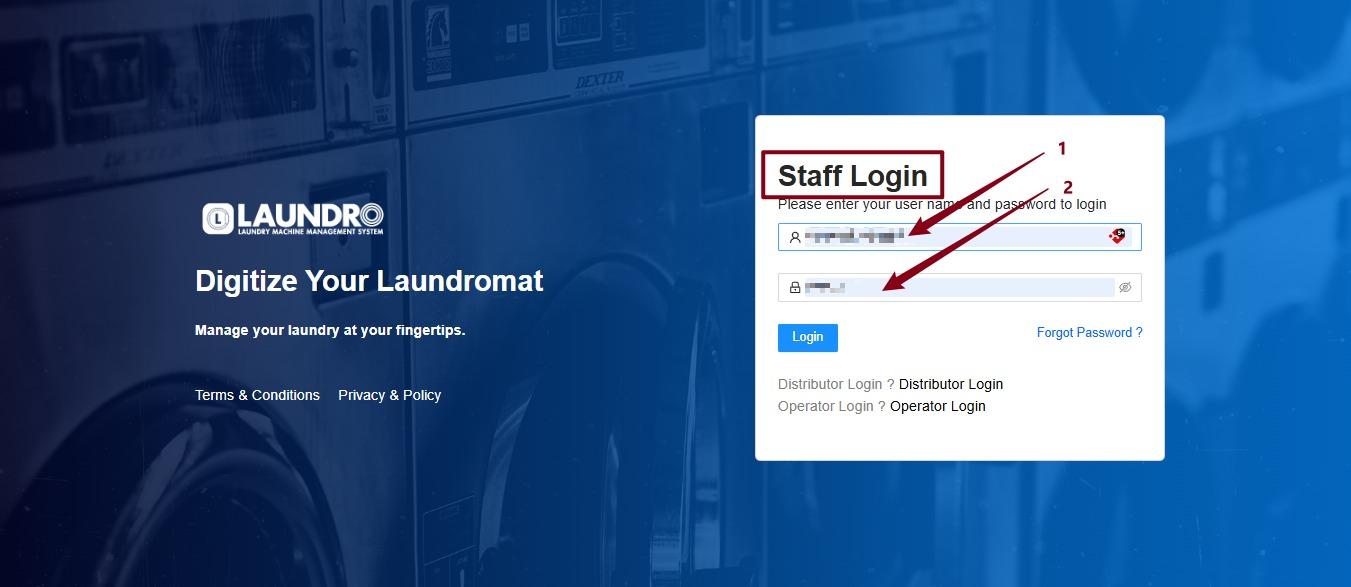
🔑 Step 11: Enter Login Details
- Enter the staff Username.
- Enter the staff Password.
- Follow the on-screen instructions to log in.
🎉 Success! The staff member can now log in using the account created for them, with access based on the assigned role and outlet permissions.
💡 Need help? Contact the Laundro support team if you encounter any issues while creating the staff account.
🏪 How to Deactivate an Outlet
Welcome to the Laundro Portal Guide! 👋
Need to deactivate an outlet? Follow this step-by-step guide to deactivate the correct outlet through the Laundro Portal.
🧭 Quick Navigation
- 🔐 Step 1: Log In to Laundro Portal
- 🏪 Step 2: Open My Outlets
- 📋 Step 3: Select the Outlet
- ⚠️ Step 4: Deactivate the Outlet
- ✅ Step 5: Confirm Deactivation
🔐 Step 1 — Log In to Laundro Portal
Open the Operator Login page and enter your username and password.
Click Log In to access the portal.
🏪 Step 2 — Open My Outlets
After logging in:
- Click the Profile icon at the top-right corner.
- Select My Outlets from the dropdown menu.
- Wait for the My Outlets page to load.
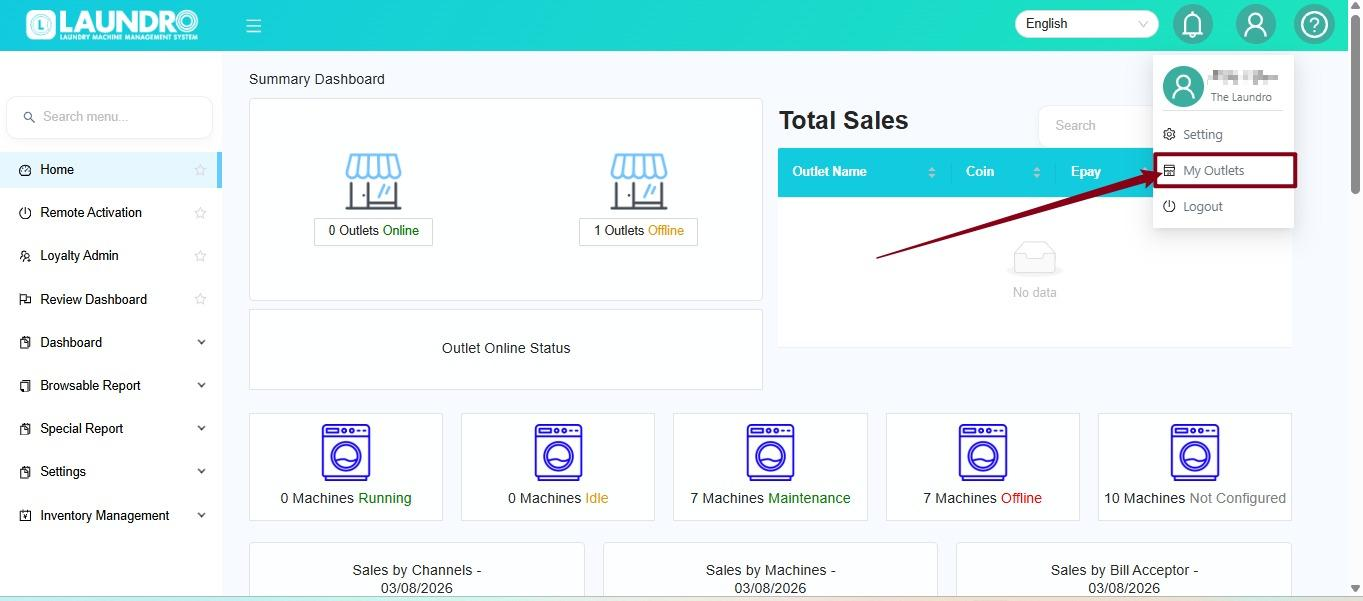
💡 Quick Tip: Make sure you are logged in to the correct operator account.
📋 Step 3 — Select the Outlet
On the My Outlets page:
- Find the outlet you want to deactivate.
- Click the outlet to open its details.
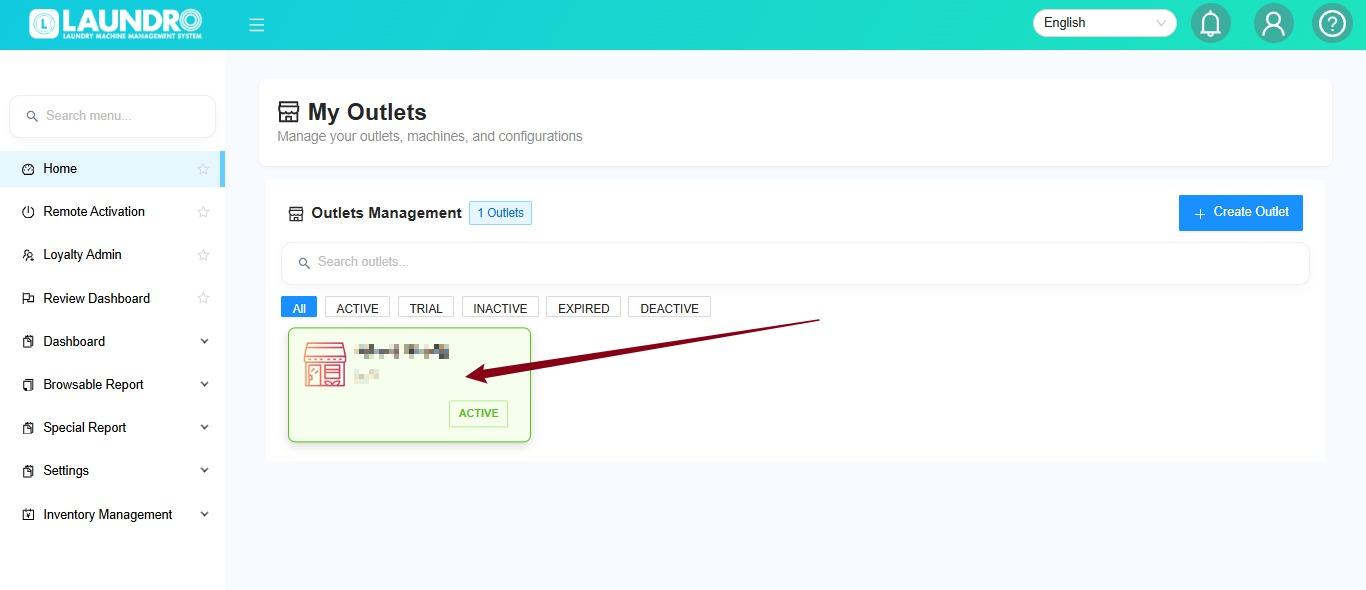
⚠️ Important: Double-check the outlet name before proceeding. Make sure you have selected the correct outlet.
⚠️ Step 4 — Click Deactivate
On the selected outlet page, click Deactivate.
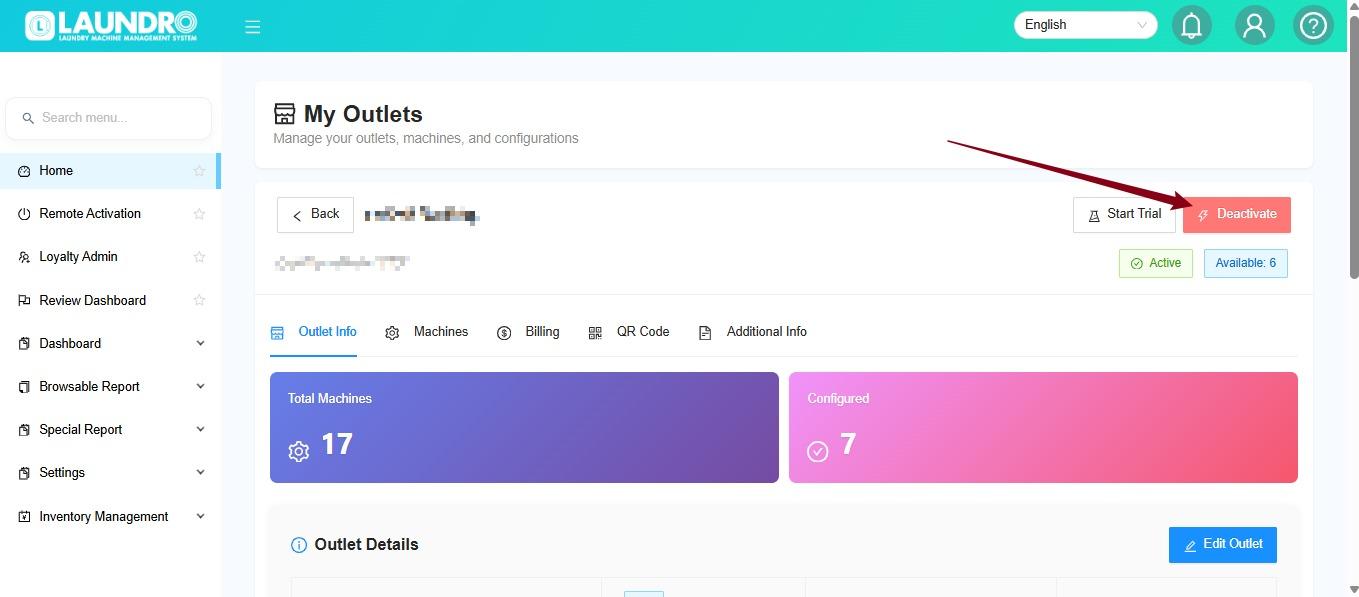
💡 Before proceeding: Make sure you intend to deactivate this outlet. Check with the relevant person in charge if you are unsure.
🔴 Step 5 — Confirm Deactivation
A confirmation prompt will appear.
- Review the confirmation prompt.
- If you are sure you want to proceed, click Yes, Deactivate.
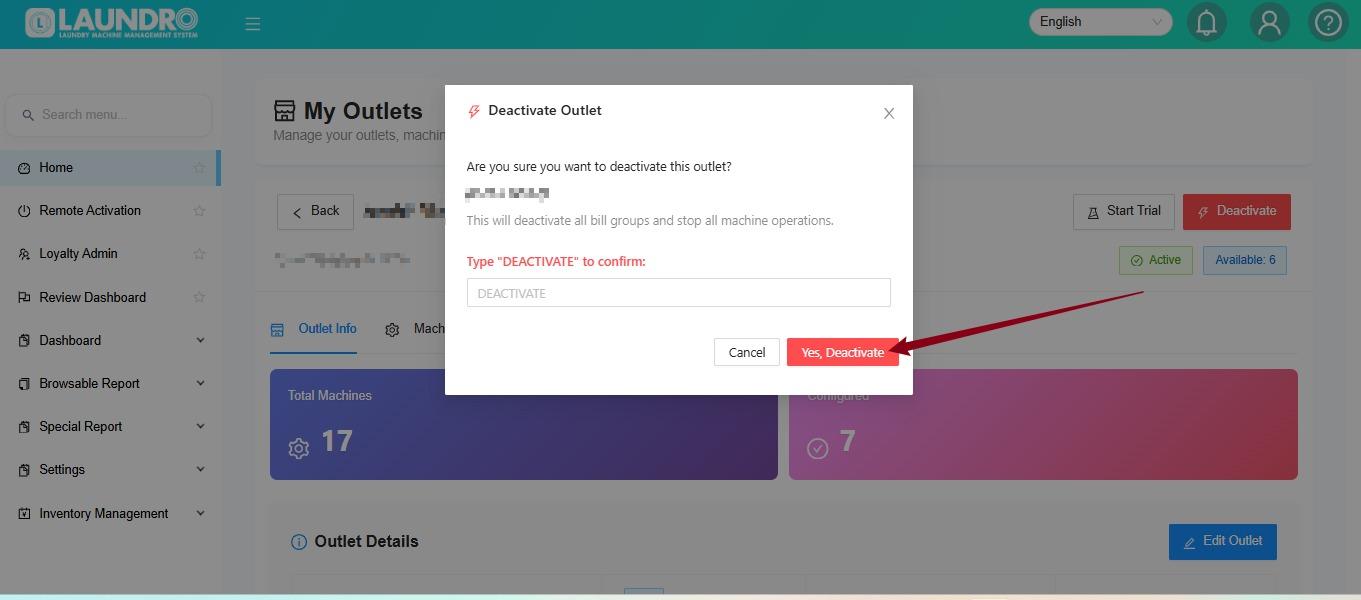
⚠️ Important Reminder: Deactivation may affect the outlet's availability or operations. Confirm the intended action before proceeding.
🎉 You're all set!
You have completed the outlet deactivation steps. Check the outlet status in the portal to verify the result.
Need help? Contact the Laundro support team if you encounter an issue during deactivation.
Epayment Transaction Record: Filter & Download Guide
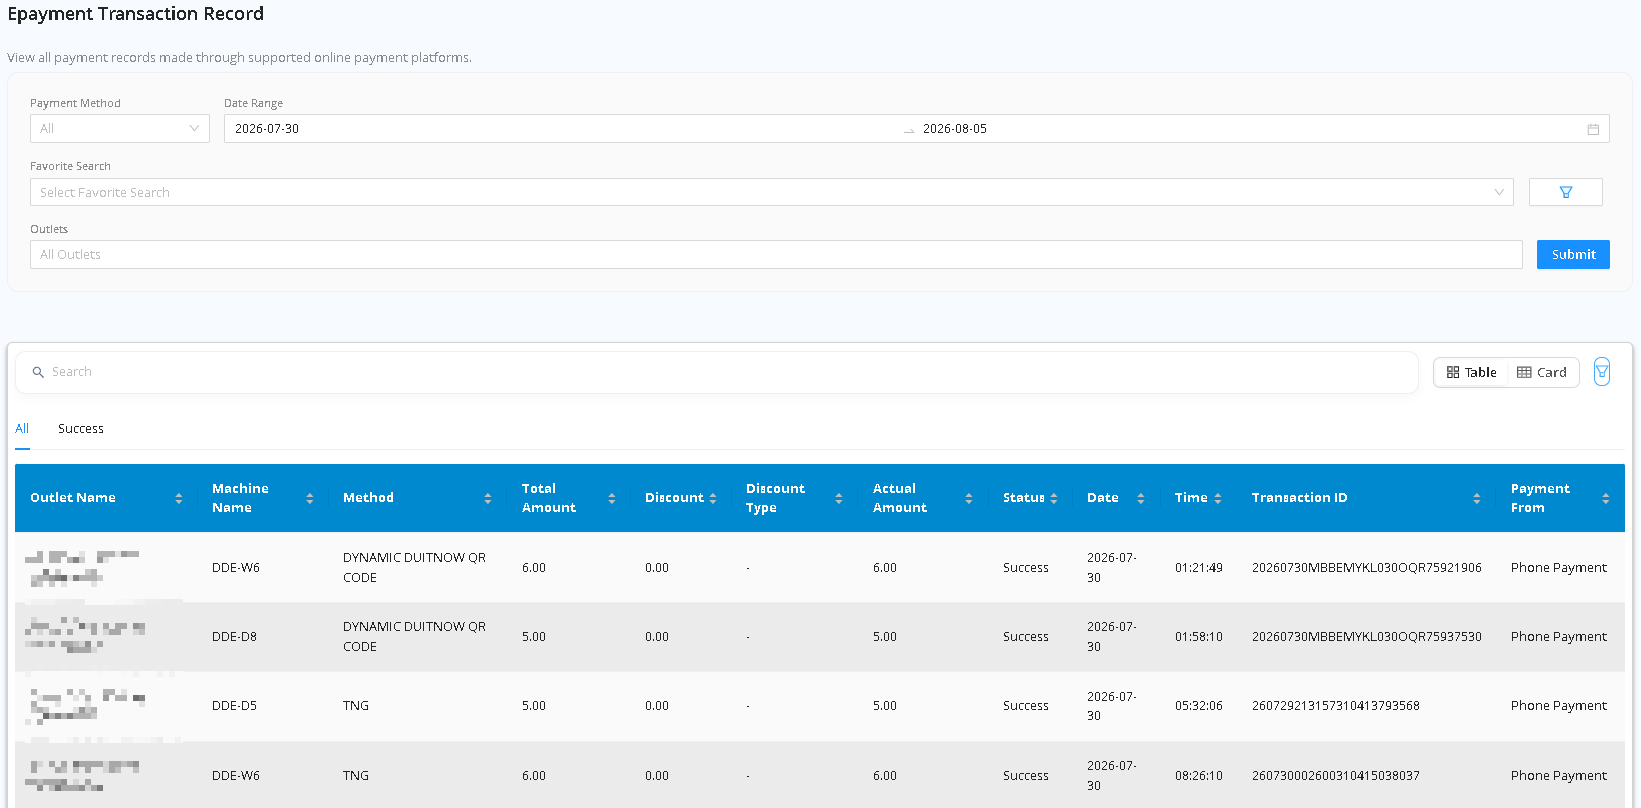
Learn how to filter epayment transaction records and download customized reports based on your table filters.
1. How to Filter Transaction Records
-
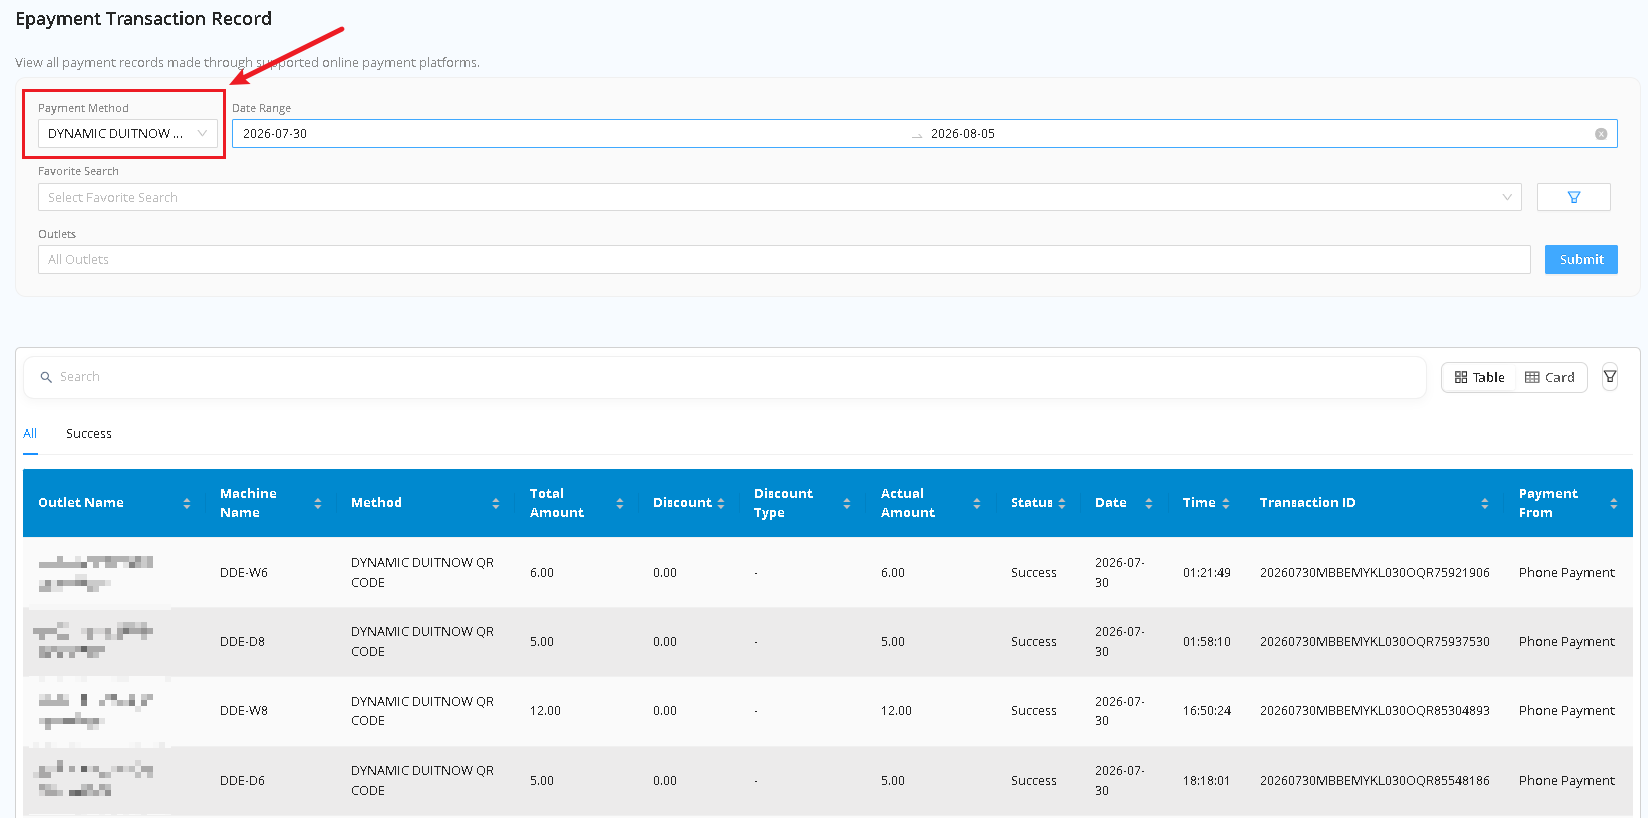
Select Payment Method
Click the Payment Method dropdown menu and select your target gateway (e.g., DYNAMIC DUITNOW QR CODE, TNG, etc.). Leave it set to All to view records from all payment channels.
-
Set Date Range
Click the Date Range field to choose your desired start and end dates. -
Select Outlets (Optional)
Choose a specific location from the Outlets dropdown, or keep it set to All Outlets. -
Apply Filters
Click the blue Submit button to filter and update the transaction table.
2. Downloading Reports Based on Filters
Note: Report downloads are generated dynamically based on the active filters applied to your table view.
- Filtered Export: The exported report only includes transactions matching your selected filters (Payment Method, Date Range, and Outlets).
- Table Search Context: Any search keywords entered into the inline table Search bar or tab selections (e.g., All vs. Success) will also determine which rows are included in the downloaded file.
- Full Export: To download a complete report of all transactions, set Payment Method and Outlets to All, clear any table search text, click Submit, and then perform the download.
3. Quick Search & View Options
- Keyword Search Bar: Located directly above the table to quickly search by Machine Name, Transaction ID, or Amount.
- View Toggle: Switch between Table and Card view using the view toggle buttons in the top-right corner.
- Favorite Searches: Save frequently used filter combinations under Select Favorite Search for fast one-click access in the future.
How To View Individual / All Machine Sales Transactions
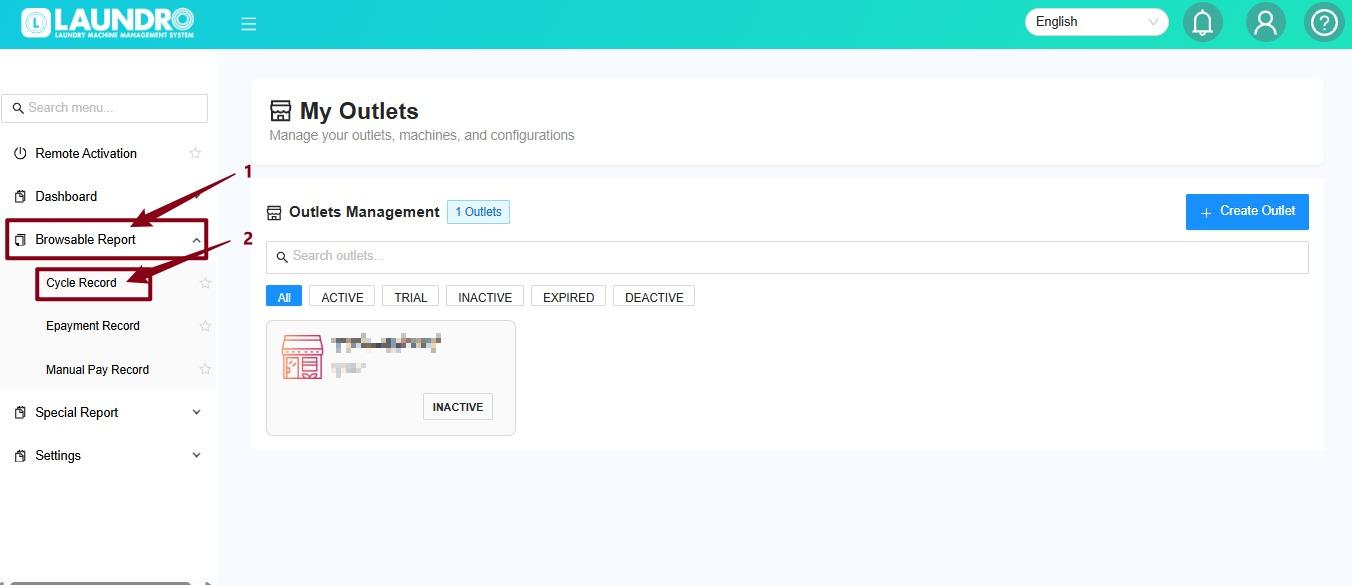
- Find and click Browsable Report in the sidebar menu, then click Cycle Record.
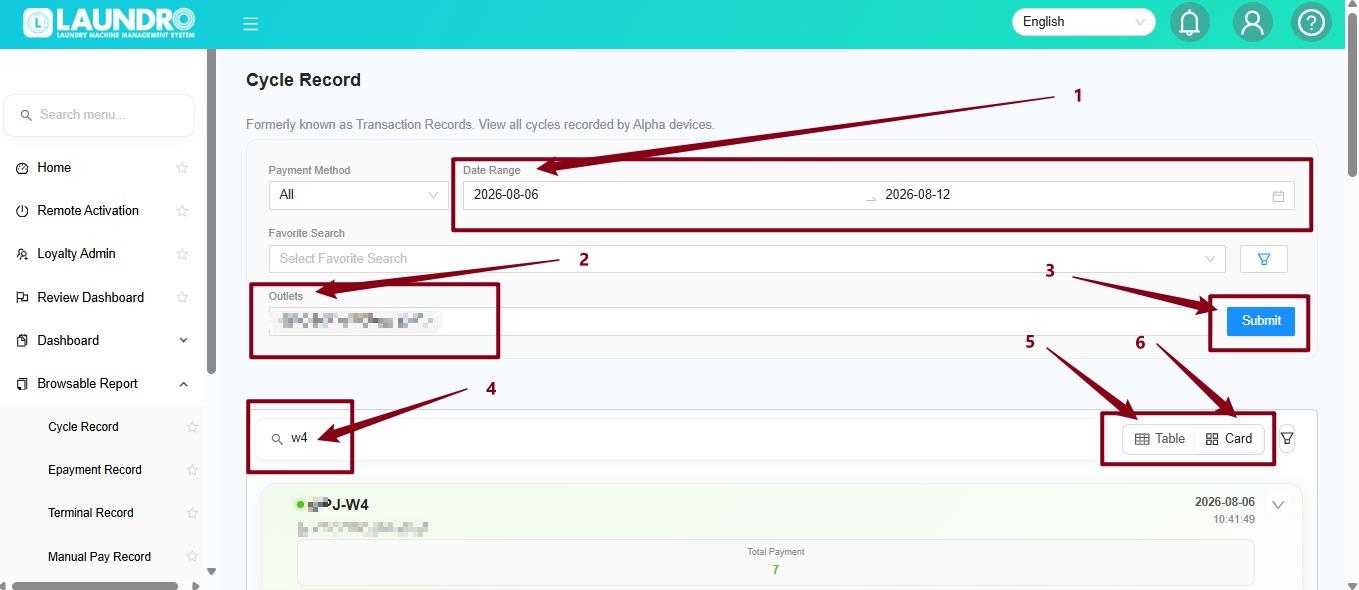
2.
1. Date Range – Select the date range you want to check.
2. Outlets – Select the outlet you want to view.
3. Submit – Click Submit to generate the records.
4. Search – Enter the washer or dryer number (e.g. W4) to find a specific machine.
5. Table / Card – Choose Table or Card view based on your preference.
6 View Record – The cycle record will show the machine's transaction details, including the payment amount and date/time.
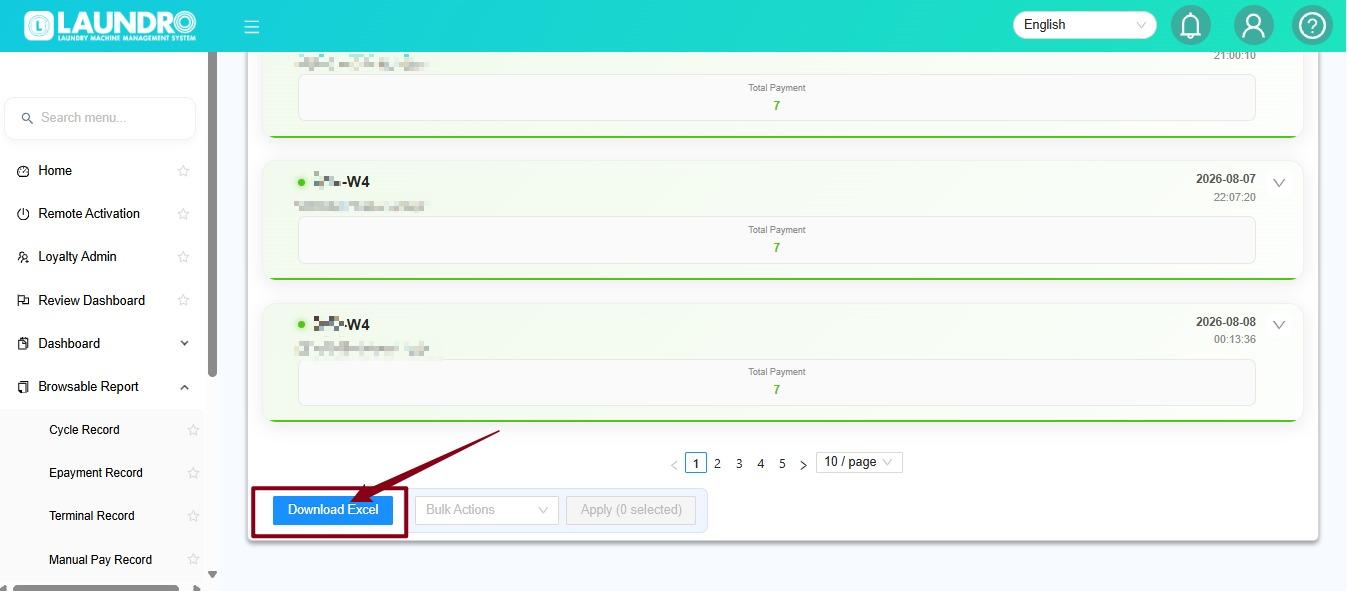
3. You can also download the report in Excel format by clicking the Download Excel button at the bottom.
📊 Costing & Sales Report
Welcome to the Laundro Portal Guide! 👋
Want to review your Costing & Sales report? Follow this guide to select your filters, generate the report, and review the total based on your selected criteria.
Purpose
The Costing & Sales report allows you to view costing and sales information based on the selected Operator, Month, and Outlet.
How to Access
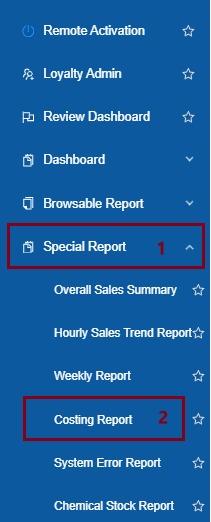
📍 Step 1 — Open Costing & Sales
Log in to the Laundro Portal using your operator account and navigate to the Costing & Sales report page.
- Log in to the Laundro Portal using your Username and Password.
🔗 Portal Login: https://v2.thelaundro.com/operator_login
💡 Tip: Make sure you are using the correct operator account before generating the report.
🔎 Step 2 — Select the Operator
Choose the required Operator from the filter.
This determines which operator's report you want to view.
📅 Step 3 — Select the Month
Choose the month you want to review.
💡 Example: Select September to review the report for September.
📸 Insert Screenshot 3: Month filter highlighted.
🏪 Step 4 — Select the Outlet
Choose the required Outlet from the filter.
Make sure you select the correct outlet for the report you want to generate.
📸 Insert Screenshot 4: Outlet filter highlighted.
📊 Step 5 — Generate the Report
Ready to view your results?
- Review your selected Operator, Month, and Outlet.
- Click Submit.
- Wait for the report to load.
- Review the report details and the displayed Total.
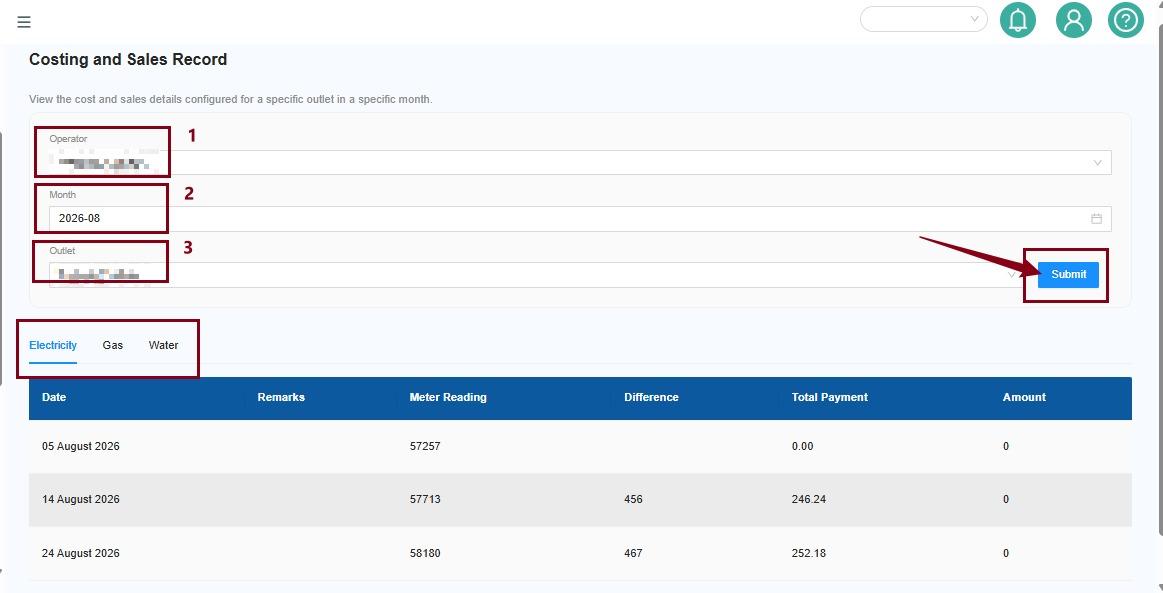
🧮 Understanding the Report Total
The report displays a Total based on the selected filters.
Before reviewing the results, check that you have selected the correct:
- 👤 Operator
- 📅 Month
- 🏪 Outlet
These filters determine which report data is displayed.
💡 Quick Tip: If the results do not look correct, check your filters and click Submit again.
⚠️ Troubleshooting Tips
The report shows unexpected results
Check whether the correct Operator, Month, and Outlet have been selected.
The report does not show the expected data
Review your filters and click Submit again. If the issue persists, contact the Laundro support team for assistance.
✅ You're All Set!
You now know how to generate and review the Costing & Sales report.
Before finishing, remember to:
- Select the correct Operator.
- Choose the required Month.
- Select the correct Outlet.
- Click Submit.
- Review the report details and Total.
🎉 Happy reporting!
Chemical Report v2
🎯 Purpose
The Chemical Report v2 allows you to view chemical stock information based on the selected Operator, Outlet, Method, Date, and Item.
You can use the report to check either:
- Consume – how much chemical stock was consumed during a selected period.
- Balance – the stock balance on a specific date.
📍 How to Access
Step 1 — Open Laundro Portal
Log in to the Laundro Portal using your Username and Password.https://v2.thelaundro.com/operator_login
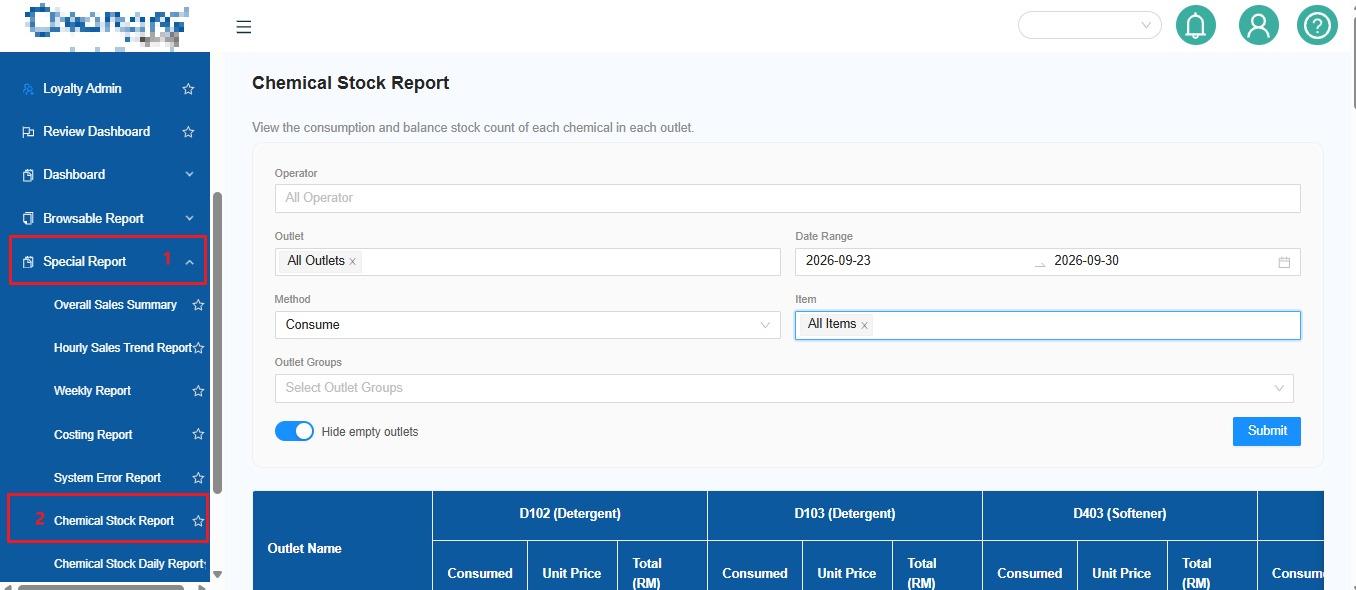
Step 2 — Open Report
Step 3 — Select Chemical Report v2
Select Chemical Report v2 from the Report menu.
You will be directed to the Chemical Stock Report page.
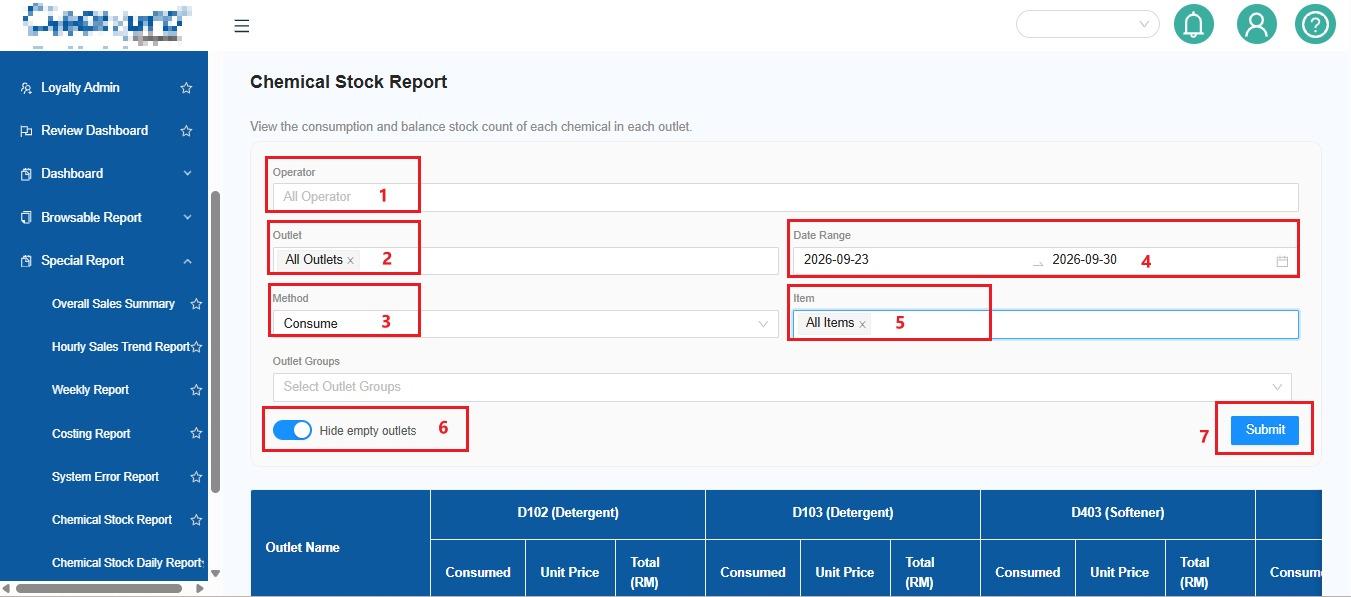
1️⃣ Select Operator
Select the Operator you want to include in the report.
To include all operators, select:
All Operator
2️⃣ Select Outlet
Select the Outlet you want to view.
To include all outlets, select:
All Outlet
3️⃣ Select Method
The Method determines what type of chemical information you want to view.
There are two options:
🧴 Consume
Select Consume when you want to check how much chemical stock was consumed during a specific period.
Date selection:
📅 Date Range
Example:
1 September 2026 → 30 September 2026
📦 Balance
Select Balance when you want to check the chemical stock balance on a specific date.
Date selection:
📅 Single Date
Example:
30 September 2026
💡 Easy Way to Remember
Want to know how much was USED?
→ Choose Consume
Want to know how much is LEFT?
→ Choose Balance
4️⃣ Select Date
The date selection depends on the Method you selected.
Method | Date Selection | Purpose |
|---|---|---|
Consume | Date Range | View chemical consumption during a period |
Balance | Single Date | View stock balance on a specific date |
5️⃣ Select Item
Select the chemical item you want to include in the report.
To view all items, select:
All Item
You can select a specific item when you only want to check one chemical.
6️⃣ Hide Empty Outlet
Turn on Hide Empty Outlet if you do not want to display outlets with no chemical stock data.
This helps make the report cleaner and easier to read.
Example
OFF
→ All outlets are displayed.
ON
→ Outlets without chemical stock data are hidden.
7️⃣ Generate the Report
After selecting all the required filters, click:
Submit
The system will generate the Chemical Stock Report based on your selected filters.
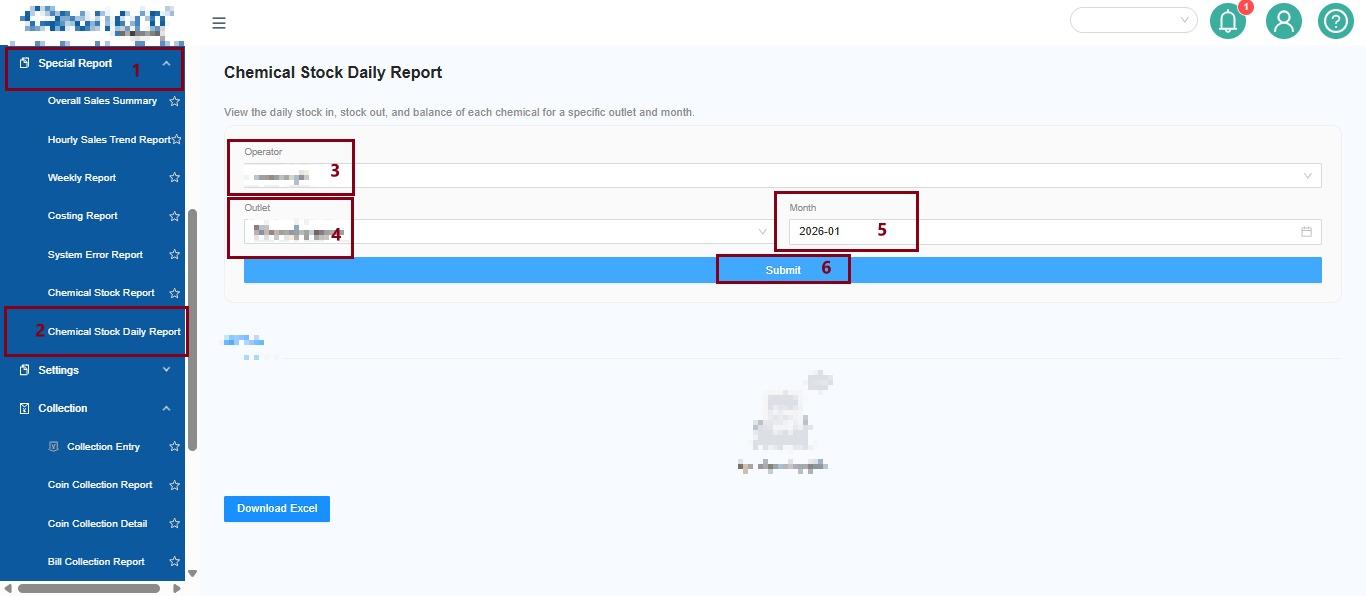
📊 Understanding the Report
The report provides chemical stock information based on your selected method.
Consume Report
The report shows the amount of chemical stock consumed during the selected date range.
The report also provides Total Consumed information.
Balance Report
The report shows the stock balance for the selected date.
The report also provides totals based on the selected chemical type.
💡 Example 1 — Check Chemical Consumption
You want to know how much detergent was consumed during September.
Select:
Filter | Selection |
|---|---|
Operator | All Operator |
Outlet | All Outlet |
Method | Consume |
Date | 1–30 September 2026 |
Item | Detergent |
Then click Submit.
The system will display the detergent consumption during the selected date range.
💡 Example 2 — Check Current Stock Balance
You want to check the chemical stock balance as of 30 September.
Select:
Filter | Selection |
|---|---|
Operator | All Operator |
Outlet | All Outlet |
Method | Balance |
Date | 30 September 2026 |
Item | All Item |
Then click Submit.
The system will display the chemical stock balance for the selected date.
Terminal Record v2
Purpose
The Terminal Record v2 allows you to view and filter payment transaction records based on Operator, Payment Method, Channel, Date Range, and Outlet.
You can also select multiple channels in a single report.
Filter Function
The following filters are available for generating the report:
How to Access Terminal Record v2
Follow these steps to open the report:
Laundro Portal → Report → Terminal Record v2
Step 1: Log in to Laundro Portal
Log in to the Laundro Portal using your Username and Password.
Step 2: Open the Report Menu
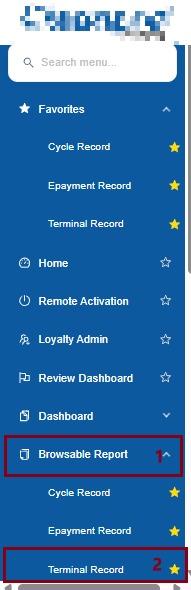
Step 3: Select Terminal Record v2
Under the Report menu, click Terminal Record v2.
You will be directed to the Terminal Record v2 page.
How to Generate the Report
Once you are on the Terminal Record v2 page, use the available filters to select the information you want to view.
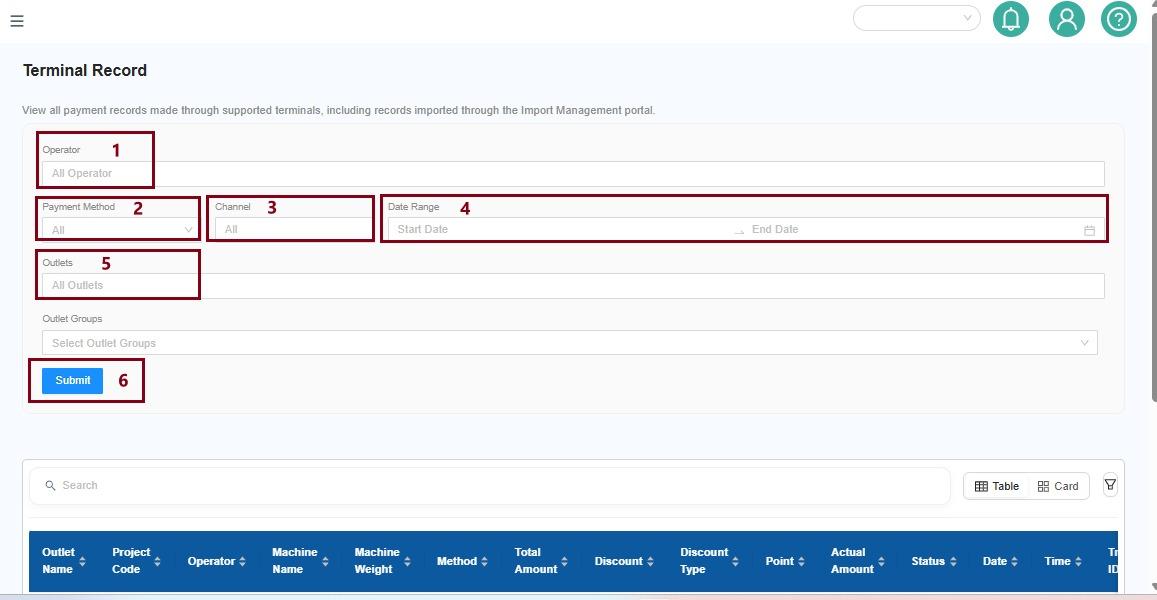
Step 1: Select Operator
Select the Operator you want to include in the report.
If you want to view transactions from all operators, select All Operator.
Step 2: Select Payment Method
Select the Payment Method you want to view.
Step 3: Select Channel
Select the Channel you want to include in the report.
You can select one or multiple channels.
Example:
Select Channel A + Channel B to view transactions from both channels in the same report.
Step 4: Select Date Range
Select the Date Range for the transactions you want to view.
For example:
1 September 2026 – 30 September 2026
Step 5: Select Outlet
Select the Outlet you want to view.
If you want to include all outlets, select All Outlet.
Step 6: Submit
After selecting all the required filters, click Submit.
The system will generate the report based on your selected filters.
Example
To view all online payment transactions from two channels at one outlet:
| Filter | Selection |
|---|---|
Operator | All Operator |
Payment Method | Online Payment |
Channel | Channel A + Channel B |
Date Range | 1 – 30 September 2026 |
Outlet | Outlet A |
After selecting the filters, click Submit.
The system will display the transaction records that match your selections.
Important Note
You can select multiple channels when generating the report. This allows you to view transactions from different channels together without generating a separate report for each channel.
Quick Navigation
Laundro Portal
↓
Report
↓
Terminal Record v2
↓
Select Filters
↓
Submit
↓
View Transaction Records
Einvoice Report v2
🎯 Purpose
The E-Invoice Report v2 allows you to view e-invoice records based on the selected Operator, Date Range, Outlet, and Company.
You can also view the Total Amount and download the generated report for further use.
📍 How to Access
Step 1 — Open Laundro Portal
Log in to the Laundro Portal using your Username and Password.
Step 2 — Open Report
Report
Step 3 — Select E-Invoice Report v2
Under the Report menu, click:
E-Invoice Report v2
You will be directed to the E-Invoice Report v2 page.
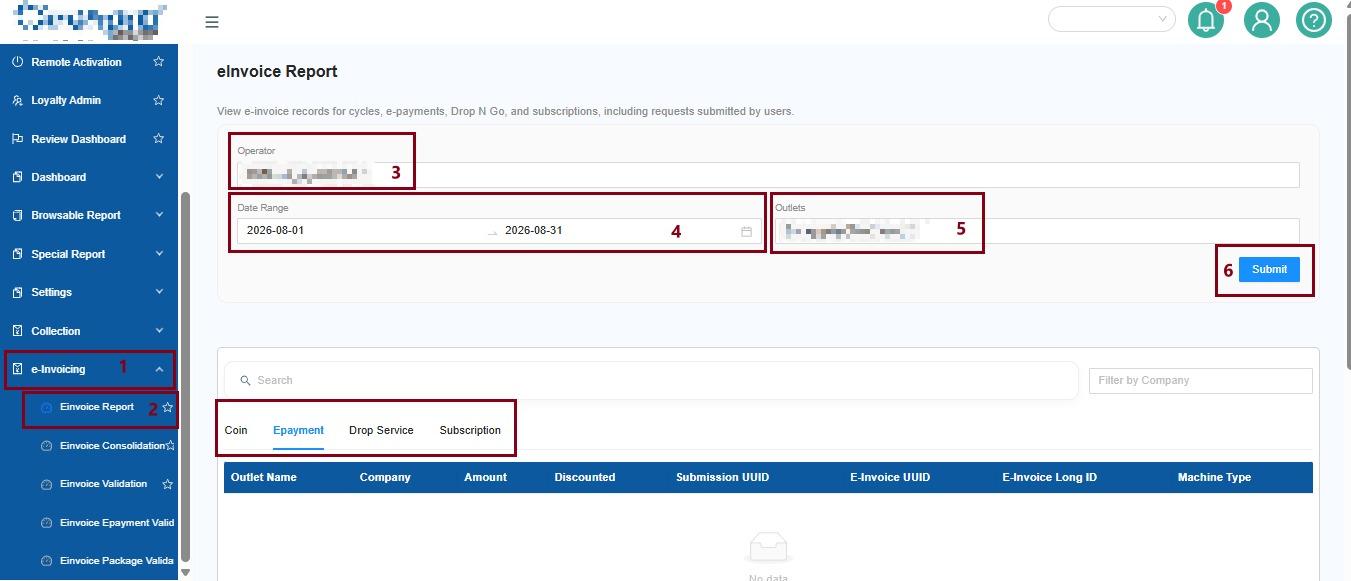
1️⃣ Select the Report Filters
Use the available filters to select the information you want to view.
👤 Operator
Select the Operator you want to include in the report.
📅 Date Range
Select the date range for the e-invoice records you want to view.
You can select a date range from the previous months.
🏪 Outlet
Select the Outlet you want to view.
🏢 Company
Select the Company you want to include in the report.
This allows you to filter the report based on a specific company.
2️⃣ Generate the Report
After selecting all the required filters:
Click → Submit
The system will generate the E-Invoice Report based on your selected filters.
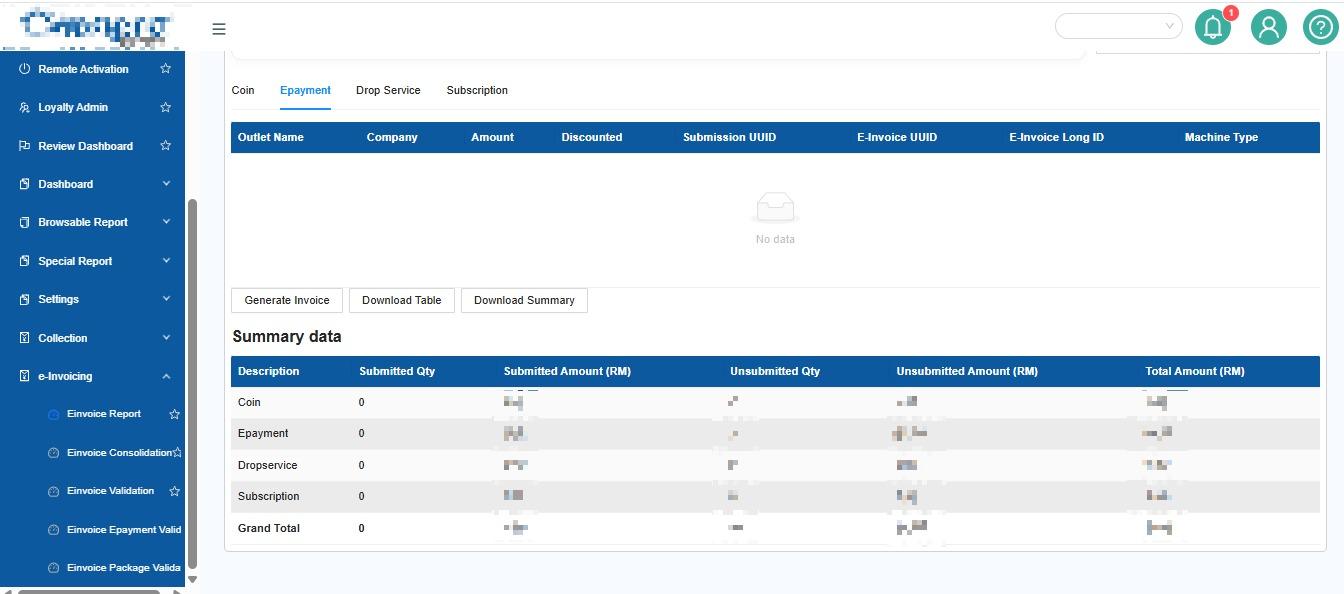
3️⃣ Check the Total Amount
After the report is generated, the Total Amount will be displayed based on your selected filters.
This allows you to quickly check the total amount of the e-invoice records included in the report.
4️⃣ Download the Report
If you need to save or use the report for further processing:
Click → Download Report
The generated report can then be downloaded for further use.
💡 Example
Scenario
You want to check the e-invoice records for Company A at Outlet A during September 2026.
Select:
| Filter | Selection |
|---|---|
Operator | Operator A |
Date Range | 1–30 September 2026 |
Outlet | Outlet A |
Company | Company A |
Then:
Click Submit → Review Total Amount → Download Report
The system will generate the e-invoice records based on your selected filters.
🧭 Quick Navigation
Laundro Portal → Report → E-Invoice Report v2 → Select Filters → Submit → View / Download Report.
📦 Inventory Management v2
Welcome to the Laundro Portal Guide! 👋
This guide explains how to select an operator and outlet, view inventory machine cards, and retrieve historical records using a date range.
🎯 Purpose
Use Inventory Management v2 to:
-
🏪 Select the operator and outlet you want to view.
-
🗂️ View Bill Acceptor and Vending machines in card format.
-
📅 Retrieve records within a selected date range.
-
📸 Review the Snapshot and Remarks included in the report.
🧭 Quick Navigation
-
🏪 Part 1: Select Operator & Outlet
-
📅 Part 2: Filter by Date Range
-
🔍 Part 3: Review the Report
-
✅ Part 4: Quick Checklist
🔐 How to Access Inventory Management v2
Log in to the Laundro Portal using your operator account and navigate to Inventory Management v2.
🔗 Portal Login: https://v2.thelaundro.com/operator_login
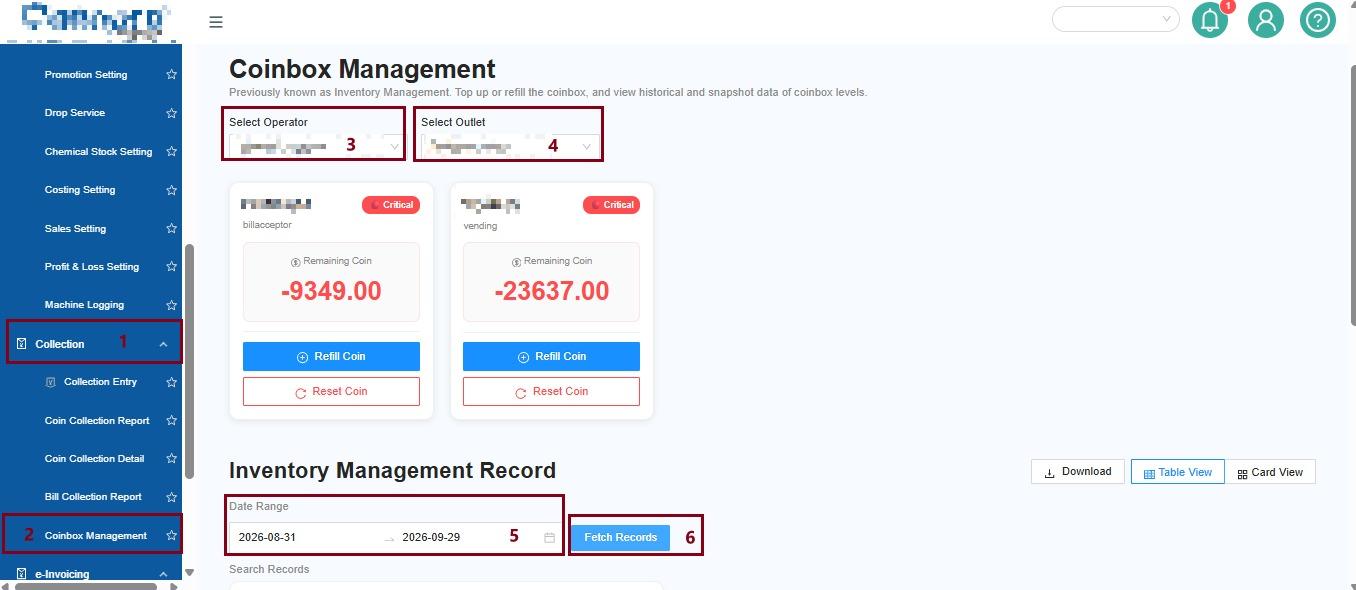
🏪 Part 1: Select Operator & Outlet
Purpose: Choose the operator and outlet before viewing the report.
Step 1 — Select Operator
Choose the required operator from the Operator dropdown.
Step 2 — Select Outlet
Choose the outlet you want to view from the Outlet dropdown.
Step 3 — Click View Report
Click View Report to display the report.
Step 4 — View Machine Cards
The report will display individual cards for:
- 💳 Bill Acceptor
- 🛒 Vending Machine
Each machine is displayed as an individual card.
💡 Quick Tip: Select the correct operator and outlet before clicking View Report. These selections apply to the current query.
📅 Part 2: Filter by Date Range
Purpose: Retrieve records within a specific period.
Step 1 — Select the Date Range
Choose the start and end dates for the records you want to retrieve.
💡 Example: To check records for 1 October to 7 October, select those dates in the date-range filter.
Step 2 — Click Fetch Record
Click Fetch Record to retrieve records based on the selected date range.
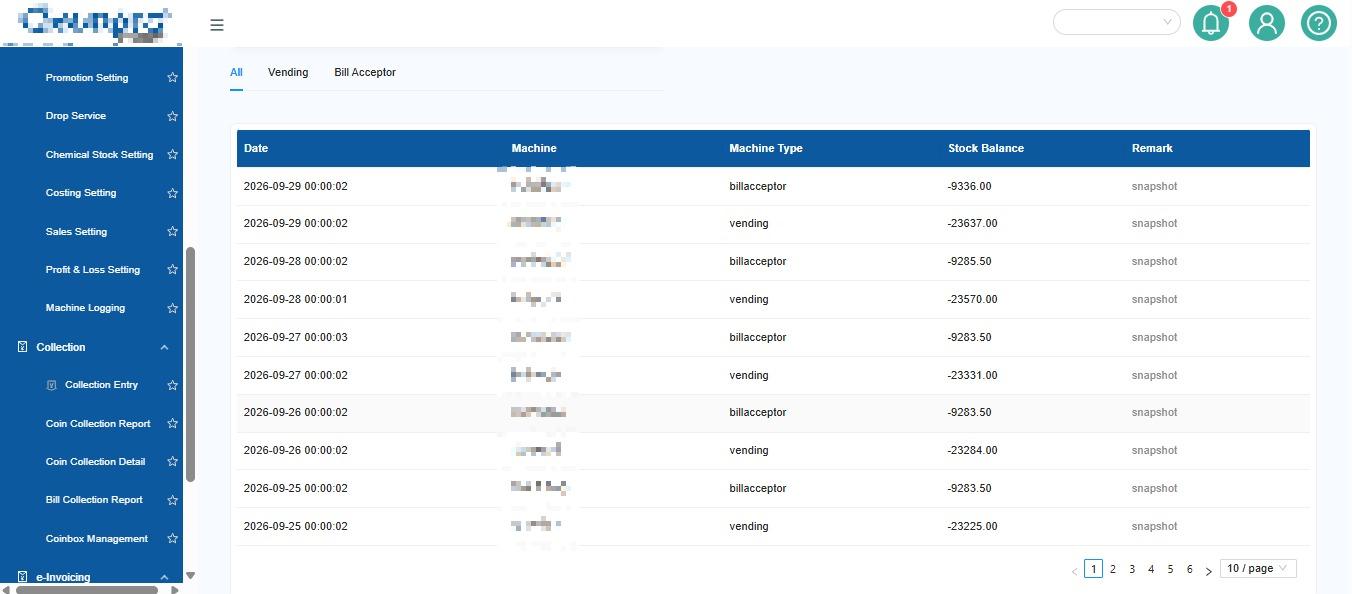
Step 3 — View the Report
The report will be displayed in table format for both:
- 💳 Bill Acceptor
- 🛒 Vending Machine
The report includes:
- 📸 Snapshot: The snapshot associated with the record.
- 📝 Remarks: Additional remarks recorded for the entry.
💡 Quick Tip: Make sure the date range is correct before clicking Fetch Record.
🔍 Part 3: How to Review the Report
After retrieving the records:
- Confirm that you selected the correct outlet and date range.
- Review the records displayed in the table.
- Check the Snapshot for visual information.
- Read the Remarks for any additional details.
If the expected records do not appear, check your filters and try fetching the records again.
Example
Operator: ABC Operator
Outlet: ABC Outlet
Date Range: 1 September – 30 September 2026
Select Operator → Select Outlet → View Report → Select Date Range → Fetch Record → Check Inventory Records
- Select the correct Operator and Outlet before viewing the inventory.
- Use Date Range when you need to check historical inventory records.
- Use Snapshot and Remarks to understand the details of each record.
📊 Quick Reference
| Feature | Purpose | Result |
|---|---|---|
| 🏪 Operator & Outlet | Select the required operator and outlet | Machine cards |
| 📅 Date Range | Specify the reporting period | Records for the selected period |
| 🔄 Fetch Record | Retrieve records matching the date range | Table report |
| 📸 Snapshot | Review the snapshot associated with a record | Visual reference |
| 📝 Remarks | Read recorded comments or details | Additional information |
✅ Final Checklist
Before finishing, make sure:
- 🏪 The correct operator is selected.
- 📍 The correct outlet is selected.
-
📅 The date range is correct.
- 🔄 You clicked Fetch Record to retrieve the records.
-
📋 You reviewed the returned table.
-
📸 You checked the Snapshot and Remarks where necessary.
🎉 You're Done!
You can now use Inventory Management v2 to view machine cards and retrieve records for your selected date range.
If you encounter any issues, contact Laundro Support and provide the outlet name, selected date range, and a screenshot of the problem.
Coin Collection by outlet v2
🪙 Purpose
Use Coin Collection by Outlet v2 to view coin collection records by operator, outlet, and date.
You can view each outlet separately or combine multiple outlets into one report.
📍 How to Access
Step 1 — Open Laundro Portal
Log in to the Laundro Portal using your Username and Password.https://v2.thelaundro.com/operator_login
Step 2 — Open Collection
Step 3 — Select Coin Collection Report
Select Coin Collection Report from the Collection menu.
You will be directed to the Coin Collection Report page.
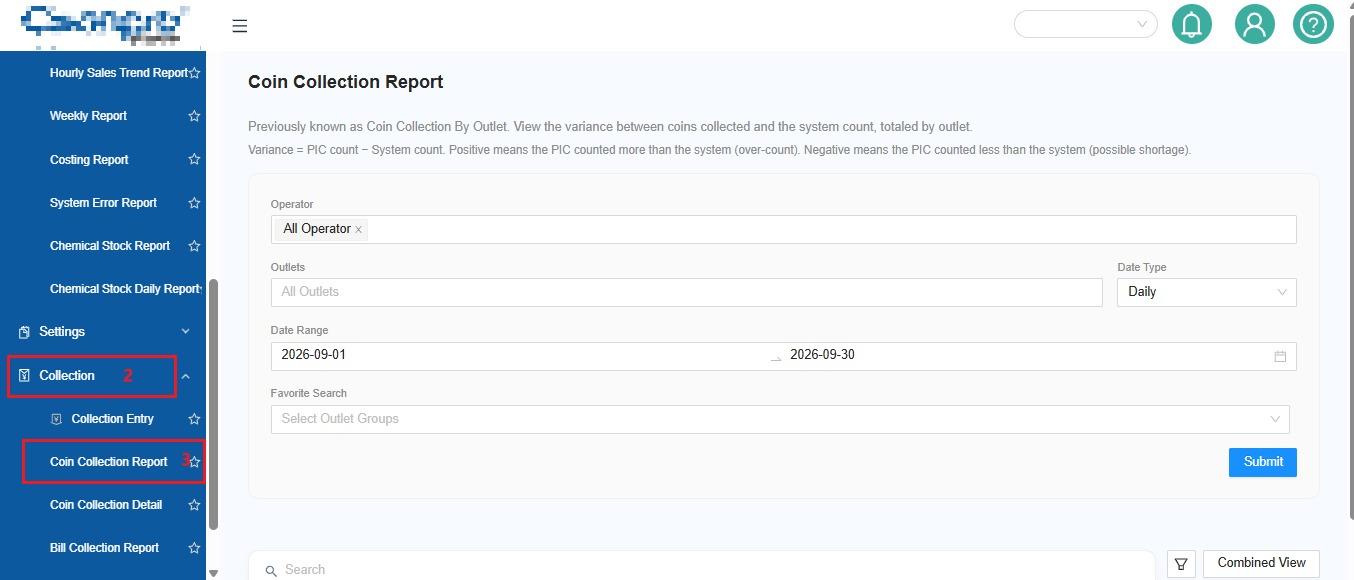
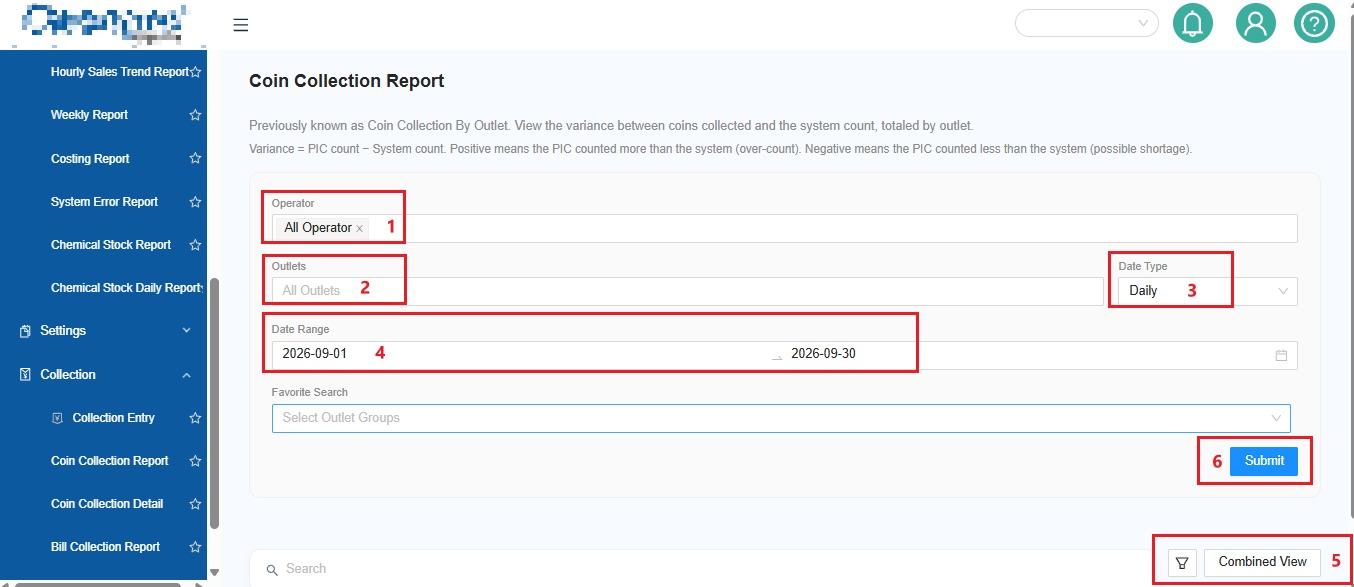
🔎 Step 1: Select Operator
Select the operator you want to check.
- Specific Operator → View one operator.
- All Operator → Include all operators.
🏪 Step 2: Select Outlet
Select the outlet you want to check.
- Specific Outlet → View one outlet.
- All Outlet → Include all outlets.
📅 Step 3: Select Date Type
Choose how you want the report to be displayed.
📆 Daily
View the collection by individual day.
Example: 1–30 September 2026
🗓️ Monthly
View the collection by month.
Example: January–September 2026
💡 Tip: After changing the Date Type, click Submit to refresh the report.
🗓️ Step 4: Select Date Range
Select the required date range based on the selected Date Type.
Daily: Select the required start and end date.
Monthly: Select the required months.
👀 Step 5: Select View Type
Choose how you want the report to be displayed.
🏪 By Outlet
View each selected outlet separately.
Outlet A → Report A
Outlet B → Report B
Outlet C → Report C
🔗 Combined View
Combine the selected outlets into one report.
Outlet A + Outlet B + Outlet C
↓
📊 One Combined Report
🤔 Which One Should I Use?
Need to check each outlet separately?
➡️ Choose By Outlet
Want to review multiple outlets together?
➡️ Choose Combined View
📊 Step 6: Generate the Report
After selecting all filters, click Submit.
The report will be generated based on your selected:
Operator + Outlet + Date Type + Date Range + View Type
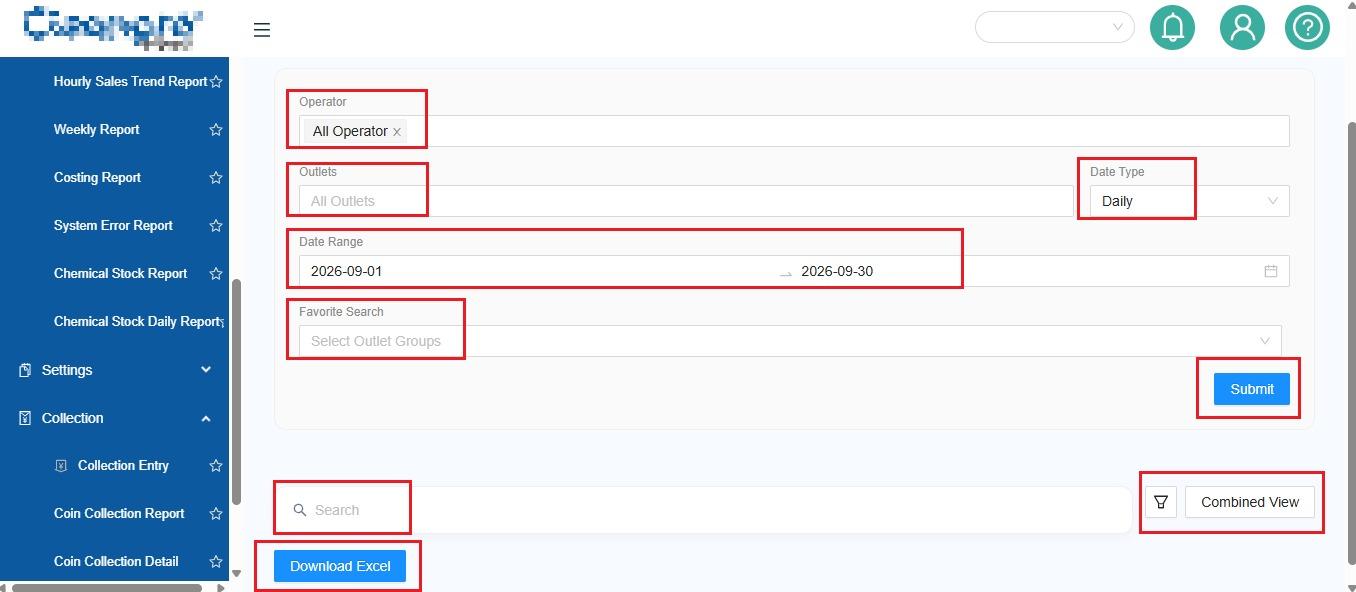
📈 Understanding the Report
📈 Total Variance
Shows the variance information for the collection record.
↔️ Difference
Shows the difference between the relevant collection values.
ℹ️ Variance Information
Use the information icon to understand what positive and negative variance represents.
🔧 Customize the Report
🔧 Column Filter
Click Column Filter to select which columns you want to display.
This allows you to keep only the information you need.
⭐ Add Favourite
Click Add Favourite to save your preferred report settings for easier access later.
Favourite settings can also be synced with the Collection report.
📥 Download Excel
Click Download Excel to download the report.
The Excel file includes:
📋 All
→ Combined data from the selected outlets.
🏪 Individual Outlet Sheets
→ Separate data for each outlet.
Example
📊 Excel Report
├── 📋 All
├── 🏪 Outlet A
├── 🏪 Outlet B
└── 🏪 Outlet C
📝 Example
Check September Collection for Multiple Outlets
👤 Operator: All Operator
🏪 Outlet: Outlet A + Outlet B
📅 Date Type: Daily
🗓️ Date Range: 1–30 September 2026
👀 View Type: Combined View
Process
Select Filters → 📊 Submit → 📈 Review Report → 🔍 Check Variance → 📥 Download Excel
💡 Quick Tips
- Use Daily when you need a day-by-day collection view.
- Use Monthly when you need a month-by-month view.
- Use By Outlet to review outlets separately.
- Use Combined View to review multiple outlets together.
- Click Submit after changing the Date Type.
- Use Column Filter to simplify the report.
- Use Add Favourite for frequently used report settings.
- Use Download Excel when you need the data for further analysis.
Bill Collection v2
🎯 Purpose
The Bill Collection v2 report allows you to view and manage bill collection records by Operator, Outlet, Date Range, and View Type.
You can also select multiple outlets, customize the displayed columns, and view the related F1 Form and Collection Slip.
📍 How to Access
Step 1 — Open Laundro Portal
Log in to the Laundro Portal using your Username and Password.
Step 2 — Open Report
Report
Step 3 — Select Bill Collection v2
Under the Report menu, select:
Bill Collection v2
You will be directed to the Bill Collection v2 page.
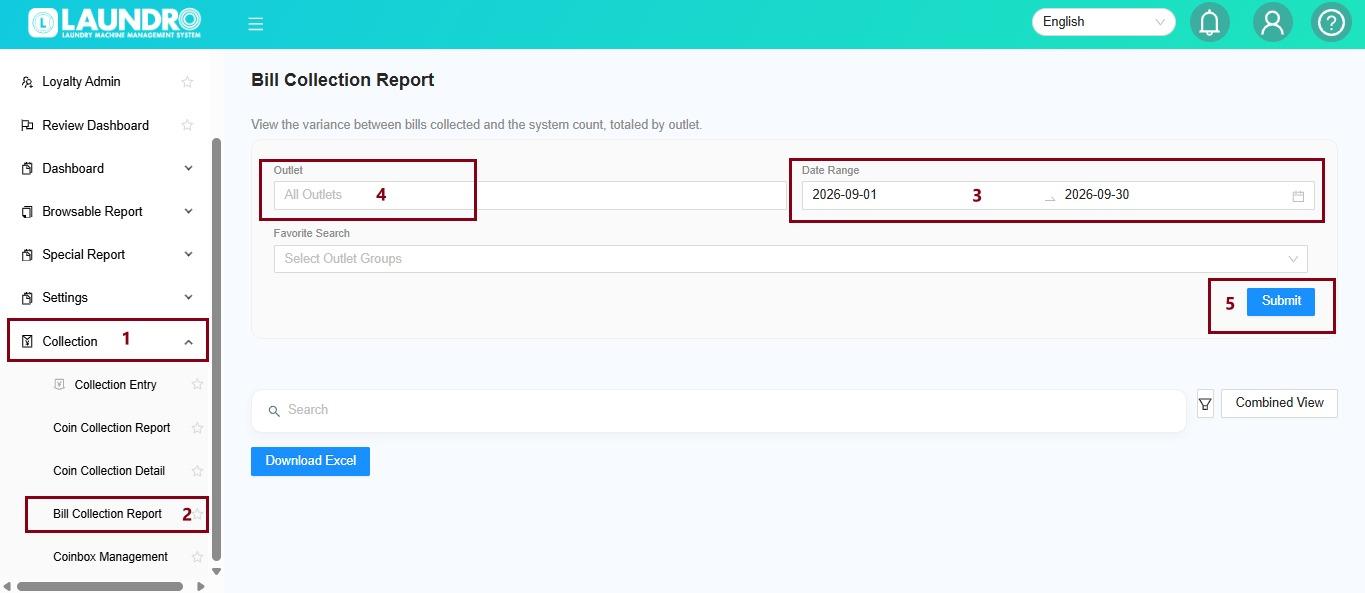
1️⃣ Select Your Filters
Before generating the report, select the information you want to view.
👤 Operator
Select the required Operator.
If you want to include all operators, leave the filter unchanged.
🏪 Outlet
Select the required Outlet.
You can select multiple outlets if you want to view several outlets in the same report.
📅 Date Range
Select the date range for the collection records you want to view.
2️⃣ Choose the View Type
Select how you want the report to be displayed.
Combined View
Displays data from all selected outlets together in one report.
Split by Outlet
Displays the data separately for each outlet.
💡 Which one should I choose?
Want to see everything together?
→ Select Combined View
Want to check each outlet separately?
→ Select Split by Outlet
3️⃣ Generate the Report
After selecting all the required filters:
Click → Submit
The system will generate the Bill Collection report based on your selections.
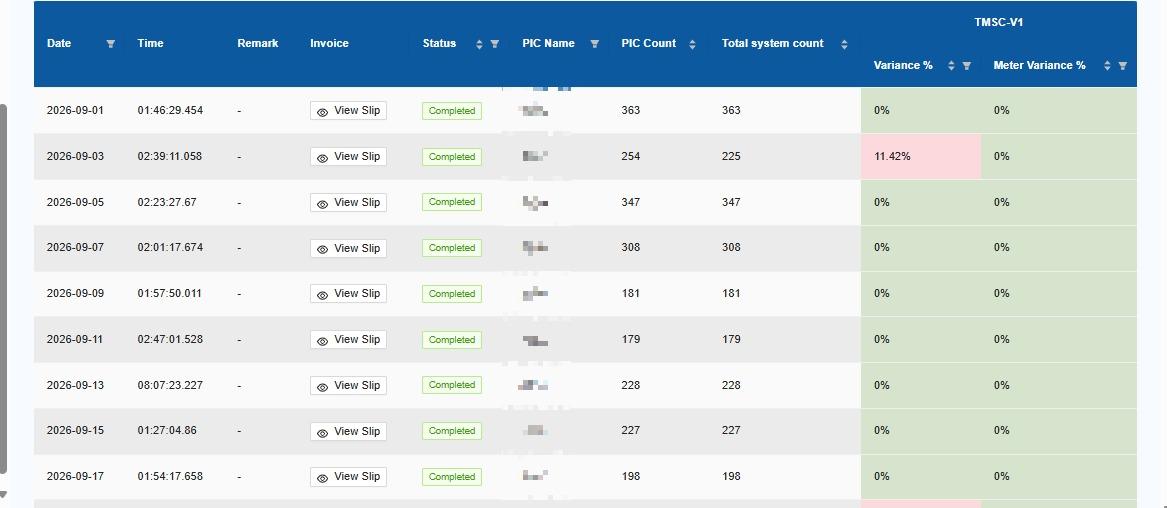
4️⃣ Use the Report
Once the report is generated, you can use the available actions to view additional information.
🔎 View Remark
Click View Remark to view the corresponding F1 Form.
🧾 View Slip
Click View Slip to open the corresponding Collection Slip.
The slip preview will open when you click the button.
5️⃣ Customize the Report
⭐ Add Favourite
You can mark the report as a Favourite for easier access.
☷ Column Filter
Use the Column Filter to select which columns you want to display.
This allows you to focus only on the information you need.
📊 Available Information
The report includes additional information such as:
- Outlet Name
- PIC Name
- PIC Count
- Total Count
🧾 Collection Slip
In Bill Collection v2, the Collection Slip is generated per collection instead of per machine.
The slip preview is not displayed directly in the report.
To view it:
Click → View Slip → View Collection Slip
💡 Example
Scenario
You want to check the bill collection records for two outlets for September 2026.
Select:
| Filter | Selection |
|---|---|
Operator | All Operators |
Outlet | Outlet A + Outlet B |
Date Range | 1–30 September 2026 |
View Type | Combined View |
Then:
Click Submit → View Report
The system will display the collection records from both outlets in one report.
💡 Quick Tips
Need several outlets?
→ Select multiple outlets.
Want all outlets together?
→ Choose Combined View.
Want to compare outlets separately?
→ Choose Split by Outlet.
Need specific columns only?
→ Use Column Filter.
Need the collection document?
→ Click View Slip.
Coin Collection V2
The Coin Collection V2 page allows you to record and manage coin collections for your outlet.
Log in to your account, then look for Collections in the left sidebar and click it. Select a Collection Entry to open coin collection page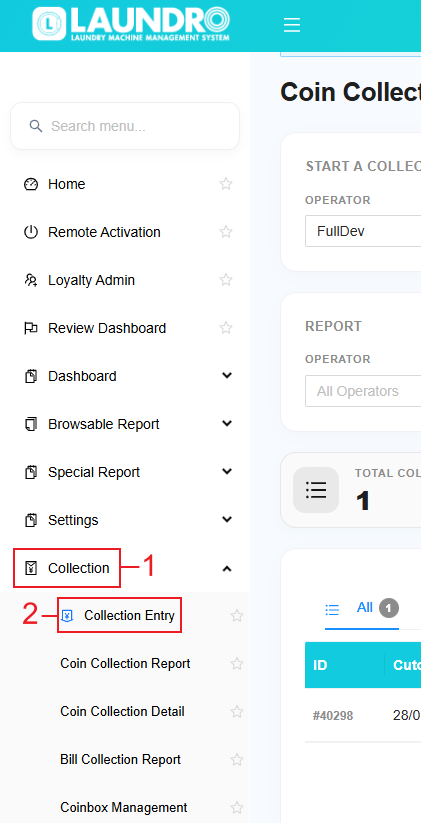
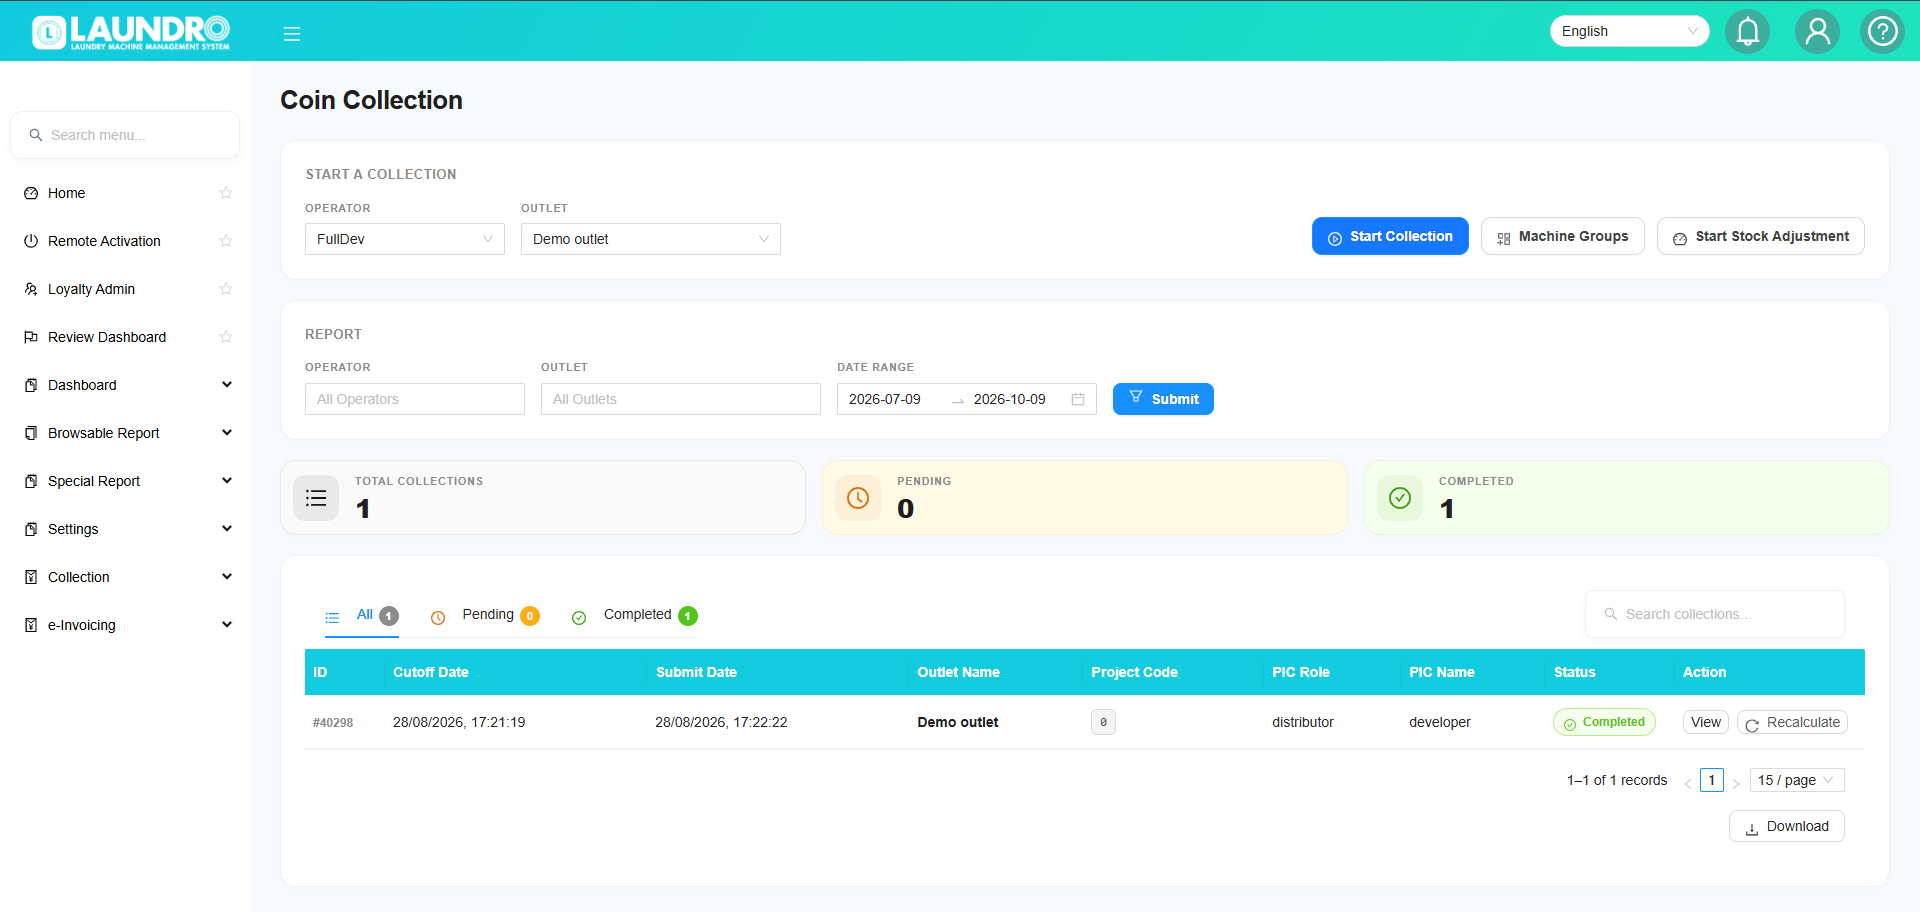
Start a New Collection
Step 1 - On the page, find Start a New Collection. Under it, select the Operator and Outlet you want, then click Start Collection.

Step 2 - Once you click Start Collection, you will be redirected to the Outlet Coin Collection page.
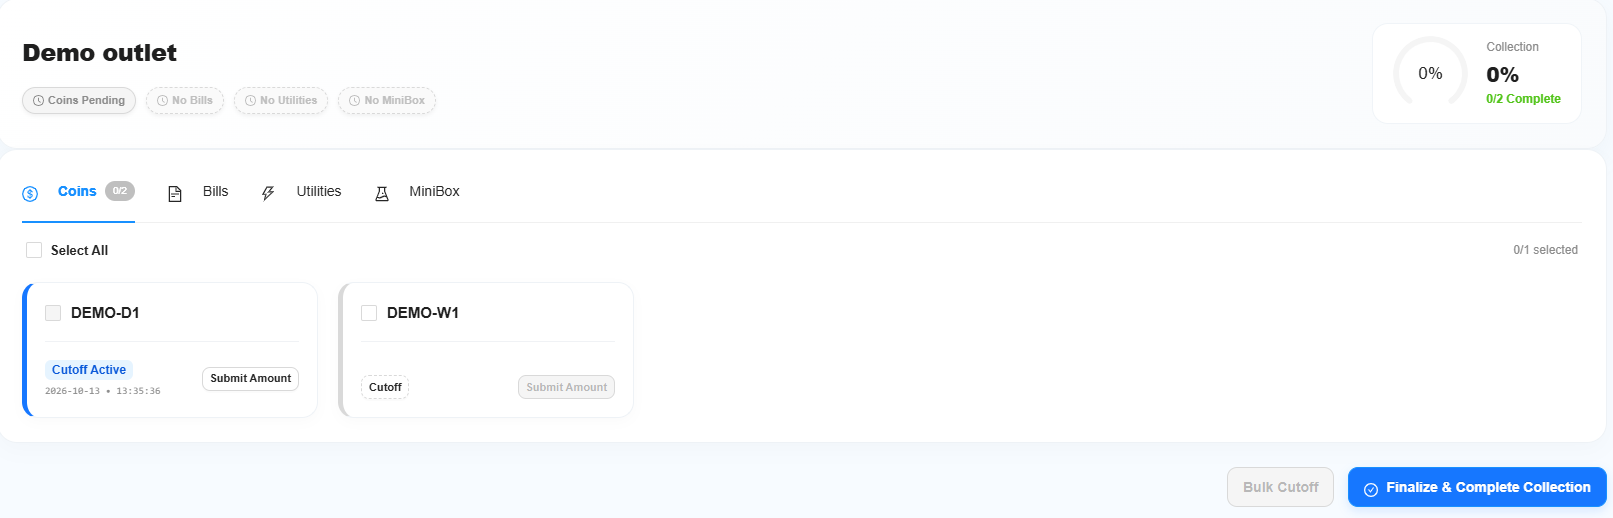
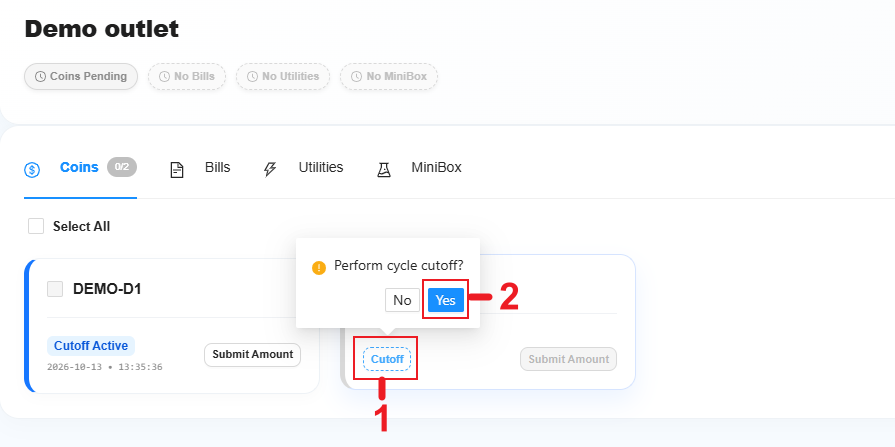
Step 3 - Under Machine ID, you will see the Cut Off option. Click on it, then click Yes to confirm. The cut-off function will then be activated.

Step 4 - Click Submit Amount, enter the coin collection amount for each Machine ID, and then click SUBMIT to proceed.
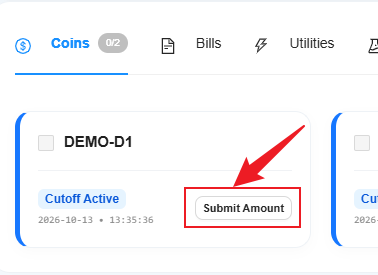
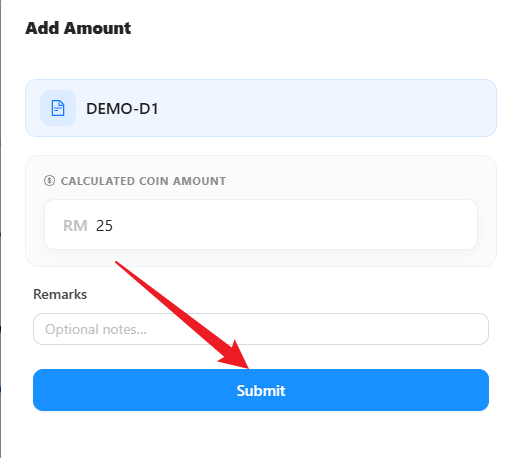
Step - 5 After confirming the amount, the machine status will turn green, indicating that it is ready to complete the coin collection process.
- Click Finalize & Complete Collection to complete the coin collection process.
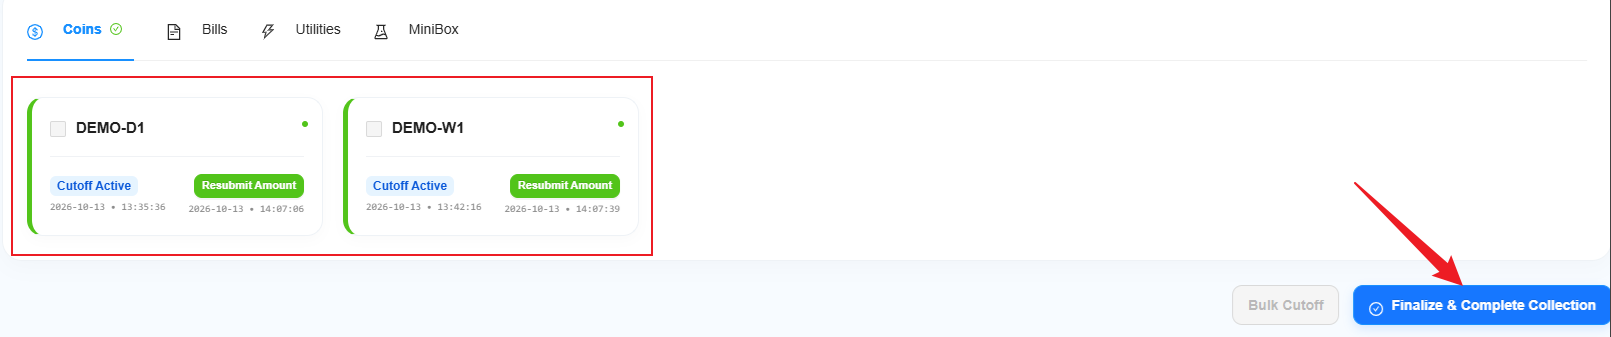
A confirmation message, “Coin collection was completed,” will appear. You can click Download Receipt (PDF) below to download the receipt containing the completed coin collection details.

Stock Adjustment
Use this option when you need to update the outlet's Utilities or Chemical/Minibox stock.
Note: Stock Adjustment is separate from the normal coin collection process.
Search Previous Collections
To check previous or pending coin collections, you can view the REPORT on this page.
- Select your preferred Operator and Outlet, choose the date range, and click SUBMIT to generate the report.

-
After clicking SUBMIT, all the details will be displayed below.
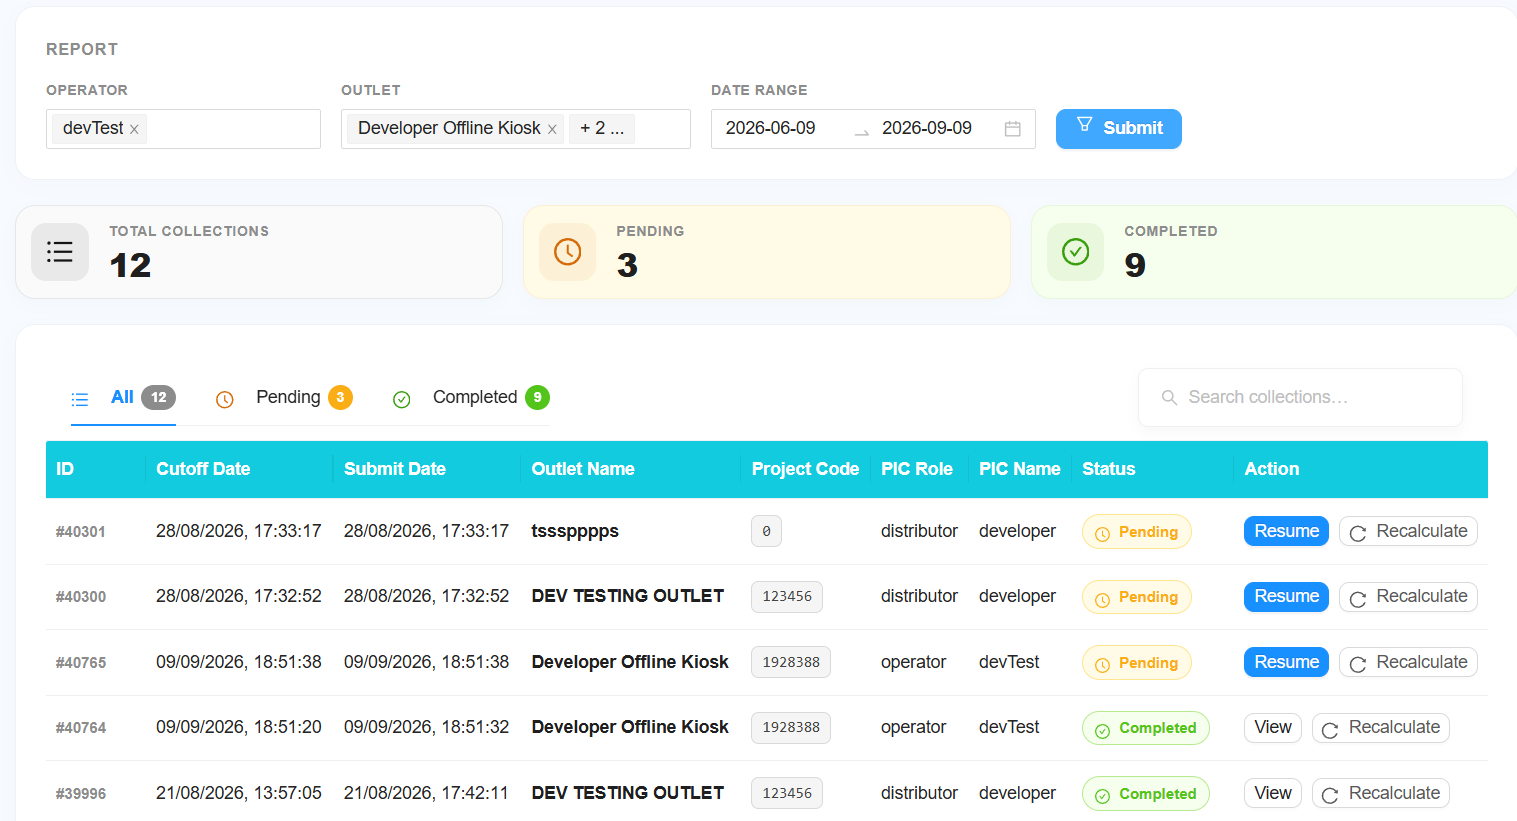
- As shown below, the Status column indicates whether the coin collection is Pending or Completed.

Actions
- Under the Action column, pending coin collections will show the RESUME option. Click RESUME to continue the collection process. If click on Recalculate it will recalculate coin collection amount from scratch.
-
For Completed coin collections, the Action column will display the VIEW option. Click VIEW to access and review the coin collection report.
- Depending on the collection status, you may see different actions.

Bulk Cutoff
Allows you to cutoff multiple machines at once instead of cutting them off one by one. Since an outlet usually has multiple machines, you can use this feature to update the coin collection amounts for the correct machine ID. This saves time and makes the coin collection process faster and easier.
⚠️ Warning: By clicking Bulk Cutoff, make sure no additional coins or tokens are inserted into any machine. Otherwise, the coin collection report may be inaccurate.
Step1 - Click Select All, then click Bulk Cutoff at the bottom-right corner of the page to proceed.
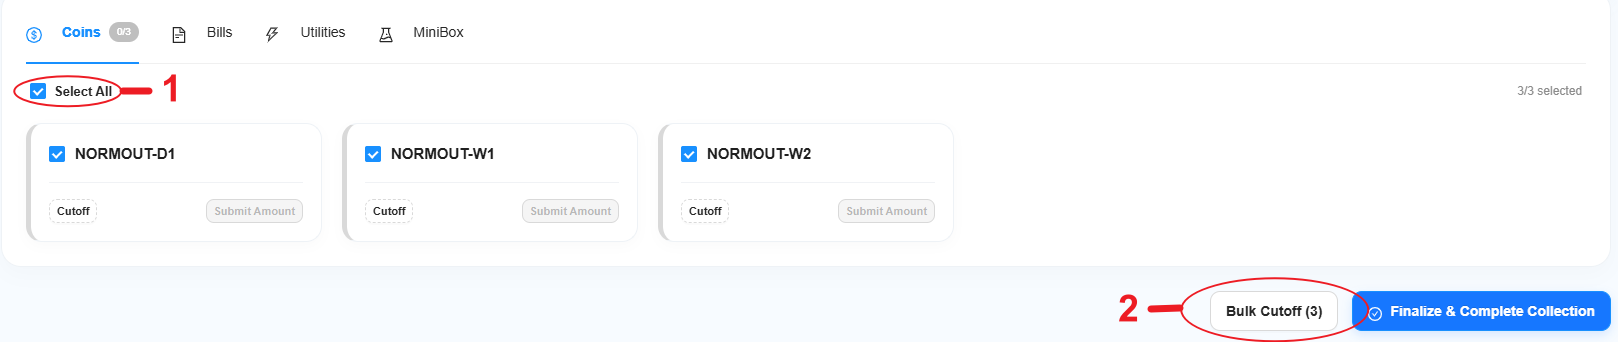
Step 2 - Click Submit Amount, enter the coin collection amount for each Machine ID, and then click SUBMIT to proceed.
Step - 3 After confirming the amount, the machine status will turn green, indicating that it is ready to complete the coin collection process.
- Click Finalize & Complete Collection to complete the coin collection process.
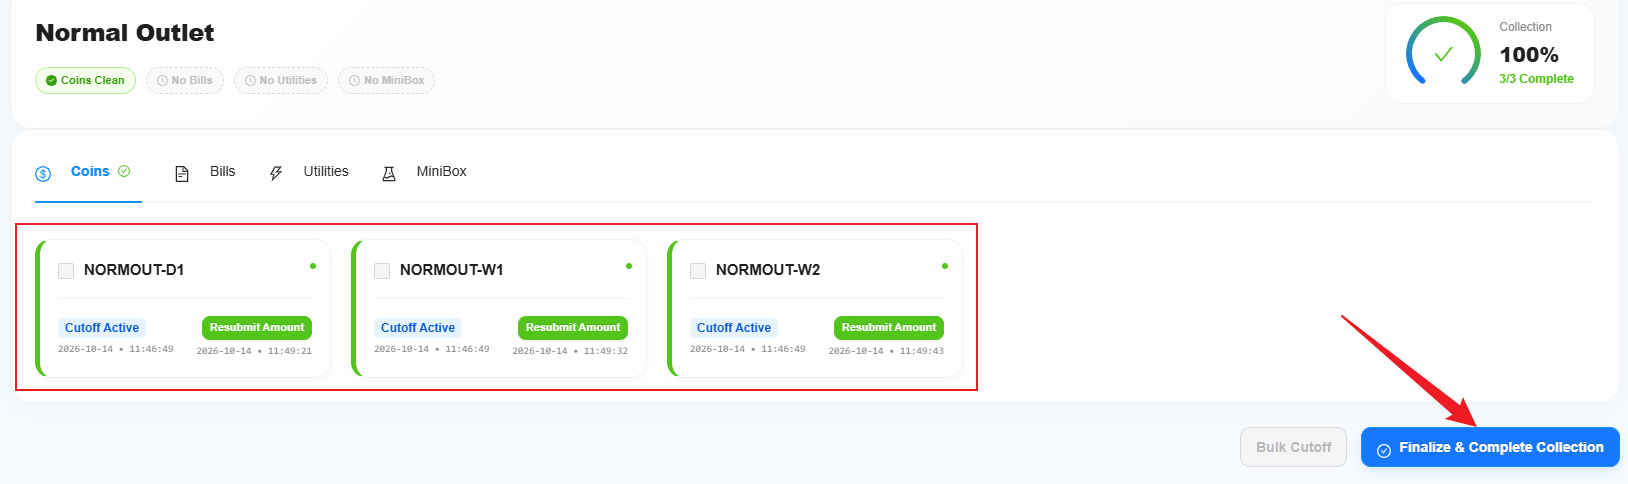
A confirmation message, “Coin collection was completed,” will appear. You can click Download Receipt (PDF) below to download the receipt containing the completed coin collection details.
Collection Information
How to Update Collection Information
Under Collection Information, you can update the details for each collection type to keep accurate records and make it easier to track and compare information in future reports.
You can choose any of the four collection types based on your needs, or use all four collection types if required.
-
Coins/Bills – Update the total amount of coins or token collected from the machines.
-
Utilities – Update the utility expenses, such as electricity and water bills, to monitor the outlet's operating costs.
-
Chemicals – Update the details of detergent or softener used or restocked, including the quantity or cost, to track chemical usage and expenses.
-
Mini Box – Update the collection details for the Mini Box to keep a record of the amount collected.
Note: Make sure all information is entered correctly and updated regularly to maintain accurate records for future tracking and report comparisons.
Mini Box & Chemical
Step1 - Click Audit Volume
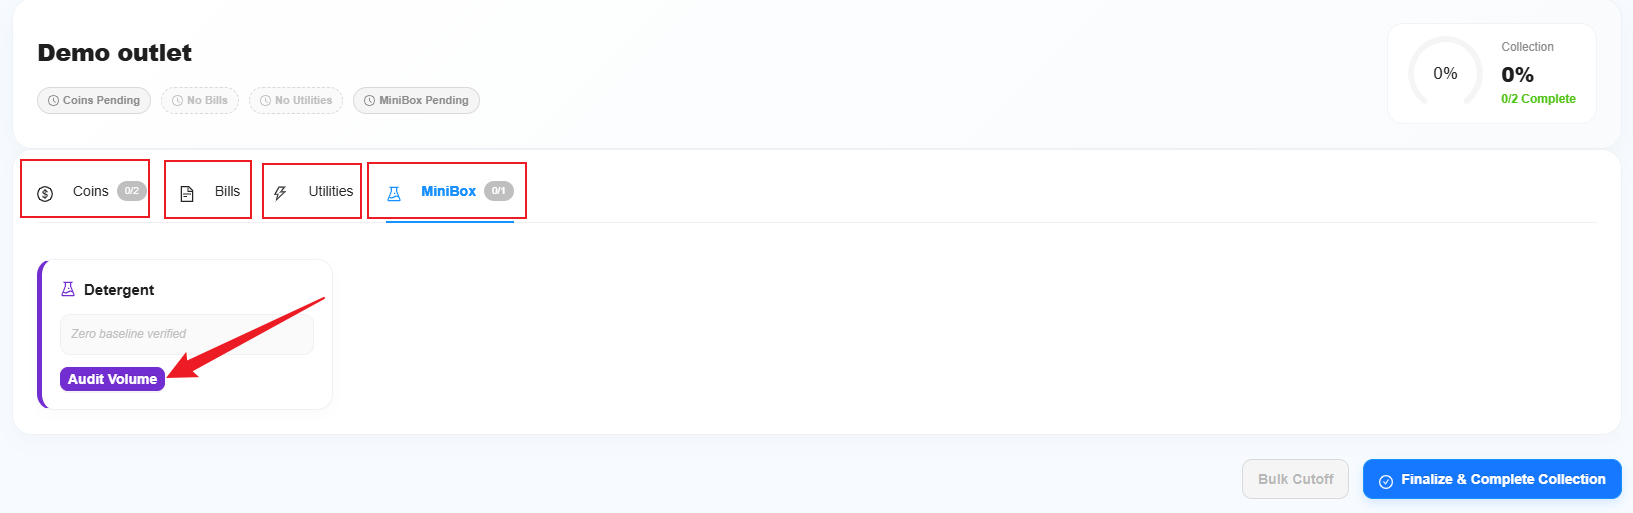
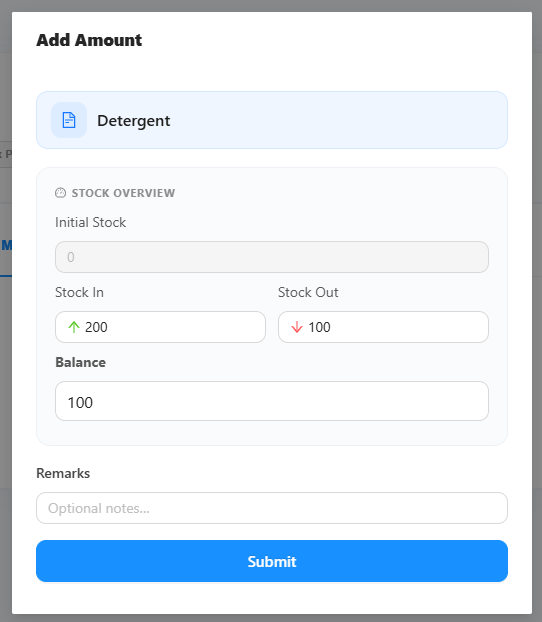
Step2 - Enter the Stock In and Stock Out amounts, and the system will automatically calculate the Balance for you. You can also update the Remarks section with any additional notes or information you want to record.
Step3 - A confirmation message, “Coin collection was completed,” will appear. You can click Download Receipt (PDF) below to download the receipt containing the completed coin collection details.
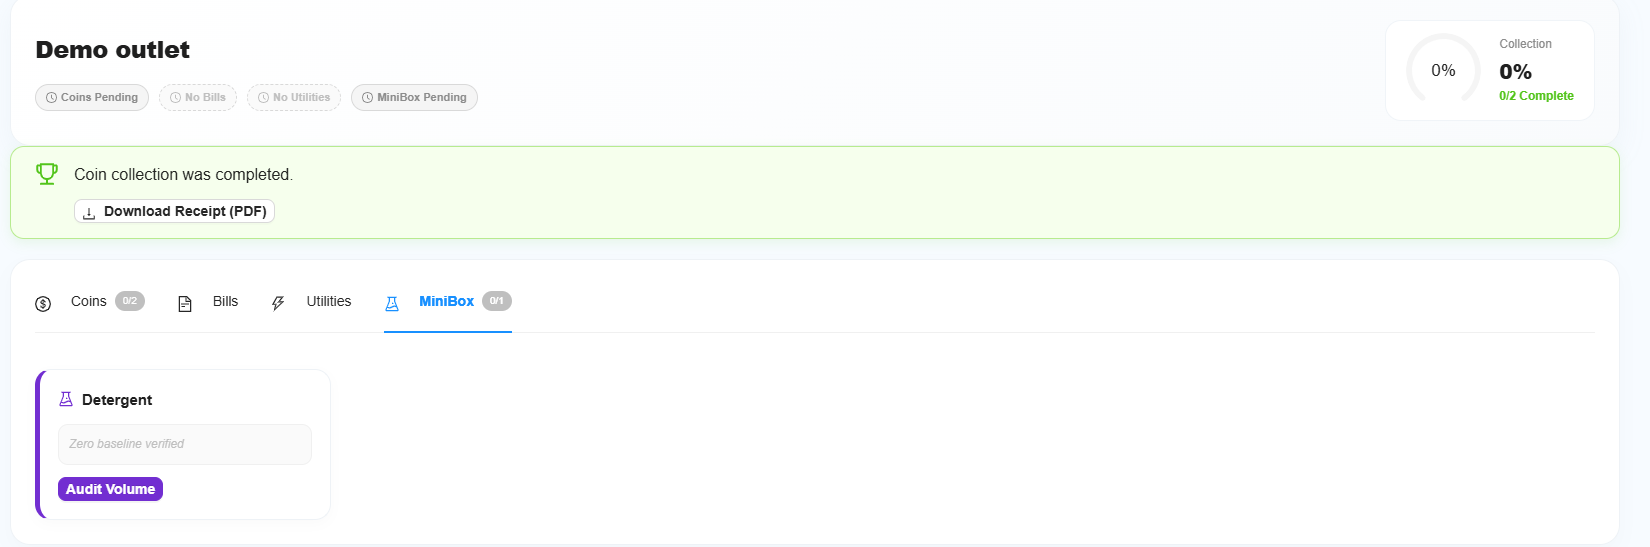
Note: This process should be completed after the coin collection to update the remaining collection information. Once all the necessary details have been updated, click Finalize & Complete Collection to complete the process.
Bill Collection
If the selected outlet has bill collection data, complete the following steps:
Step 1: Complete Bill Cutoff
Enter the required bill cutoff information.
Step 2: Submit the Collected Amount
Enter the amount collected and submit it.
Step 3: Submit the Invoice
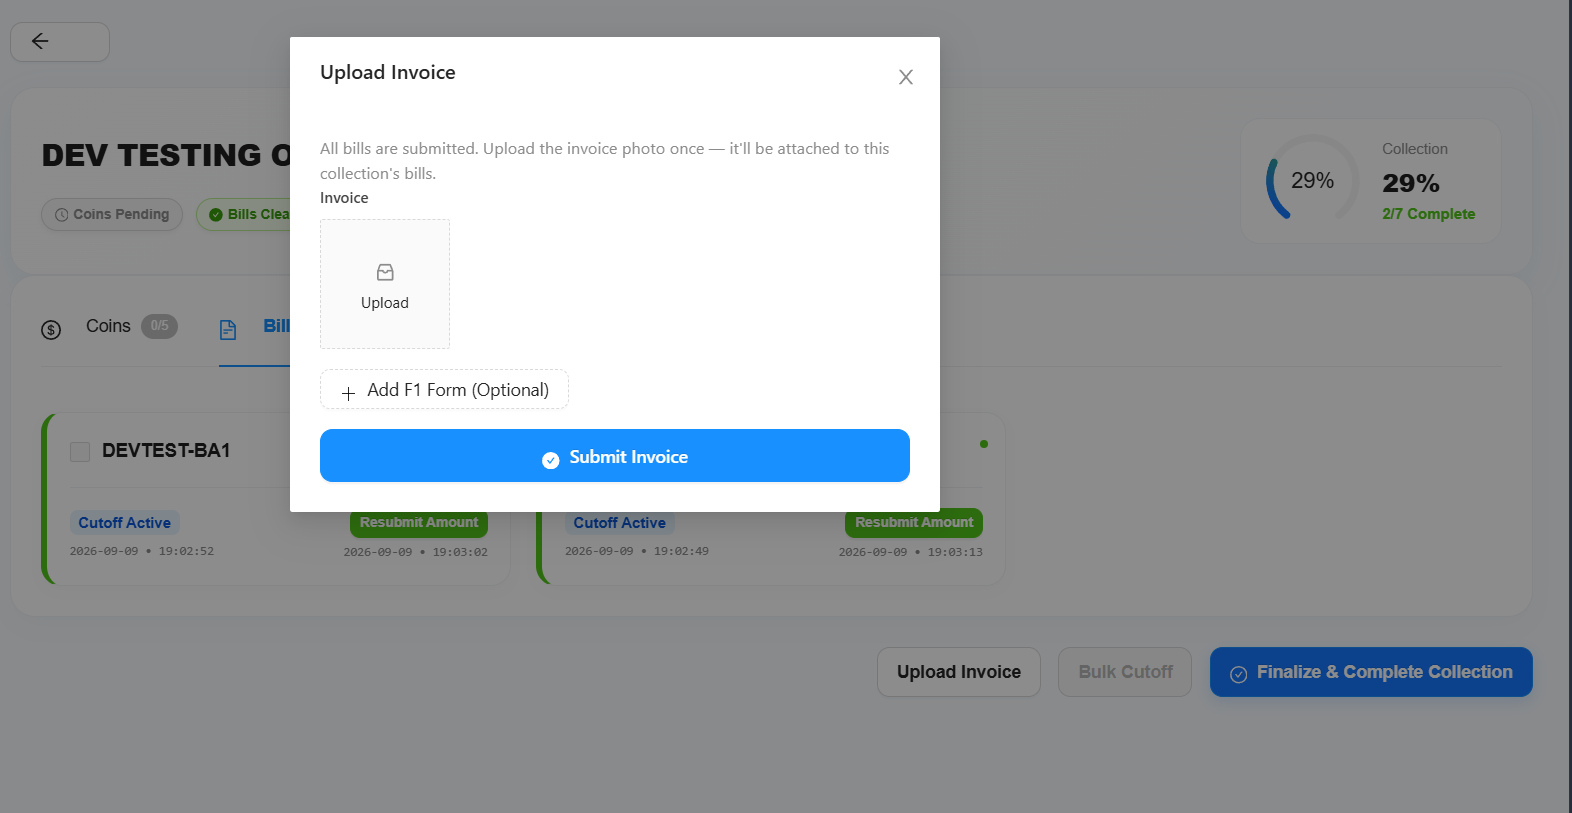
After submitting the bill collection, the Submit Invoice button will become available.
Upload the receipt or invoice provided by the bank or payment provider.
Add F1 Form or Remarks
- Add an F1 Form.
- Add additional remarks.
Important: If the outlet has bill collection data, an invoice is required before the collection can be completed.
Outlet Group
What is Outlet Group?
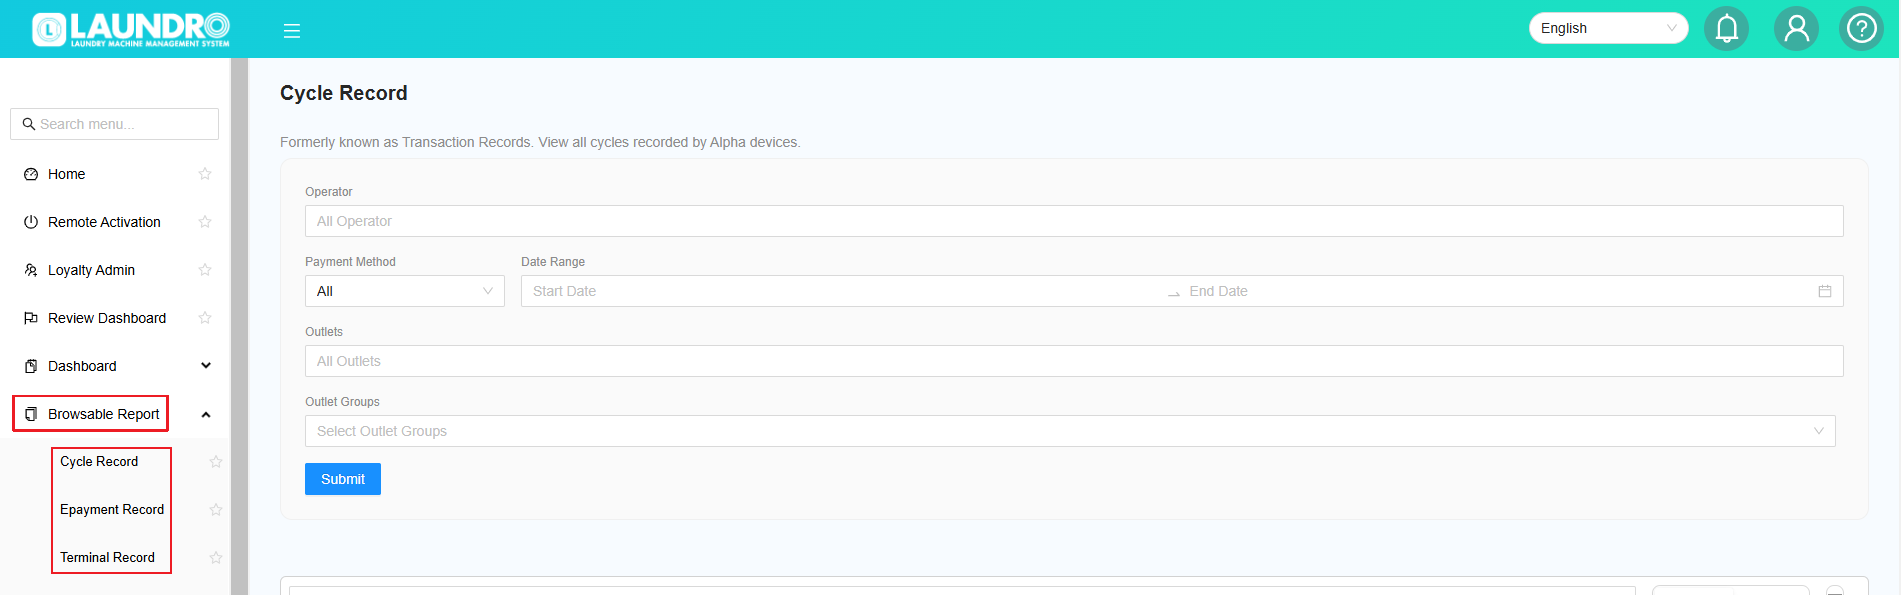
Creating an Outlet Group makes it easier and faster to search for records under any payment type, such as Cycle, E-payment, Manual Pay or Others.
Normally, you need to select the Operator and Outlet manually every time you search for a record. However, if you create an Outlet Group in advance, you can simply select the group when searching for records, saving you time and effort.
-
Under Browsable Report, you can select the type of record you want to view based on your needs.
How to create an Outlet Group?
Step1 - Under Prefer Payment Record, locate Outlet Groups. Click on the blank row, then select Create New when it appears.
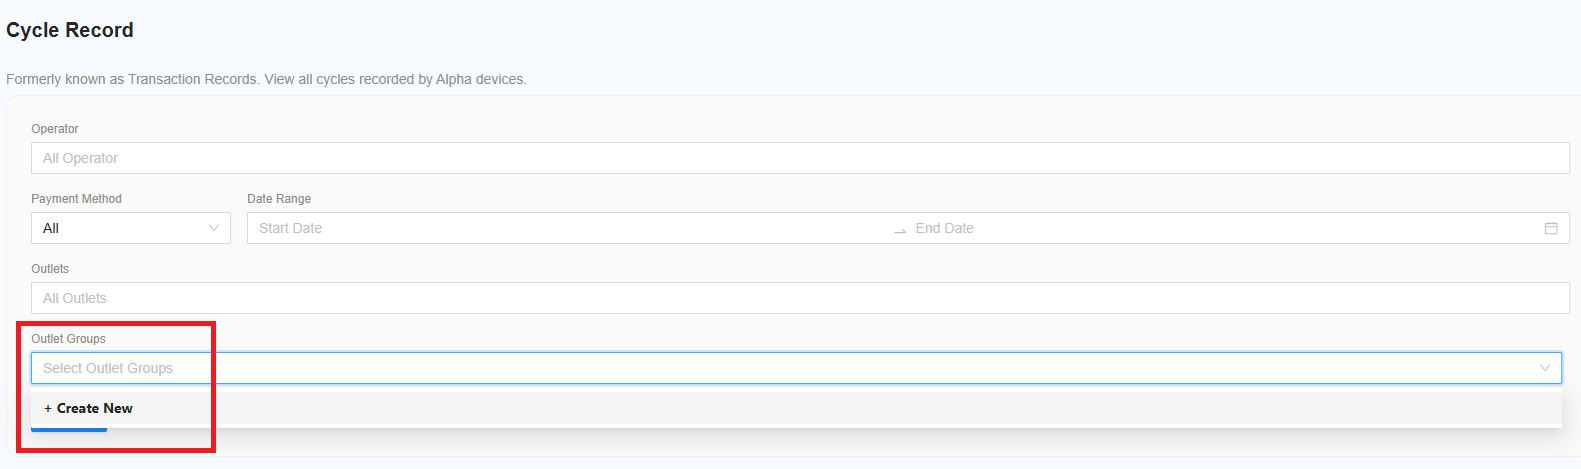
Step2 - Fill in the required details, then click Save to create your Outlet Group.
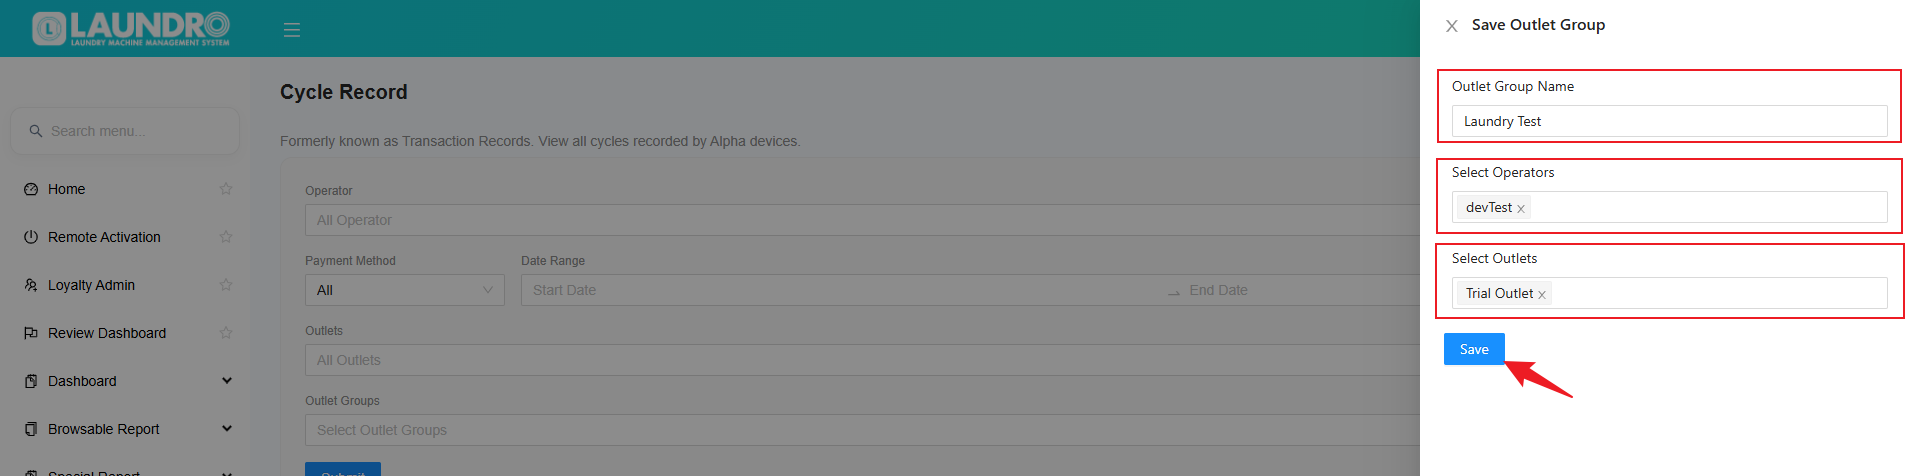
Your Outlet Group has been created successfully. Next, proceed to the Use an Outlet Group in a Report section to learn how to use it when searching for records.
Use an Outlet Group in a Report
After successfully creating an Outlet Group, you can use it when generating reports.
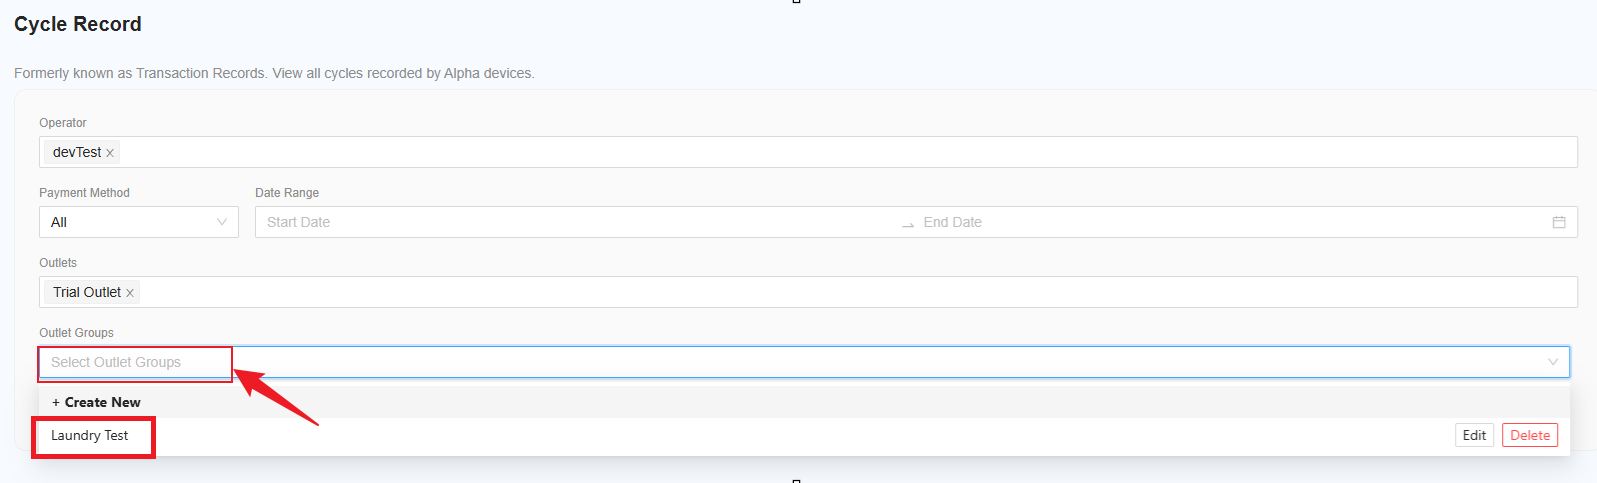
Step1 - Under Outlet Group, click Select Outlet Group. A list of available outlet groups will appear below. Select the outlet group you created earlier to proceed.
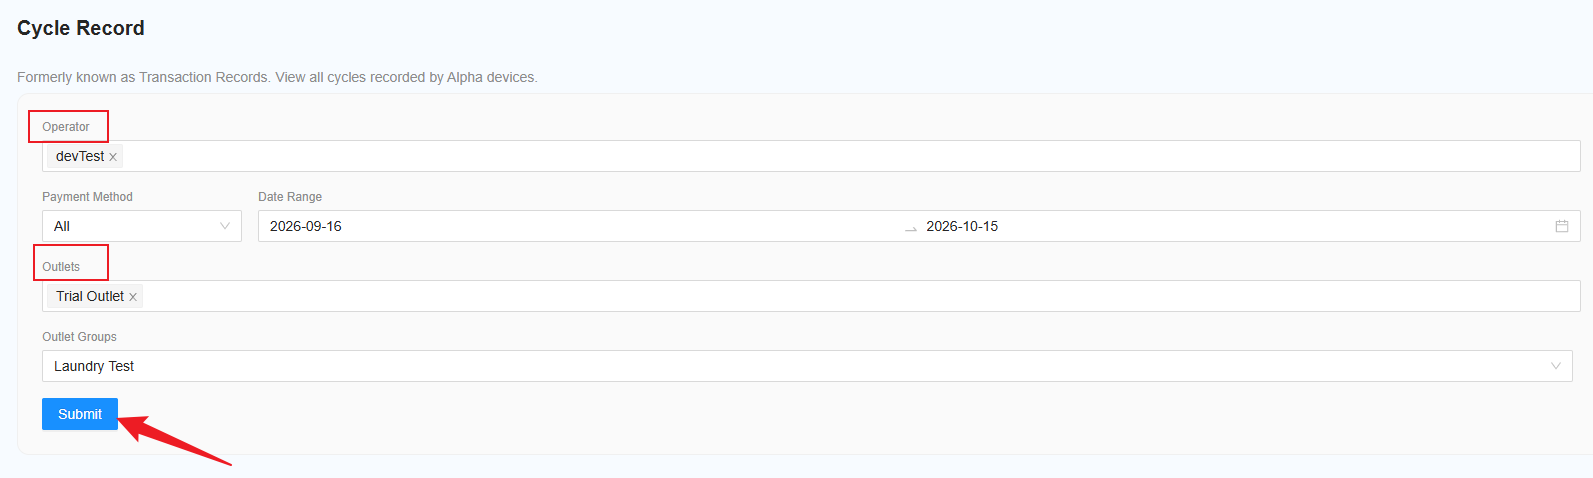
Step 2 - After selecting the outlet group, the system will automatically select the corresponding Operator and Outlets based on your saved settings. Next, choose your preferred Date Range and click Submit to view the report.
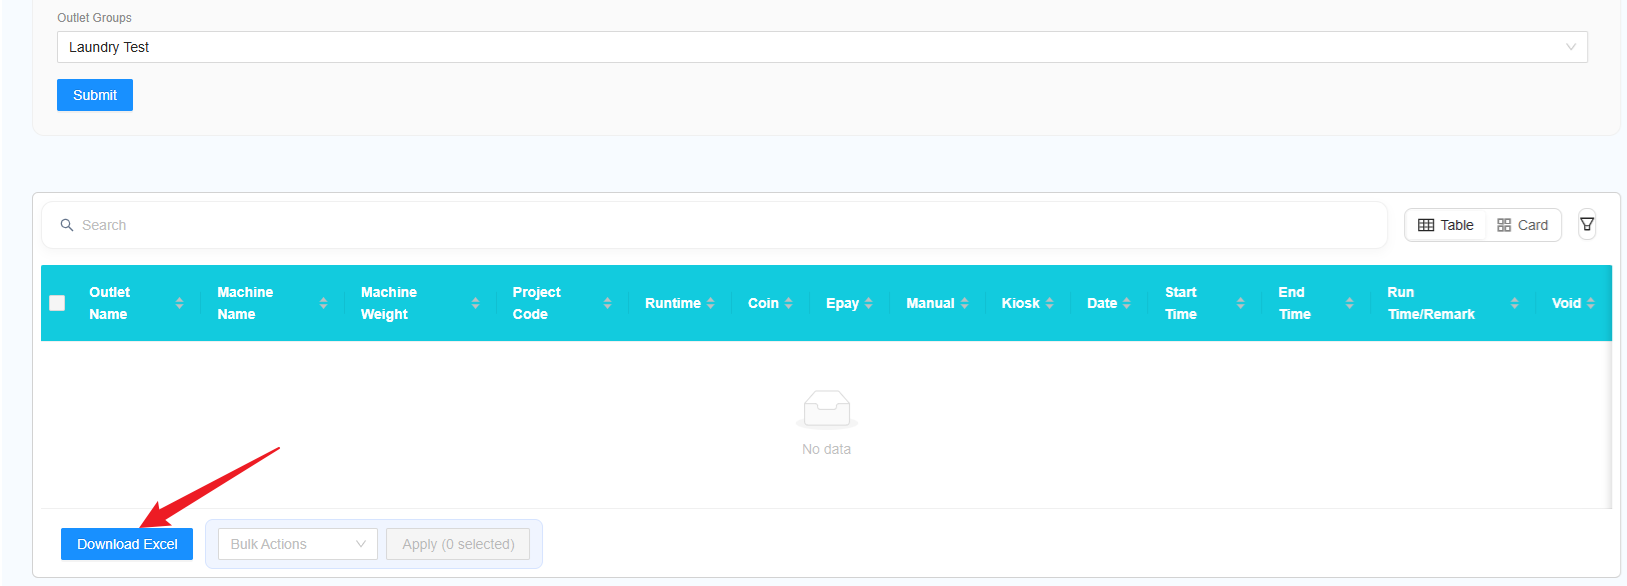
Step3 - The report will be generated and displayed below for you to review. You can also click Download Excel to download the report to your PC for future reference.
Important Note
-
Make sure the correct operators and outlets are selected when creating the Outlet Group.
-
If you need a different combination of operators or outlets, create a separate Outlet Group with a different name.
Offline Dashboard
Offline Dashboard
The Offline Dashboard allows you to check the online and offline status of your outlet and machines.
You can use it to:
- Check how long an outlet or machine has been online or offline.
- See how many times a machine went offline.
- Find the longest offline period.
- View the exact time a machine went offline and came back online.
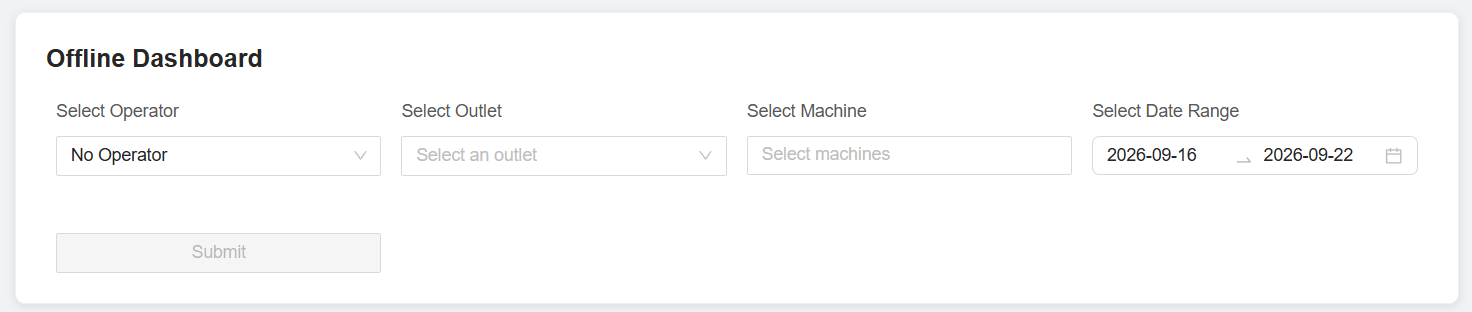
1. Select Your Filters
Before checking the dashboard, select the information you want to view.
Step 1: Select Operator
Select the Operator you want to check.
Step 2: Select Outlet
Select the Outlet you want to check.
Step 3: Select Machine
Select a specific machine if you want to check only one machine.
Note: Leave this filter unchanged if you want to view all machines in the outlet.
Step 4: Select Date Range
Select the date range you want to check.
Once all filters are selected, the dashboard will display the corresponding data.
2. Outlet Overview
The Outlet Overview shows the overall online and offline status of the selected outlet.
You can see:
Total Online Time
The total amount of time the outlet was online during the selected date range.
Total Offline Time
The total amount of time the outlet was offline.
Overall Uptime
The percentage of time the outlet was online.
Offline Frequency
The total number of times the outlet went offline.
Longest Offline Time
The longest continuous period that the outlet remained offline.
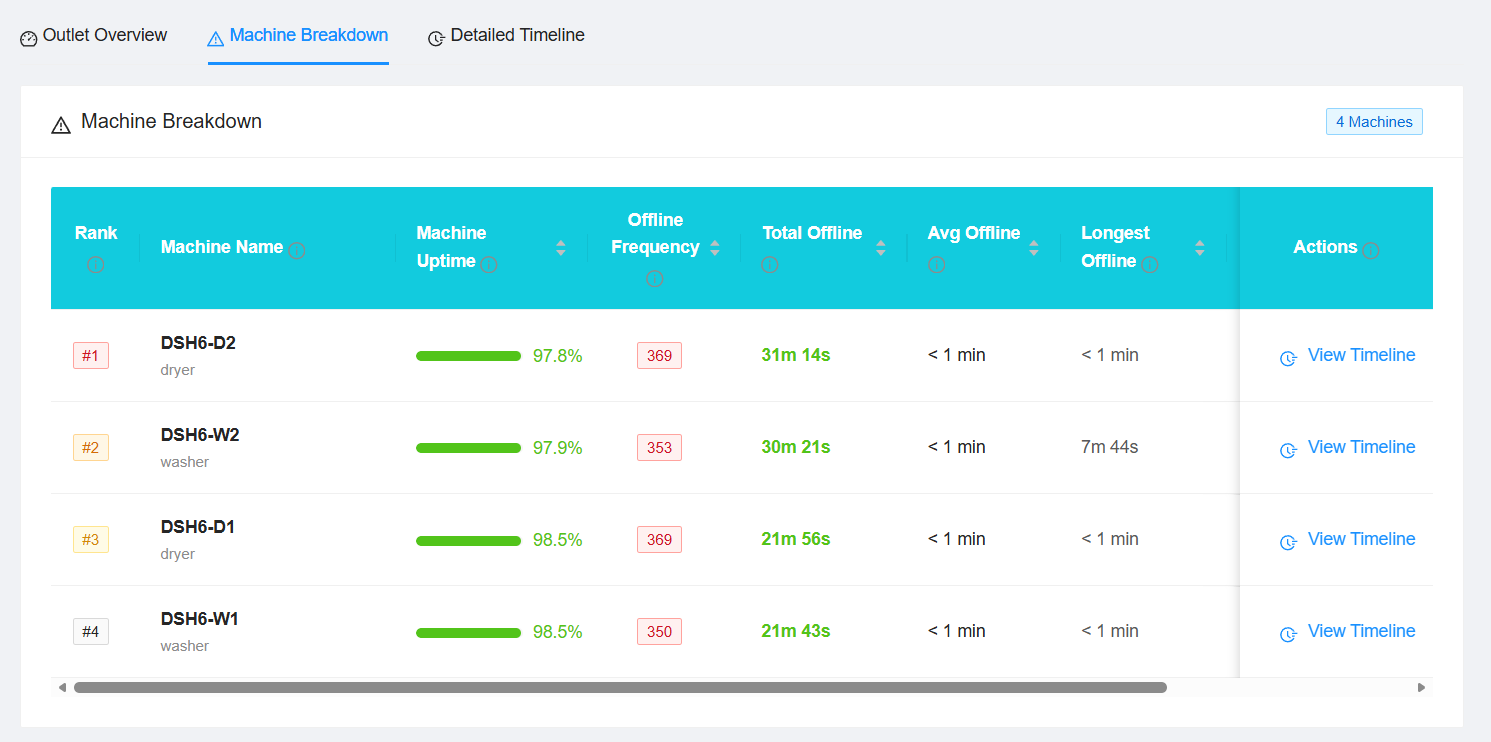
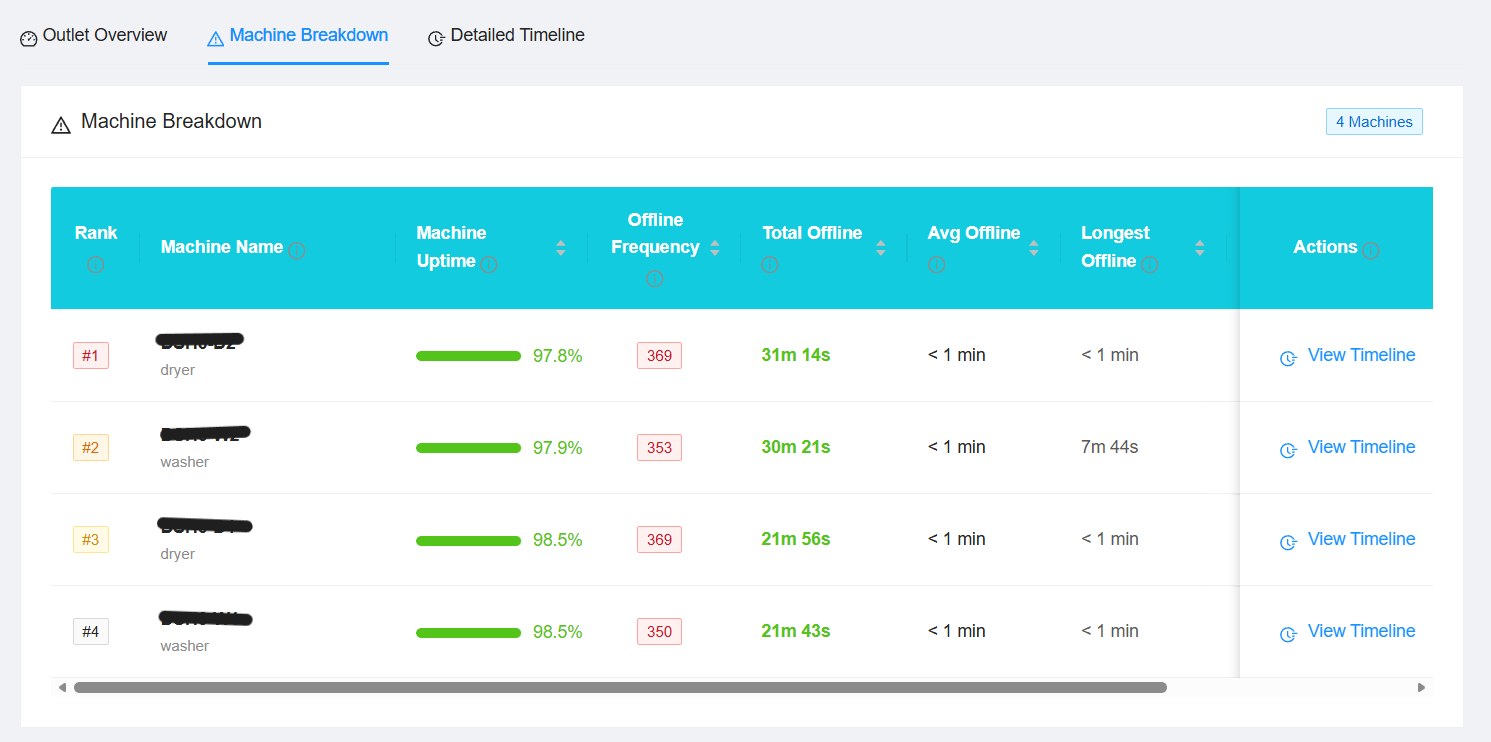
3. Machine Breakdown
The Machine Breakdown section shows the online and offline status of each machine in the selected outlet.
For each machine, you can check:
- Machine Uptime – Percentage of time the machine was online.
- Offline Frequency – Number of times the machine went offline.
- Average Offline Duration – Average length of each offline period.
- Longest Offline Duration – Longest continuous period the machine was offline.
View Machine Details
Click Detailed next to a machine to see more information about its online and offline activity.
Machine Details
Users can click Detailed for a specific machine to view a more detailed breakdown of its online/offline activity.
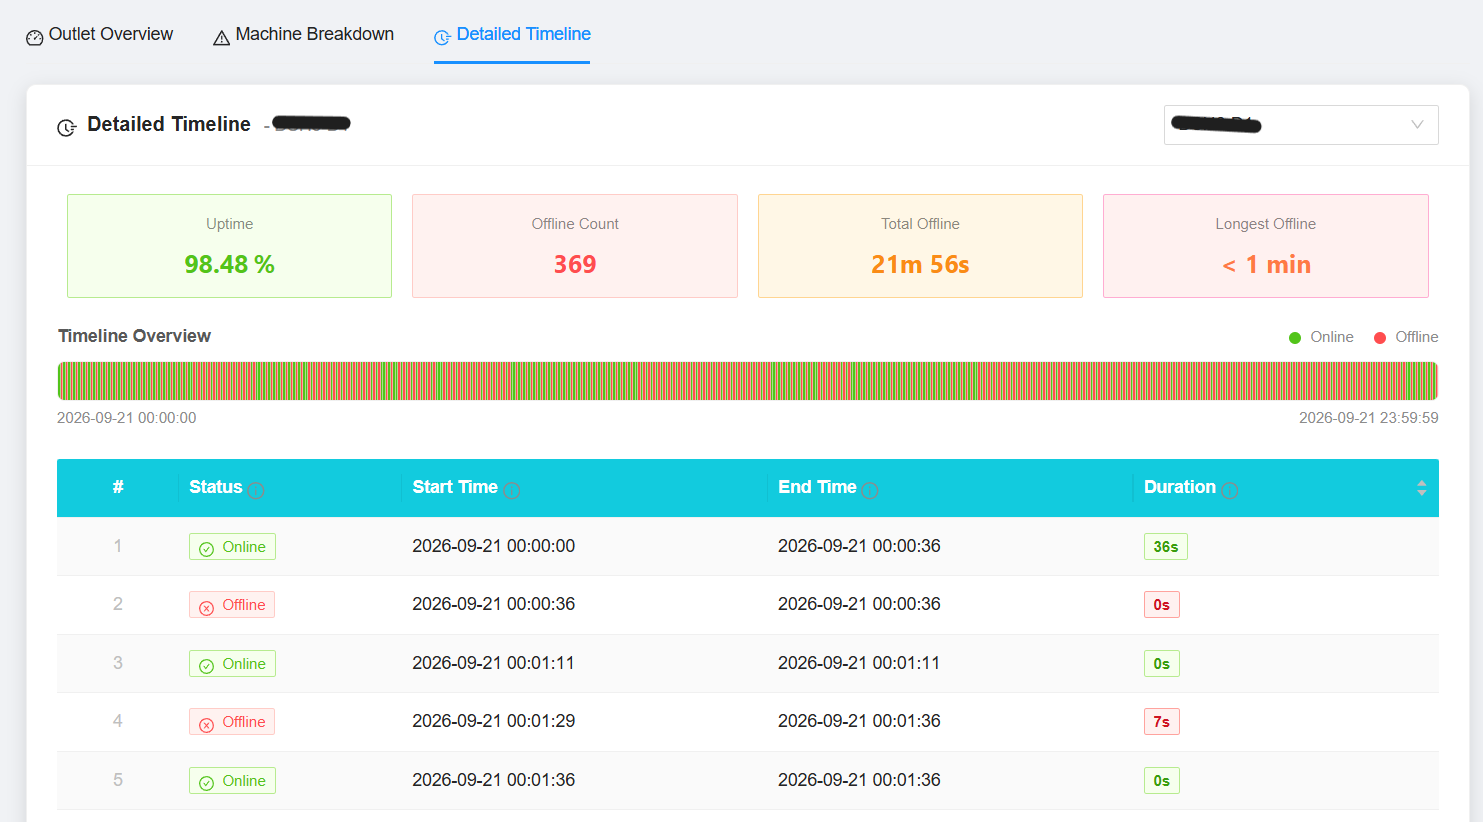
4. Detailed Timeline
The Detailed Timeline provides a more detailed view of the selected machine's online and offline activity.
The timeline shows:
- When the machine went offline.
- When the machine came back online.
- How long the machine was offline.
- How long the machine was online.
- Total online and offline duration.
- Other relevant status information.
This helps you identify when the machine went offline and how long the downtime lasted.
Example
For example, if a machine shows:
Offline: 10:00 AM
Online: 10:30 AM
The machine was offline for 30 minutes.
You can use the Detailed Timeline to identify repeated or long offline periods and investigate possible connectivity or machine issues.
Machine Utilization v2
What is Machine Utilization?
Machine Utilization allows you to check how frequently your machines are being used during a selected period.
You can use this report to compare machine usage by:
- Weight Group
- Individual Machine
- Machine Type
You can also view the results by hour, day, week, or month.
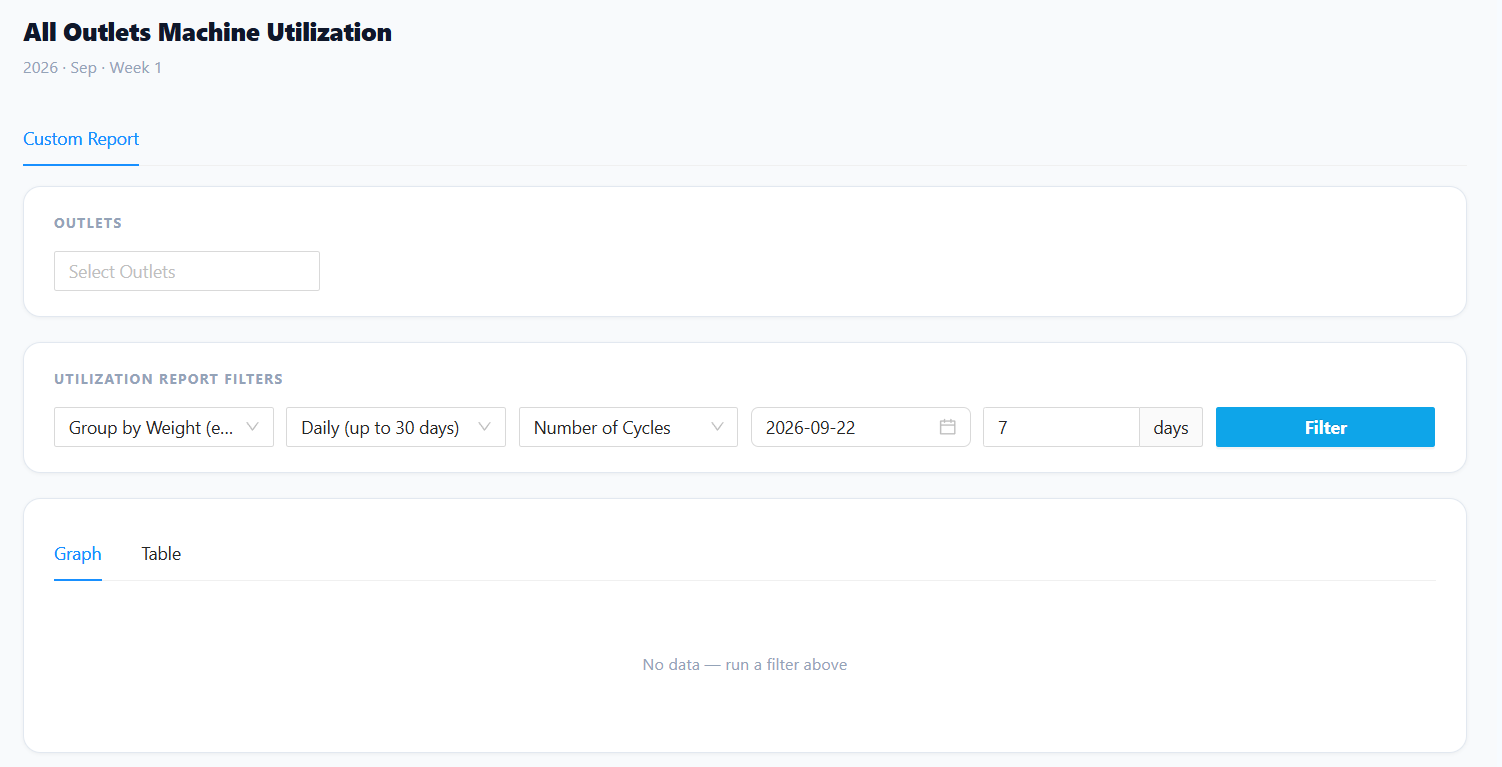
1. Select Your Filters
Before viewing the machine utilization data, select the filters you need.
Step 1: Select Outlet
Select the outlet you want to check.
If you want to view data from all outlets, leave this filter as All.
Step 2: Select Group Data
Choose how you want the machine utilization data to be displayed.
You can select:
Weight Group
Groups machines according to their weight category.
Individual Machine
Shows the utilization of each machine separately.
Machine Type
Groups machines according to their type, such as Washer or Dryer.
Step 3: Select Time Period
Choose how you want the data to be grouped over time.
- Hourly – View utilization by hour.
- Daily – View utilization by day.
- Weekly – View utilization by week.
- Monthly – View utilization by month.
Step 4: Select Utilization Metric
Choose how you want to measure machine usage.
Number of Cycles
Shows how many cycles the machine completed.
Time Utilization
Shows how much time the machine was being used.
Step 5: Select Date
Select the date or date range you want to check.
Depending on the selected time period, you may also be able to select specific days.
2. View the Utilization Data
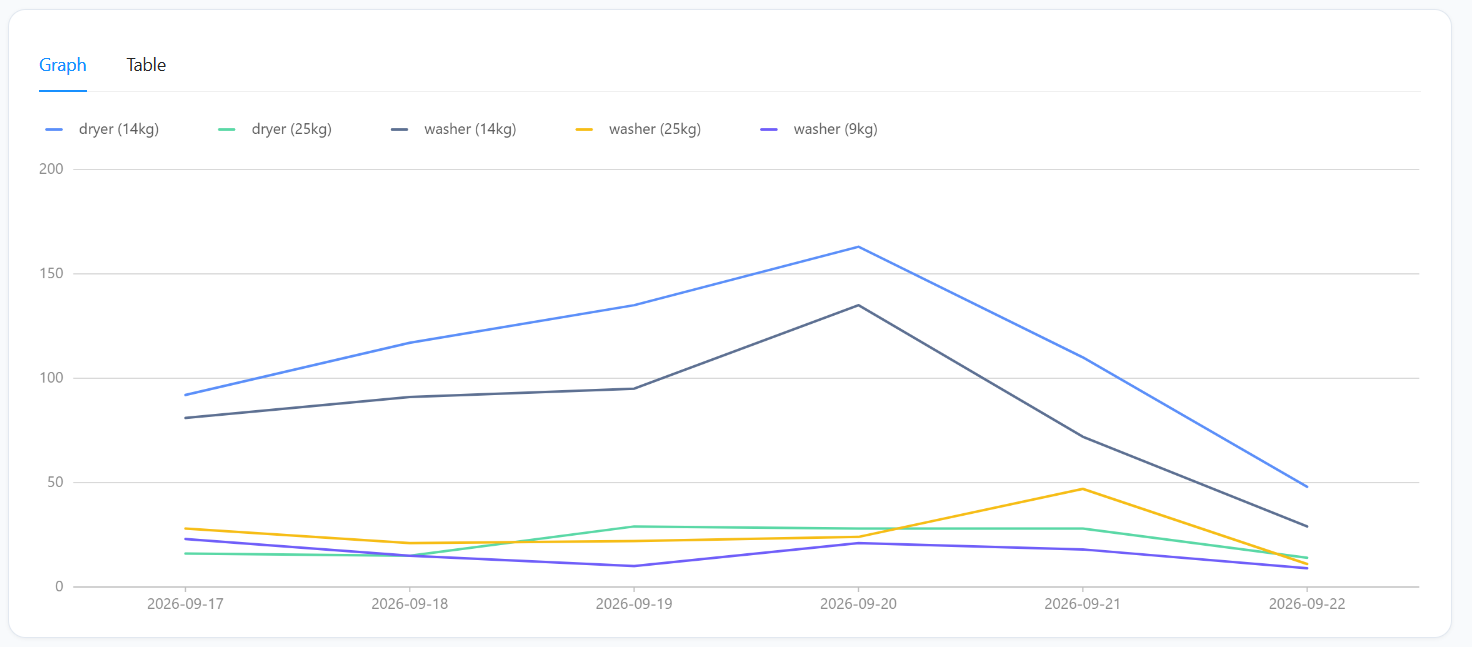
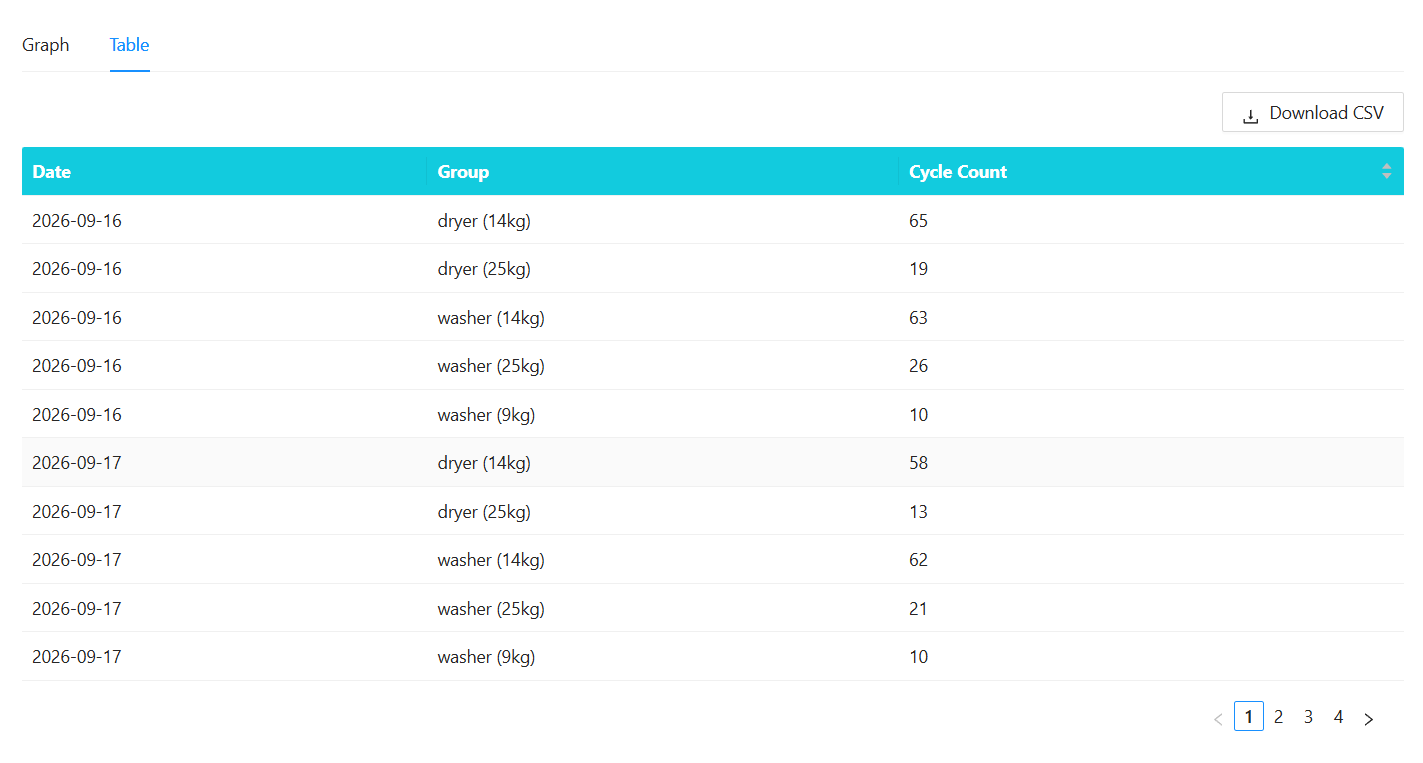
After selecting your filters, the system will display the machine utilization data.
You can view the results in two formats:
Graph
The Graph gives you a quick visual overview of machine usage.
Use the graph to easily compare:
- Different machines
- Machine types
- Weight groups
- Different time periods
Table
The Table provides the detailed utilization data.
Use the table when you need to check the exact figures for a machine, group, or selected period.
3. Example
For example, if you want to check how many times your dryers were used each day:
Outlet: Outlet A
Group Data: Machine Type
Time Period: Daily
Utilization Metric: Number of Cycles
Date: 1 September – 7 September
The report will show the number of dryer cycles for each day during the selected date range.
4. Quick Guide
| Option | What it shows |
|---|---|
| Outlet | Which outlet you want to check |
| Weight Group | Usage grouped by machine weight |
| Individual Machine | Usage for each machine |
| Machine Type | Usage grouped by machine type |
| Hourly | Usage by hour |
| Daily | Usage by day |
| Weekly | Usage by week |
| Monthly | Usage by month |
| Number of Cycles | Number of machine cycles |
| Time Utilization | Amount of time the machine was used |
Quick Steps
Select Outlet → Select Group Data → Select Time Period → Select Utilization Metric → Select Date → View Graph or Table
Sales / Bill Performance v2
What is Sales / Bill Performance?
The Sales / Bill Performance report allows you to check and compare sales for your outlets.
You can use this report to:
- View total sales for a year.
- View daily sales for a selected month.
- Compare sales between outlets.
- Check Coin and E-Payment sales.
- View monthly sales for a selected outlet.
- Identify outlets with the highest sales.

1. Select Your Filters
Before viewing the report, select the filters you need.
Step 1: Select Outlet
Select the outlet you want to check.
If you want to view sales for all outlets, leave the Outlet filter unchanged.
Step 2: Select Year
Select the year you want to view.
Example: 2026
Step 3: Select Month
Select the month you want to view.
The selected month is mainly used when viewing the Daily Sales report.
Example: September
Step 4: Select Outlet Group
If you have already created an Outlet Group, you can select it here.
Once an Outlet Group is selected, the system will automatically apply the outlets included in that group.
Tip: Use Outlet Group when you regularly check the same group of outlets.
Reports
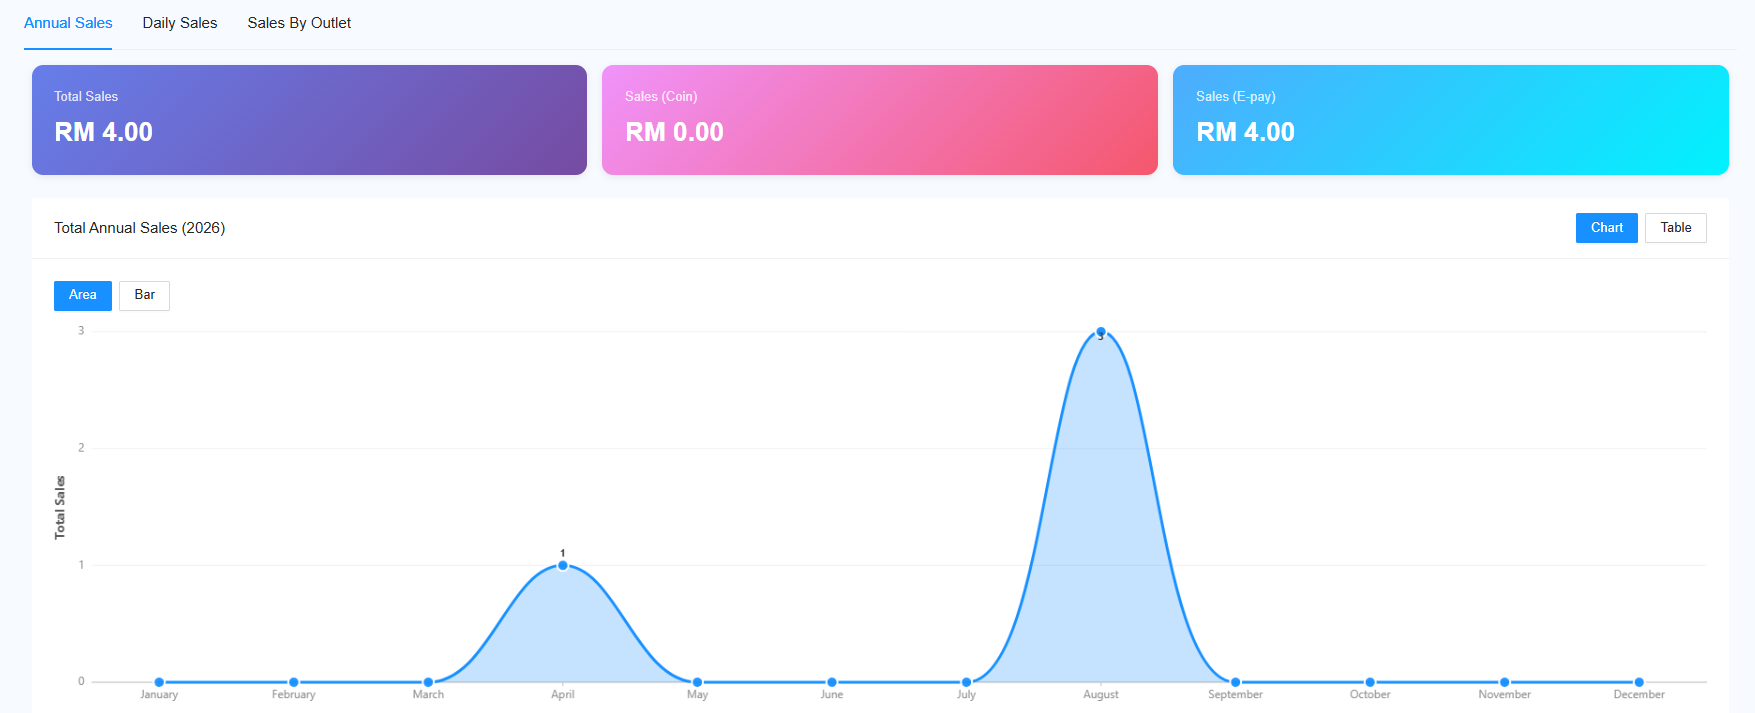
2. Annual Sales
The Annual Sales section shows the sales performance for the selected year.
You can view:
- Total Sales – Total sales for the selected year.
- Coin Sales – Sales collected through coins.
- E-Payment Sales – Sales collected through electronic payments.
How to view Annual Sales
- Select the Year.
- Select the Outlet or Outlet Group, if required.
- View the Annual Sales report.
You can view the information in:
- Graph Format – For an easy visual comparison.
- Table Format – For detailed figures.
3. Daily Sales
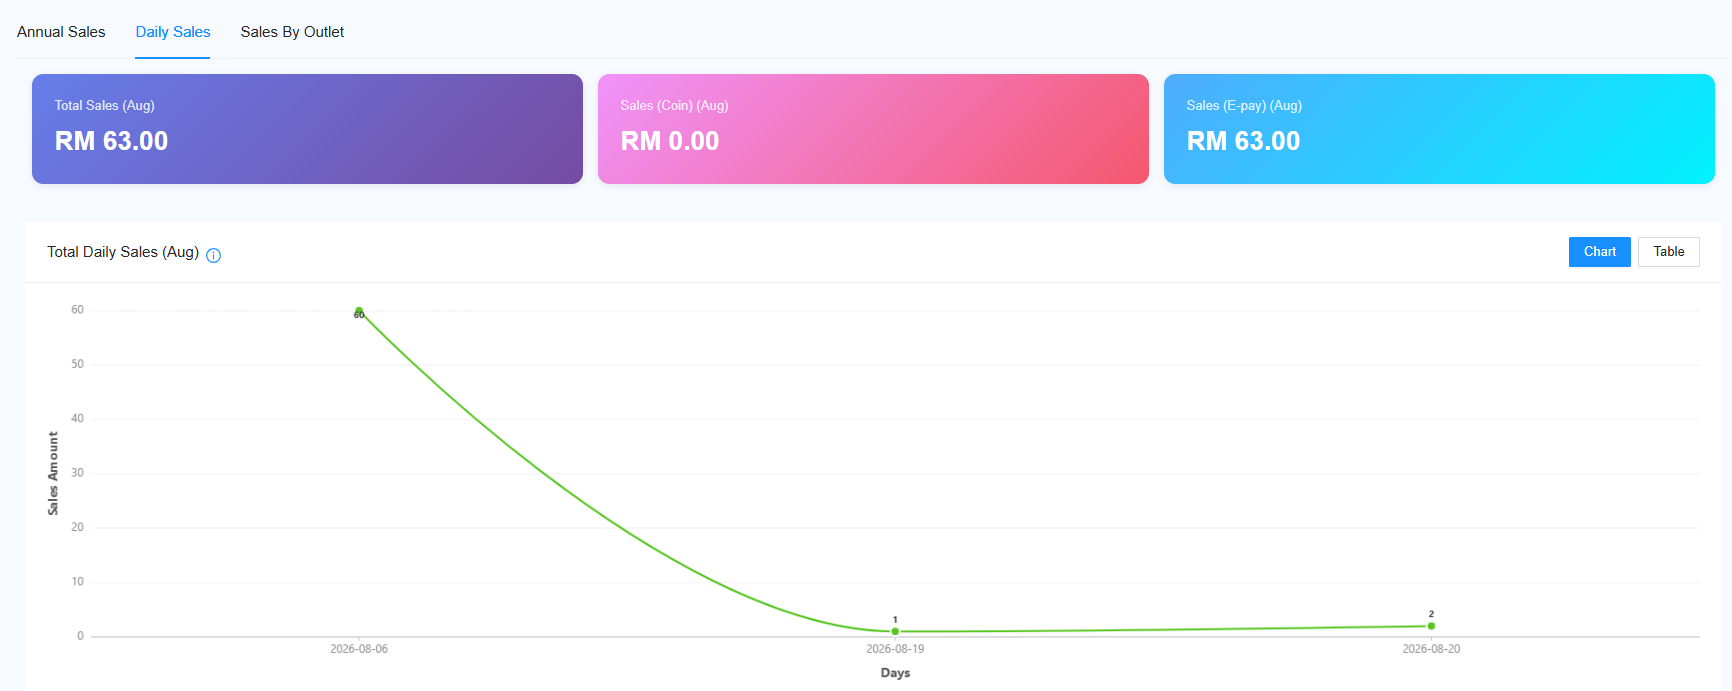
The Daily Sales section shows the sales for each day within the selected month.
You can view:
- Daily Total Sales
- Daily Coin Sales
- Daily E-Payment Sales
How to view Daily Sales
- Select the Year.
- Select the Month.
- Select the Outlet or Outlet Group, if required.
- View the Daily Sales report.
The information is available in:
Graph Format
Use the graph to quickly compare sales between days.
Table Format
Use the table when you need to check the exact sales amount for each day.
Sales by Outlet
4. Sales by Outlet
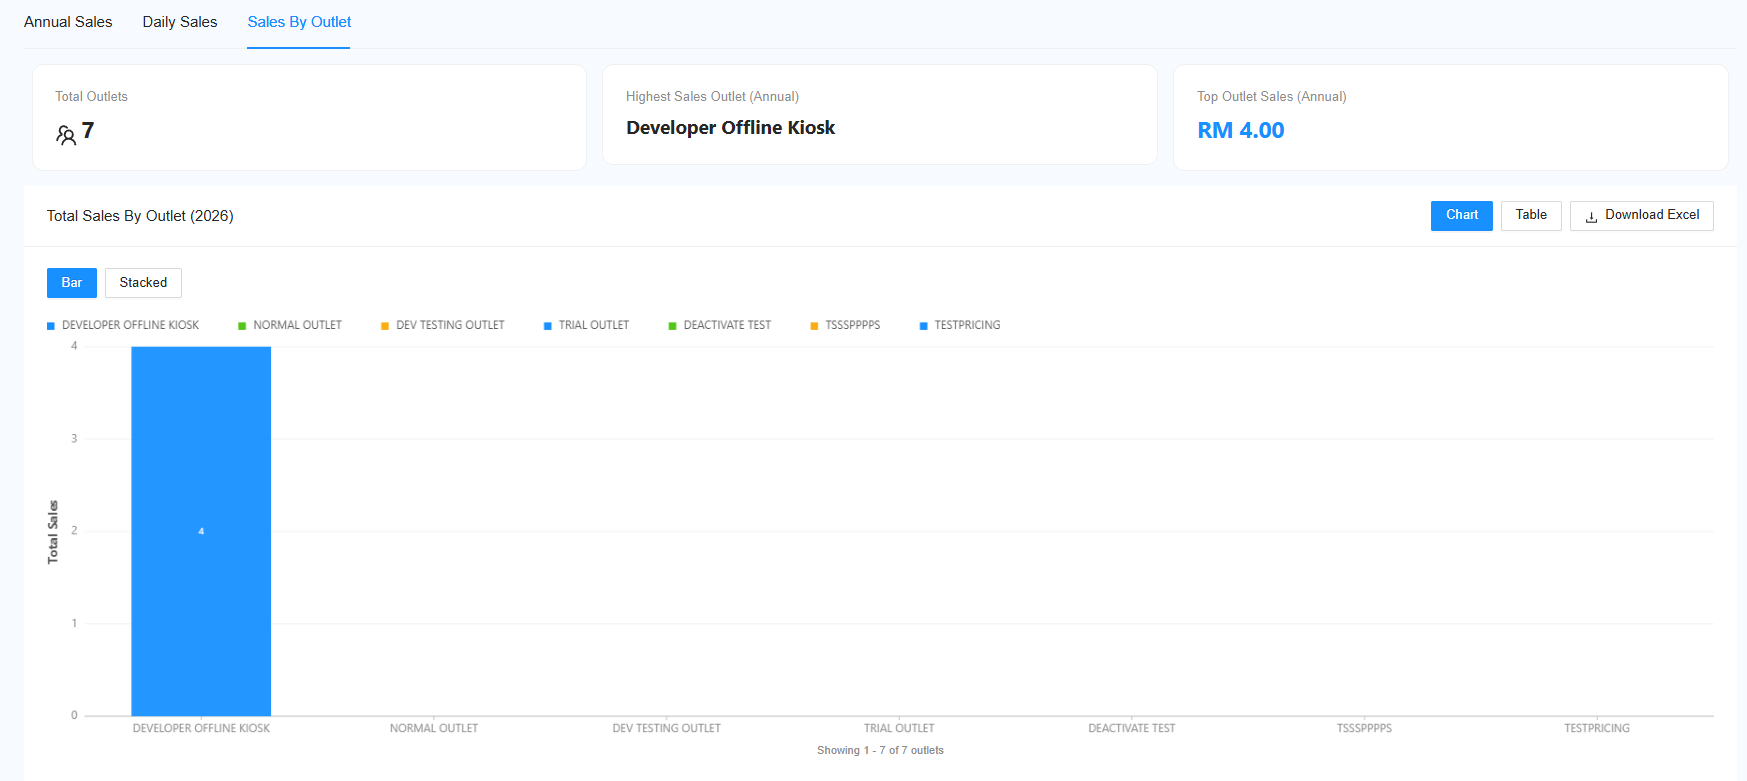
The Sales by Outlet section allows you to compare sales between different outlets.
Overall Statistics
The report provides an overview of your outlets, including:
- Total Outlets – Number of outlets included in the report.
- Highest Sales Outlet – Outlet with the highest sales.
- Highest Sales Amount – Sales amount recorded by the highest-sales outlet.
- Total Sales – Combined sales from the selected outlets.
Sales for Each Outlet
You can view the sales amount for each outlet.
The report allows you to check:
- Total sales for the selected year.
- Monthly sales breakdown.
This makes it easier to compare sales between different outlets.
5. Top Outlets
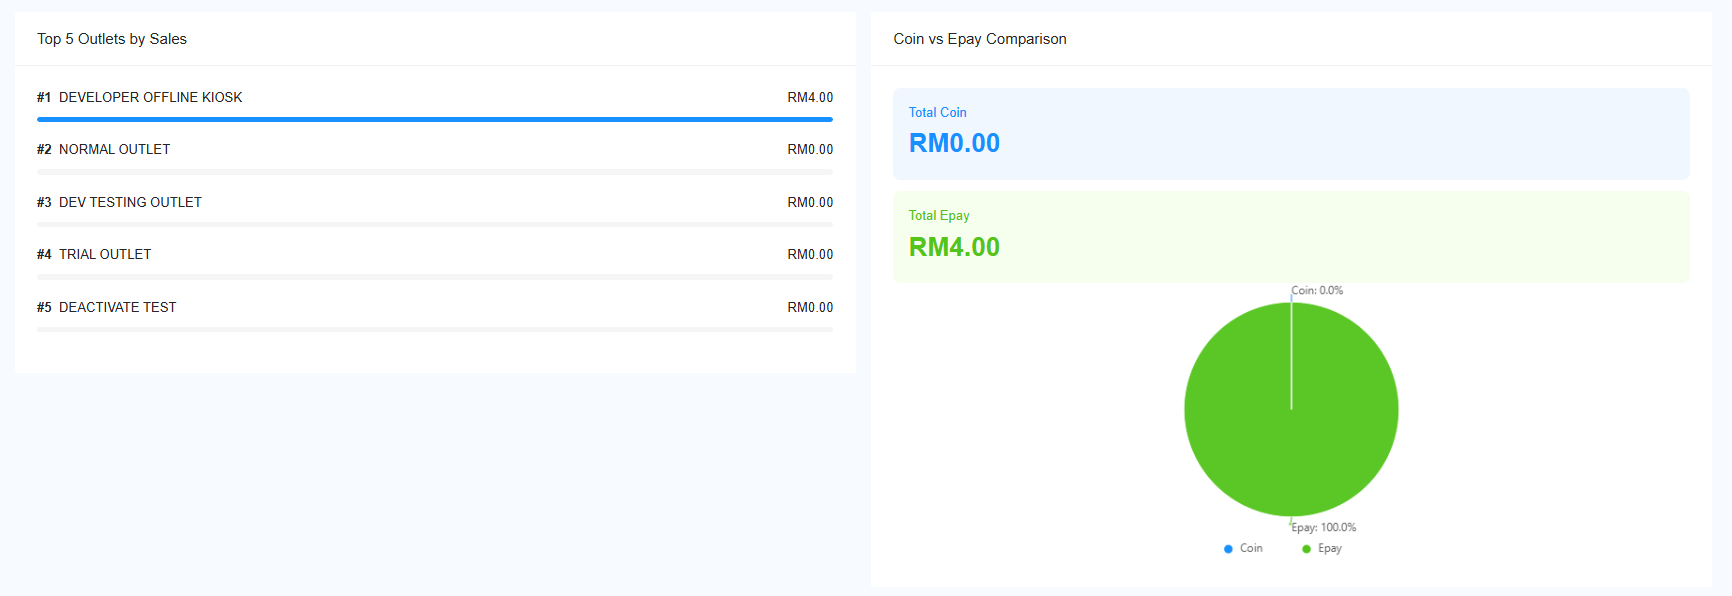
The Top Outlets section allows you to view the outlets with the highest sales.
You can choose to view:
- Top 5 Outlets
- Top 10 Outlets
The results are based on the selected Year and Month.
Example: If you select September 2026, the Top Outlets list will be based on the sales data for the selected period.
6. Selected Outlet Monthly Sales
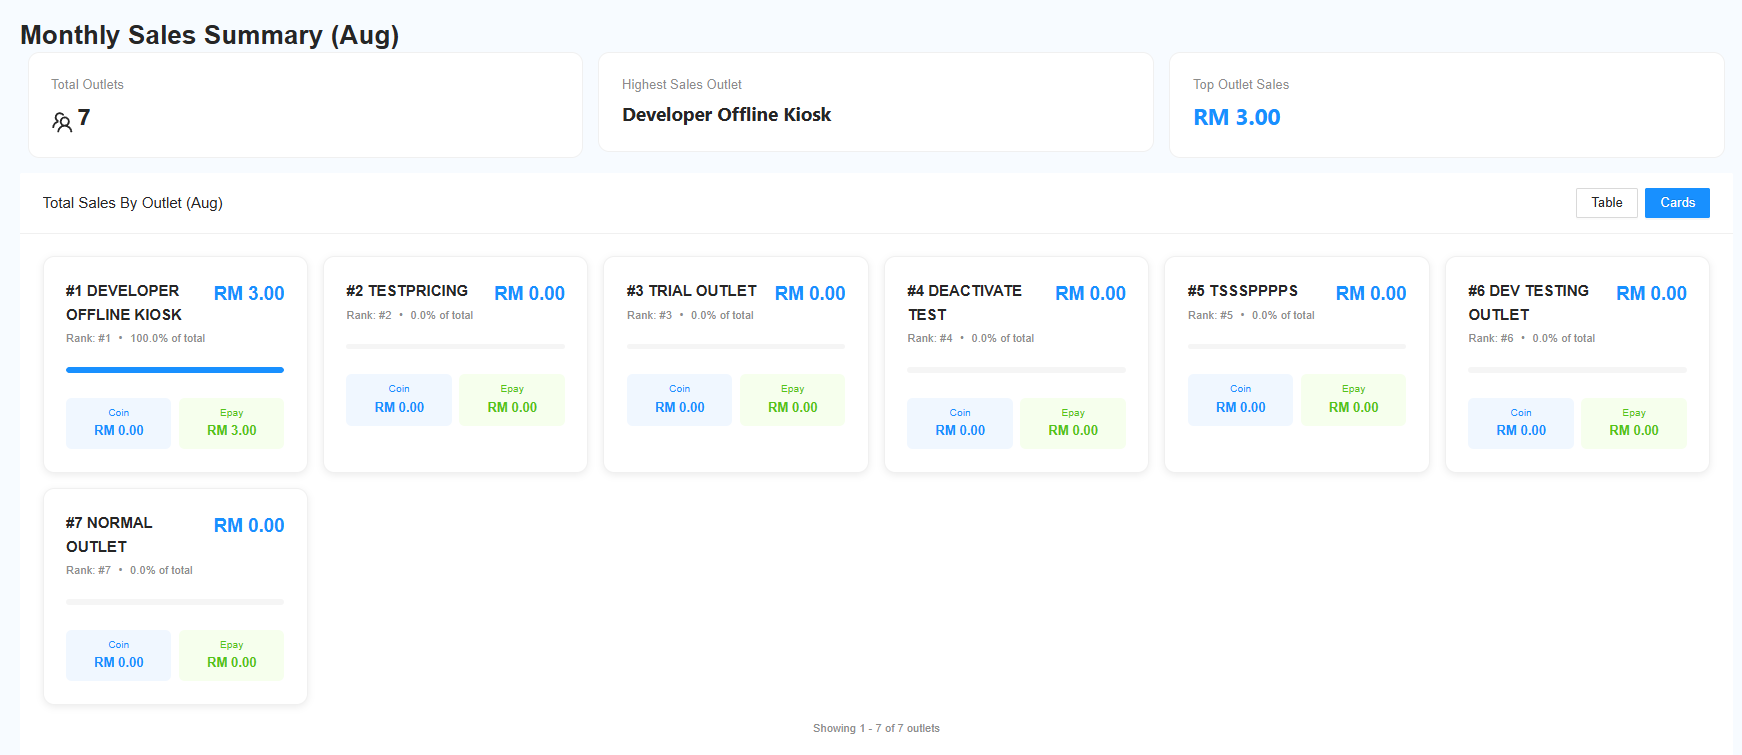
Use this section when you want to check the monthly sales of one specific outlet.
The report shows:
- Total Monthly Sales
- Coin Sales
- E-Payment Sales
Sales Breakdown
The monthly sales are divided into:
Coin
Sales collected through coins.
E-Payment
Sales collected through electronic payments.
Total Sales
Combined Coin and E-Payment sales.
This allows you to compare the outlet's sales performance from month to month.
Quick Guide
| Report | What can you check? |
|---|---|
| Annual Sales | Total yearly sales |
| Daily Sales | Sales for each day |
| Sales by Outlet | Compare sales between outlets |
| Top Outlets | Outlets with the highest sales |
| Selected Outlet Monthly Sales | Monthly sales for one outlet |
Example
If you want to check daily sales for September 2026:
Select Year: 2026
Select Month: September
Select Outlet: Your preferred outlet
View: Daily Sales
You can then compare:
Coin Sales + E-Payment Sales = Total Sales
Quick Steps
Select Outlet → Select Year → Select Month → Select Outlet Group (if needed) → View the Report
Summary Dashboard v2
Coming Soon
➕ Add Machines to an Existing Operator
🎯 Purpose
Use this guide to add new machines to an existing outlet without creating a new operator account.
🧭 Quick Navigation
- 🔐 Log in to Laundro Portal
- 📍 Go to My Outlet
- 🏪 Select The Outlet
- ⚙️ Open Machines
- ➕ Add Washer or Dryer
- 📝 Enter Details & Save
📍 How to Access
🔐 Step 1 — Login to Laundro Portal
Log in using your Username and Password. https://v2.thelaundro.com/operator_login
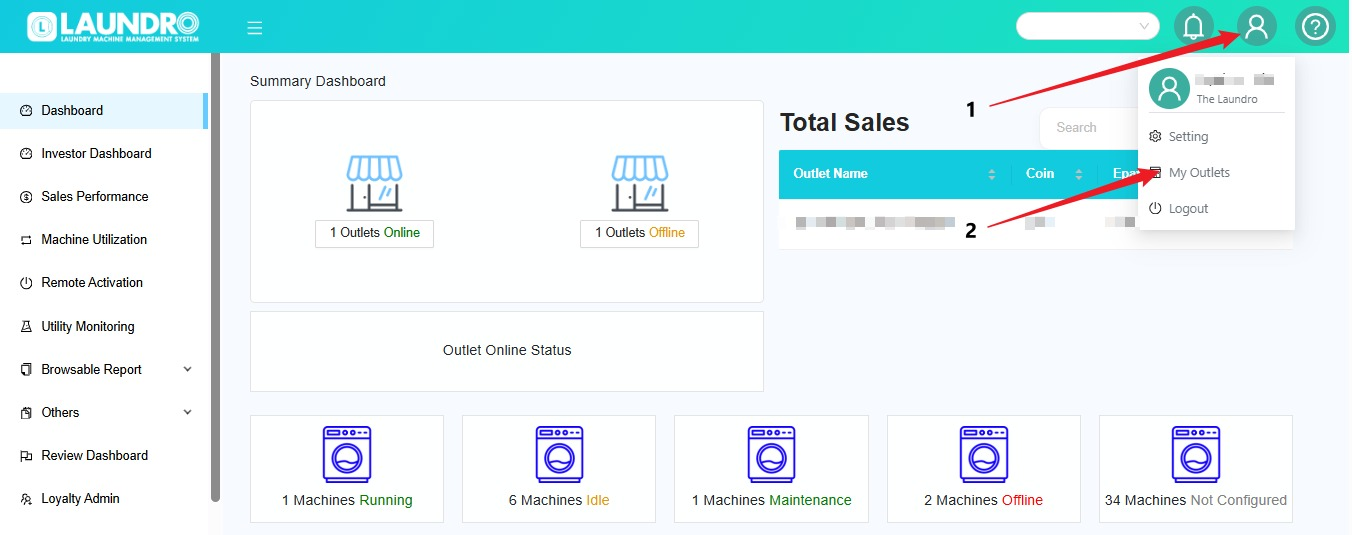
📍 Step 2 — Go to My Outlets
- Click the 👤 Profile icon.
- Select My Outlets.
- The list of your outlets will be displayed.
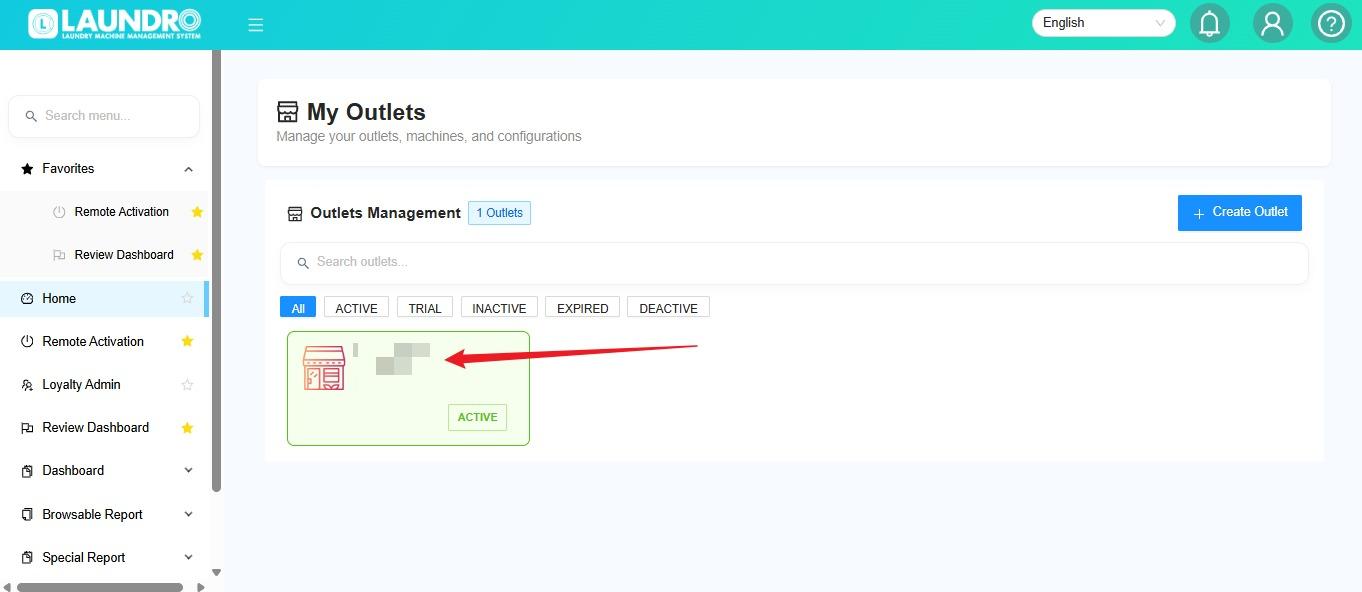
🏪 Step 3 — Select the Outlet
Click the outlet where you want to add the machine.
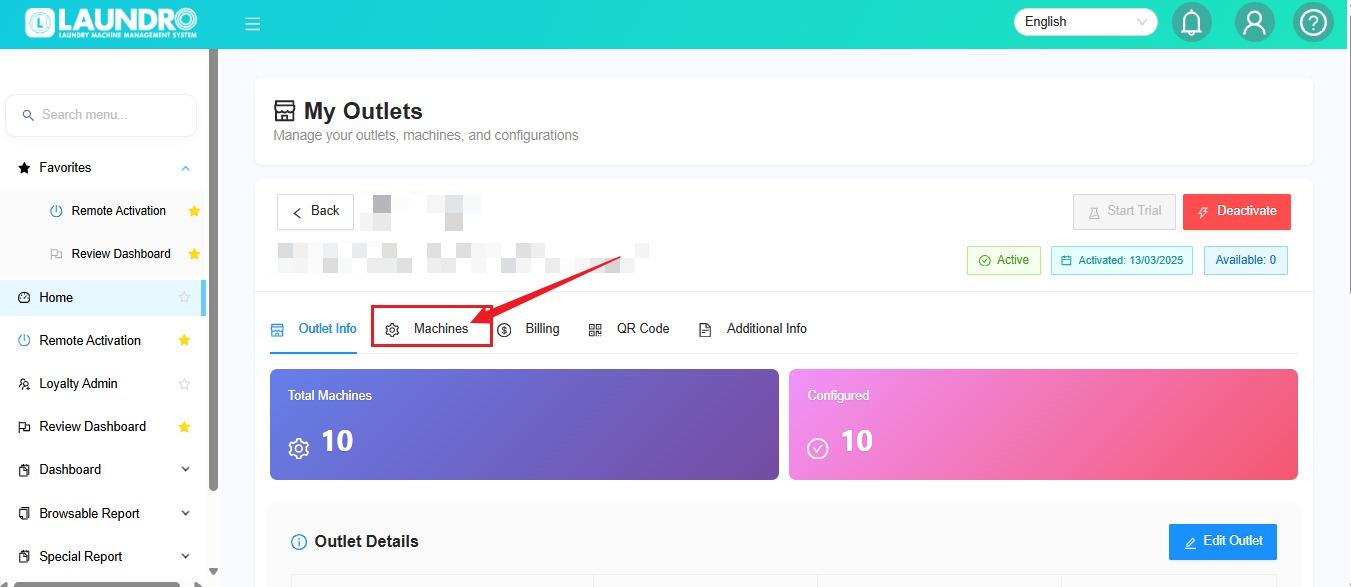
⚙️ Step 4 — Open Machines
Click Machines to manage the machines under the selected outlet.
➕ Step 5 — Add a Washer or Dryer
- Click Edit Machine.
- Select the machine type:
- 🧺 Washer
- 🔥 Dryer
- Repeat the process if you need to add more machines.
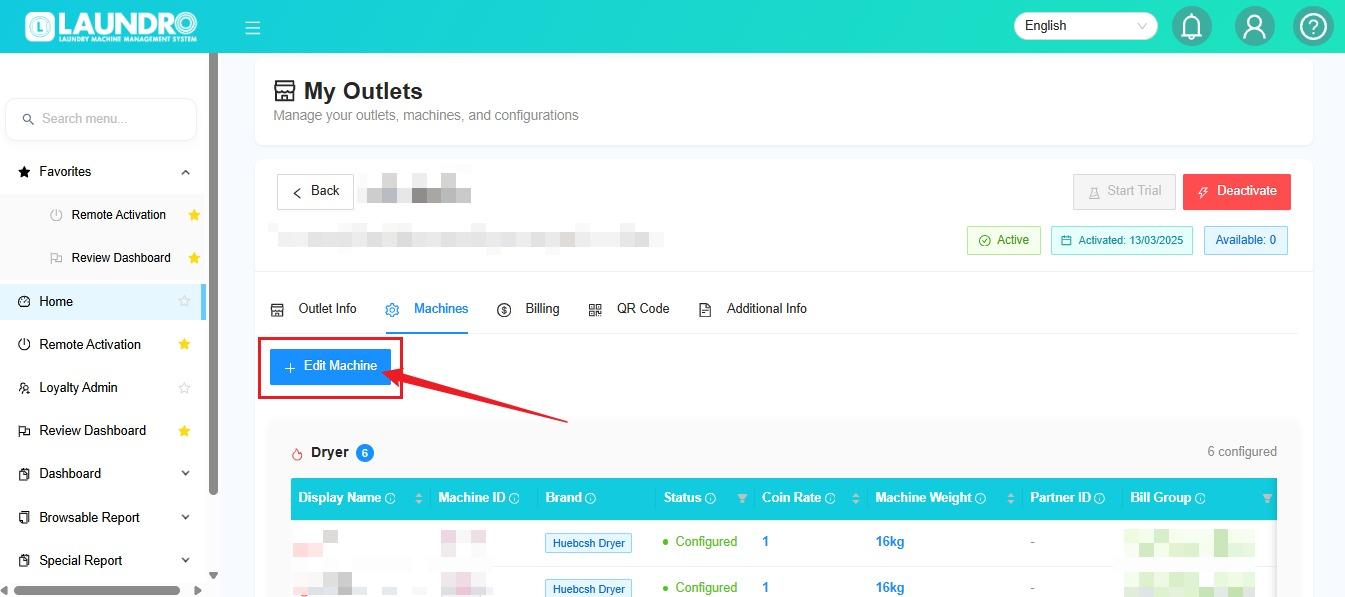
Quick Tip : You can click Add Machine repeatedly to add multiple units. Scroll up or down to view the additional machine entries.
📝 Step 6 — Fill in Machine Information
Enter all required information for each machine.
- Check that the machine details are correct.
- Repeat for every additional machine.
- Click Save when finished.
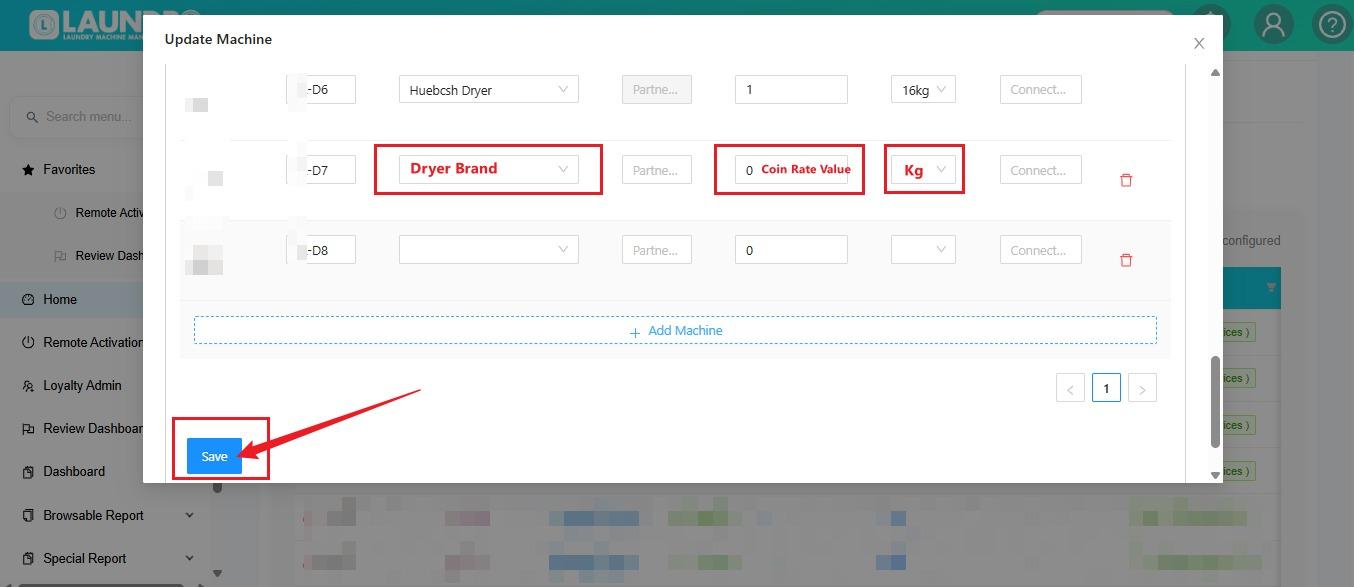
💡 Important Note : Before clicking Save, make sure all machine information is correct.
🔢 Step 6 — Add More Machines
Need to add more than one machine?
↕️ Scroll up or down to add additional machines.
➕ You can also click Add Machine repeatedly to add multiple units.
Click Add Machine, then select whether you want to add a Washer or Dryer.
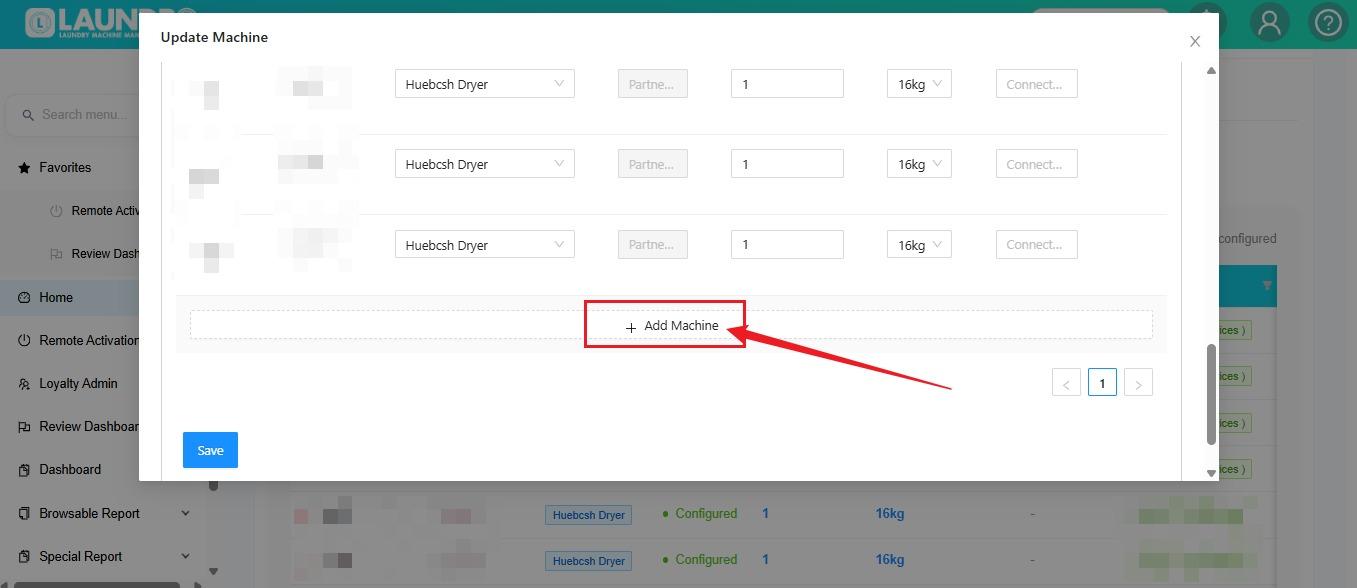
🗂️ Need to Add Another Machine Category?
If the machine is not a Washer or Dryer:
- Open the Machine Type dropdown.
- Select the required category.
- Click Add Category.
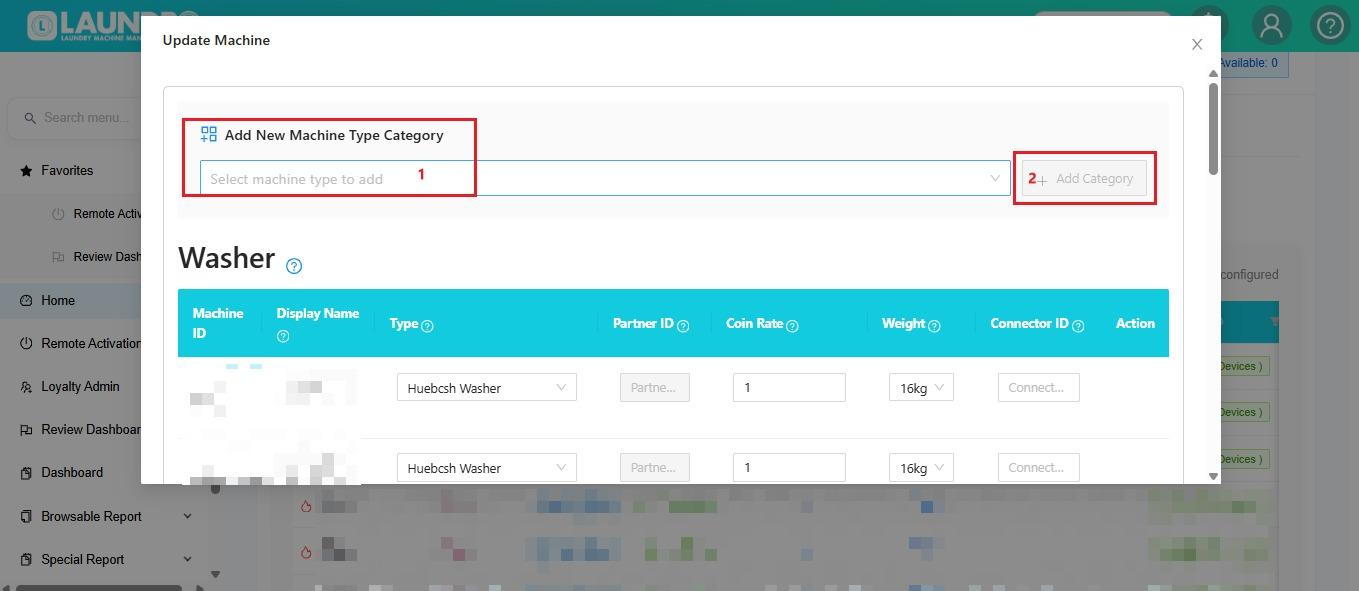
✅ Final Check
Before leaving the page, confirm that all machines have been entered correctly and saved.
✏️ How to Edit Machine Details
Welcome to the Laundro Portal Guide! 👋
Need to update a machine's name, type, coin rate, or weight? Follow this guide to edit machine details in the Laundro Portal.
🧭 Quick Navigation
- 🔐 Step 1: Log In
- 🏪 Step 2: Open My Outlets
- 🧺 Step 3: Select the Outlet
- ⚙️ Step 4: Open Machines
- ✏️ Step 5: Select the Machine to Edit
- 📝 Step 6: Update Machine Details
- 💾 Step 7: Save Changes
📍 How to Access
🔐 Step 1 — Login to Laundro Portal
Log in using your Username and Password. https://v2.thelaundro.com/operator_login
🏪 Step 2 — Open My Outlets
- Click the 👤 Profile icon.
- Select My Outlets.
- Find the outlet you want to manage.
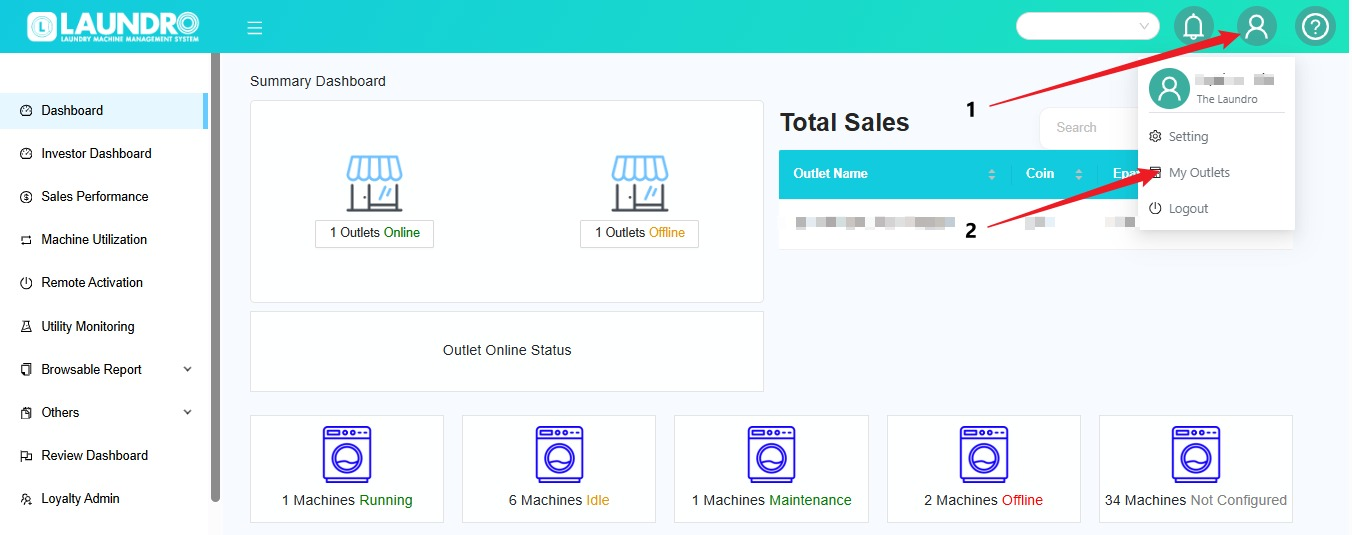
🧺 Step 3 — Select the Outlet
Click the outlet where the machine is located.
💡 Quick Tip: Double-check the outlet name before editing any machine details.
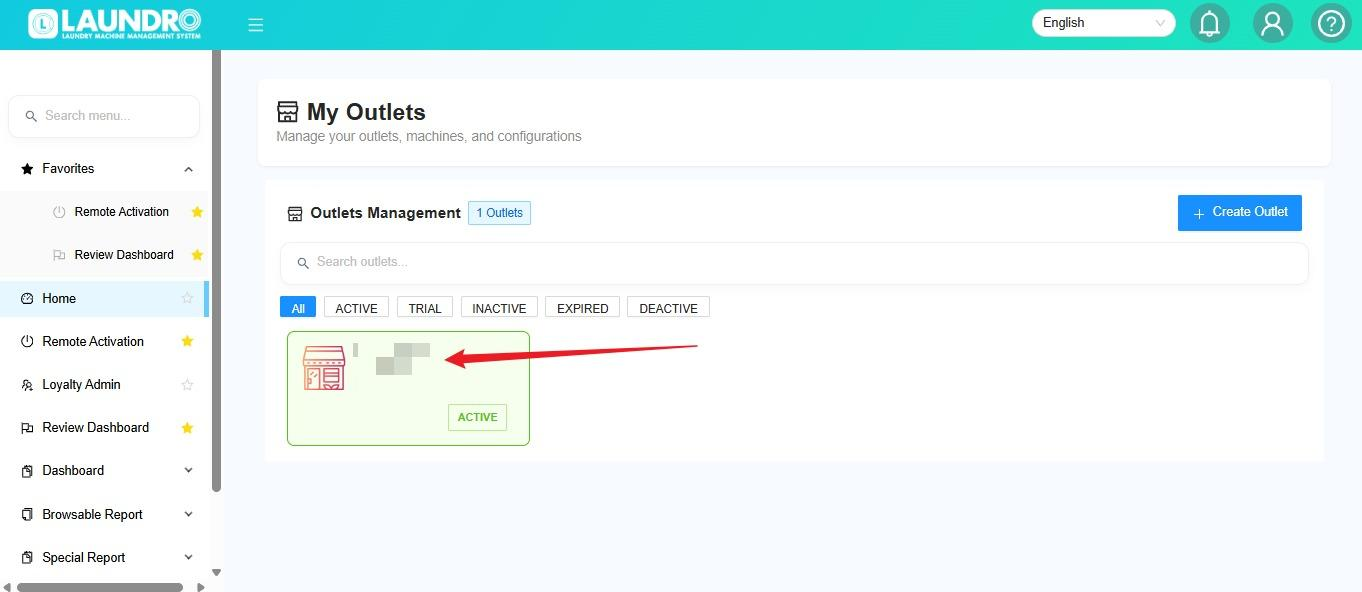
⚙️ Step 4 — Open Machines
On the selected outlet page, click Machines to view and manage its machines.
✏️ Step 5 — Select the Machine to Edit
Click the relevant machine-editing option and select the machine type, if prompted:
- 🧺 Washer
- 🔥 Dryer
💡 Important: Confirm that you are editing the correct machine type.
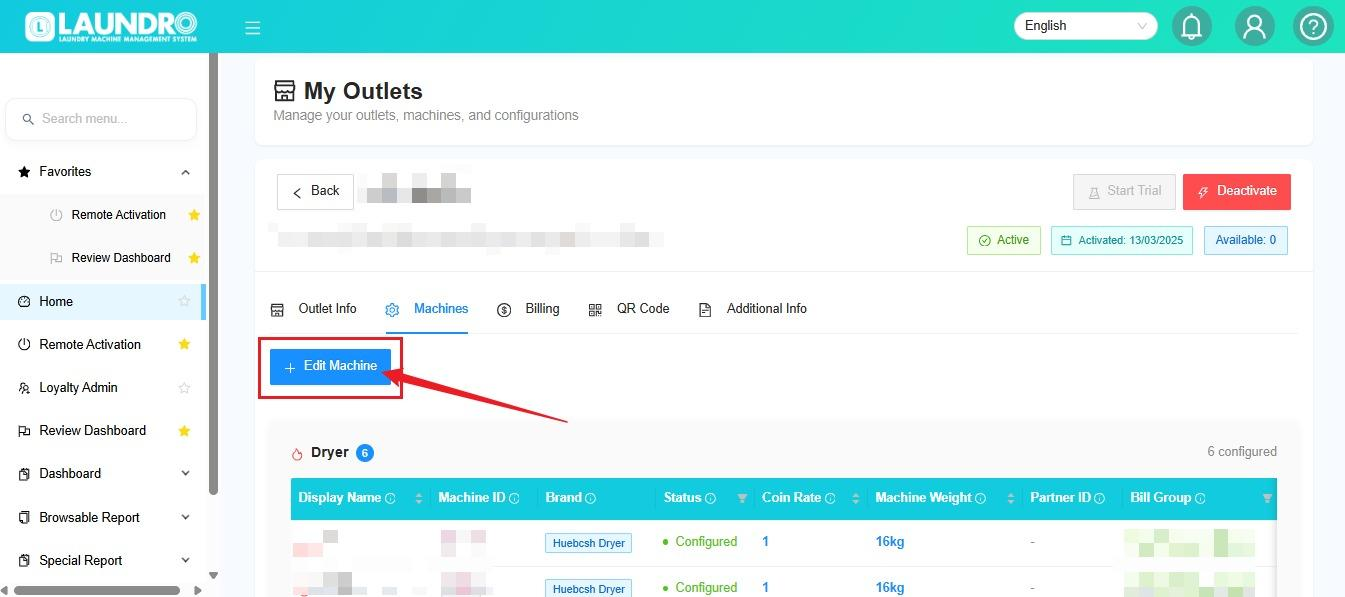
📝 Step 6 — Update Machine Details
In the Update Machine section, review and edit the required fields.
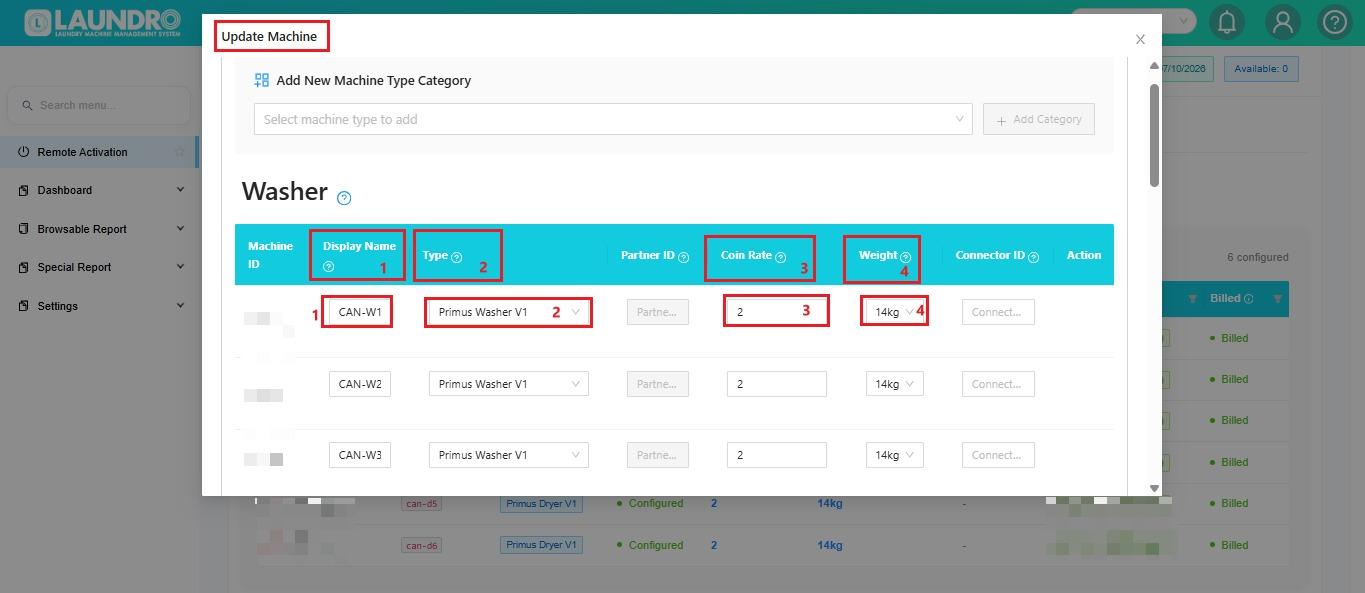
🏷️ 1. Display Name
Enter or update the name used to identify the machine.
Example: Washer W1 or Dryer D1, following your outlet's naming convention.
🧺 2. Type
Select the appropriate machine model or type.
Example: Speedqueen Dryer, if applicable.
🪙 3. Coin Rate
Enter the required coin rate.
Example: 1, if this is the correct value for your machine setup.
⚠️ Confirm the intended coin rate before changing it.
⚖️ 4. Weight
Select the correct machine capacity.
Examples: 15kg or 30kg.
💡 Quick Tip: Make sure the selected weight matches the actual machine. The weight may affect how the machine is identified and configured elsewhere in the system.
➕ Need to Edit More Machines?
Scroll up or down to locate other machines and update their details as needed.
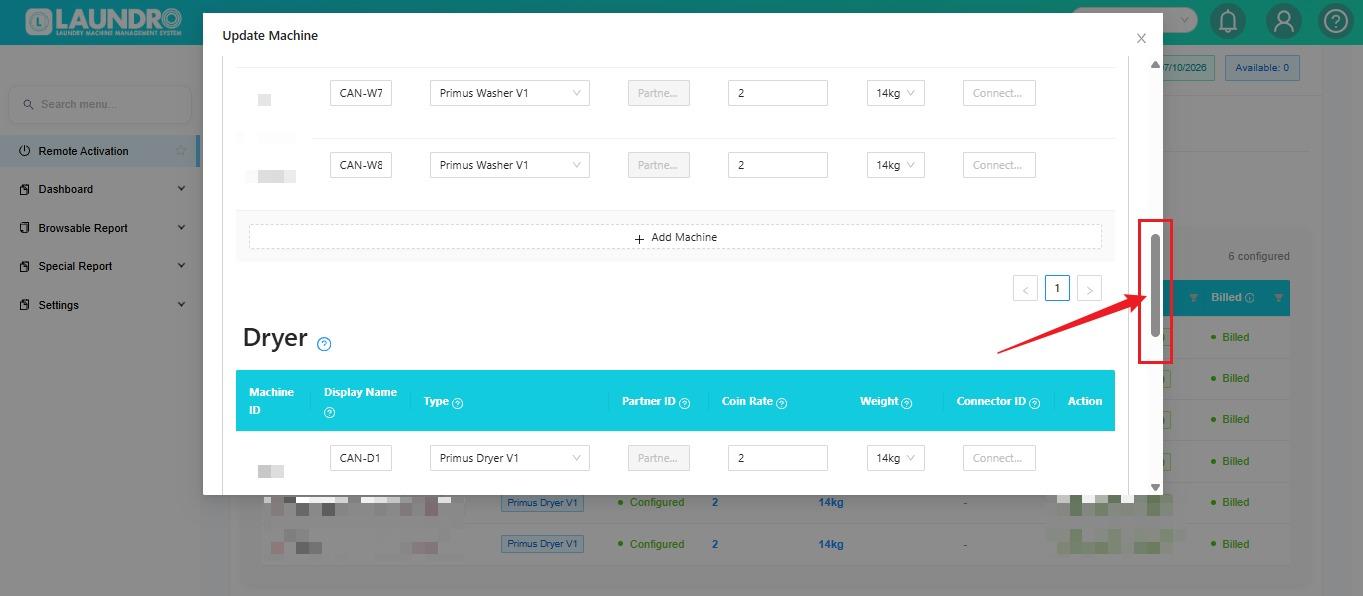
💾 Step 7 — Save Changes
Once you have finished editing:
- Review all updated fields.
- Check the machine name, type, coin rate, and weight.
- Click Save.
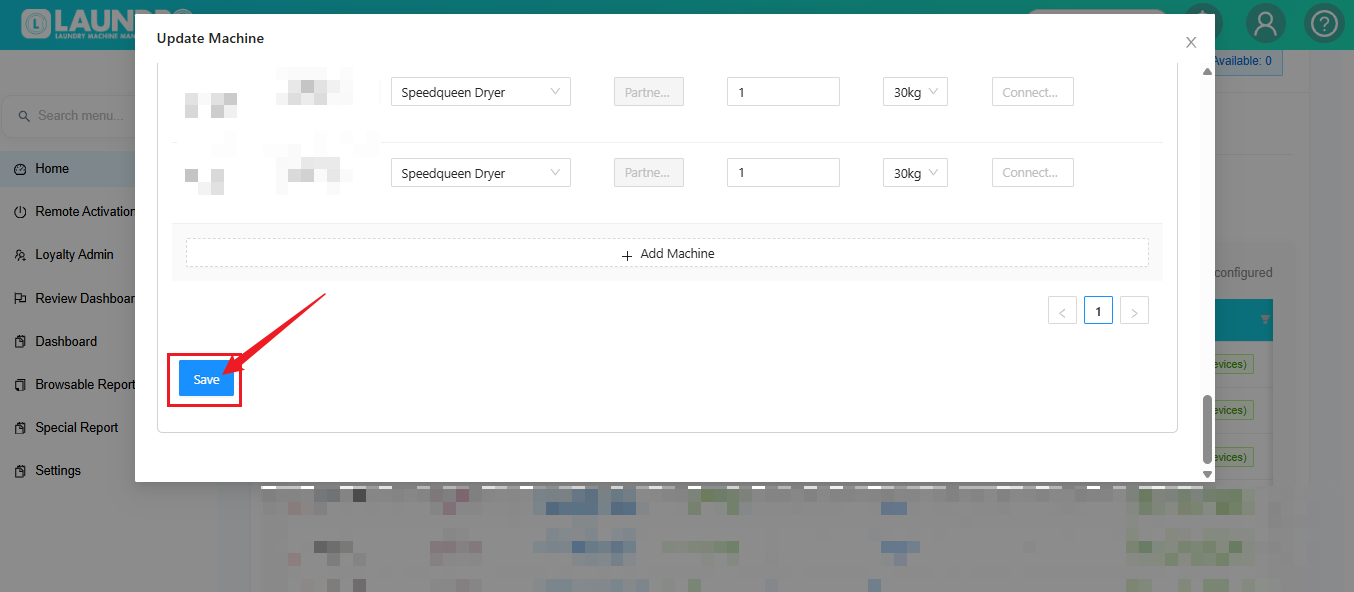
✅ Final Check: Confirm that the updated details are displayed correctly after saving.
🎉 You're All Set!
💰 How to Set Pricing
🎯 Purpose
This guide explains how to:
🆕 Create pricing for a new outlet.
🏪 Edit pricing for an existing outlet.
➕ Add additional Washer/Dryer configurations.
🎁 Configure promotions.
🧭 Quick Navigation
🔐 How to Access
🔐 Step 1 — Login to Laundro Portal
Log in using your Username and Password. https://v2.thelaundro.com/operator_login
📍 Step 2 — Go to Price Setting
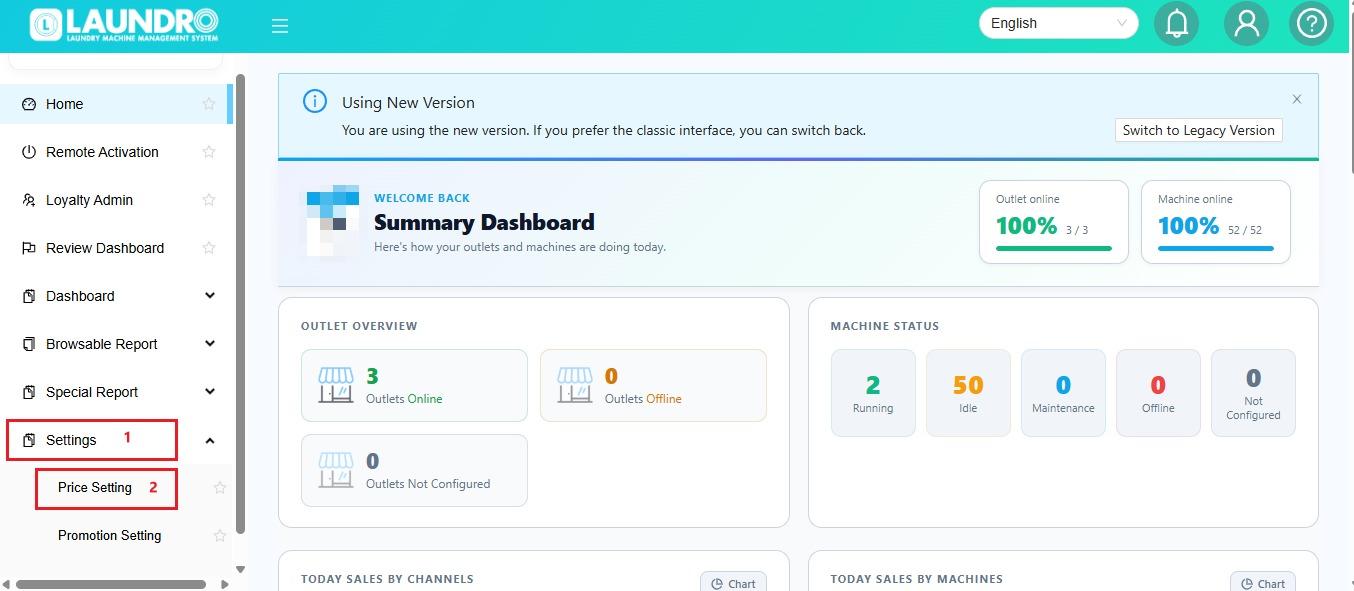
💰 Step 3 — Set Your Machine Pricing
- Select the Washer or Dryer and enter the required price.
- 🧺 Washer — Set the price according to the machine size / KG.
- 🔥 Dryer — Set the price according to the machine size / KG.
Click Add Pricing for New Outlet.
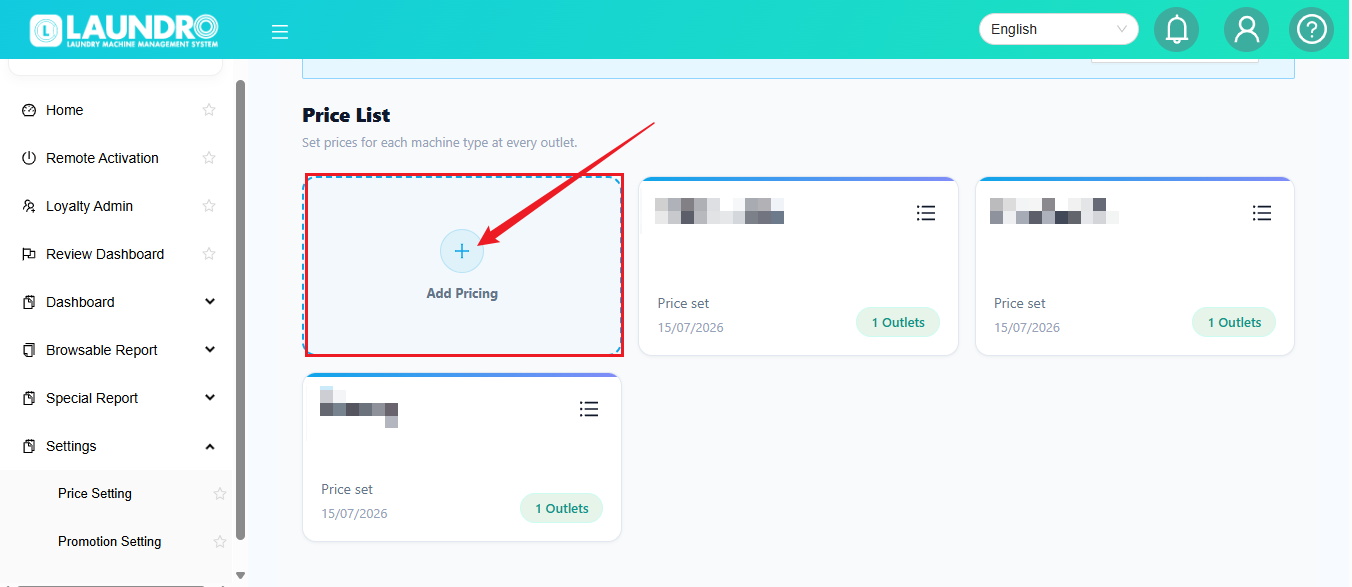
✏️ Step 4 — Fill in the Details
Complete the required information:
1️⃣ Outlet Name
Enter the outlet name.
2️⃣ Description
Add a description if needed.
3️⃣ Machine Type
Choose Washer or Dryer.
4️⃣ Washer Mode
If the Washer only has 1 Mode, enter 1 and fill in the required pricing.
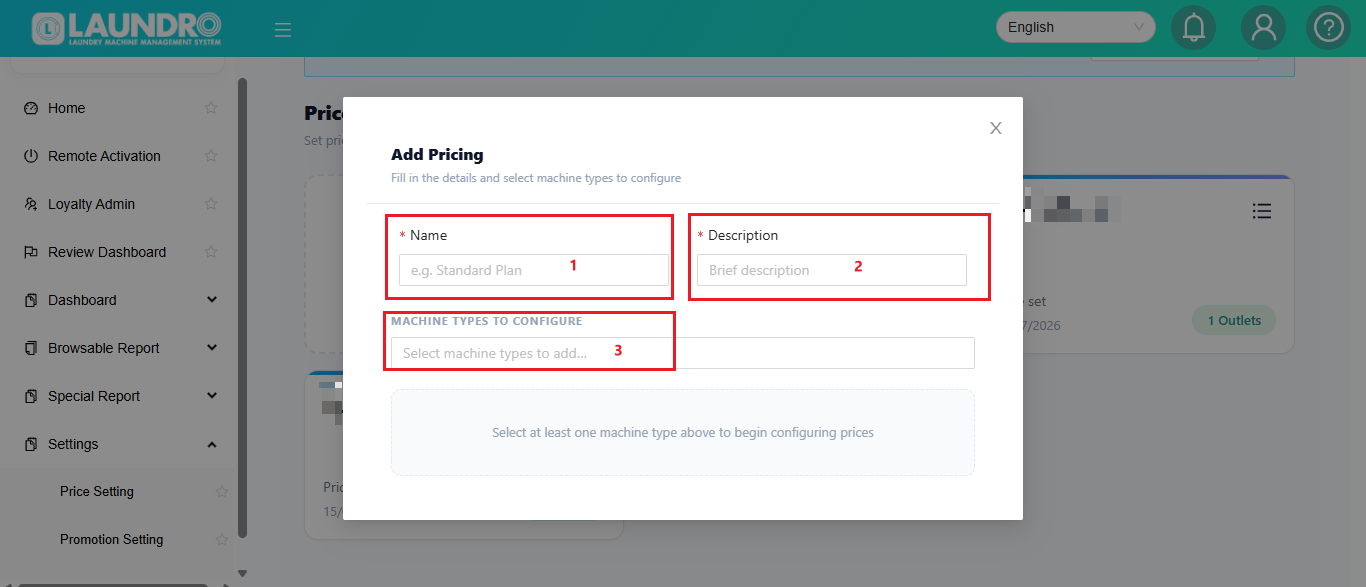
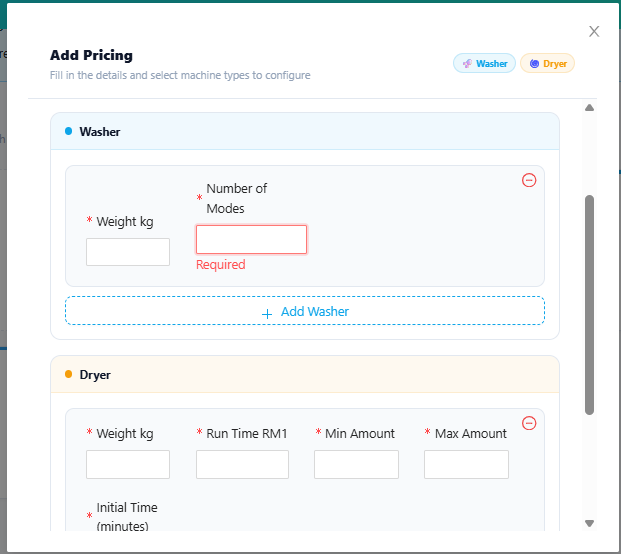
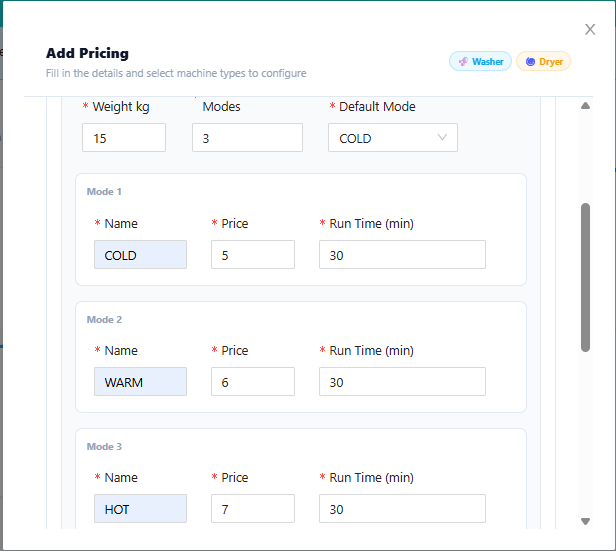
🆕 Add-on Machine with Different KG
Have you added a new machine with a different weight / KG?
No problem! 👇
- Scroll down to find the Add-on Machine section.
- Select the required Dryer / Washer.
- Enter the desired price.
- 💾 Click Save Changes when finished.
💾 Save
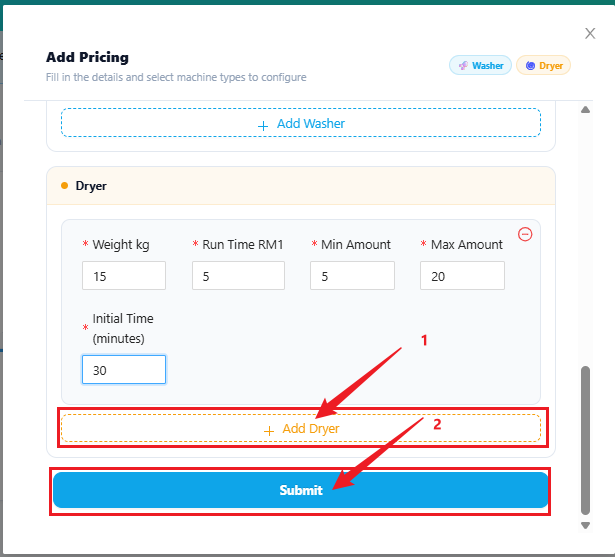
🆕 Existing Outlet
Already have an outlet and want to add a new machine with a different KG / weight?
Follow these steps 👇
🏪 Step 1 — Select the Outlet
Click the Outlet Selector at the top and choose the outlet you want to edit.
Then click ✏️ Edit.
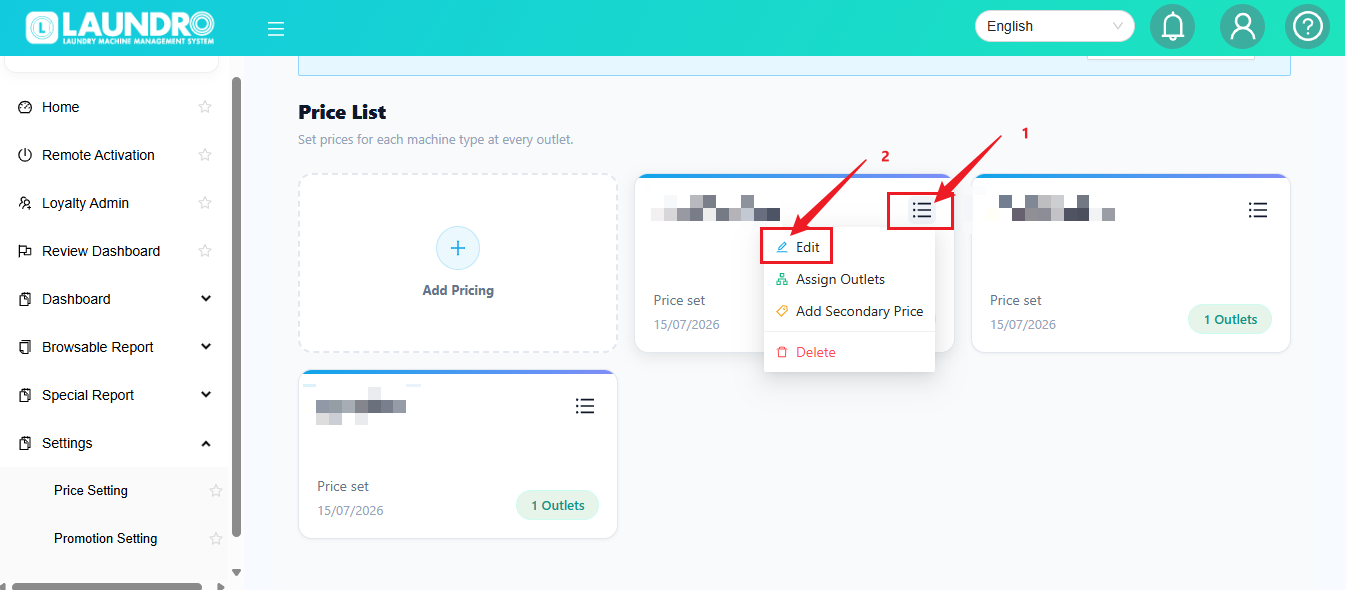
➕ Step 2 — Add the Machine
Scroll down to the Add-on Machine section.
Select the required Washer / Dryer and configure the pricing.
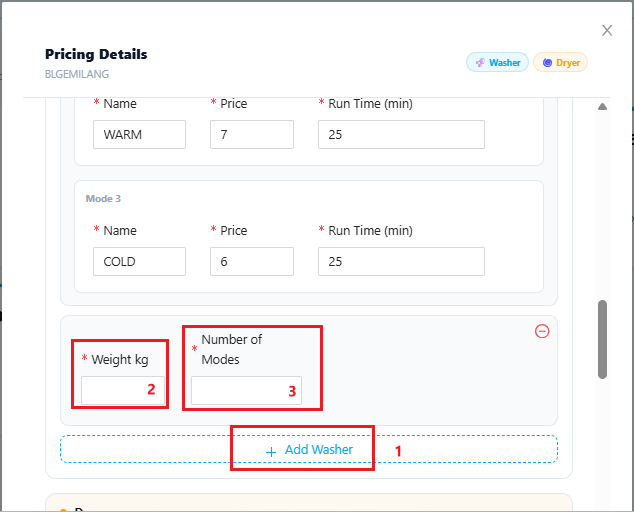
💾 Step 3 — Save Changes
Finished adding the machine?
Click Save Changes.
💡 Quick Tip: Before saving, double-check the machine type, KG, and price.
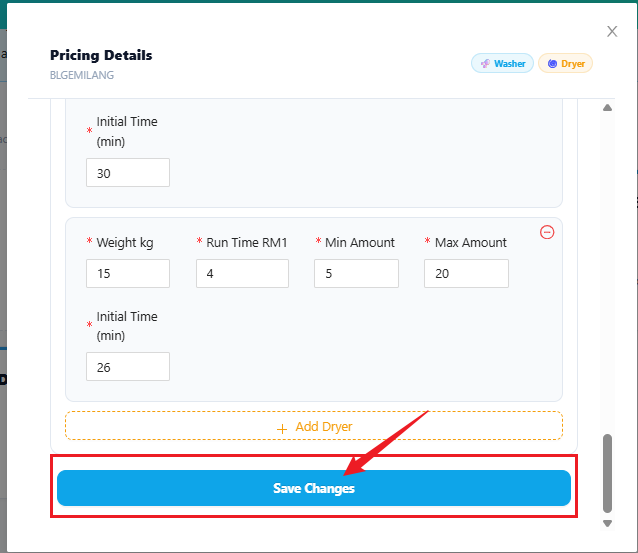
🎁 Promotion Setting
Want to create a special price or promotion?
Click:
➕ Add Promotion
Then:
1️⃣ Fill in the promotion details.
2️⃣ Check the information.
3️⃣ Click Submit.
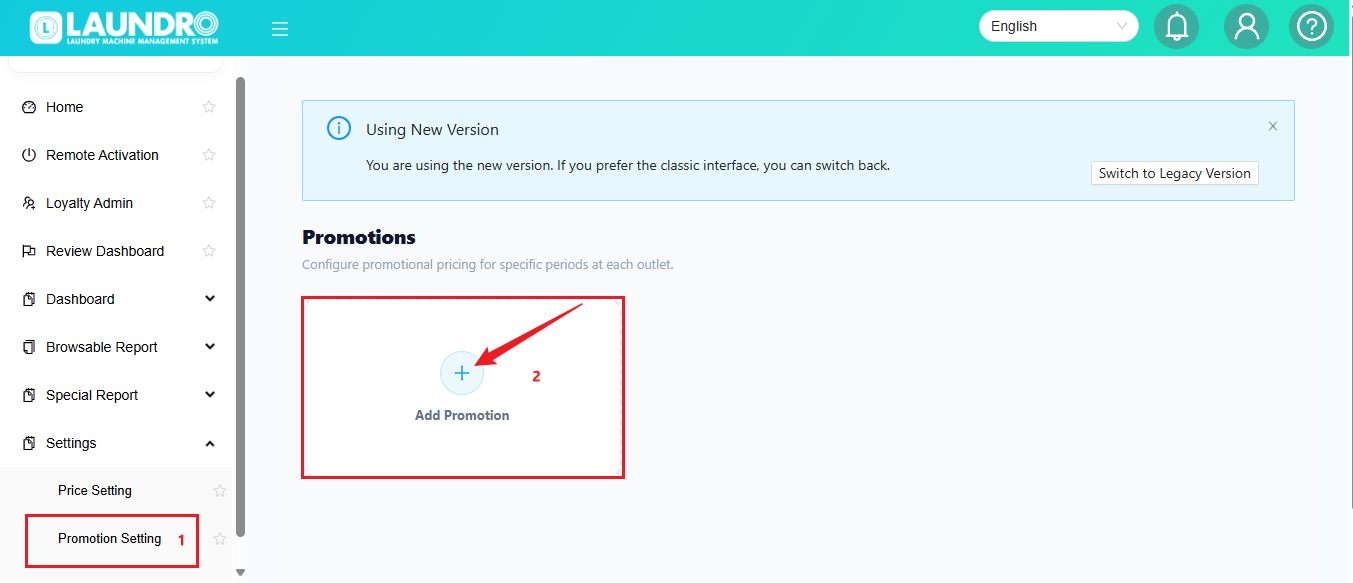
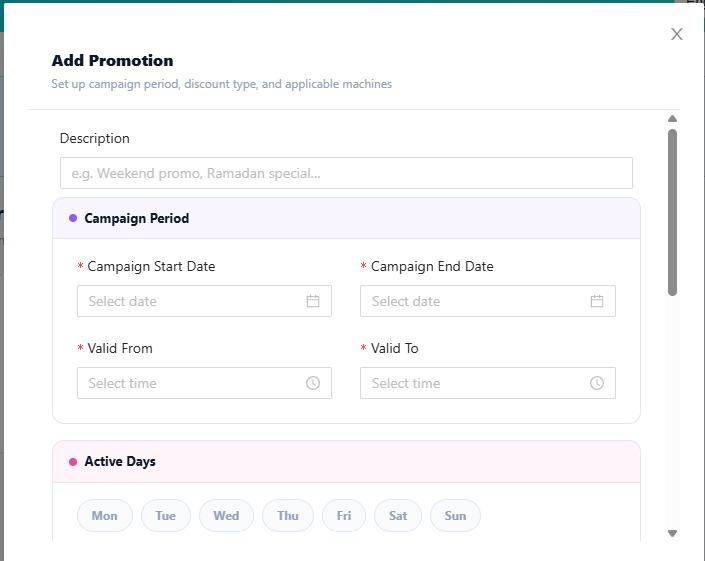
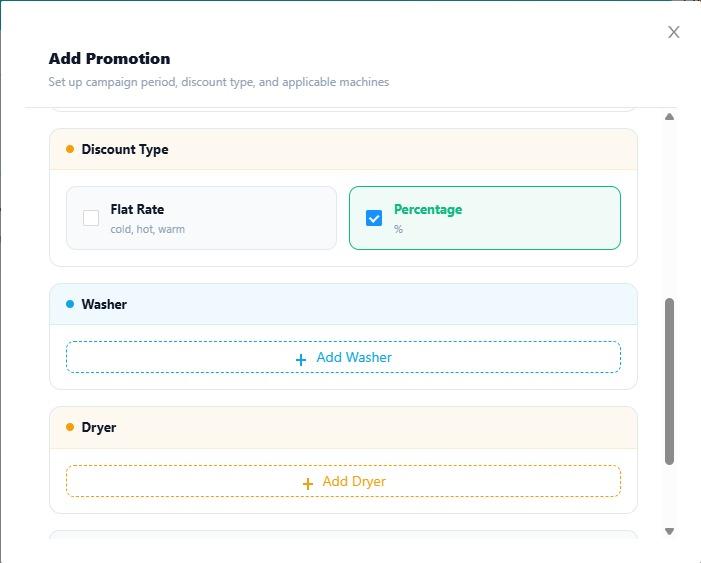
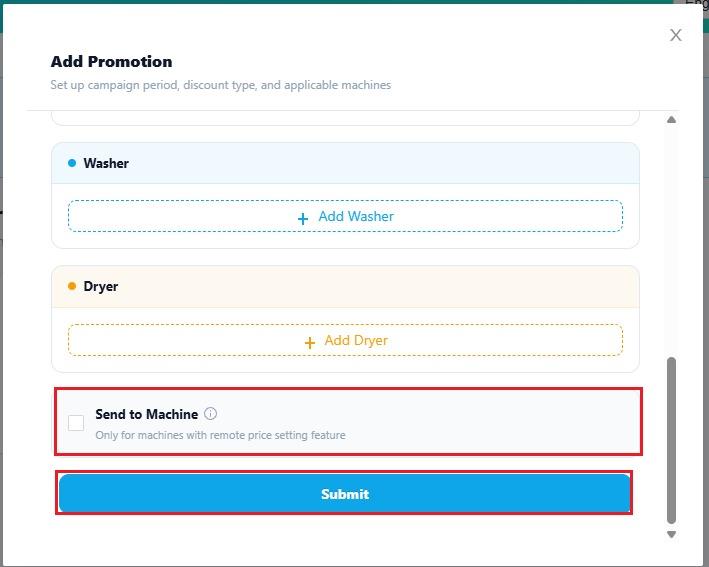
💡 Note: Make sure the promotion settings match the pricing you want to offer to customers.
🎉 You're Done!
Your pricing setup is complete! ✅
💡 Before you leave:
✔️ Check Outlet
✔️ Check Machine Type
✔️ Check KG
✔️ Check Price
✔️ Click Save
⚡ How to Do Remote Activation
Welcome to the Laundro Portal Guide! 👋
Need to start a Washer or Dryer remotely? Follow this guide to activate the correct machine, manage maintenance status, and control machine service.
🧭 Quick Navigation
- ⚡ Remote Activation
- 🛠️ Put a Machine Under Maintenance
- 🔄 Remove a Machine from Maintenance
- 🔌 Enable or Disable Service
- 🔍 Troubleshooting
⚡ Part 1: Remote Activation
Purpose: Remotely activate a selected Washer or Dryer through the Laundro Portal.
🔐 Step 1: Log In to Laundro Portal
Open the Laundro Portal and enter your operator username and password.
🔗 Portal Login: https://v2.thelaundro.com/operator_login
⚙️ Step 2 — Open Remote Activation
After logging in:
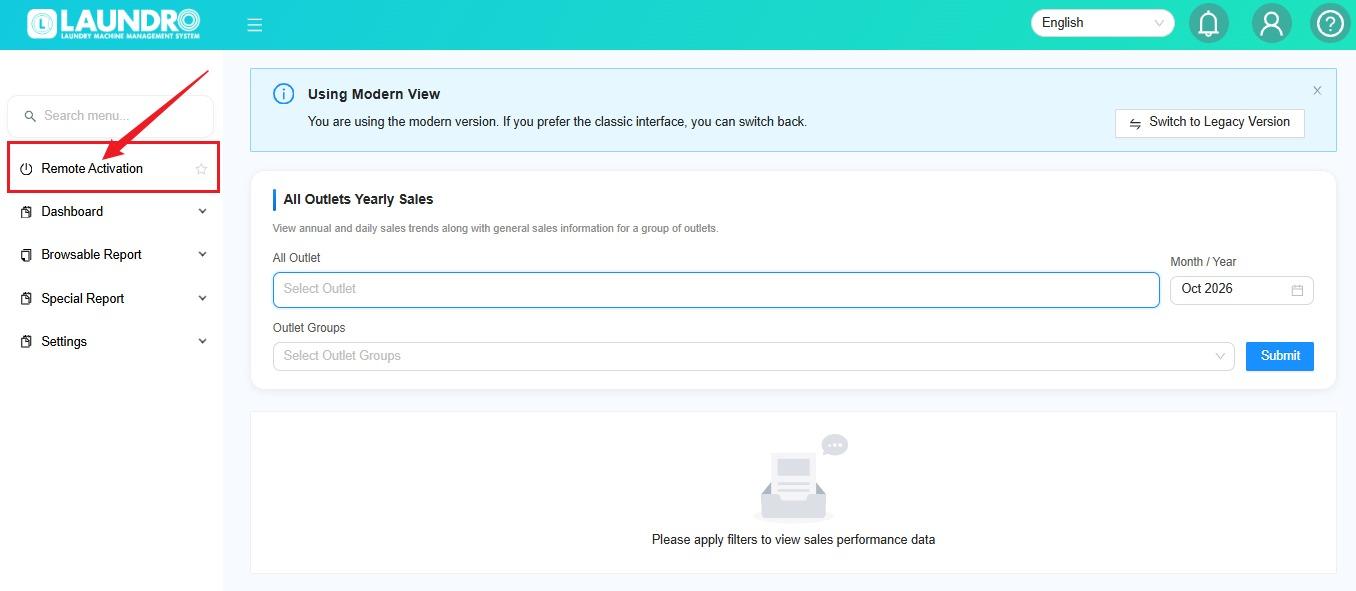
💡 Tip: Make sure you have the correct account permissions to access this feature.
🏪 Step 3 — Select an Outlet
On the Remote Activation page:
- Click the Outlet dropdown.
- Select the outlet where the machine is located.
💡 Quick Tip: Always double-check the outlet before selecting a machine.
🧺 Step 4 — Select a Machine Type
Choose the required machine type:
- 🧺 Washer — to find a washing machine.
- 🔥 Dryer — to find a drying machine.
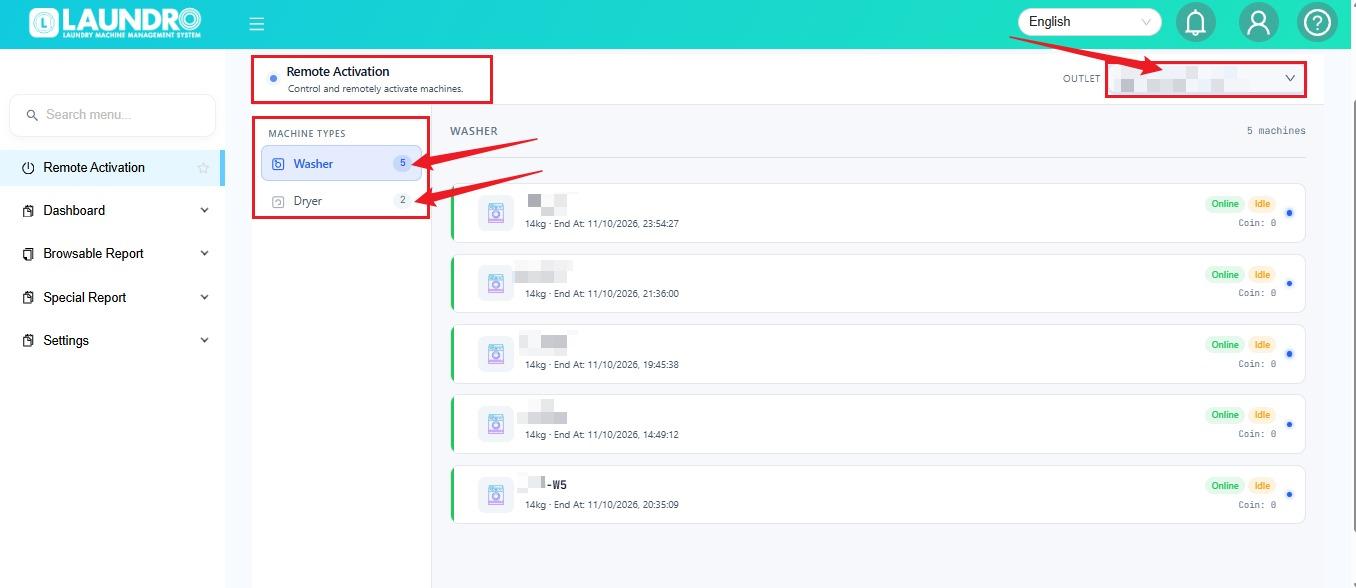
🔎 Step 5 — Select the Machine
- Select the correct machine number, such as W1 or D1.
- Enter the required Amount.
- Add a Remark explaining the reason for activation.
- Double-check all details before proceeding.
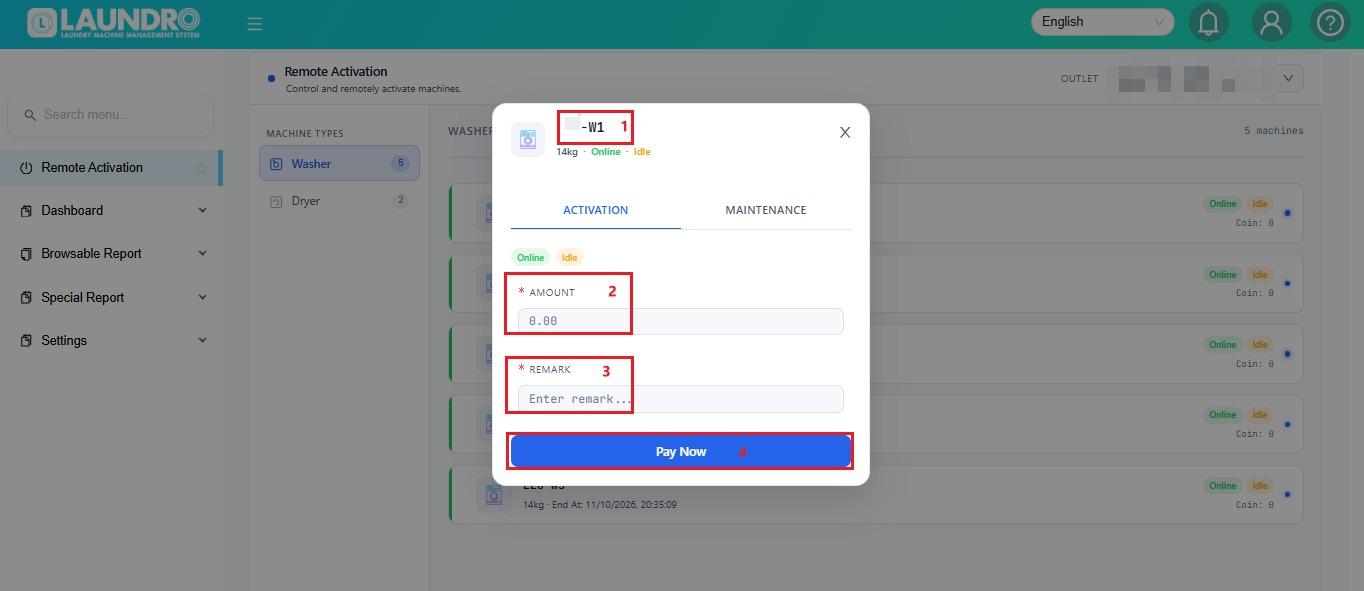
⚠️ Important: Confirm the machine number before proceeding to avoid activating the wrong machine.
✅ Step 6 — Complete Remote Activation
- Click Pay Now.
- Follow the confirmation instructions displayed in the portal.
- Check the activation result and confirm whether the machine starts successfully.
⚠️ Important: Verify the actual machine status before considering the process complete. If activation fails, record the outlet, machine number and error message, then contact Laundro Support.
Activation Result
If the activation is successful:
Success – The machine will start.
If the activation fails, the machine will not start.
Possible reasons include:
- The machine/device is offline.
- The device cannot receive the activation request.
- There is a communication or device error.
🛠️ Part 2: Put a Machine Under Maintenance
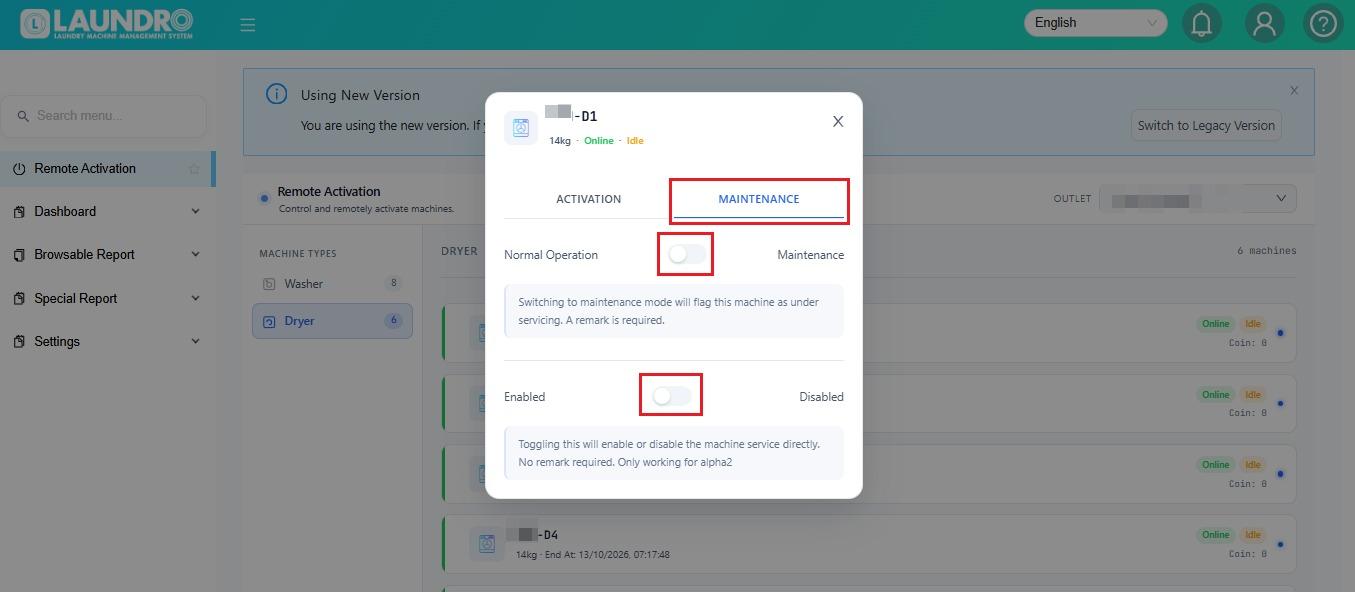
Use Maintenance Mode when a machine needs to be temporarily marked as unavailable for normal operation.
- Open the Maintenance tab.
- Switch Maintenance Mode ON.
- Enter a remark explaining the reason.
Example: Machine is being repaired.
- Confirm that the machine status shows Under Maintenance.
🔄 Part 3: Remove a Machine from Maintenance
After the maintenance work is completed:
- Open the Maintenance tab.
- Switch Maintenance Mode OFF.
- Enter a remark explaining why the machine is being returned to service.
- Confirm the change.
- Check that the machine is no longer marked as Under Maintenance.
🔌 Part 4: Enable or Disable Service
Use this function to control the machine's service status.
- ✅ Enable Service: Turn the machine service on.
- ⛔ Disable Service: Turn the machine service off.
💡 Note: This feature is available only for machines running Alpha2 firmware. A remark is not required for these service actions.
📋 Quick Reference
Action | What it does | Remark Required? |
|---|---|---|
Start | Remotely starts the machine | Yes |
Maintenance Mode ON | Marks the machine as Under Maintenance | Yes |
Maintenance Mode OFF | Removes the machine from maintenance | Yes |
Enable Service | Enables machine service | No |
Disable Service | Disables machine service | No |
🔍 Part 5: Troubleshooting
Issue: The machine does not start after remote activation.
Check the following:
- Is the machine/device online?
- Did you select the correct outlet?
- Did you select the correct machine?
- Can the device receive remote commands?
If the issue persists, contact Laundro Support with the outlet name, machine number and error details.
Issue: The Service option is not working.
Check whether the machine is running Alpha2 firmware.
🎉 You're all set! Always verify the machine status after making changes in the Laundro Portal.
Billing Page
The Billing page lets you view and pay invoices, top up notification credits, and manage payment reminders, all in one place.
Access
The Billing page has a strict permission setting and is only visible to users who have it enabled on their account. If you don't see it and believe you should have access, contact the Laundro team.
To open it, click your profile icon and select Billing from the dropdown menu. The page has five tabs: Invoice History, Payment, Notification Package, Payment History, and Reminder.
1. Invoice History
The Invoice History tab shows all invoices issued from the start of 2026, including each invoice's status and date issued.
- Use the Search bar to look up an invoice by invoice number, reference, or date.
- Use Filter by Status and Filter by Date (Date Issued or Due Date, with a start and end date) to narrow the list.
- Click Download next to any invoice to save a copy.

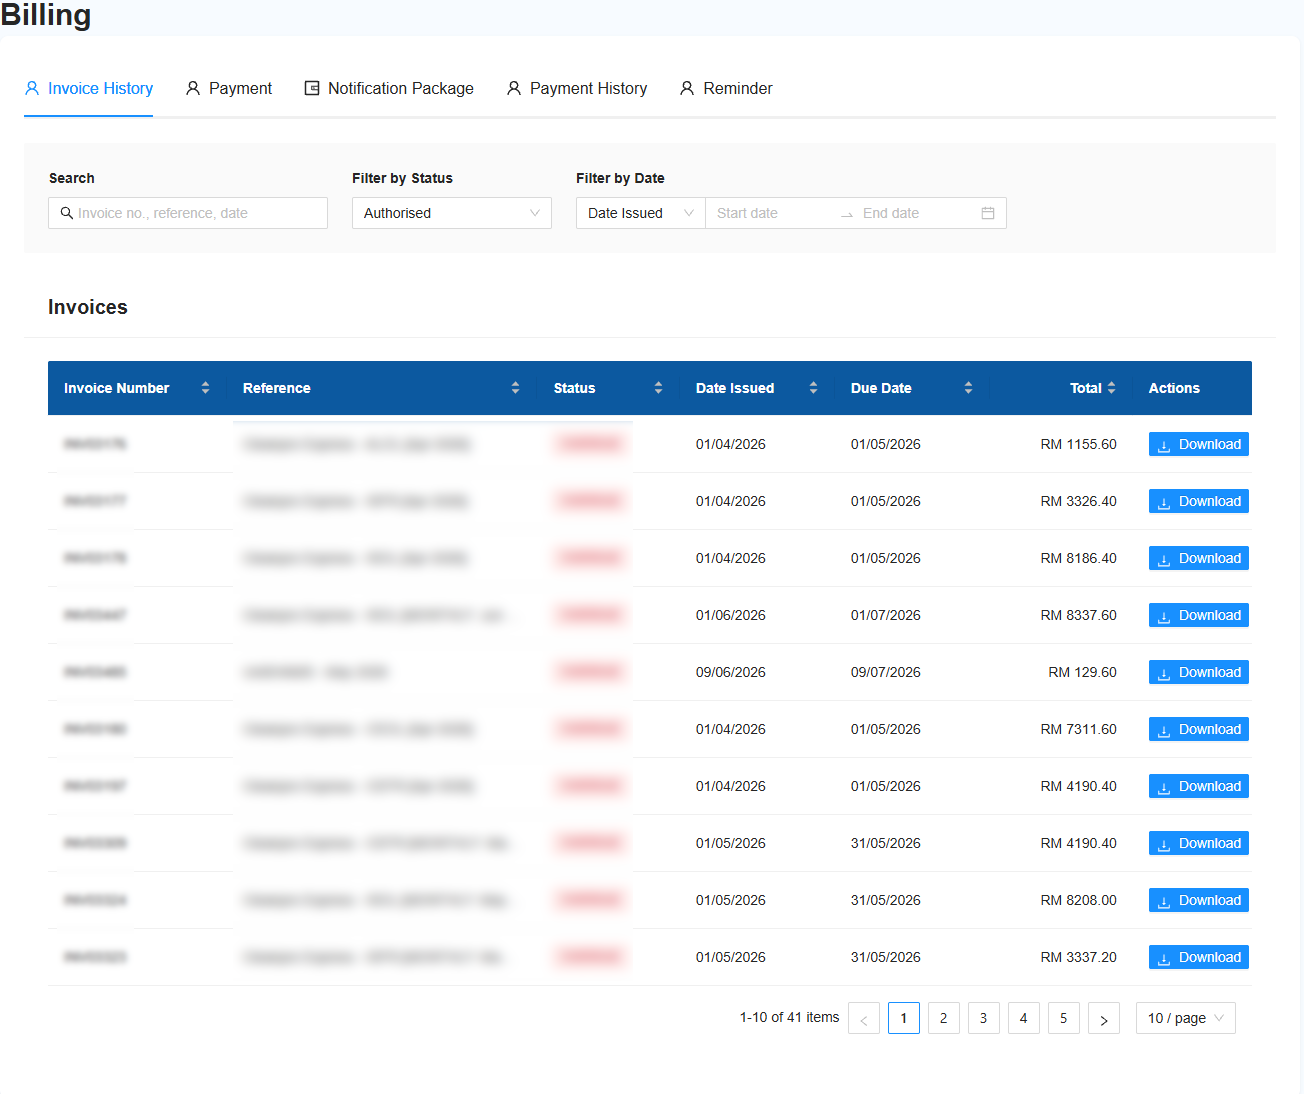
2. Payment
The Payment tab is where you select invoices to pay and go through the payment portal.
- Browse or search your authorised invoices, and use the filters (Date Issued, Due Date, Overdue) to find the ones you want.
- Click Add to cart on each invoice you want to pay. You can add multiple invoices to the same cart.
- Review the cart and total amount, choose a payment method, and click Pay Now to complete payment.

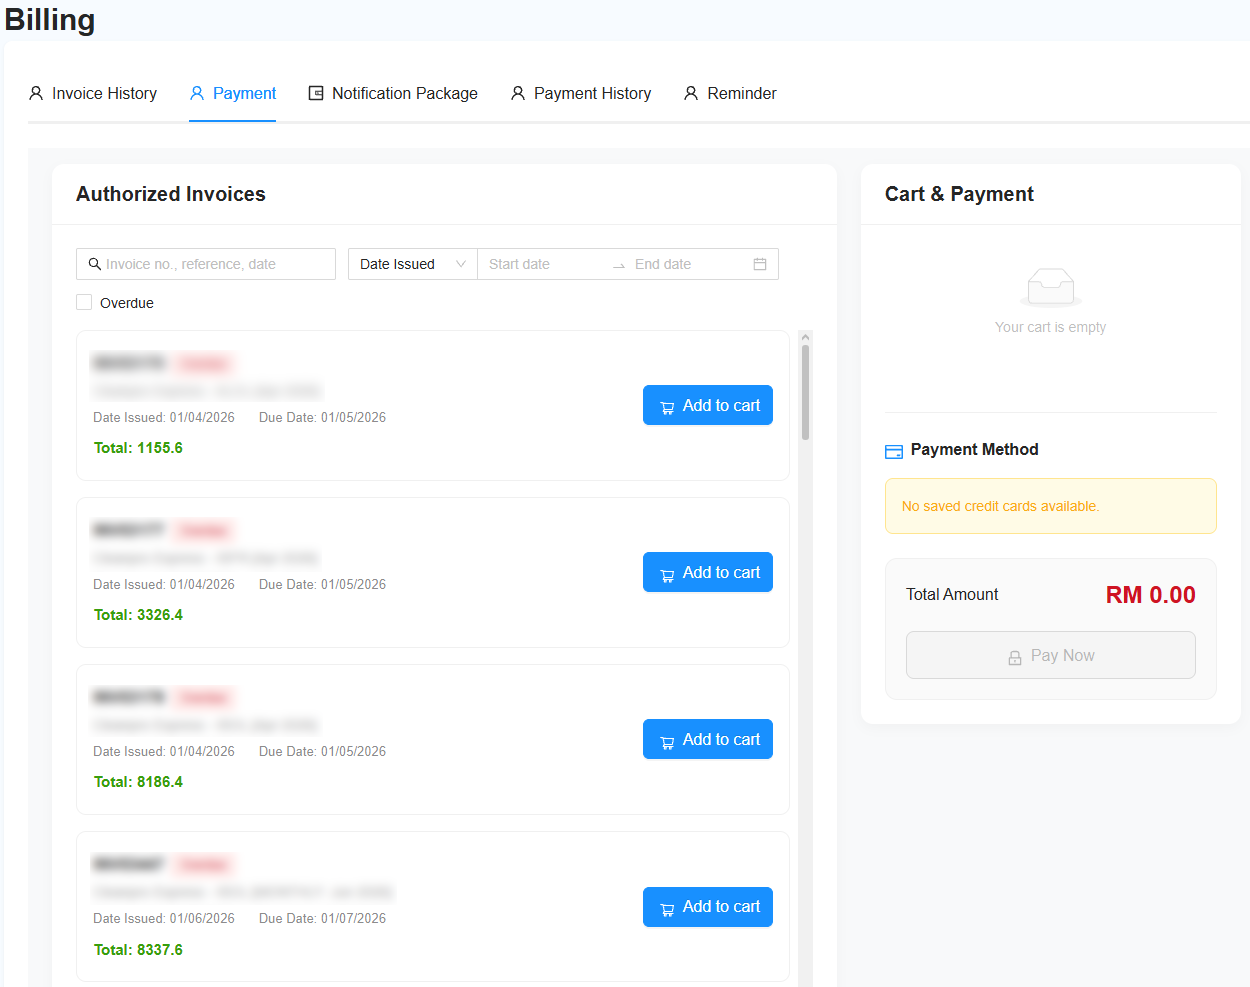
Payment limit: a single payment transaction is capped at RM2,000. If an invoice's total exceeds this limit, don't try to pay it through this tab — follow the payment details printed on the invoice instead.
3. Notification Package
The Notification Package tab is used to top up notification credits (Email, SMS, and WhatsApp) for a specific notification account.
- If you have more than one notification account (for example, as a distributor user), select the appropriate account at the top of the page.
- Choose the notification package(s) you want — SMS or Email — and enter the quantity for each package on the right.
- Select the contact the invoice should be issued to. This list is populated from the contacts already set up on your recurring invoices. If the contact you need isn't listed, contact the Laundro team.
- Click Pay Now / the payment button to go to the payment portal and complete the purchase.

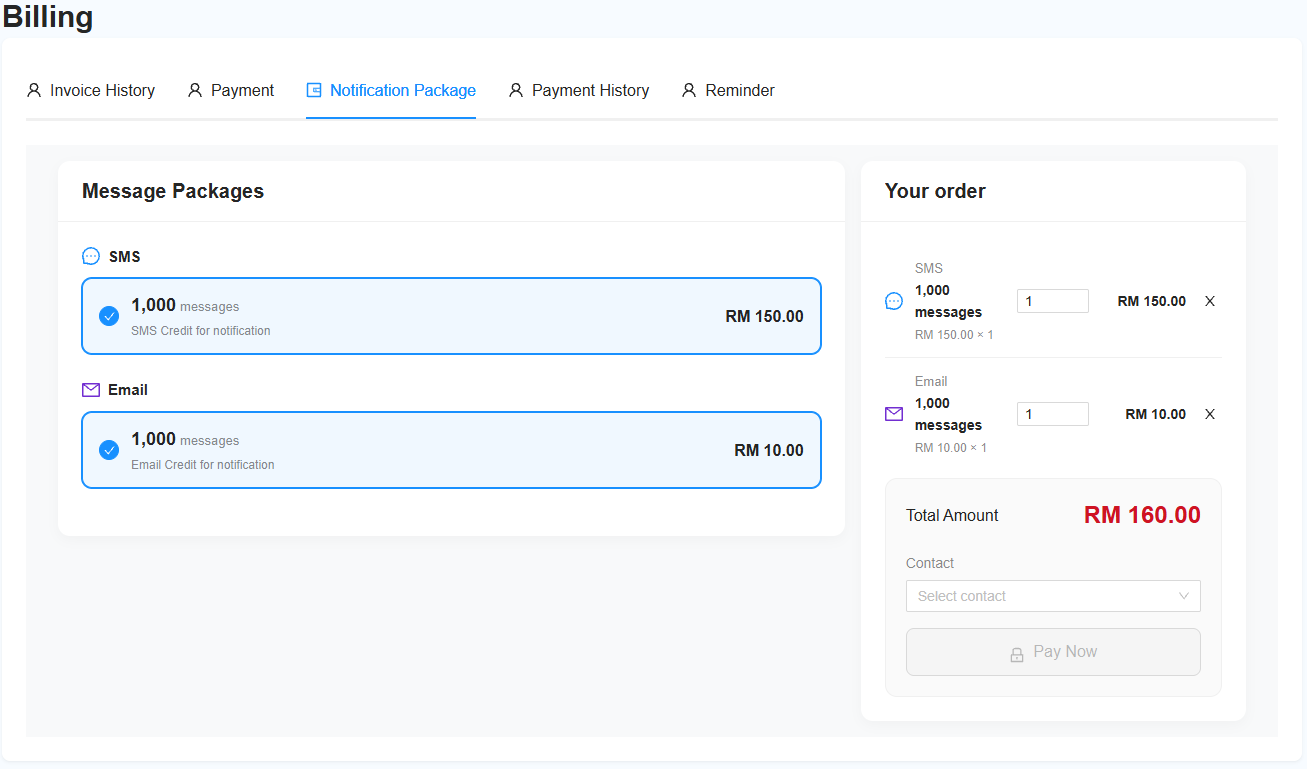
4. Payment History
The Payment History tab shows all payments made through the Billing page, along with the relevant transaction details (order ID, date and time, amount, payment method, status, and the invoice(s) covered).
Use the date range and filter controls at the top to narrow the results to a specific period.
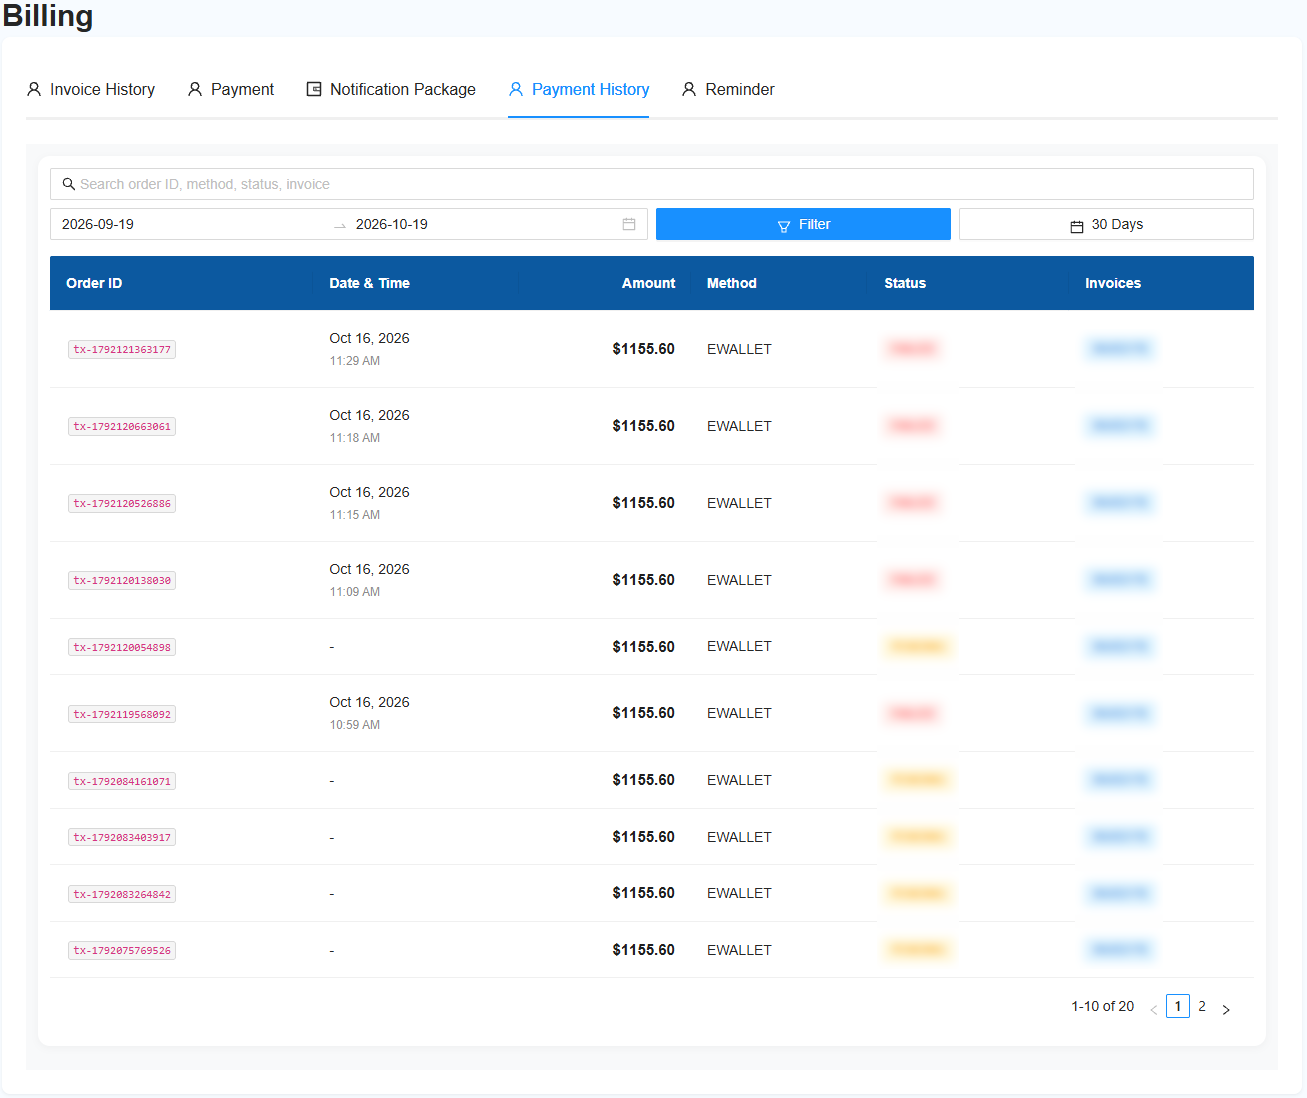
5. Reminder
The Reminder tab lets you set up automated email reminders for invoices that are about to expire or have expired.
- Enter the recipient's email address under Recipient Details.
- Under Schedule, choose when reminders should be sent: 7 days before expiry, on the day an invoice expires, and/or 7 days after it expires.
- Toggle reminders on and click Save Changes to apply your settings.

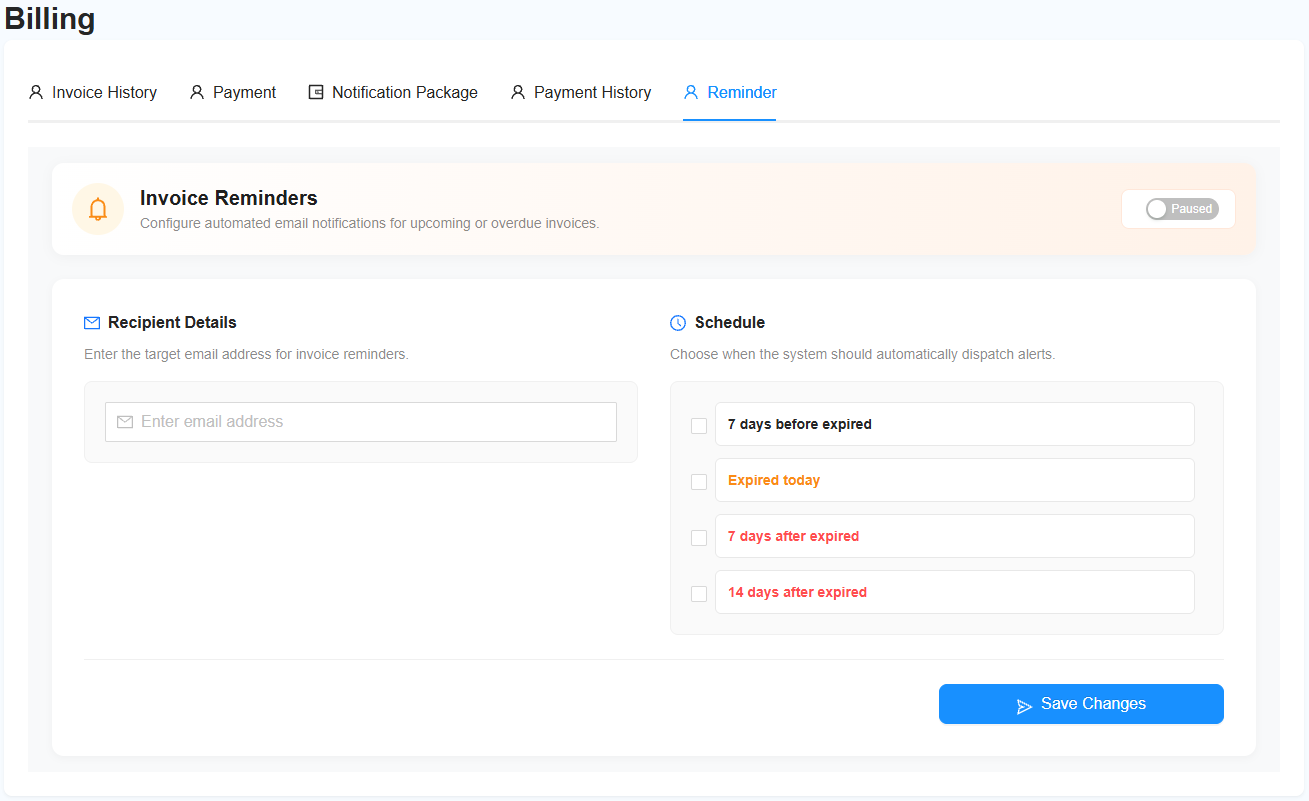
Unresolved Data
Unresolved Data lets you set a cutoff period for closing out a month's sales, so late-arriving transactions don't silently change figures you've already reported.
Why transactions can arrive late
- A device went offline, stored transactions locally, and uploaded them as backup data once it reconnected.
- A payment gateway had an issue and sent its transaction records late.
How it works
You configure a resolution window (in days). Any transaction that enters the system after that window has closed is parked in the Unresolved Data report instead of being posted directly into your records. It then needs to be manually resolved. This keeps the previous month's sales figures constant and unchanged by late data after the cutoff.
Enabling Unresolved Data
- Click your profile icon and select Settings from the dropdown menu.
- Go to the Security & System tab.
- In the Unresolved Data section, click Change.
- Toggle Enable Unresolved Data on.
- Set the Resolution Window (days), the number of days after a transaction's date before it's considered late and parked for review.
- Click Save Settings.

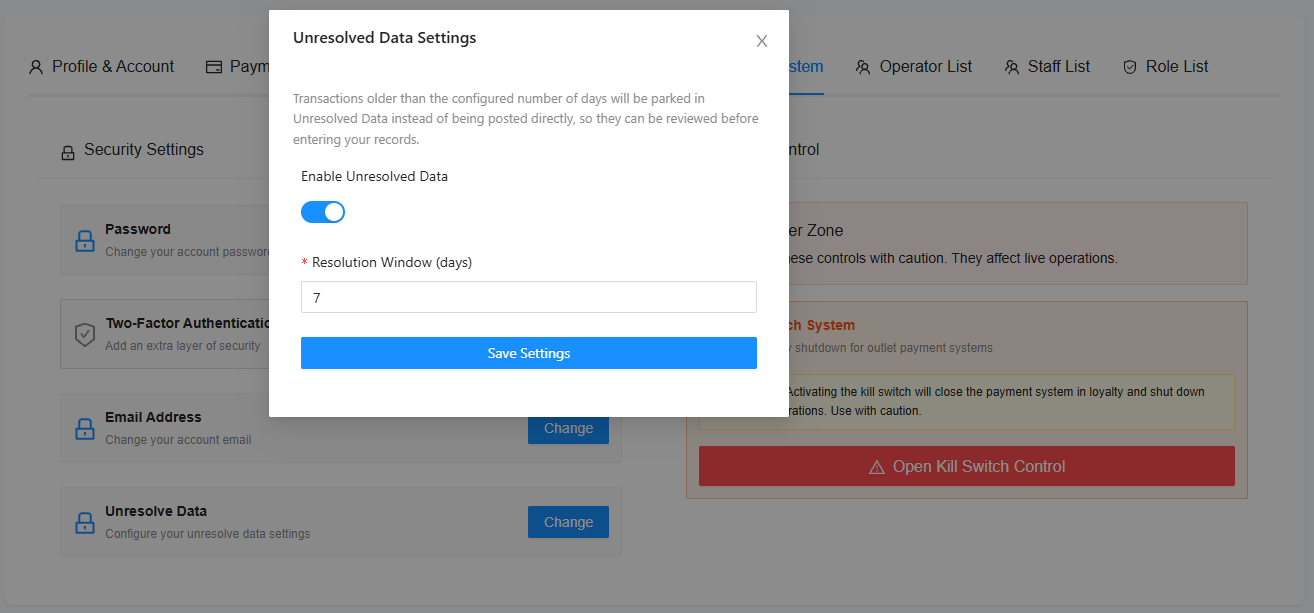
Using the Unresolved Data report
The Unresolved Data report is found under the Special Report category. It lists every late transaction together with its actual Transaction Date and its Received/Capture Date.
For each transaction, you can resolve it one of two ways:
- Resolve to Transaction Date — the transaction is posted into the sales report for its original transaction month. This will modify that previous month's sales data.
- Resolve to Capture Date — the transaction is posted into the sales report for the month it was captured in, and will appear in the sales report under the capture date instead.
Filtering and search
Use Source, Resolved Status, Date Range, Favorite Search (outlet groups), and Outlets to narrow the list, or use the search bar. You can also switch between Table and Card view, and toggle whether rows are matched by Transaction Date or Capture Date.
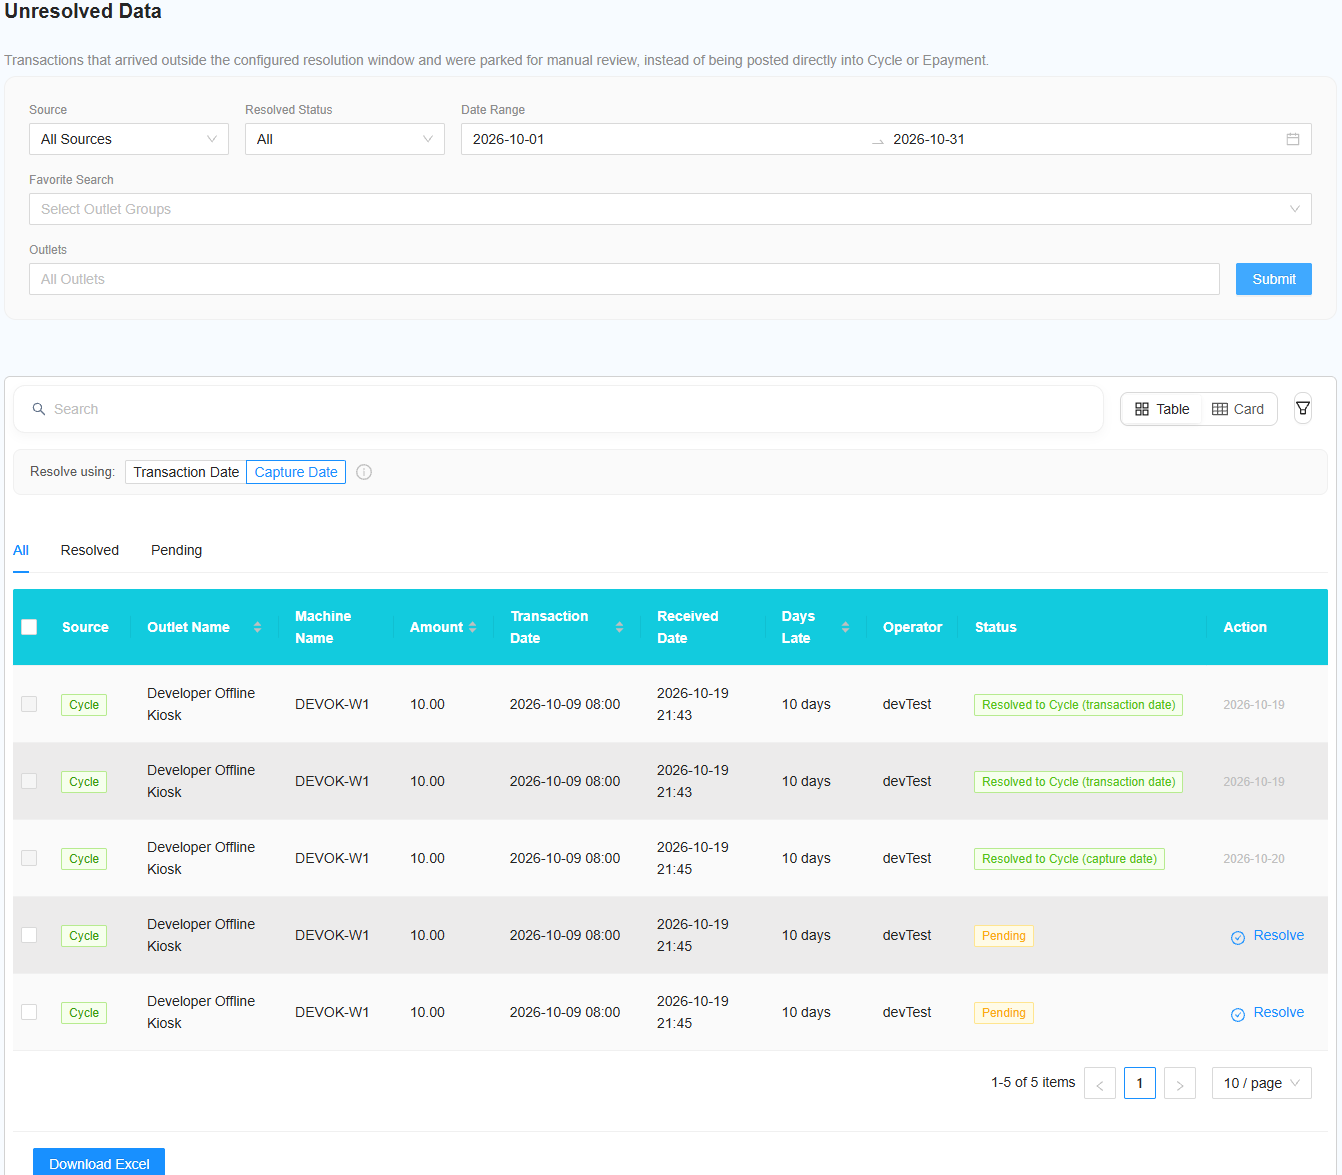
Notification Settings
Notification Settings moves Email and SMS credit management into the Laundro Settings page. Previously, email quantities were set manually in the backend, and SMS was set manually and viewed through the Loyalty admin portal. Now you can configure, monitor, and top up both directly as an operator, with no backend involvement.
What each channel is used for
- Email — notifications, system alerts, OTPs, and password resets.
- SMS — typically used by your customers for OTPs and cycle-done alerts.
- WhatsApp — not yet available; coming in a future update.
This same settings area will also support upcoming Email marketing and WhatsApp alerts, so you can monitor balances and top up credits for those from one place once they launch.
Where to find it
Click your profile icon, select Settings from the dropdown menu, then go to the Notification Settings tab.
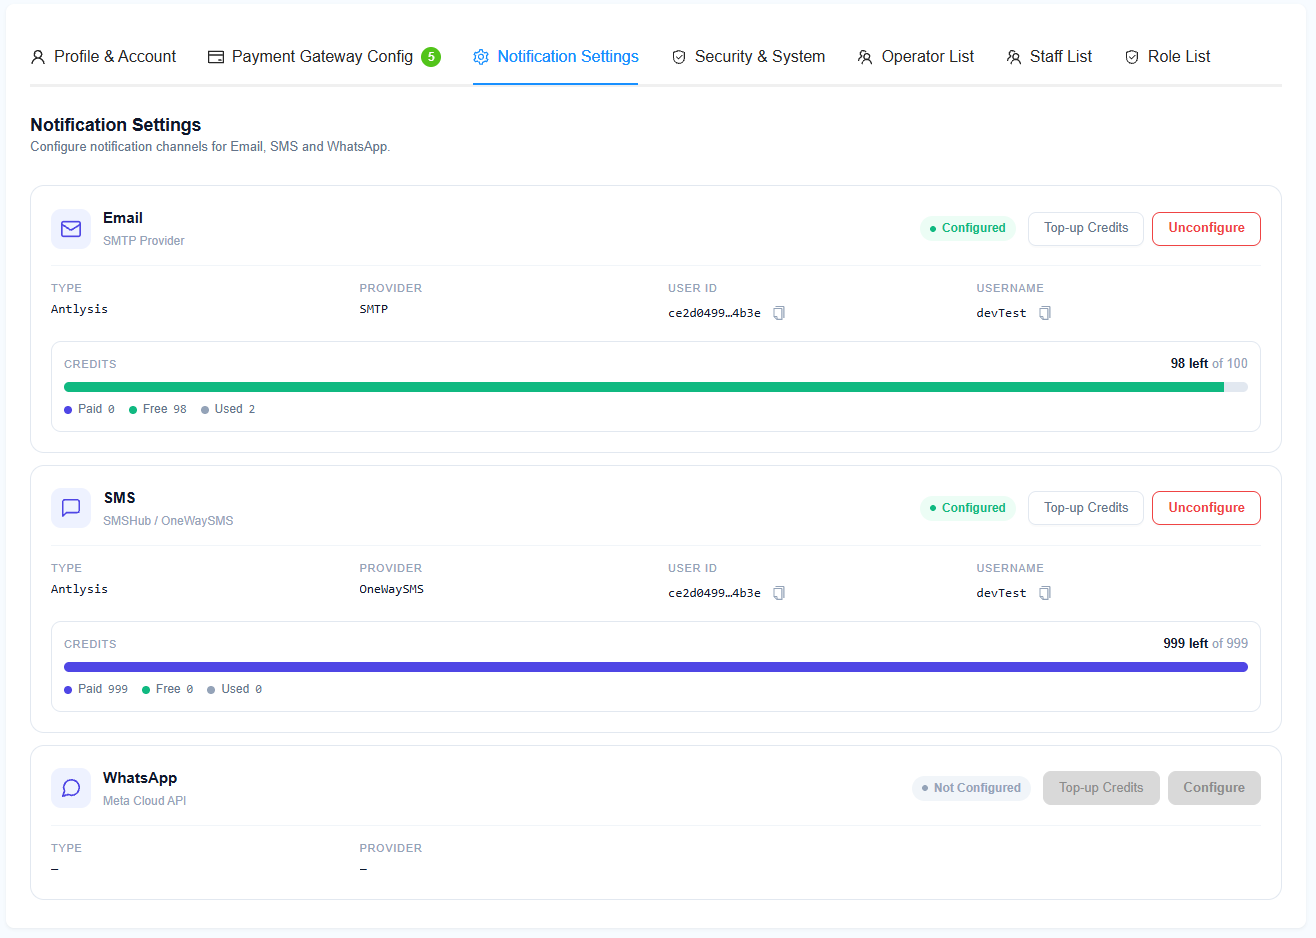
You can currently configure two platforms here: Email and SMS. WhatsApp is not available yet and will be added in a future update.
Configuring a platform
Click Configure on the Email or SMS card, then choose one of two options:
- Use existing notification account — key in a notification account user ID. This lets multiple operators share the same notification account and credit balance.

- Create new notification account — choose a credential type:
- Laundro — creates an account with default Laundro settings. You top up credits through Laundro as usual.
- Custom — key in your own credentials (SMTP provider for Email, SMSHub for SMS). You manage top-ups yourself outside Laundro.

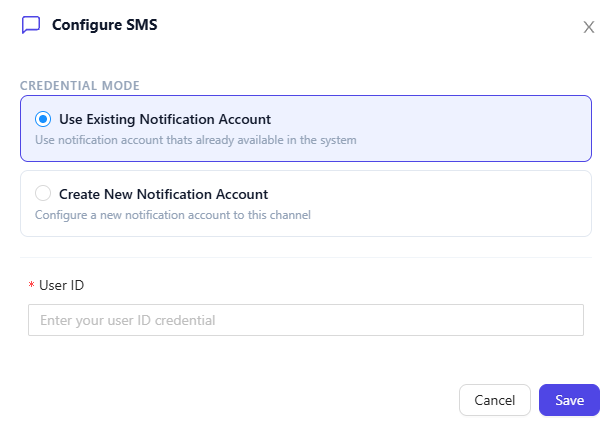
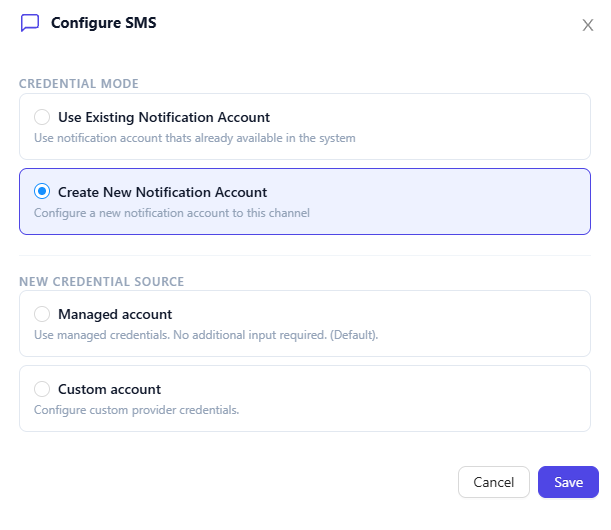
Once an account is created, the card shows its balance and configuration details (type, provider, user ID, and credits). If a Custom account was created, the balance isn't shown, since top-ups are handled outside Laundro.
Note: if no account is set up for a platform, no emails or SMS will be sent on that channel.
Topping up credits
Click Top-up Credits on the Email or SMS card. This takes you to the Notification Package tab on the Billing page, where you can purchase more credits.
This only applies to Laundro-managed accounts — if you configured a Custom account, top-ups are handled directly with your own provider.
🔔 How To Enable Daily Email Update
🎯 Purpose
Learn how to access Notification Settings and enable the notifications you want to receive.
🧭 Quick Navigation
- 🔐 Log in to Laundro Portal
- ⚙️ Open Settings
- 🔔 Open Notification Settings
- ✅ Enable Notification Options
- 🚪 Close and Finish
📍 How to Access
🔐 Step 1 — Log in to Laundro Portal
- Open the Laundro Portal Login.
- Enter your username and password.
- Click Login.
⚙️ Step 2 — Open Settings
- Click the Profile icon.
- Select Setting.
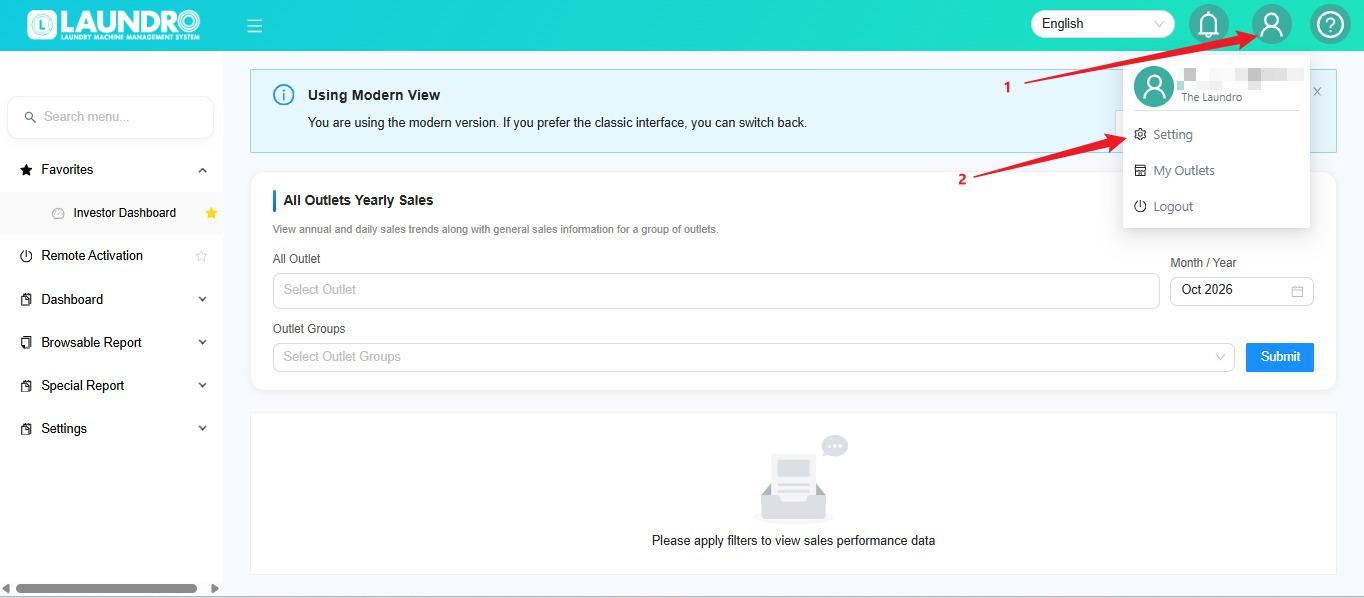
🔔 Step 3 — Open Notification Settings
Find the notification settings section where you can manage your notification preferences.
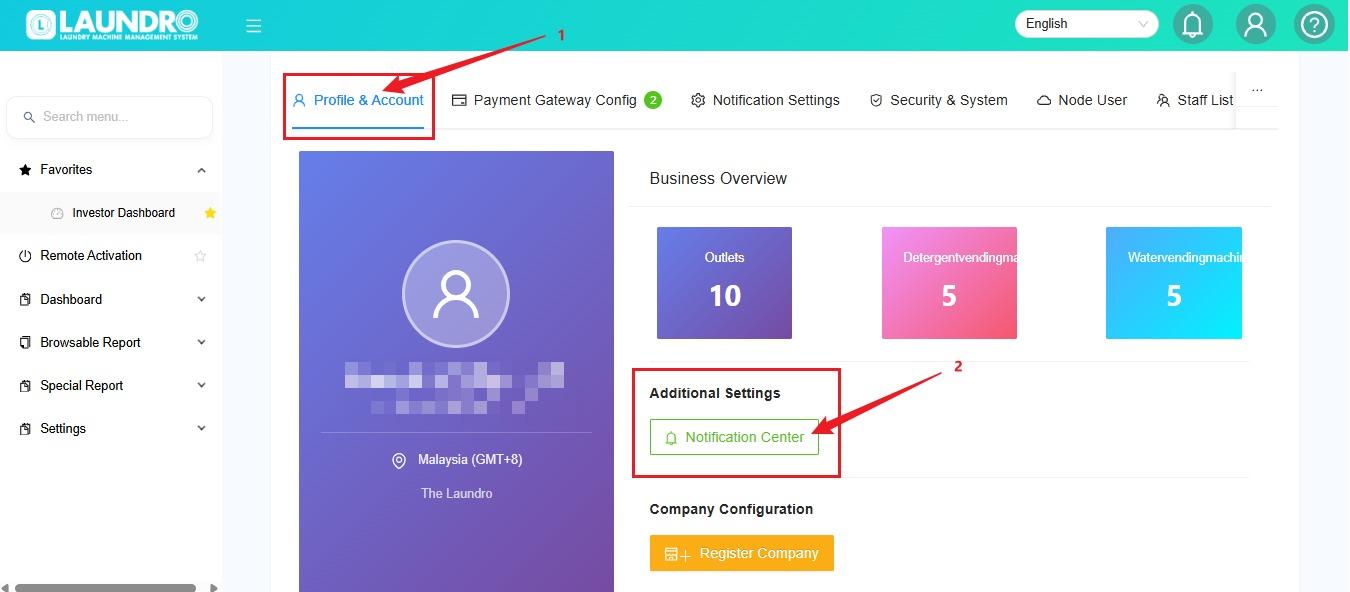
✅ Step 4 — Enable Your Notifications
- Review the available notification options.
- Tick the checkbox beside each notification you want to enable.
- Scroll up or down to view additional options.
- Double-check your selections before proceeding.
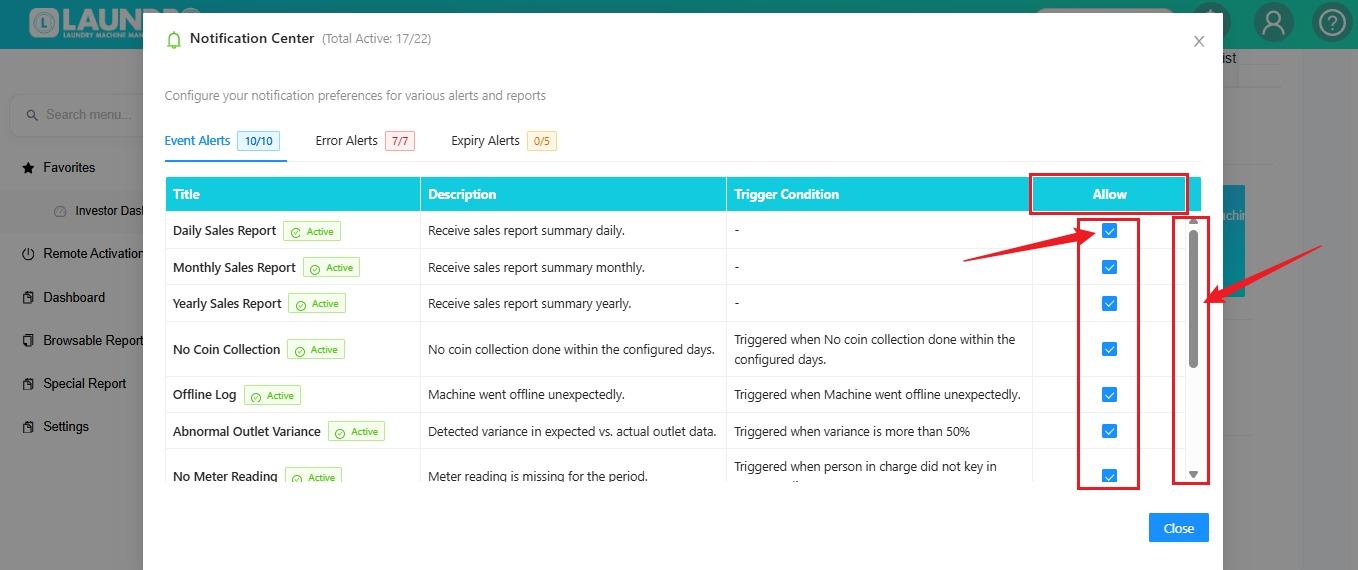
Helpful Tip : Review the available options carefully and enable only the notifications you need.
🚪 Step 5 — Close the Settings
Once you have finished selecting your notification preferences, click Close.
🎉 You're Done!
Your notification preferences have been selected. If the portal requires a separate save or confirmation action, complete it before leaving the page.
✏️ How to Edit Pricing
Want to update the existing Washer or Dryer prices? Follow this guide to edit your pricing through the Laundro Portal.
🎯 Purpose
This guide explains how to access Price Setting and update the pricing for your machines.
🧭 Quick Navigation
- 🔐 Log in to Laundro Portal
- ⚙️ Open Setting
- 💰 Select Price Setting
- ✏️ Edit the pricing
- 💾 Save and verify the changes
🔐 Step-by-Step Guide
🔐 Step 1 — Login to Laundro Portal
Log in using your Username and Password. https://v2.thelaundro.com/operator_login
⚙️ Step 2 — Open Price Setting
- Click Setting.
- Select Price Setting.
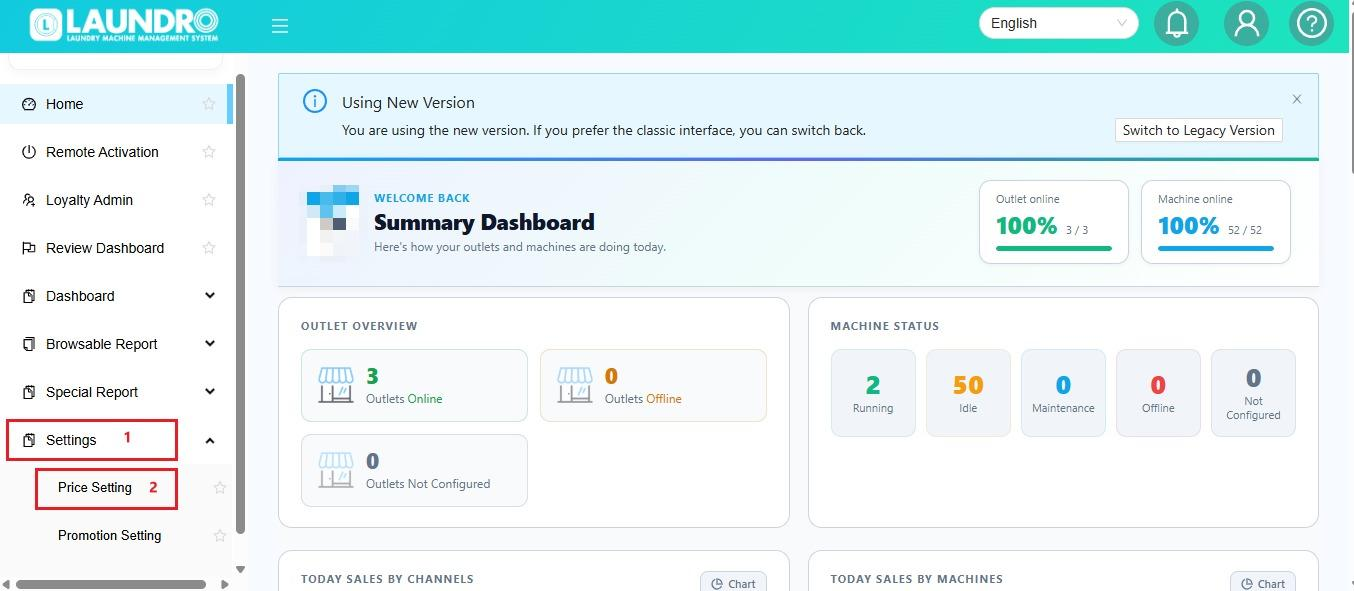
💰 Step 3 — Find the Existing Pricing
Locate the pricing or machine you want to update.
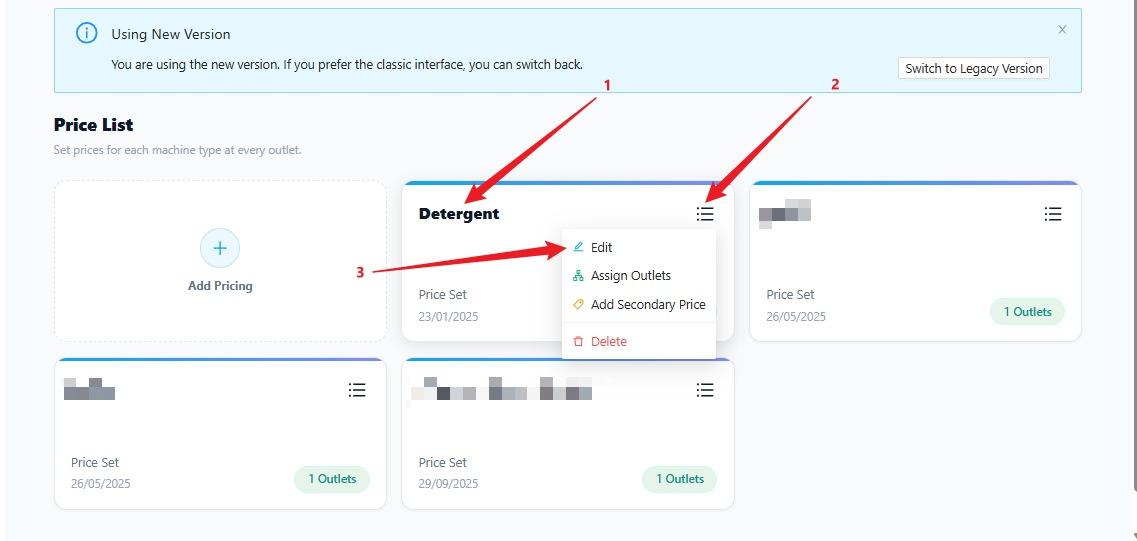
💡 Tip: Make sure you have selected the correct outlet, machine, or pricing category before making changes.
✏️ Step 4 — Find and edit the existing price
Washer :
- Select the relevant pricing entry.
- Edit the required price details.
- Double-check the amount before proceeding.
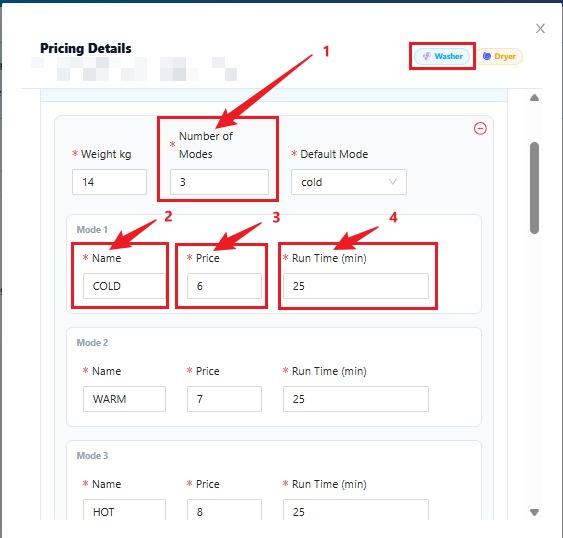
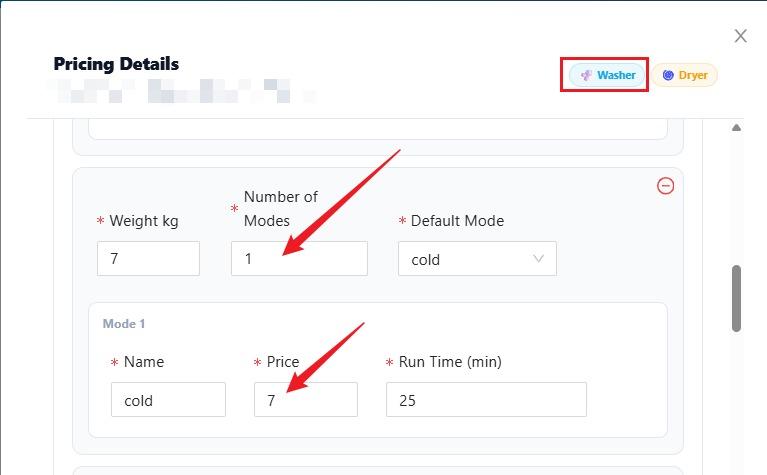
Dryer :
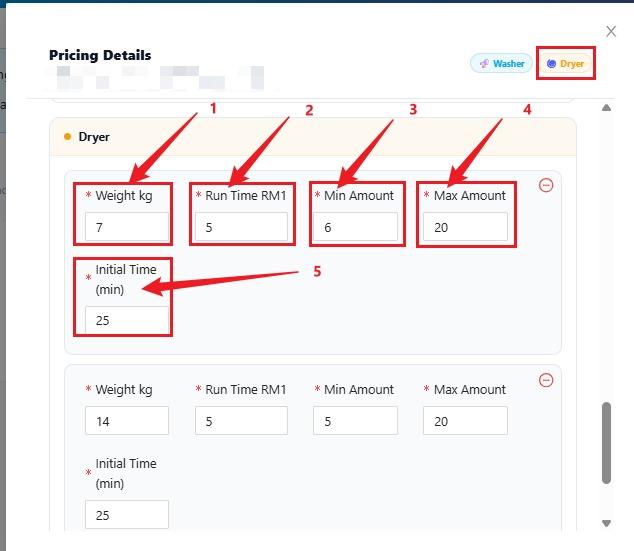
💾 Step 5 — Save and verify your changes
Click [Confirm the actual Save/Update button name] to save the changes.
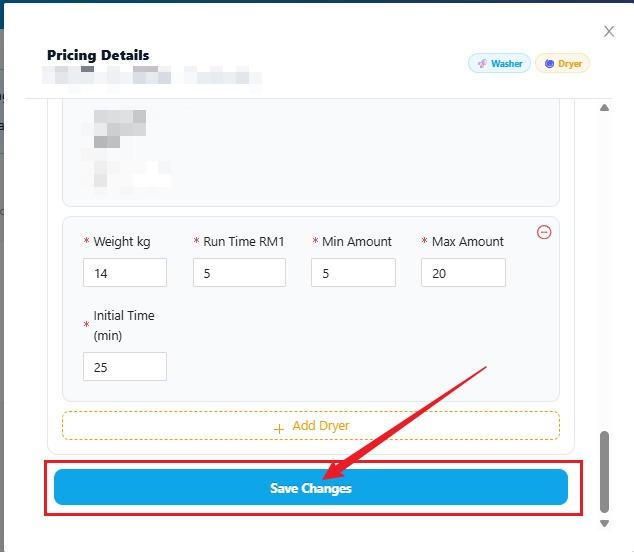
💡 Helpful Tips
- Double-check the machine and pricing before saving.
- Make sure the updated price is correct.
- Verify the changes after saving.
✅ Final Checklist
- Correct machine or pricing selected
- New price entered correctly
- Changes saved successfully
- Updated pricing verified
🎉 You're all set! Your pricing has been updated.
🧾 How to Get an Invoice
Need to retrieve or download your invoice from the Laundro Portal? Follow this simple step-by-step guide!
🎯 Purpose
This guide explains how to access the invoice section and retrieve your invoice through the Laundro Portal.
🧭 Quick Navigation
- 🔐 Log in to Laundro Portal
- 📂 Navigate to the invoice section
- 🔎 Find your invoice
- 📥 View or download your invoice
🔐 Step-by-Step Guide
🔐 Step 1 — Login to Laundro Portal
Log in using your Username and Password. https://v2.thelaundro.com/operator_login
📂 Step 2 - Navigate to the invoice section
After logging in, navigate to the relevant section where invoices are available.
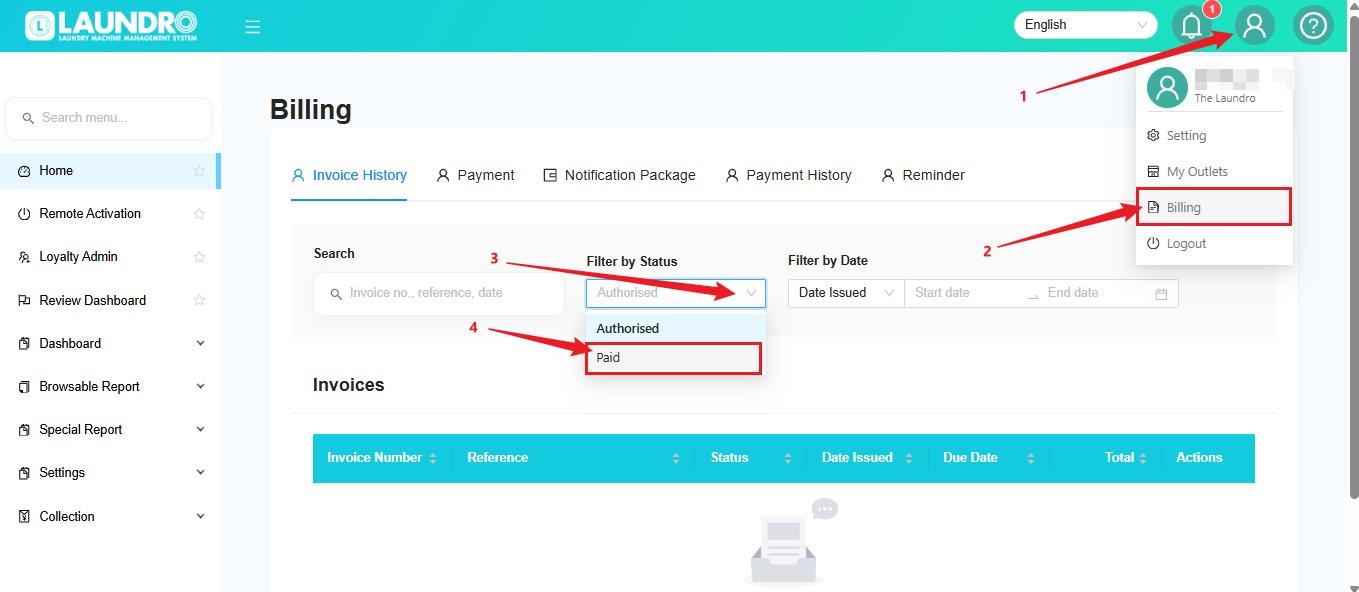
🔎 Step 3 - Find your invoice
Locate the invoice you wish to retrieve.
If available, use the relevant filters such as date, billing period or account to find the correct invoice.
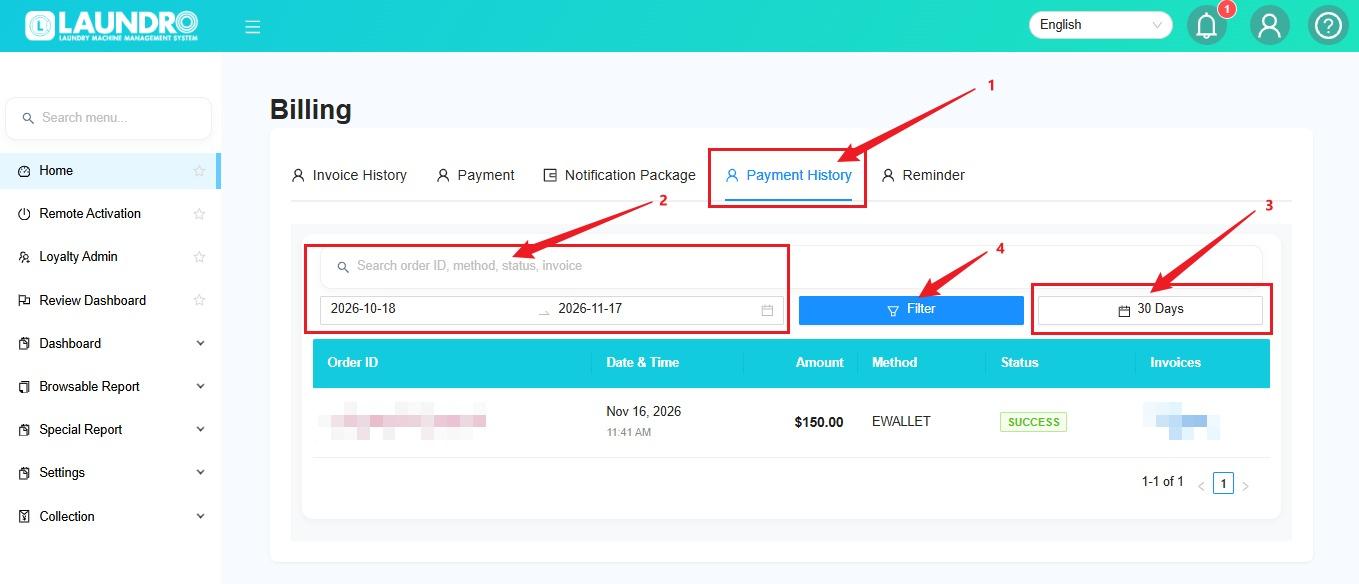
📥 Step 4 - View or download your invoice
Select the required invoice and use the available option to view or download it.
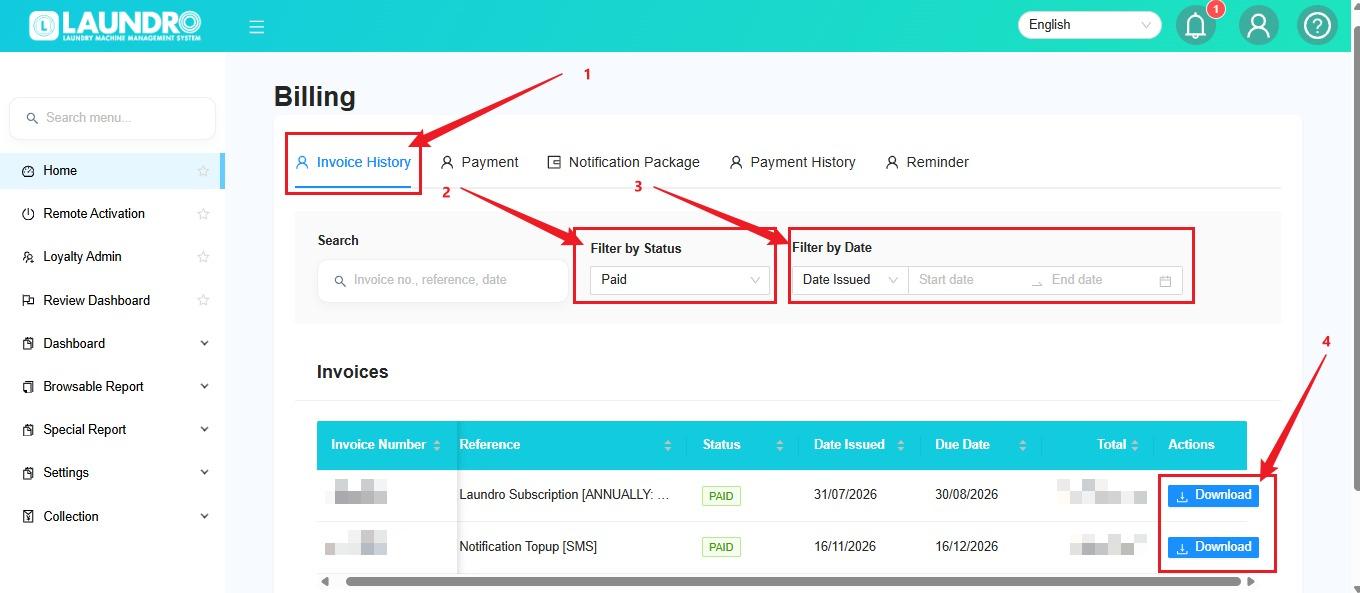
💡 Helpful Tips
- Make sure you select the correct billing period.
- Double-check the invoice details before downloading.
- Keep a copy of your invoice for future reference.
- If the invoice is unavailable, contact the support team for assistance.
✅ Final Checklist
- Successfully logged in
- Opened the correct invoice section
- Selected the correct invoice
- Invoice viewed or downloaded successfully
🎉 That's it! You have successfully retrieved your invoice.
How to Pay an Invoice
Antlysis Design Sdn Bhd bills SaaS subscriptions, IoT hardware, and add-on services to registered B2B customers via electronic invoices issued in Malaysian Ringgit (MYR). Online invoice payments are processed securely through Fiuu (Razer Merchant Services).
Step 1: Select Authorized Invoices to Pay
- Log in to your Laundro portal.
- Navigate to Billing > Payment on the top menu (refer to How to Get an Invoice).
- Under Authorized Invoices, locate the invoice(s) you wish to settle and click Add to cart.
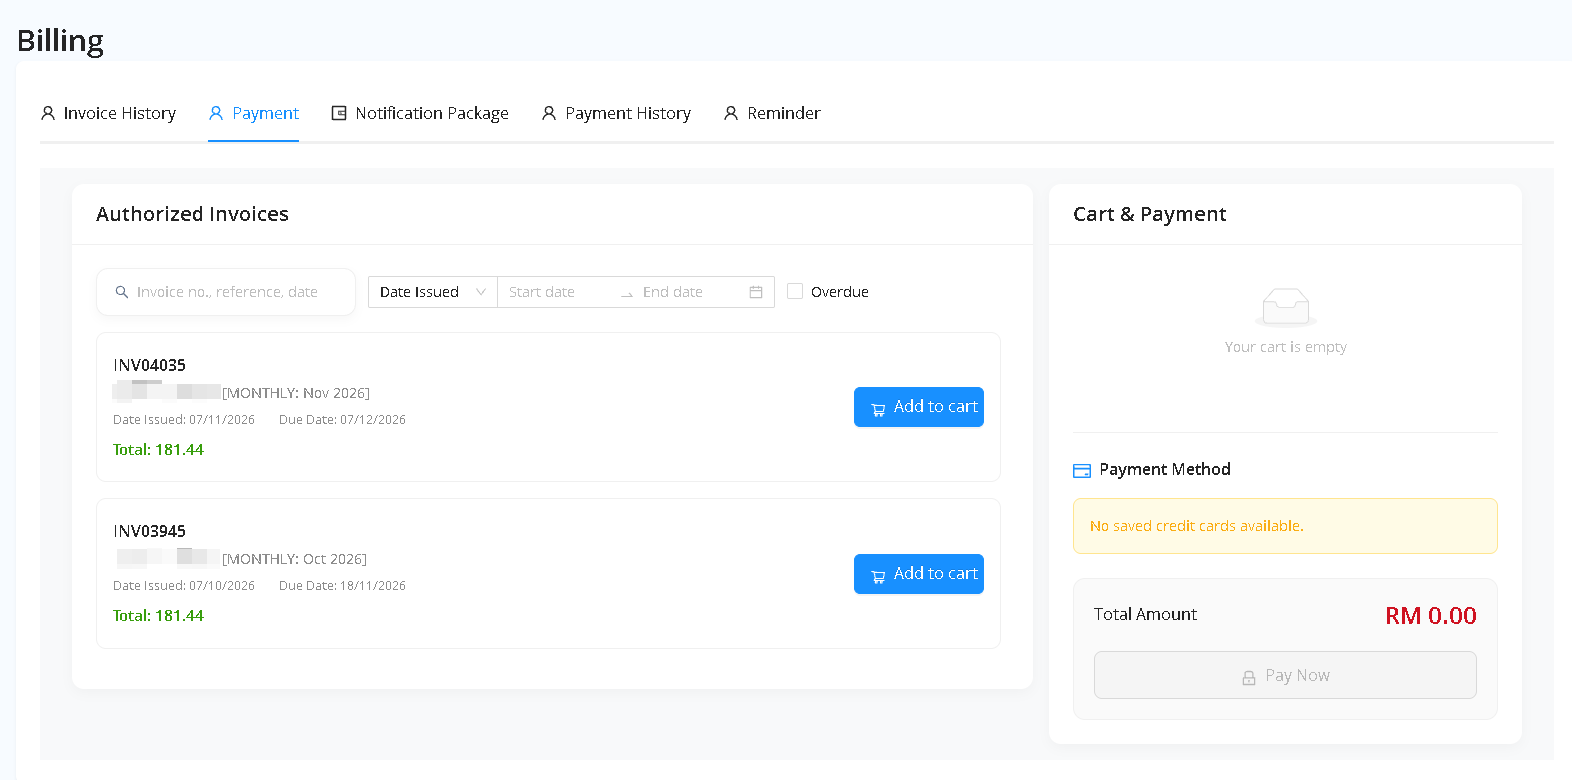
Step 2: Review Cart & Proceed to Checkout
- Selected invoices will appear under the Cart & Payment panel on the right with the Total Amount calculated in RM.
- Verify the selected invoice numbers and total payable amount, then click Pay Now.
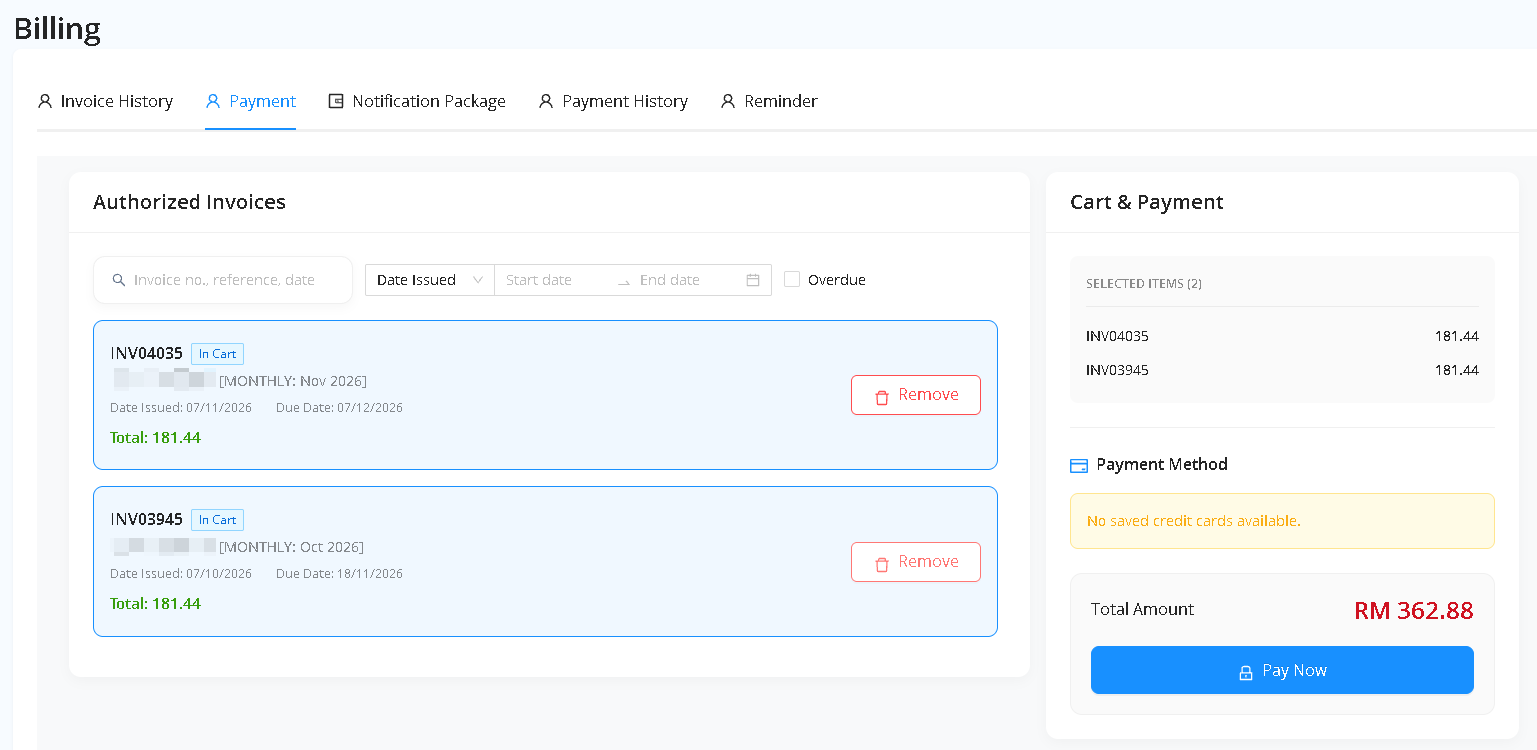
Step 3: Complete Payment via Fiuu Checkout
- Clicking Pay Now redirects you to the secure Fiuu Payment Gateway checkout page.
- Select your preferred payment method:
- FPX Online Banking (B2B / Corporate or Individual)
- Credit / Debit Card (Visa / Mastercard)
- E-Wallet / DuitNow QR
- Complete the authorization with your bank or payment provider.
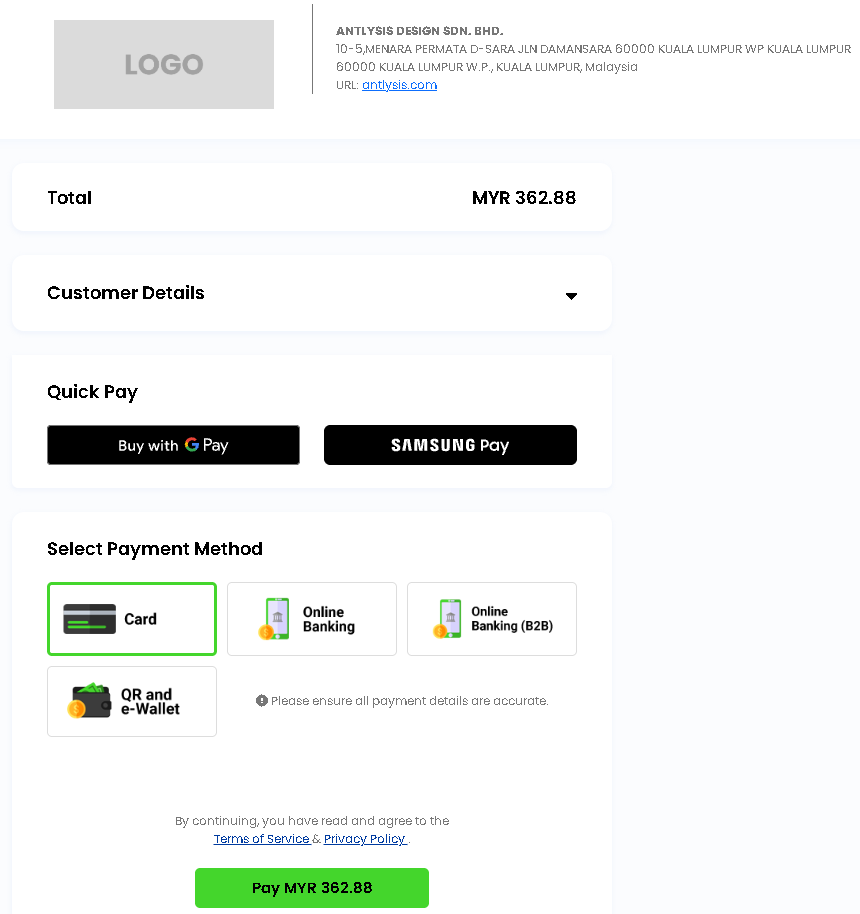
Step 4: Payment Confirmation & Receipt
- Once payment succeeds, you will be redirected back to the Laundro CMS portal.
- Your settled invoices will move to Payment History, and an official receipt will be available for download.
Billing Terms & Policies
- Currency: All transactions are billed and settled in MYR (RM).
- Delivery / Fulfillment: SaaS license renewals and cloud credits are activated immediately upon payment confirmation; IoT hardware orders are dispatched within 3–5 business days.
- Refunds & Disputes: For billing discrepancies or refund requests, please refer to our Terms of Service or contact admin@antlysis.com within 7 days of the transaction date.
How to change outlet visibility for a staff user
Use this guide to change which outlets (laundry locations in Laundro) a staff user can see.
Prerequisites
-
You sign in to your Laundro workspace as the distributor or operator who created the staff user.
-
A distributor is a brand owner who manages multiple operators.
-
An operator is an owner who manages one or more outlets.
-
You know which outlets the staff user needs to see.
Steps
-
Point the mouse cursor at the person icon (1) in the top-right corner of the screen.
-
Click Setting (2) in the menu.
If you sign in as a distributor, choose an operator in Select Operator first.
- Click Staff List (3) in the navigation bar.
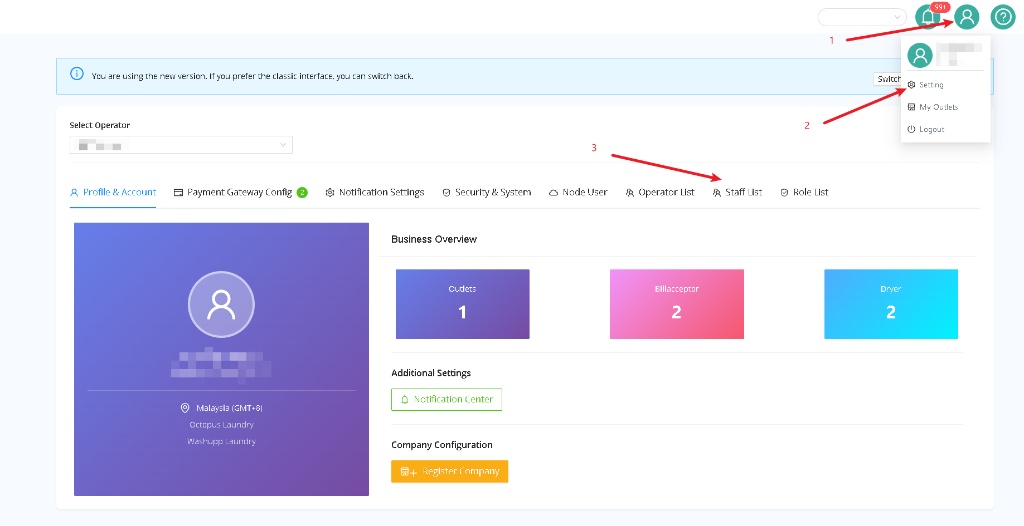
-
Click Edit (1) in the Action column next to the staff user.
-
Click Change Outlet Visibility (2) in the Update User window.
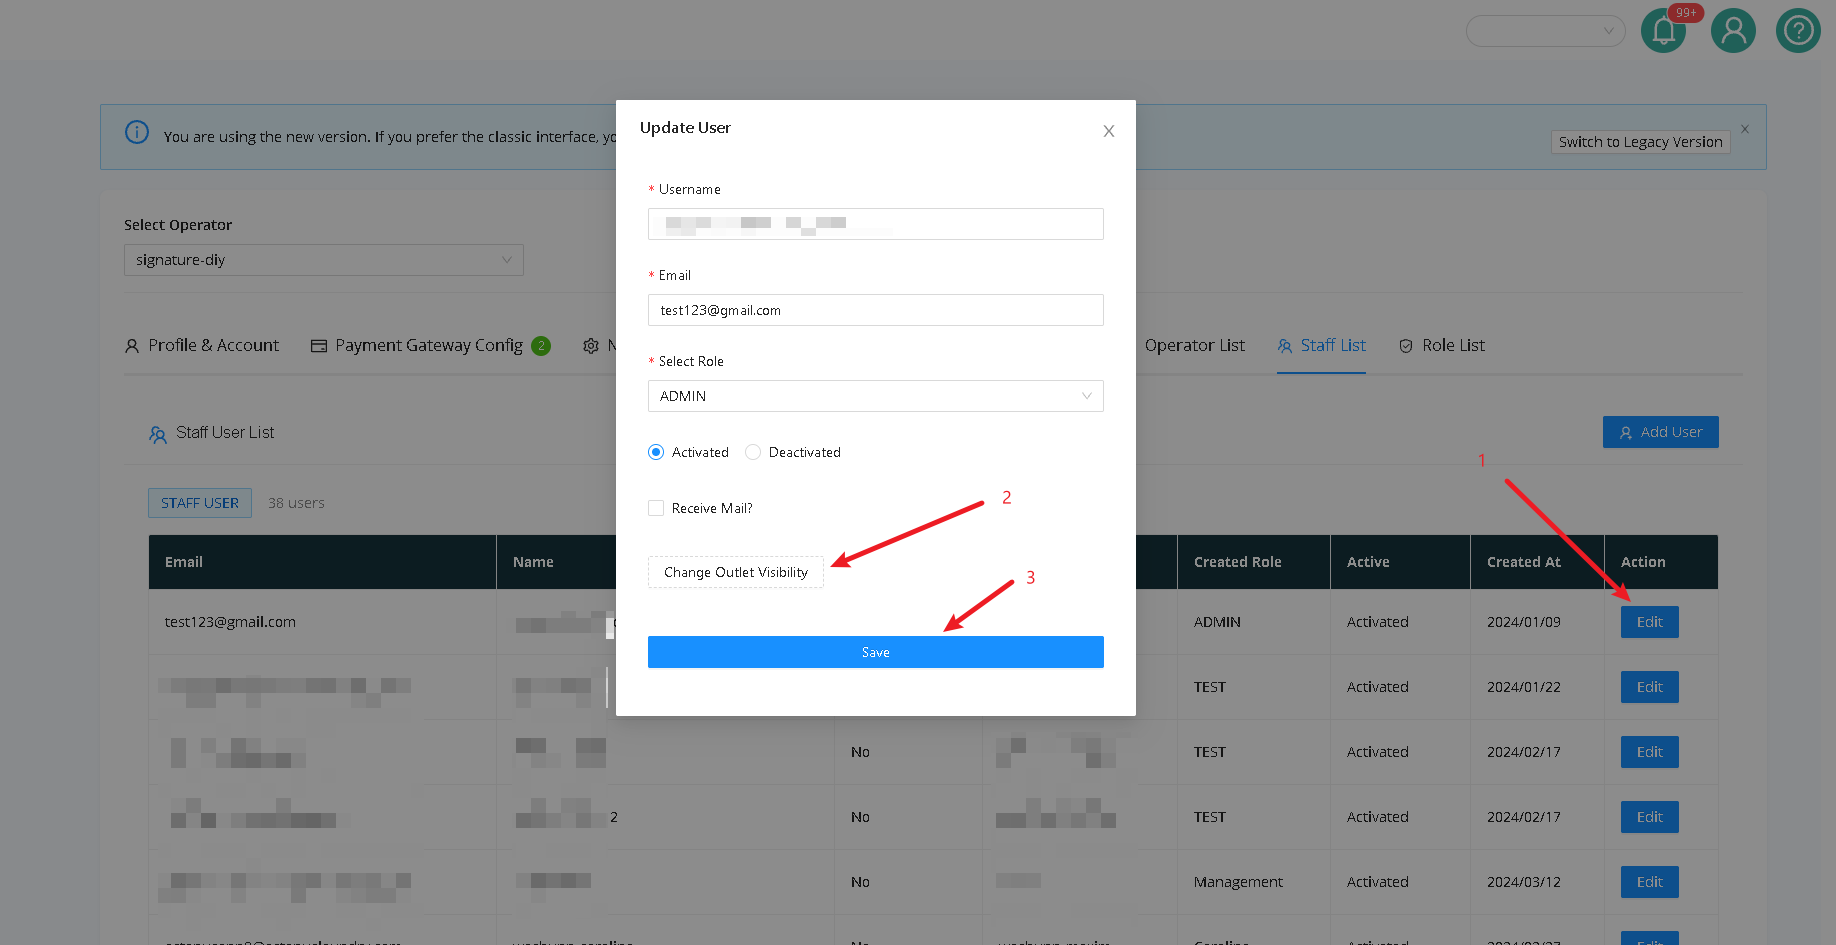
- Select or clear the checkbox next to each outlet.
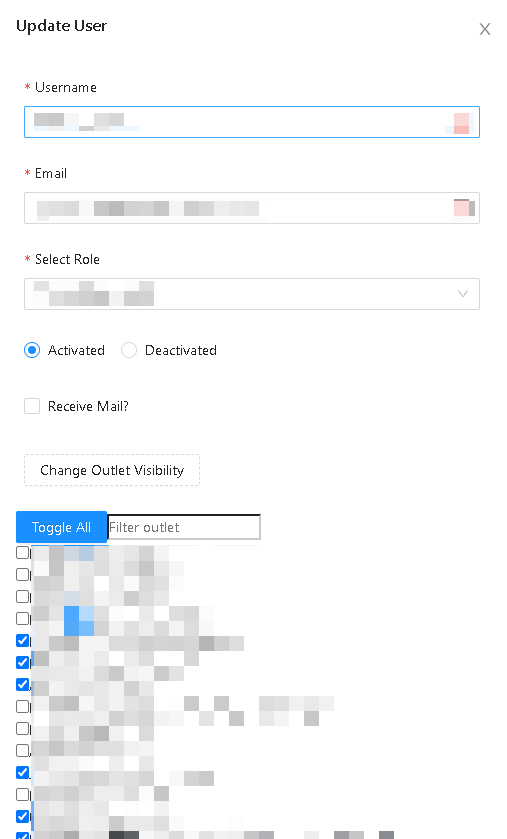
- Click Save (3) in the Update User window.
Expected result
The Update User window closes, and the Staff User List appears. No confirmation message appears.